- Exabeam Auto Parser Generator
- Create a Custom Parser Using Auto Parser Generator
- Duplicate a Parser Using Auto Parser Generator
- Import a Custom Parser Into Auto Parser Generator
- Edit a Custom Parser in Auto Parser Generator
- Delete a Custom Parser In Auto Parser Generator
- Tokenize Non-Standard Log Files
- Event Types in Custom Parsers
- What's New in Auto Parser Generator
Create a Custom Parser Using Auto Parser Generator
Use Auto Parser Generator to create a custom parser that works for both Advanced Analytics and Data Lake , or one that works just for Data Lake .
Create a parser from scratch, or use a default parser as a starting point.
Creating a custom parser, and corresponding custom event builder or Data Lake configuration file, requires following 6 basic steps, with variations at each step.
Pause your work at any time. Auto Parser Generator saves your progress after each step, and after you change anything. If you leave while creating a parser, the incomplete parser appears in the list of parsers with a Draft status. To pick up where you left off, edit the parser.
Before you begin you should:
Be familiar with how Data Lake categories and categorization works, how parsers and event builders work, and how all these components work with the Data Parsing Engine and or the Analytics Engine.
Gather sample logs containing the same format and syntax as the raw data your system typically ingests.
If you obtain the logs from another system, some log lines may be nested under structures not sent to to your system; for example, a syslog may be nested in a CSV file. Ensure that you remove these structures.
If you obtain the logs in a custom or non-standard way, like using a proprietary script or from an uncommon log system, remove any redundant escape characters; for example,
"","""",\r,\n,\t,\\\\, or\{.
To create a custom parser, log on to the Auto Parser Generator and click +New Parser.
The Create Parser page appears. You will be on the Add Log Sample stage of creating a new parser.
Import sample logs
Import sample logs that represent the type of information your system typically ingests, so you can create a parser that properly extracts this information.
In the Add Sample Log Lines section of the Create Parser page, select sample logs to import:
To select a log file from your file system, select Add a file, then drag and drop a file or click Select a File. You can upload a
.gzor.tgzfile that is nor more than 100 MB.To copy and paste logs, select Copy and paste raw logs, then paste the content into the text box. You can enter up to 100 lines.
Auto Parser Generator matches your sample logs to the latest available parsers in the content repository. These are parsers created by Exabeam, and can include parsers added or updated more recently than the latest product release. It also uses other custom parsers you or other team members have created.
To match your sample logs only to out-of-the-box parsers and not to other custom parsers, check Match default parsers only.
Click Find Matching Parsers.
A Matching Parsers section will appear at the bottom of the Create Parser page.
Define a Subset of the Sample Logs
After Auto Parser Generator analyzes the sample logs, it compares the conditions in the sample logs with those in existing parsers, and identifies a match if the conditions are similar. Identifying similar existing parsers helps Auto Parser Generator extract information about the sample logs correctly.
Once Auto Parser Generator has analyzed and matched the sample logs to existing parsers, you must decide which subset of the logs you want to create a parser for:
Logs that match an existing parser you want to duplicate and modify.
Logs that don't match any existing parsers.
Using logs that match an existing parser you want to duplicate and modify
In the Matching Parsers section of the page, under the Matching Parsers tab, review the existing parsers that match the sample logs.
Note
If the parser is one that's unavailable to you because you don't have the latest version of Advanced Analytics or Data Lake, upgrade to the latest product version.
Reduce the number of parser by filtering by parser Type, Vendor, and Data Type. Click on the drop down menus to filter the parsers.
Use the Search bar to further narrow down the number of matching parsers.
(Optional) It is important to ensure that the matching parser parses your sample logs correctly. Although Auto Parser Generator uses the parsers conditions to match parsers to your sample logs, parsers use regular expressions to extract values from the logs, not conditions. Even if the parsers conditions match the sample logs, its regular expressions may extract values incorrectly.
For a matched parser, click View Parser Details.
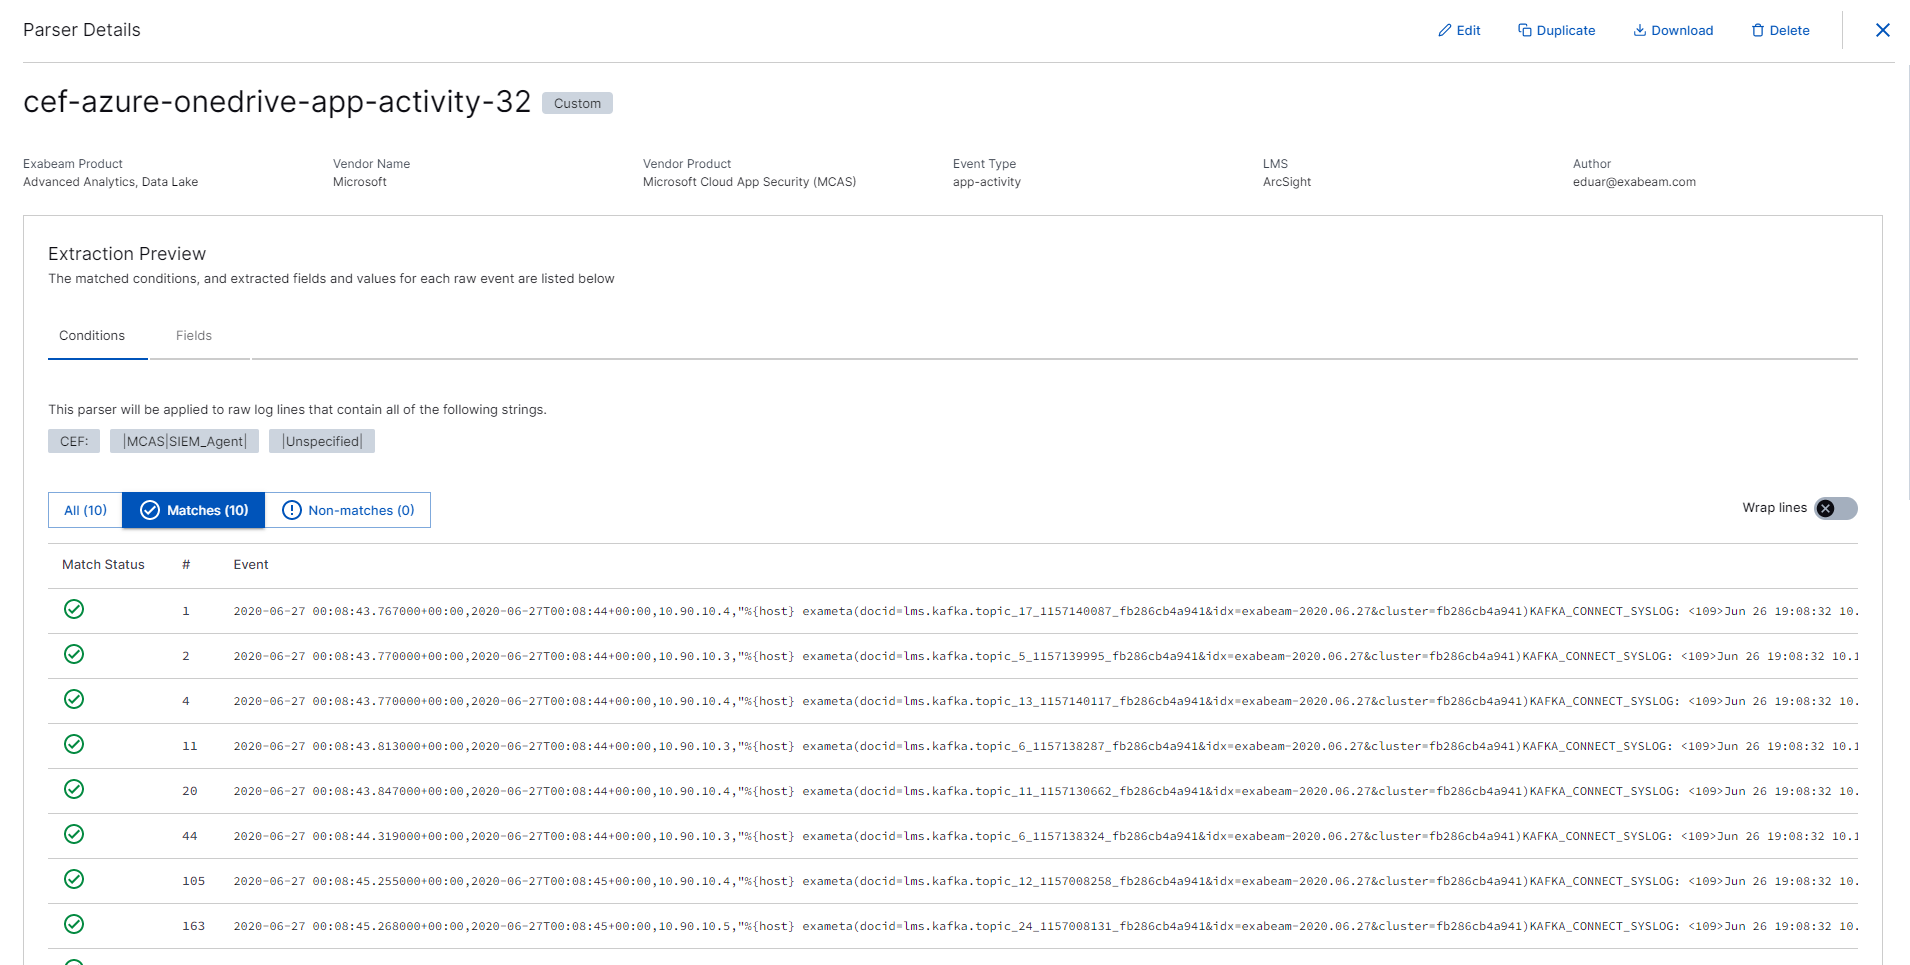
The Parser Details screen appears.
In the Extraction Preview section:
To view which log values match the parsers event type field, click the FIELDS tab. Each log is numbered and each field is listed in the top row.
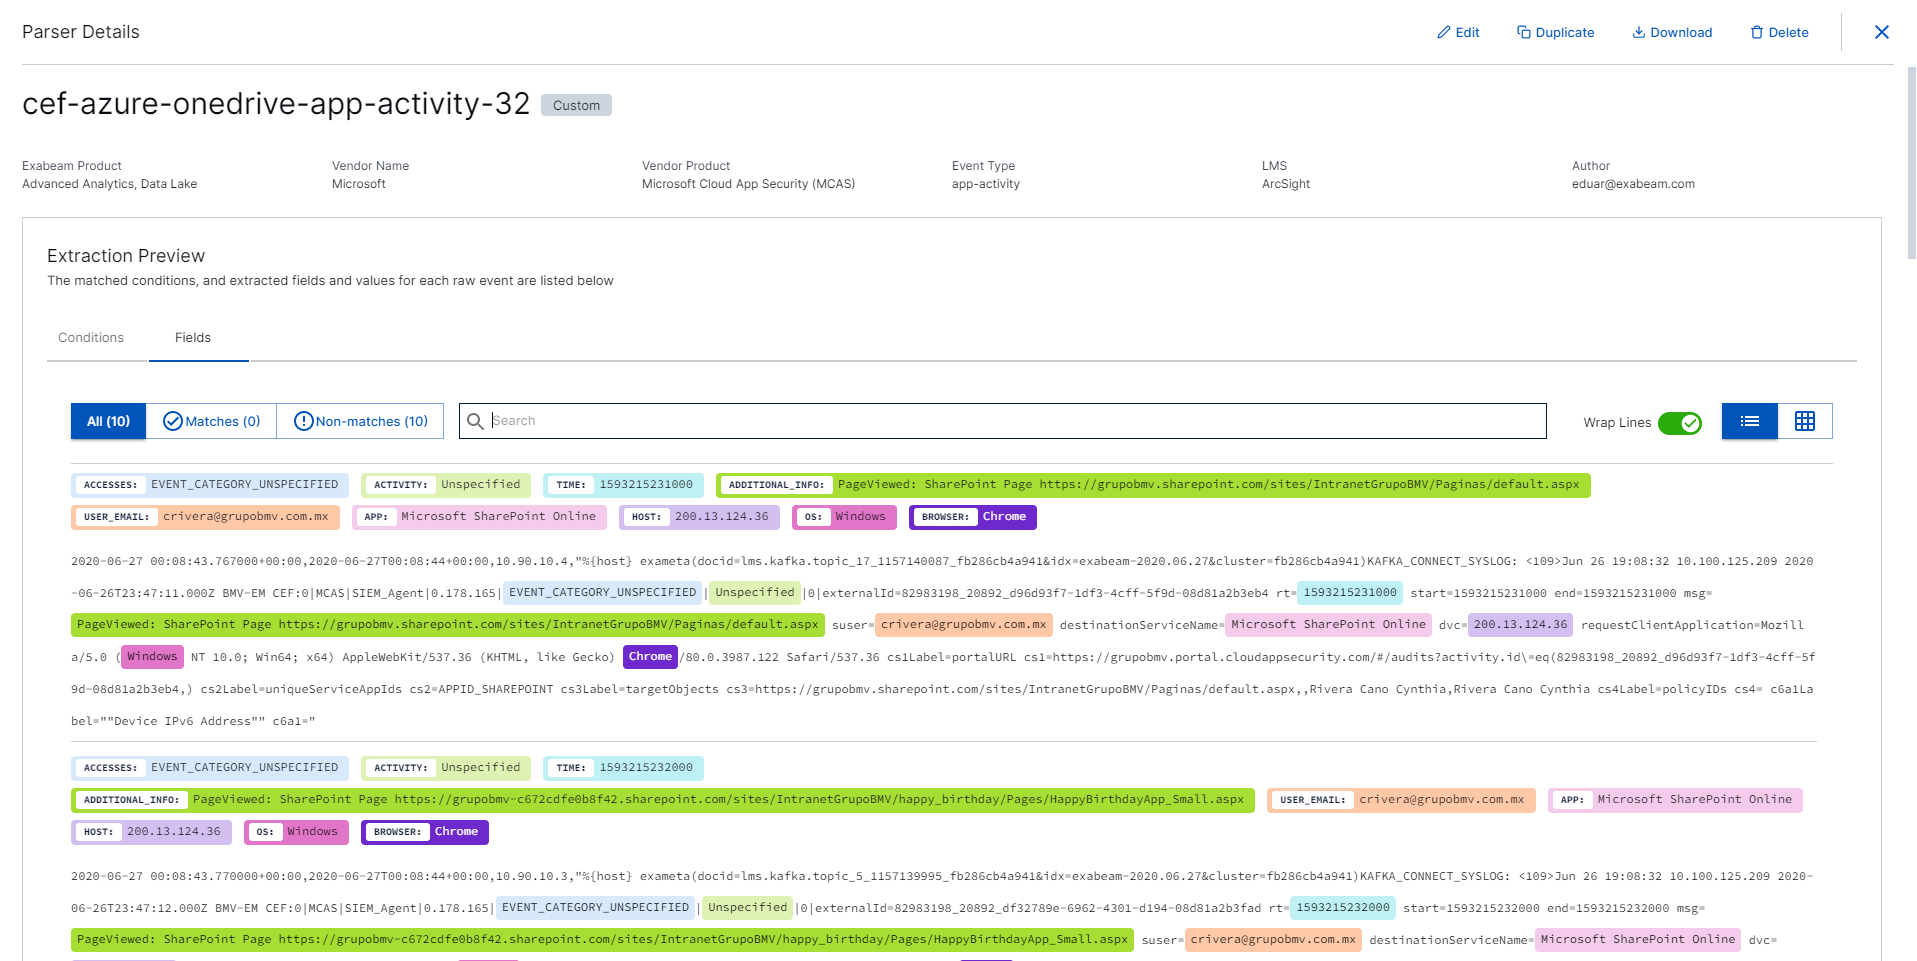
To view the fields that have a matching value in every log, select Matches. Ensure that the parser has extracted log values to the appropriate event type field; for example,
src_ipshould contain an IP address. Click the arrow to view the matching values highlighted in the raw log.To view the fields that don't have a matching value in every log, select Non-matches.
to view which log values match the parser conditions, select the CONDITIONS tab. Each log is numbered and the matched log values are listed.
When you display the parser, category, and categorization contents in the Configuration Files section, the configuration fields are a preview of the package contents.
To edit the matched parser, select Edit, and then skip to Step 7.
To download the matched parser and event builder, click Download.
Click + New Parser in the In the Matching Parsers section of the page.
The Add Conditions page appears.
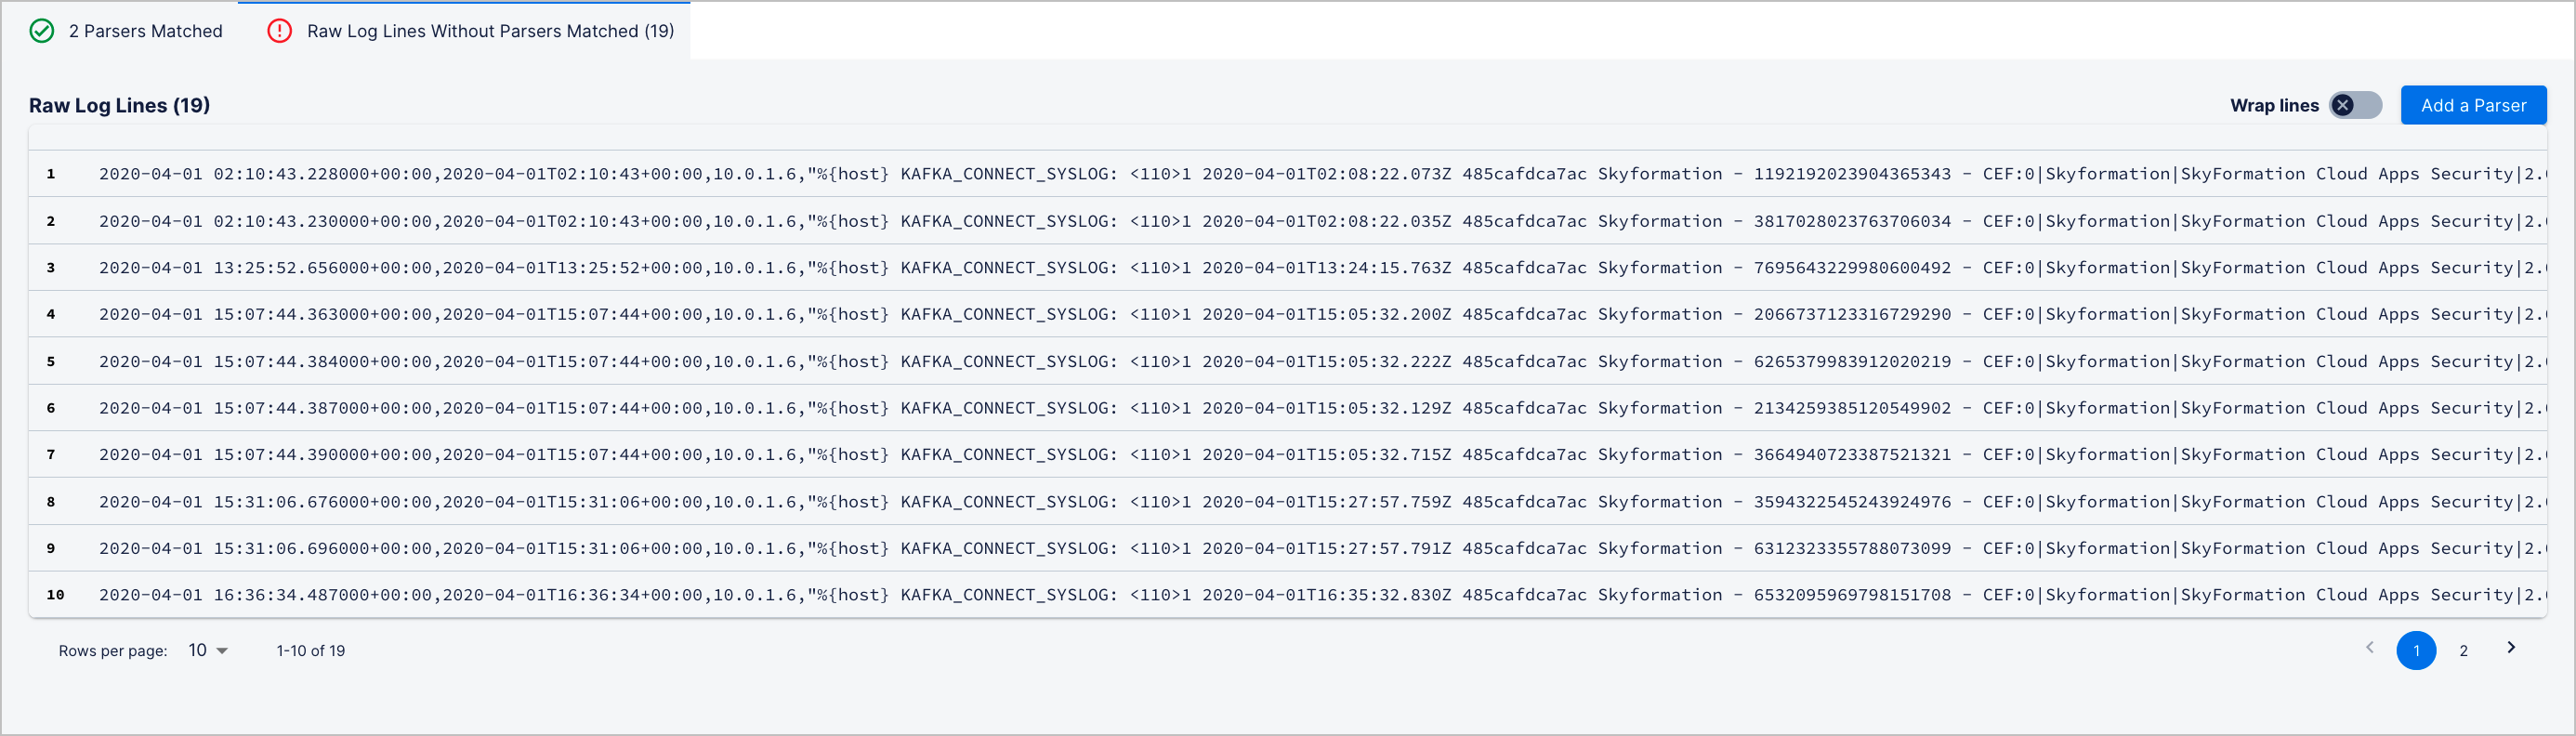
Using logs that don't match any existing parsers
Click the Log Lines With No Parser Matched tab.
Review the log lines that didn't match any existing parsers.
Click Add a Parser.
Add Conditions
Conditions are a string, or set of strings, that uniquely exist in specific logs. The Log Ingestion and Messaging Engine (LIME) in Advanced Analytics, and the Data Lake Parsing Engine both look for conditions in your logs to identify the correct parser to use. Determine which condition must be in a log so it matches your custom parser.
Ensure that you understand:
Keep in mind that a log is evaluated against custom parsers first, then out-of-the-box parsers. LIME and the Data Lake Parsing Engine both use the first parser that matches all conditions. If a log doesn't include all conditions, it wont match the parser.
Note
To avoid matching a log with the wrong parser, you must carefully choose conditions that uniquely exist in specific logs. Conditions can't be too general or strict.
Let's take this log as an example:
%{host} KAFKA_CONNECT_SYSLOG: <110>1 2020-04-01T02:08:22.073Z 485cafdca7ac Skyformation - 1192192023904365343 - CEF:0|Skyformation|SkyFormation Cloud Apps Security|2.0.0|sk4-audit-event|audit-event|0|cat=audit cfp3=34.0544 cfp3Label=latitude cfp4=-118.244 cfp4Label=longitude cs6Label=raw-event destinationServiceName=Okta flexString1=app.inbound_del_auth.login_success flexString1Label=application-action src=13.108.238.8 suid=system suser=barbara.salazar request=Success deviceInboundInterface=5d6baf21-742d-11ea-9f5a-7fa07153If conditions are too general and can match with many logs, the parser may parse log incorrectly. For example, if you choose just [“CEF:0|Skyformation”] as a condition, the parser matches any log received from Exabeam Cloud Connectors. Choosing two conditions, like [“CEF:0|Skyformation”, “destinationServiceName=Okta”] is better, but the parser still matches any Okta log received from Exabeam Cloud Connectors.
If conditions are too strict, the parser can't cover all relevant logs. In general, don't use values for log variables like IP address, time, and host name as conditions. For example, if you choose [“CEF:0|Skyformation”, “destinationServiceName=Okta”, “src=13.108.238.8”] as your conditions, the parser only matches Okta logs from source IP address 13.108.238.8 and that were received from Skyformation; only very specific logs would match all these conditions.
To ensure that your conditions aren't too general or strict, it's best if you include conditions that indicate:
Vendor or product that generated the log—for example,
"Windows","Okta","Cisco ASA v9.8".Log format—for example,
"CEF:0","LEEF:1.0","LEEF:2.0".Event type—for example,
"app.inbound_del_auth.login_success","action=security-alert-high","vpn-session-started".
If your sample logs don't contain this information, choose other conditions that are unique to your sample logs product or vendor, format, and event type. Let's take this log as an example:
<134>Aug 30 22:35:23 DNSLOG: src=192.25.5.12 spt=53 dst=156.140.56.11 dpt=28317 proto=UDP mid=59898 op=0 fl=|QR|RD|RA| rc=SRVFAIL cl=IN tp=PTR name=70.6.29.113.in-addr.arpa aa_log_source=DNSLOG_FROM_CISCO_UMBRELLAYou could select "DNSLOG:", "src=", "spt=", "dst=", "dpt=", "proto=", "mid=", "fl=", "rc=", and "name=" as your conditions because they are unique to your log and unlikely to appear in logs from other vendors or products.
As a last resort, before the log is ingested, append a value to the log so the parser can easily identify it. For example, append a value like "aa_log_source=DNSLOG_FROM_CISCO_UMBRELLA" to the end of the log and use it as your only condition:
<134>Aug 30 22:35:23 DNSLOG: src=192.25.5.12 spt=53 dst=156.140.56.11 dpt=28317 proto=UDP mid=59898 op=0 fl=|QR|RD|RA| rc=SRVFAIL cl=IN tp=PTR name=70.6.29.113.in-addr.arpa aa_log_source=DNSLOG_FROM_CISCO_UMBRELLATo add conditions:
In the list of Original Logs, highlight a string.
Click Add Condition.
The string is highlighted in yellow so you can see if all sample logs contain the string.
Carefully review the logs that match the conditions you added.
To view the logs that match every condition, click the Matches tab.
To view the fields that don't match every condition, click the Non-matches tab.
Click Next.
The Parser Info page appears.
Add Basic Parser Information
In the Add Basic Info section:
Enter the Parser Name. Every customer parser must have a unique name. The parser's name is used to identify and trace the parser as it's used in the Analytics Engine.
Note
Only letters, numbers, dashes and low dashes are allowed.
Under Exabeam Products, select Data Lake only or Data Lake and Advanced Analytics.
For custom parsers used in Data Lake, you will need to select a data type.
Click Select data type.
Scroll the list to find a data type, or search for a data type by entering a query in the search bar.
Note
If none of the data types describe your sample logs, post a request on the Exabeam Community board.
Select the data type.
Click Select data type.
For custom parsers used in Data Lake and Advanced Analytics, you will need to select an event type. For more information on event types, see
Click Select event type.
Scroll the list to find an event type, or search for an event type by entering a query in the search bar.
Select the event type.
Click Select event type.
Note
For more information about Event Types, see Event Types in Custom Parsers.
Under Time Format, select a format that best matches how dates and times are formatted in the sample logs. When the format you select matches the dates and times in the sample logs, they are highlighted in yellow under Sample Log Lines.
In Advanced Analytics, identifying the time format helps to map the dates and times in the log to a Unix timestamp that is displayed in Advanced Analytics Smart Timeline™ events. Information about the log management system is useful metadata that documents how the log was formatted coming into the Analytics Engine.
In Data Lake, the parsed time field is matched with the defined
timeFormatto create theunixTimestampwhich is then populated asexa_rawEventTimein Data Lake.Under Log Management System, select the log management system where the logs were stored.
Under Vendor, select the vendor that generated the logs you imported:
Click Select a vendor, then select from the list of vendors. If Auto Parser Generator identifies a vendor name in the logs, it appears in the list of recommended vendors.
To search for a vendor, start typing in the Select a vendor field.
If you don't find the vendor, manually add it:
Click + Add a Vendor.
Enter the Vendor Name and Product Name.
Click Create.
Under Product, select the product that generated the logs:
Click Select a product, then select from the list of vendors. If Auto Parser Generator identifies a vendor name in the logs, it appears in the list of recommended vendors.
To search for a vendor, start typing in the Select a vendor field.
If you don't find the vendor, manually add it:
Click + Add a Product.
Enter the Vendor Name and Product Name.
Click Create.
Click Next.
The Extract Event Fields page appears.
Extract Event Fields
For event types, you see all required, extended, and informational fields for the event type you selected. Since required fields are mandatory to create an event, you must enter a regular expression for these fields. Although extended and informational field are optional, it's best to enter a regular expression for these fields because they help process and display an event.
For data types, you see all of the field for the data type you selected. All of the data type fields are optional, but you must enter at least one in order to continue.
For each field, enter a regular expression. To help validate the expression, you can also enter a key.
You can enter a regular expression using either JRegex or Perl Compatible Regular Expressions (PCRE) syntax. Keep in mind that both LIME and the Data Lake Parsing Engine only work with parser and event builder files that use JRegex syntax. If you enter a regular expression using PCRE syntax, Auto Parser Generator automatically converts it into JRegex syntax in the background so the parser and event builder file created at the end of this process uses JRegex syntax.
There are three ways to enter a regular expression for a field:
Generate a regular expression from a list of keys.
Generate a regular expression directly from a value in the sample logs.
Manually enter a regular expression or key. You can also use this method to edit a regular expression you created using the other two methods.
After you enter a regular expression for each field, ensure the fields are in the correct order, review the matching event type fields and log values, then continue.
Generate a regular expression from a list of keys
To generate a new regular expression, click +Add another regex.
Under KEY, click Select.
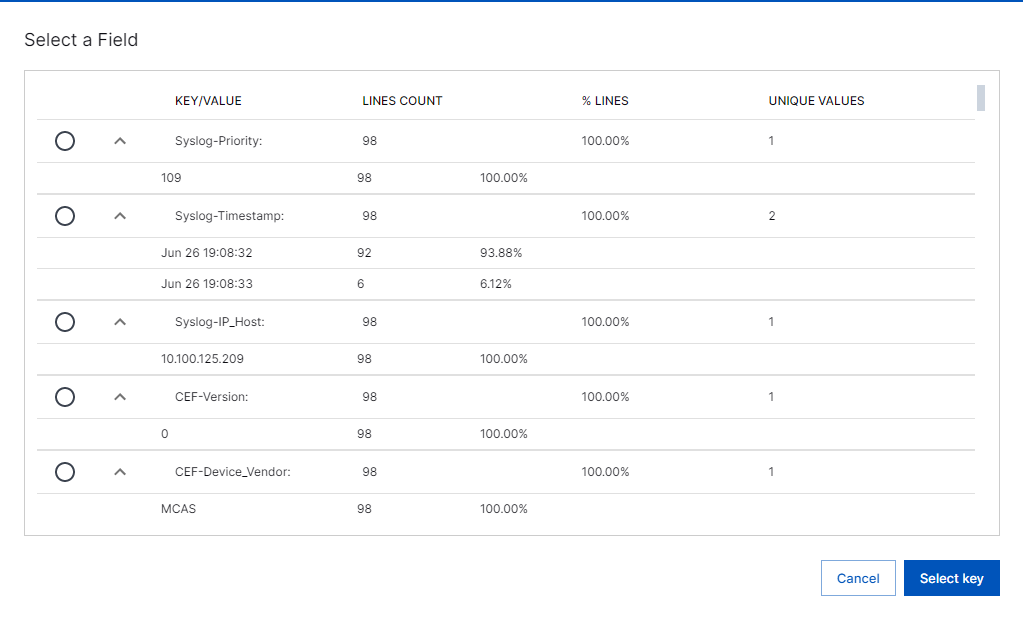
From the list, select a key, then click Select key. Auto Parser Generator recommends keys by comparing the custom parser to similar existing parsers.
Under MAPS TO FIELD, select an event type field from the list. The regular expression is automatically populated.
Click the check mark
 .
.Under % Lines, verify the percentage of log lines from which the regular expression extracted a value. Next to the event type field, verify the number of values extracted, in parentheses.
Generate a regular expression directly from a value in the logs
Sometimes, the host and time fields are required but you can't find appropriate values in your sample logs. If you retrieved your sample logs from a SIEM like Advanced Analytics, manually enter a regular expression using special keys.
Under Sample Log Lines, click a highlighted value.
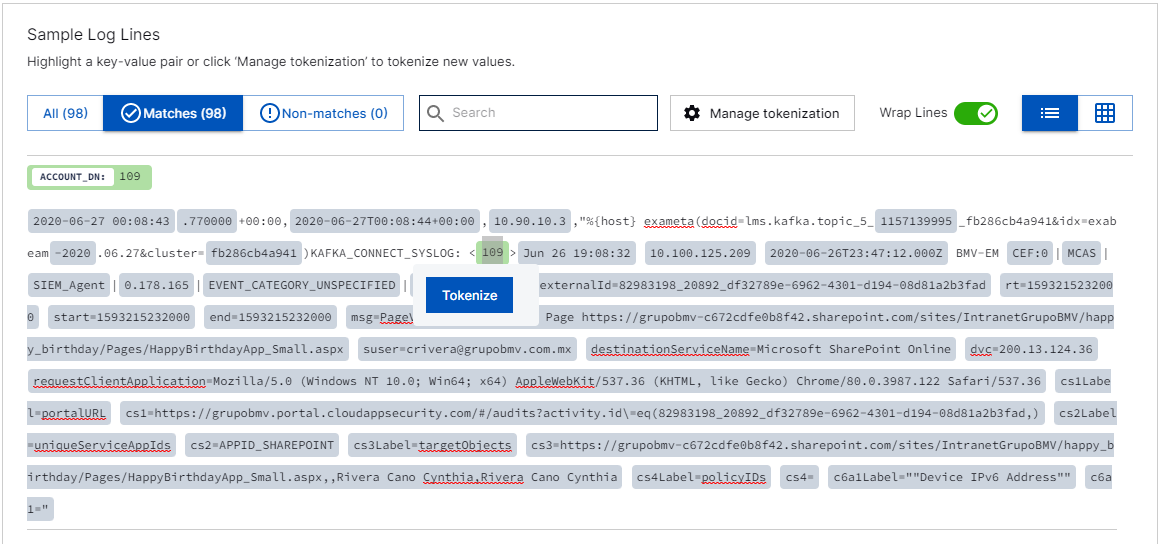
A value is highlighted:
If the log is in a well-structured format, like CEF, LEEF, or JSON, Auto Parser Generator can tokenize key/value pairs. If a value isn't highlighted, consider configuring the log so it uses one of these formats.
When a value matches a regular expression that is commonly used in existing parsers to extract this field, for this event type.
From the list, select a field, then click MAP EXTRACTION. The regular expression is automatically populated.
Under % LINES, verify the percentage of log lines from which the regular expression extracted a value. Next to the event type field, verify the number of values extracted, in parentheses.
Manually enter or edit the regular expression
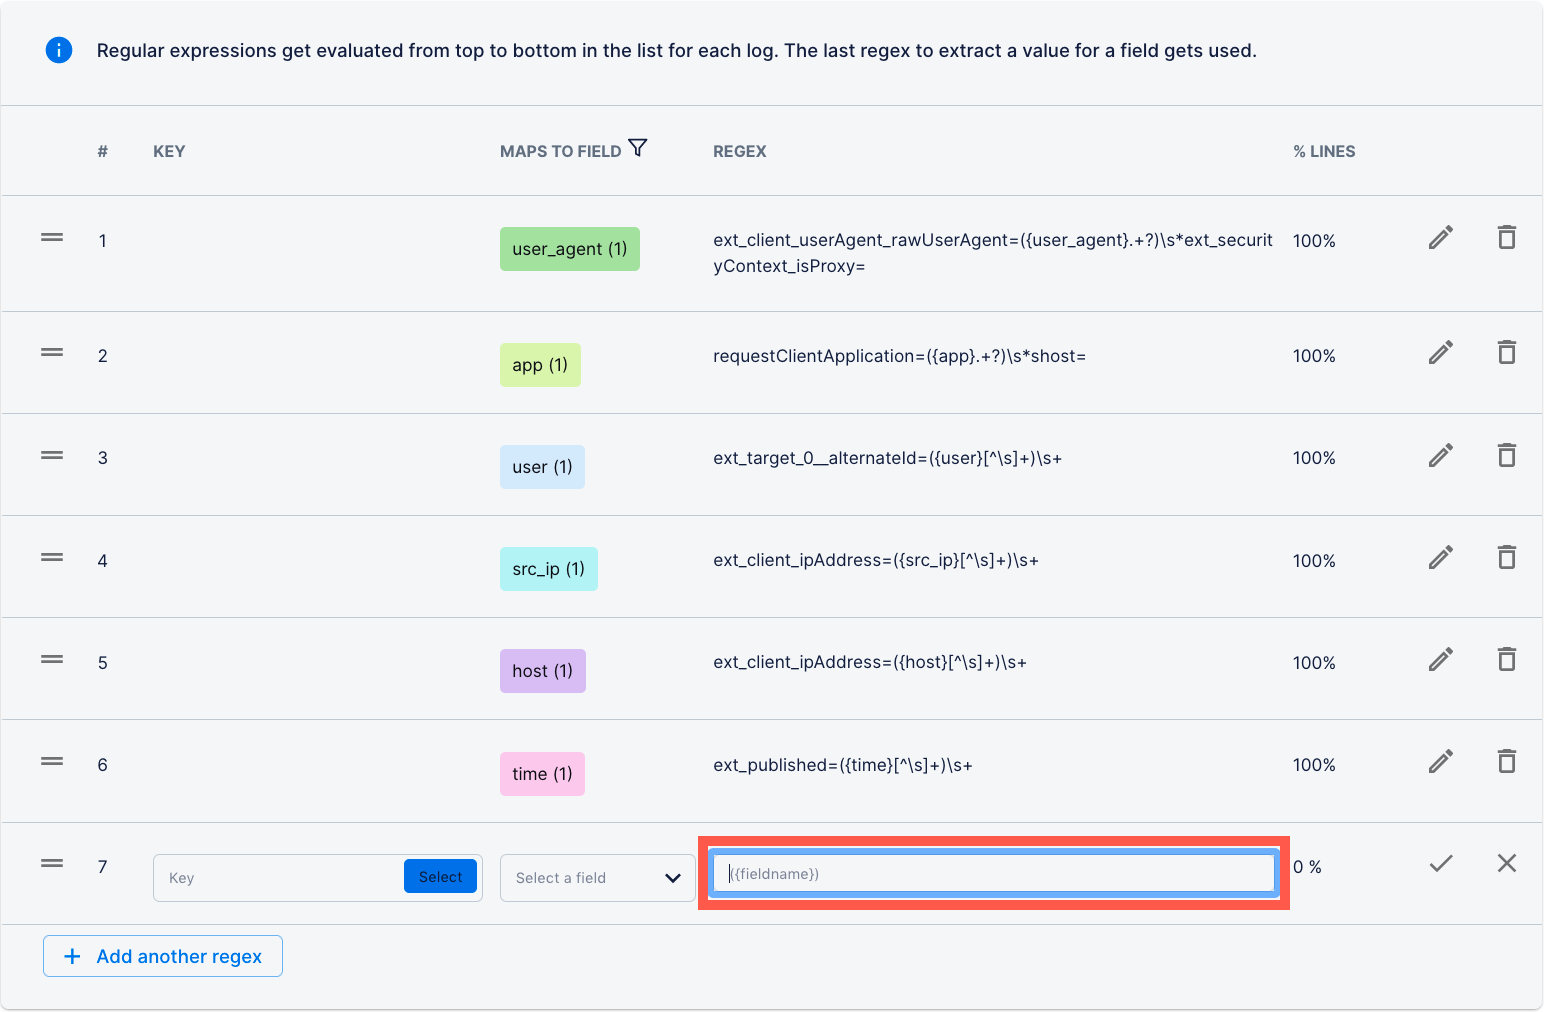
To generate a new regular expression, click +Add another regex.
In the REGEX field, enter the regular expression.
Keep in mind:
You should include a value from the log in the regular expression. You must include the field name in the capturing group. If you enter a key, include it in the regular expression, outside the capturing group.
For example, let's say you have an field called
alert-name. In the sample logs, you have a key,foo=, and values696and636. You can enter a regular expression that is more specific; for example,foo=({alert-name}6[39]6). Or, you can enter a regular expression that is more inclusive; for example,foo=({alert-name}\d+).You can enter a regular expression that extracts multiple fields. Consider creating an expression like this if your log values are concatenated; your logs aren't formatted in key-value pairs, so you're identifying values based on location; or your parser covers multiple, slightly different log formats.
For example, in the
s-xml-4663parser, a single regular expression extracts theprocess,directory, andprocess_namefields:
Sometimes, the host and time fields are required but you can't find appropriate values in your sample logs. If you retrieved your sample logs from a SIEM like Advanced Analytics, you can enter a regular expression using special keys,
exabeam_hostandexabeam_time; for example,exabeam_host=({host}[\w.\-]+). Your SIEM may add a header to the raw log that includes host and time information, and these special keys parse that information.
Click the check mark
.Under % LINES, verify the percentage of log lines from which the regular expression extracted a value. Next to the event type field, verify the number of values extracted, in parentheses.
Reorder regular expressions
A parser evaluates its regular expressions against a log consecutively from top to bottom. Ensure that your regular expressions are in an order that correctly parses your logs.
To reorder an event type field, drag  the field to a new place in the list.
If you enter multiple regular expressions for the same field, the values that are parsed but won't be extracted are outlined under Sample Log Lines.
Review the matching event and data type fields and log values
Under Sample Log Lines, carefully review the values that match a field's regular expression for each log.
To view the fields that have a matching value in every log, click the Matches tab.
To view the fields that don't have a matching value in every log, click the Non-matches tab.
Once you're done, click Next.
The Add Event Categorization page appears.
Add categorization to Data Lake events
Categorize the logs parsed by the parser by activity, device, and outcome.
The categorization configuration object will be assigned to parsed Data Lake events based on rules that you assign.
To assign rules:
Select the tab of the categorization property whose rules you want to configure.
exa_activity_type
exa_device_type
exa_outcome
Select a data type.
Click + Add condition.
Select your fields, values, and operators to build your desired rule.
Click + Add another rule.
Click Next.
The Review Parser page appears.
Review Parser
Carefully review the matching event type fields and values for each log.
To view a raw log, click the arrow. To view the matching values highlighted in the raw log, toggle Field highlighting on.
Click VIEW UNIQUE FIELD VALUES, then select a field from the list to review the matching log values. The Count indicates how many times the value appears across all logs.
Note
You will need this download file to install the custom parser onto your Advanced Analytics and/or Data Lake environments.
Click Finish and Close.
Install the Parser
You have finished creating your own custom parser, and if you created it for both Advanced Analytics and Data Lake, an event builder. Before the Data Lake Parsing Engine and Analytics Engine can use them, you must install them onto your environment.
Note
In order to install a parser onto your Advanced Analytics and/or Data Lake environments, you must have first downloaded the zip file from the Review Parser page.
Install the parser (and event builder) onto your system:
If you have Advanced Analytics i54 or later, upload the file to Advanced Analytics settings.
If you have Advanced Analytics i53 or earlier, use Content Installer to install the parser and event builder.
Click Finish.