- Exabeam Data Lake Agent Log Collectors
- Prerequisites for Installing Log Collector Agent
- Install Exabeam Data Lake Log Collectors
- Configure Exabeam Data Lake Log Collectors
- Upgrade Exabeam Data Lake Log Collectors
- Uninstall Exabeam Data Lake Log Collectors
- Uninstall Exabeam Windows Log Collectors via PowerShell
- Uninstall All Exabeam Windows Log Collectors via MSI Package
- Uninstalling Exabeam Data Lake Log Collectors on Windows via MSI Silent Mode
- Uninstall Exabeam Data Lake Log Collectors on Linux & Ubuntu
- Remove an Uninstalled Collector from the Collector Management Page
- Exabeam Data Lake Database Log Collector
- Cisco eStreamer Log Collector in Exabeam Data Lake
- Debug an Exabeam Data Lake Log Collector Agent
Exabeam Data Lake Database Log Collector
Data Lake provides a way for users to collect database logs and index them on a scheduled basis. This service currently supports MS-SQL, MySQL, PostgreSQL, and Oracle databases.
The Database collector is a server-side collector that is installed on the Data Lake master node during installation or upgrade. There are health checks available when the service is enabled.
See Configure Database Collector for detailed instructions on how to configure and enable this service.
Exabeam Data Lake Database Log Collector Use Cases
Data Lake Database collection supports three different run use cases with databases listed in the table below:
Timestamp Based: Data Lake queries the database and, based on the timestamp, updates only the data that has been updated since the previous fetch. Note that the timestamp is not the time of the last run, but rather the timestamp for that specific field. This use case assumes that the table being queried contains a timestamp column.
Incremental ID Based: Data Lake queries the database and, based on the numeric ID, updates only the data that has been updated since the previous fetch. This use case assumes the table being queried contains a column with a numeric ID.
Entire Table: Each run retrieves the entire database table and each row becomes an event. While this use case is supported it is not recommended by Exabeam as there will be duplicated data with every fetch.
Vendor | Version |
|---|---|
Microsoft | MS-SQL 2008-R2/2012/2014/2016 (with JDBC 6.0) MS-SQL 2017 (with JDBC 6.2) |
MySQL | MySQL 5.5/5.6/5.7 MySQL 8.0 (with latest MySQL JDBC 8 driver) |
Oracle | Oracle Database 11.x.0.x Oracle Database 12c release 1 or 2 Oracle Database 18c (with latest Oracle 18.3 JDBC Thin driver) |
PostgreSQL | PostgreSQL 9/10/11 (with recommended JDBC driver postgresql-42.2.5) |
Prerequisites for Configuring an Exabeam Data Lake Database Log Collector
Open Ports
Ensure your database ports are open.
JDBC User ID
When Database Collector is used, the database server credentials are securely stored and encrypted. During installation users are asked to input a User ID key that is connected to a set of credentials. When configuring the Database Collectors, users must specify a JDBC User ID (the jdbc_user_id field in the configuration file) to use when connecting to a database.
You can enter as many JDBC User IDs as needed.
Download JDBC Drivers
The JDBC drivers should be downloaded from the official website of your database manufacturer.
The JDBC driver package must be copied and extracted to /opt/exabeam/data/lms/dblog.
MySQL: https://dev.mysql.com/downloads/connector/j/5.1.html
MS-SQL: https://docs.microsoft.com/en-us/sql/connect/jdbc/download-microsoft-jdbc-driver-for-sql-server
Oracle: http://www.oracle.com/technetwork/database/features/jdbc/index-091264.html
PostgreSQL: https://jdbc.postgresql.org/download.html
Enable JSON Parsers for Exabeam Data Lake Database Log Collectors
The JSON parser is turned off by default. However, the Database Logs require it to be enabled.
To enable go to Settings > Index Management > Advanced Settings. Check the box underneath the Filter bar that says Enable Generic JSON Parser.
Configure an Exabeam Data Lake Database Log Collector
This section will give you the necessary information for configuring database collection and assumes a basic understanding of the SQL language. Data Lake supports MySQL, MS-SQL, PostgreSQL, and Oracle databases. We will provide configuration examples and descriptions of fields and parameters so that you may construct your own configuration file tailored to your organization's needs.
These configuration steps must be performed after either a fresh installation of Data Lake or an upgrade.
Navigate to the configuration folder at /opt/exabeam/config/lms/dblog/conf. Inside this folder you will find two files:
logstash-dblog-input-example.conf- this file provides an example on how to setup the JDBC input configuration. Users should create a similar config rather than modifying this example file directly as the example file will be deleted by upgrades and redeployments.logstash-dblog-output.conf- this file contains the filter and output configuration. It is managed by Exabeam and users should not edit this file.
We highly recommend that users create their own configuration file in /opt/exabeam/config/lms/dblog/conf based upon the examples in logstash-dblog-input-example.conf. In the configuration file you create, you will need an input section and one or more JDBC statements.
Below are three examples of configurations.
Example A: a configuration for fetching data from a MySQL database that utilizes the timestamp use case detailed in the Overview section above.
input {
    # config example for connecting to MySQL DB
    jdbc {
        jdbc_driver_library =>"/opt/jdbc-drivers/mysql-connector-java-5.1.42/mysql-connector-java-5.1.42-bin.jar"
        jdbc_driver_class => "com.mysql.jdbc.Driver"
        jdbc_connection_string => "jdbc:mysql://DB_HOST_IP:3306/TARGET_DB_NAME?verifyServerCertificate=false&useSSL=true"
        jdbc_user_id => "USERID"
        schedule => "* * * * *"
        statement => "SELECT * from TABLE where TIMESTAMP_FIELD > :sql_last_value"
        last_run_metadata_path => "/opt/logstash/config/.last_run"
    }
}
Example B: a configuration for fetching data from an MS-SQL database that utilizes the incremental ID use case detailed in the Overview section above.
input {
    # config example for connecting to MSSQL
    jdbc {
        jdbc_driver_library =>"/opt/jdbc-drivers/sqljdbc_6.0/enu/jre8/sqljdbc42.jar"
        jdbc_driver_class => "com.microsoft.sqlserver.jdbc.SQLServerDriver"
        jdbc_connection_string => "jdbc:sqlserver://DB_HOST_IP:1433;databasename=TARGET_DB_NAME;encrypt=true;trustServerCertificate=true;"
        jdbc_user_id => "USERID"
schedule => "* * * * *"
        statement => "SELECT * from TABLE WHERE id > :sql_last_value"
        use_column_value => true
        tracking_column => id
        last_run_metadata_path => "/opt/logstash/config/.last_run"
    }
}
Example C: a configuration for fetching data from an Oracle database that utilizes the incremental ID use case detailed in the Overview section above.
Note
In this example, SERVICE is the oracle SID (database name).
input {
    #config example for connecting to Oracle DB
    #jdbc {
        # jdbc_driver_library =>"/opt/jdbc-drivers/PATH_TO/ojdbc8.jar"
        # jdbc_driver_class => "Java::oracle.jdbc.driver.OracleDriver"
        # jdbc_connection_string => "jdbc:oracle:thin:@IP_OF_HOST:1521/SERVICE
        # jdbc_user_id => "USERID"
            ## jdbc_user => "USERNAME"
            ## jdbc_password => "PASSWORD"
        # schedule => "* * * * *"
        # statement => "SELECT * from TABLE WHERE ID_FIELD > :sql_last_value"
        # use_column_value => true
        # tracking_column => ID_FIELD
        # last_run_metadata_path => "/opt/logstash/config/.last_run"
        #}
Caution
For multiple database inputs, there must be input files logstash-dblog-input-[database_name].conf configured for each source, such as:
logstash-dblog-input-mssql1.conf
logstash-dblog-input-mssql2.conf
logstash-dblog-input-mysql.conf
In this example, dblog will process all the input files (logstash-dblog-input-mssql1/mssql2/mysql) and collect logs from all configured databases.
Fields in an Exabeam Data Lake Database Log Collector Configuration File
The Data Lake database collector input configuration file, logstash-dblog-input-[database_name].conf, has required parameters as well as optional parameters. Ensure all required fields are populated.
Required Fields | Definition |
|---|---|
| This is the path to the JDBC driver JAR file that you downloaded in the previous step. The desired JDBC driver library must be explicitly passed using the configuration option. In case of multiple libraries being required you can pass them separated by a comma. |
| The JDBC driver class to load based on your database type. This can be copied exactly: MySQL: MS-SQL: |
| The below string can be copied into your configuration file, with the sections DB_HOST_IP and TARGET_DB_NAME replaced with your database host IP and your database target name. You should also change the port number if your database is running on a different port.
|
| This is the User ID key that will be linked to the Database credentials (username & password) during the install process (Enable Database Collector). For more information see Database Credential. |
| The schedule of when to periodically run The scheduling syntax is powered by Examples:
Further documentation on this syntax can be found at: https://github.com/jmettraux/rufus-scheduler#parsing-cronlines-and-time-strings. |
| The statement to execute; a SQL statement is required for this input. This can be passed-in via a statement option in the form of a string, or read from a file (
|
| The path to the file with the last run time. The system will persist the We recommend that the user does not change the path. The file name can be changed if desired. |
| This field is required only if you are using an incremental column value rather than a timestamp to track the data to be updated during each fetch. Set to a boolean value of If set to If it is set to |
| This field is required only if you are using an incremental column value rather than a timestamp to track the data to be updated during each fetch. This field defines the column whose value is to be tracked. |
Optional Fields | Definitions |
|---|---|
| Can be used as a reference in the To use parameters, use named parameter syntax. For example:
Here, |
| Many drivers use this field to set a limit to how many results are pre-fetched at a time from the cursor into the client’s cache before retrieving more results from the result-set. No fetch size is set by default in this plugin, so the specific driver’s default size will be used. |
| The page size. This is a numeric value and the default is 100000. For example, if our run size is 100 but |
| This will cause a SQL statement to be broken up into multiple queries. Each query will use limits and offsets to collectively retrieve the full result-set. The limit size is set with jdbc_page_size. The default setting is Be aware that ordering is not guaranteed between queries. |
Authenticate an Exabeam Data Lake Database Log Collector using Active Directories and Kerberos
For environments implementing Active Directory (AD), you can configure a connection between the JDBC driver and MS-SQL Server using an AD account. It is best practice to use a service account with limited access to connect to your databases.
Before setting up a service account, verify that a connection is possible between the database collector and source. Setup a user test account and confirm that it can fetch data from the source database.
Note
You must have administrator privileges to execute these instructions.
Create a service account designated to be used by the collector with permissions to access the MS-SQL server. .
Go to Active Directory Users and Computers manager and then select the domain.
Right-click and then select Add User.
Fill-in the user account information. Ensure Password never expires is enabled.
Click OK to create the account. The new account should appear in the list of users for the domain.
Add AD user (
<domain>\<username>created in the previous step) login credentials to MS-SQL.Log in to
MS-SQL Management Studioand select the database the collector will be granted access to.Go to the database’s Security > Users, and then right-click to select Add User.
Fill in the user account information and select the role
db_datareader.Note
Roles with higher-permissions are acceptable.
Click OK to apply the permissions.
Test by logging out of MS-SQL Management Studio and logging back in using the new user account. Then, test throughput by fetching data from the designated database.
Install Kerberos workstation to create a
keytabfor dblog service:With YUM:
sudo yum update -y && sudo yum install -y krb5-workstation
With RPM (offline):
On the Data Lake host, run the following to get krb5-libs version:
rpm -qa | grep krb5-libs | grep el7_6 && echo "CentOS Updates x86_64" || echo "CentOS x86_64"
Open the respective download pages for RPM packages and download the binary packages for krb5-libs, libkadm5, and krb5-workstation.
Note
If the output of the previous command is 'CentOS x86_64' then download CentOS 7 &gt; CentOS x86_64 &gt; {package_name_version}.el7.x86_64.rpm file from each page.
If the output of the previous command is 'CentOS Updates x86_64' then download CentOS 7 > CentOS Updates x86_64 > [package_name_version].el7_6.x86_64.rpm file from each page.
Repeat the rpm (offline) steps for all three packages.
Caution
The version of all RPM packages must be the same.
Upload the RPM packages on the Data Lake host.
Install them using:
sudo rpm -Uvh krb5-libs-{VERSION}.rpm libkadm5-{VERSION}.rpm krb5-workstation-{VERSION}.rpm
Configure Data Lake and dblog service.
At the Data Lake host, add the MS-SQL and AD hosts to
/etc/hostsusing the following format:<ad_host_ip> <ad_hostname> <ms-sql_host_ip> <ms-sql_hostname>
Add the same lines to dblog container's hosts file by adding next lines to
/etc/systemd/system/exabeam-lms-dblog.service:ExecStartPost=/usr/bin/docker exec -u 0 exabeam-lms-dblog-host1 /bin/sh -c "echo '<ad_host_ip> ad.summer.time ad' >> /etc/hosts" ExecStartPost=/usr/bin/docker exec -u 0 exabeam-lms-dblog-host1 /bin/sh -c "echo '<ms-sql_host_ip> win12-sql.summer.time win12-sql' >> /etc/hosts"
Configure Kerberos in LMS and dblog service.
Note
For more information about Kerberos configuration, see Kerberos Requirements.
Edit the domain configuration file
/etc/krb5/krb5.confwith the FQDN of the AD server. The followingkrb5.confexample uses theSUMMER.TIMEdomain:[libdefaults] dns_lookup_realm = false ticket_lifetime = 24h renew_lifetime = 7d forwardable = true default_realm = SUMMER.TIME [realms] SUMMER.TIME = { kdc = ad.summer.time admin_server = ad.summer.time default_domain = SUMMER.TIME } [domain_realm] SUMMER.TIME = SUMMER.TIME .SUMMER.TIME = SUMMER.TIMECopy
/etc/krb5/krb5.confto/etc/and/opt/exabeam/config/lms/dblog/directories.Locate and edit
SQLJDBCDriver.confwith Kerberos login credentials.SQLJDBCDriver {<LoginModule> <flag> <LoginModule options>; <optional_additional_LoginModules, flags_and_options>; };Here is an example of
SQLJDBCDriver.confedits using theSUMMER.TIMEdomain:SQLJDBCDriver { com.sun.security.auth.module.Krb5LoginModule required client=true debug=true doNotPrompt=true useTicketCache=false useKeyTab=truekeyTab="/opt/logstash/config/summeruser.keytab" principal="[email protected]"; };Enable the domain configuration by appending the following to
/opt/exabeam/config/lms/dblog/jvm.options:-Djava.security.krb5.conf=/opt/logstash/config/krb5.conf -Djava.security.auth.login.config=/opt/logstash/config/SQLJDBCDriver.conf -Dsun.security.krb5.debug=true -Dsun.security.jgss.debug=true
Run
ktutilto create akeytabfor the new user. Here is an example using the[email protected]credentials.ktutil ktutil: addent -password -p [email protected] -k 0 -e aes256-cts Password for [email protected]: [summeruser_password] ktutil: wkt /opt/exabeam/config/lms/dblog/summeruser.keytab ktutil: quit
Configure
/opt/exabeam/config/lms/dblog/conf/logstash-dblog-input.confwith connection parameters. Here is an example using the[email protected]credentials.input { # config example for connecting to MSSQL jdbc { jdbc_driver_library =>"/opt/jdbc-drivers/sqljdbc_<jdbc_version>/enu/mssql-jdbc-<jdbc_version>.jre8.jar" jdbc_driver_class => "com.microsoft.sqlserver.jdbc.SQLServerDriver" jdbc_connection_string => "jdbc:sqlserver://<ms-sql_hostname>.summer.time:1433;databaseName=<database>;integratedSecurity=true;authenticationScheme=JavaKerberos;" jdbc_user => "SUMMER\summeruser"jdbc_password => "<summeruser_password>" schedule => "* * * * *" statement => "SELECT * from Logs where Id > :sql_last_value order by Id ASC" last_run_metadata_path => "/opt/logstash/config/.last_run" use_column_value => true tracking_column => Id } }
Run and verify the output.
Start the dblog service.
sudo systemctl restart exabeam-lms-dblog
Wait a few minutes and then check the output.
sudo journalctl -u exabeam-lms-dblog -e
A successful configuration will produce error-free status records that resembles:
[timestamp][docker_host] docker[proc_id]: [INFO ][logstash.inputs.jdbc] (0.003542s) SELECT * from Logs where Id > 0 order by Id ASC
Encrypted Exabeam Data Lake SSL/TLS Database Connection
Certificates need to be generated and installed at the database and collector hosts for encrypted data feeds. Below are the steps to generating certificates to support a secure connection from collector host to database, including:
MS-SQL
MySQL
Oracle
Instructions for configuring PostgreSQL secure connections is not available. PostgreSQL does not support SSL/TLS.
Note
Certificates are not required to establish unencrypted connections to databases, by default. Certificates may be unnecessary for transactions within your organization's internal network. To explicitly set unencrypted connections ensure your connections conforms to the following:
Database | Non-Secure Connection String Template |
|---|---|
MS-SQL |
|
MySQL |
|
Oracle |
|
PostgreSQL |
|
The example below shows how to generate a certificate using Internet Information Services (IIS). Please use tools approved within your organization.
To generate certificates and establish a secure connection from collector host to MS-SQL database:
Create self-signed SSL certificates and configure MS-SQL server in Windows.
Open the Internet Information Services (IIS) Manager of your MS-SQL server.
Select your MS-SQL host and then Server Certificates.
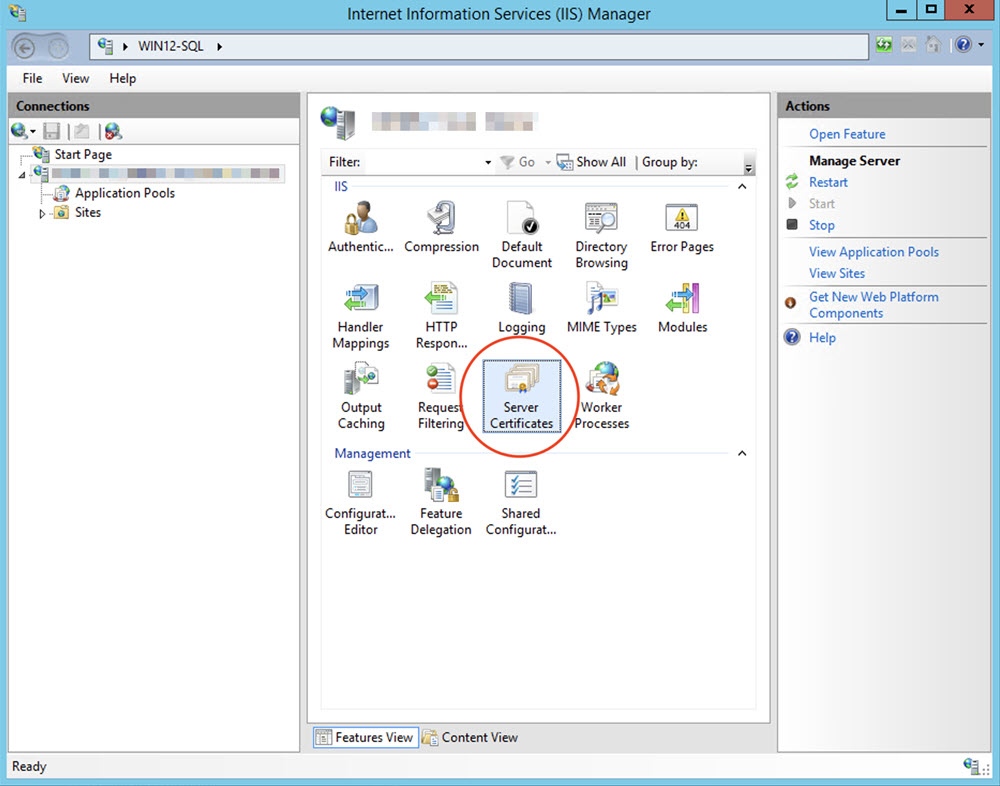
Select Create Self-Signed Certificate.

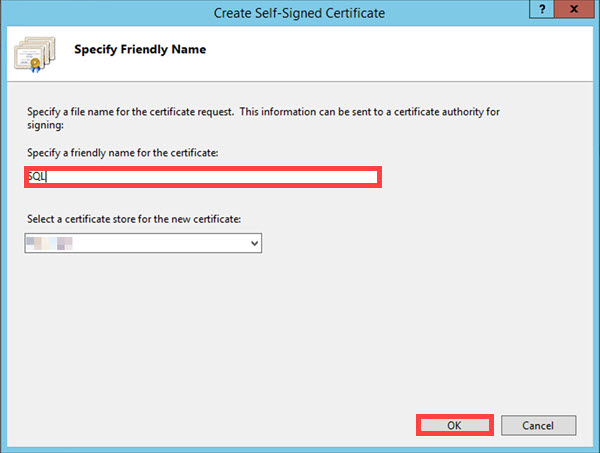
Name the certificate and then click OK to save.
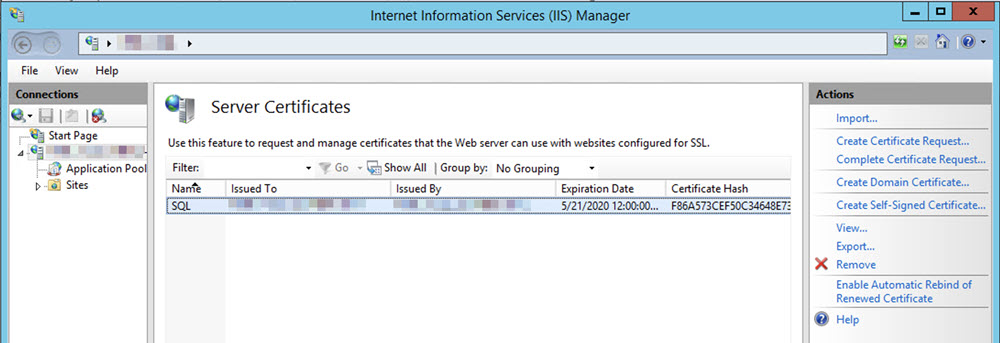
Your self-signed certificate should appear in the Server Certificates listing.
Close the IIS Manager.
Open the SQL Server Configuration Manager.
Select SQL Server Network Configuration > Protocols [mssql_servername] > Properties.
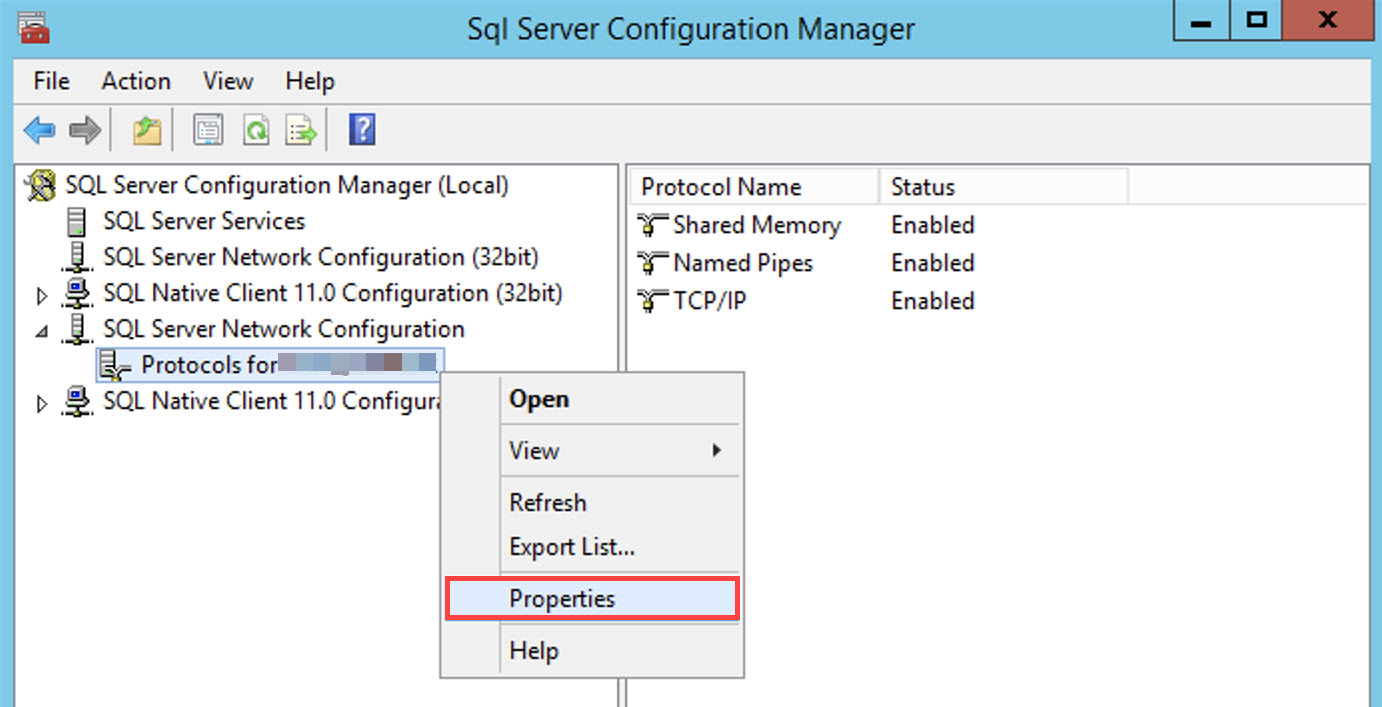
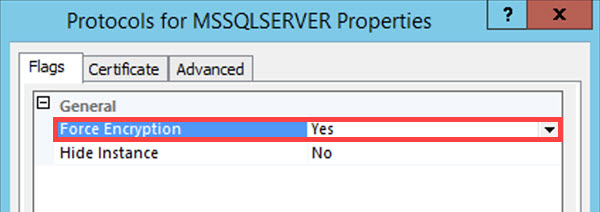
In the Flags tab, enable Force Encryption by selecting Yes.
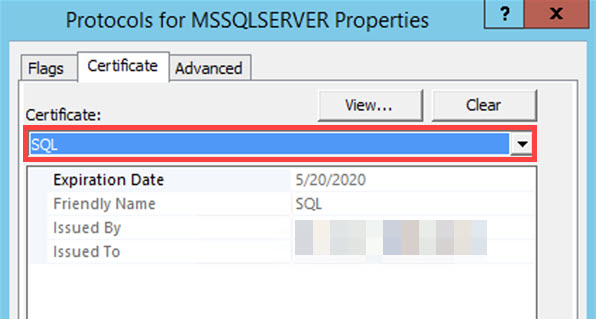
In the Certificate tab, select your self-signed certificate in the Certificate drop-down.
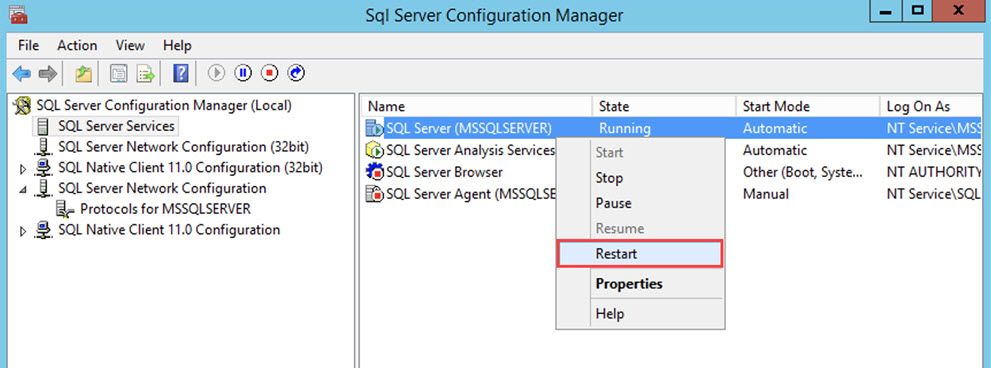
At the SQL Server Configuration Manager, select your server. Right-click to open the submenu and select Restart.
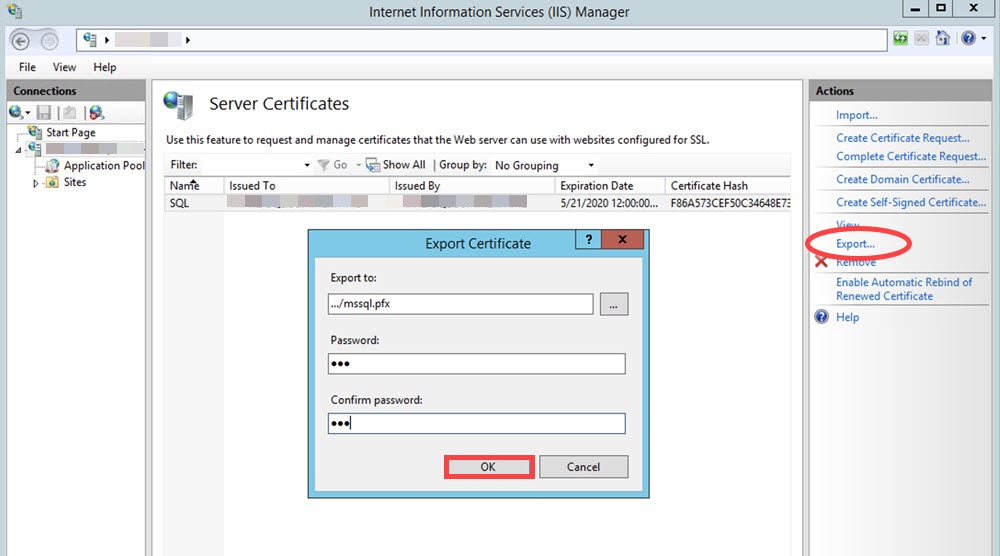
At the IIS Manager, Export the certificate to a PFX-formatted file.
In the Export Certificates menu, enter a PFX filename and password.
Click OK to create the file.
Copy the PFX file to the Data Lake master host and generate a truststore and keystore using
keystore. (Install Java SDK or JRE to obtain thekeystoretool, if Java has not been installed on the host.)keytool -importkeystore -srckeystore mssql-final.pfx -srcstoretype pkcs12 -destkeystore /opt/exabeam/config/common/kafka/ssl/db.keystore.jks -deststoretype JKS keytool -importkeystore -srckeystore mssql-final.pfx -srcstoretype pkcs12 -destkeystore /opt/exabeam/config/common/kafka/ssl/db.truststore.jks -deststoretype JKS
MS-SQL server command line, generate the self-signed SSL key using the domain name or IP address of server where MS-SQL is installed. This example produces a 1-year key.
openssl req -x509 -nodes -newkey rsa:2048 -subj '/CN=<domainname_or_ip>' -keyout mssql.key -out mssql.pem -days 365
Create
pkcs12storage with the certificate and key.openssl pkcs12 -export -in client-cert.pem -inkey client-key.pem -name "mysqlclient" -passout pass:mypassword -out store.p12
Send this store to the Data Lake master host and generate truststore and keystore.
keytool -importkeystore -srckeystore store.p12 -srcstoretype pkcs12 -srcstorepass mypassword -destkeystore /opt/exabeam/config/common/kafka/ssl/db.keystore.jks -deststoretype JKS -deststorepass mypassword
keytool -importkeystore -srckeystore store.p12 -srcstoretype pkcs12 -srcstorepass mypassword -destkeystore /opt/exabeam/config/common/kafka/ssl/db.truststore.jks -deststoretype JKS -deststorepass mypassword
To configure access permissions and move to keys for the MS-SQL server on the Data Lake master host, at the Data Lake host, run the following:
sudo chown mssql:mssql mssql.pem mssql.key
sudo chmod 600 mssql.pem mssql.key
sudo mv mssql.pem /etc/ssl/certs/
# Create this directory if it does not already exist.
sudo mkdir /etc/ssl/private/
sudo mv mssql.key /etc/ssl/private/
sudo systemctl stop mssql-server
sudo /opt/mssql/bin/mssql-conf set network.tlscert /etc/ssl/certs/mssql.pem
sudo /opt/mssql/bin/mssql-conf set network.tlskey /etc/ssl/private/mssql.key
sudo /opt/mssql/bin/mssql-conf set network.tlsprotocols 1.2
sudo /opt/mssql/bin/mssql-conf set network.forceencryption 0
sudo /opt/mssql/bin/mssql-conf set sqlagent.enabled true
# The next line will print out the MS SQL server configuration.
sudo cat /var/opt/mssql/mssql.conf sudo systemctl start mssql-server
Download the Microsoft JDBC Driver for SQL Server and place it in
/opt/exabeam/data/lms/dblog/.Edit configurations in
/opt/exabeam/config/lms/dblog/conf/folder in Data Lake node. The following example is for/opt/exabeam/config/lms/dblog/conf/logstash-dblog-input.conf:input { # config example for connecting to MSSQL jdbc { jdbc_driver_library =>"/opt/jdbc-drivers/sqljdbc_6.0/enu/jre8/sqljdbc42.jar" jdbc_driver_class => "com.microsoft.sqlserver.jdbc.SQLServerDriver" jdbc_connection_string => "jdbc:sqlserver://<ms-sql_ip>:1433;databasename=TestDB;encrypt=true;trustServerCertificate=false" jdbc_user => "<adminrole_user>" jdbc_password => "<adminrole_user_password>" schedule => "* * * * *" statement => "SELECT * from Inventory" last_run_metadata_path => "/opt/logstash/config/.last_run" } }Add truststore and keystore parameters to
jvm.options.sudo vim /opt/exabeam/config/lms/dblog/jvm.options
Then add the following parameters:
-Djavax.net.ssl.trustStore=/opt/logstash/ssl/<truststore_filename>
-Djavax.net.ssl.trustStoreType=JKS
-Djavax.net.ssl.trustStorePassword=<truststore_password>
-Djavax.net.ssl.keyStore=/opt/logstash/ssl/<keystore_filename>
-Djavax.net.ssl.keyStoreType=JKS
-Djavax.net.ssl.keyStorePassword=<keystore_password>
Install and start
dblog.sudo sh /opt/exabeam/bin/lms/lms-dblog-install.sh
Allow 3 minutes of processing and then check dblog logs to verify activity.
sudo journalctl -u exabeam-lms-dblog -e
Inspect the output that it does not contain error messages. Messages like this should be found:
[INFO ][logstash.inputs.jdbc ] (0.118623s) SELECT * from Inventory
To generate certificates and establish a secure connection from the collector host to MySQL database:
Note
In the following example, /mysql_keys folder represents the key storage directory.
Run the following commands to create the Certificate Authority (CA) keys:
openssl genrsa 2048 > /mysql_keys/ca-key.pem
openssl req -sha1 -new -x509 -nodes -days 3650 -key /mysql_keys/ca-key.pem > /mysql_keys/ca-cert.pem
Run the following commands to create the server SSL key and certificate:
openssl req -sha1 -newkey rsa:2048 -days 3650 -nodes -keyout /mysql_keys/server-key.pem > /mysql_keys/server-req.pem
openssl x509 -sha1 -req -in /mysql_keys/server-req.pem -days 3650 -CA /mysql_keys/ca-cert.pem -CAkey /mysql_keys/ca-key.pem -set_serial 01 > /mysql_keys/server-cert.pem
openssl rsa -in /mysql_keys/server-key.pem -out /mysql_keys/server-key.pem
Run the following commands to create the client SSL key and certificate:
openssl req -sha1 -newkey rsa:2048 -days 3650 -nodes -keyout /mysql_keys/client-key.pem > /mysql_keys/client-req.pem
openssl x509 -sha1 -req -in /mysql_keys/client-req.pem -days 3650 -CA /mysql_keys/ca-cert.pem -CAkey /mysql_keys/ca-key.pem -set_serial 01 > /mysql_keys/client-cert.pem
openssl rsa -in /mysql_keys/client-key.pem -out /mysql_keys/client-key.pem
Import client private key and certificate to a keystore:
openssl pkcs12 -export -in client-cert.pem -inkey client-key.pem -name "mysqlclient" -passout pass:mypassword -out client-keystore.p12
keytool -importkeystore -srckeystore client-keystore.p12 -srcstoretype pkcs12 -srcstorepass mypassword -destkeystore keystore -deststoretype JKS -deststorepass mypassword
Import CA certificate to a trustore:
keytool -importcert -alias MySQLCACert -file ca.pem \ -keystore truststore -storepass mypassword
Send the truststore and keystore to the LMS server.
Open the
/etc/my.cnffile with your preferred text editor.Insert the following lines in the
[mysqld]section of themy.cnffile:ssl-cipher=DHE-RSA-AES256-SHA ssl-ca=/mysql_keys/ca-cert.pem ssl-cert=/mysql_keys/server-cert.pem ssl-key=/mysql_keys/server-key.pem
Insert the following lines in the
[client]section of themy.cnffile (If the[client]section does not exist, you must add a[client]section):ssl-cert=/mysql_keys/client-cert.pem ssl-key=/mysql_keys/client-key.pem
Your updated
my.cnffile should resemble the following example:[mysqld] max_connections=500 log-slow-queries max_allowed_packet=268435456 open_files_limit=10000 default-storage-engine=MyISAM innodb_file_per_table=1 performance-schema=0 ssl-cipher=DHE-RSA-AES256-SHA ssl-ca=/mysql_keys/ca-cert.pem ssl-cert=/mysql_keys/server-cert.pem ssl-key=/mysql_keys/server-key.pem [client] ssl-cert=/mysql_keys/client-cert.pem ssl-key=/mysql_keys/client-key.pem
Save your changes to the
/etc/my.cnffile and exit your text editor.Run the following command to update the file permissions of the
/mysql_keysdirectory and its files:chown -Rf mysql/mysql_keys
Restart MySQL:
sudo systemctl restart mysqld
View MySQL's active SSL configuration to verify activity:
mysql -e "show variables like '%ssl%';"
The output will resemble the following example:
+---------------+------------------------+
| Variable_name | Value |
+---------------+------------------------+
| have_openssl | YES |
| have_ssl | YES |
| ssl_ca | /mysql_keys/ca-cert.pem |
| ssl_capath | |
| ssl_cert | /mysql_keys/server-cert.pem |
| ssl_cipher | DHE-RSA-AES256-SHA |
| ssl_key | /mysql_keys/server-key.pem |
+---------------+------------------------+
MySQL can check X.509 certificate attributes in addition to the usual authentication that is based on the user name and credentials. To restrict access only from some hosts we can do that using client side SSL certificates. Set the certificate parameters we want to check for the particular client and user by modifying the user’s GRANT, which means that the client must have a valid certificate:
Grant all on
testdb.*totestuseridentified bypasswordrequire X509; restart MySQL database service:sudo systemctl restart mysqld
Open port 3306 in firewall rules or just stop firewall on the server.
Put
truststoreandkeystoreto this directory:/opt/exabeam/config/common/kafka/ssl/
Put downloaded MySQL JDBC driver (for example, mysql-connector-java-5.1.42-bin.jar) to:
/opt/exabeam/data/lms/dblog
Add
truststoreandkeystoretodblog jvm.optionsfile:Open
jvm.options:sudo vim /opt/exabeam/config/lms/dblog/jvm.options
Add this to the end of file:
-Djavax.net.ssl.trustStore=/opt/logstash/ssl/<TRUSTSTORE FILE NAME>
-Djavax.net.ssl.trustStoreType=JKS
-Djavax.net.ssl.trustStorePassword=<TRUSTSTORE PASSWORD>-Djavax.net.ssl.keyStore=/opt/logstash/ssl/<KEYSTORE FILE NAME>-Djavax.net.ssl.keyStoreType=JKS-Djavax.net.ssl.keyStorePassword=<KEYSTORE PASSWORD>
Configure
jdbc_connection_stringin logstash dblog input file for oracle database connection:Location of file:
sudo vim /opt/exabeam/config/lms/dblog/conf/logstash-dblog-input.conf
Connection string:
jdbc:mysql://<SERVER HOST NAME>:3306/<DATABASE NAME>?useSSL=true&verifyServerCertificate=true&requireSSL=true
Example of logstash input file:
input {
# config example for connecting to MySQL DB
jdbc {
jdbc_driver_library =>"/opt/jdbc-drivers/mysql-connector-java-5.1.42-bin.jar"
jdbc_driver_class => "com.mysql.jdbc.Driver"
jdbc_connection_string => "
jdbc:mysql://10.10.2.181:3306/testdb?useSSL=true&verifyServerCertificate=true&requireSSL=true"
jdbc_user => "testuser"jdbc_password => "password"
jdbc_validate_connection => true
schedule => "* * * * *"
statement => "SELECT * from customers"
last_run_metadata_path => "/opt/logstash/config/.last_run"
}
Allow 3 minutes of processing and then check dblog logs to verify activity.
sudo journalctl -u exabeam-lms-dblog -e
A message like this should be found:
[2018-09-28T14:26:00,157][INFO ][logstash.inputs.jdbc ] (0.000767s) SELECT * from customers
To generate certificates and establish a secure connection from the collector host to Oracle database:
Create the wallet:
orapki wallet create -wallet <WALLET DIRECTORY>
Add the self-signed certificate:
orapki wallet add -wallet <WALLET DIRECTORY> -dn CN=<CERTIFICATE NAME>,C=US -keysize 2048 -self_signed -validity 3650
Check the wallet:
orapki wallet display -wallet <WALLET DIRECTORY>
Export certificate:
orapki wallet export –wallet <WALLET DIRECTORY> -cert <SERVER CERTIFICATE FILE NAME>
Add certificate to
truststore:keytool -importcert -alias <ALIAS NAME> -keystore <PATH TO TRUSTSTORE> -file <FILE PATH TO SERVER CERTIFICATE>
Create
keystorewith client certificate (only for two-way authentication):keytool -genkeypair -alias <ALIAS NAME> -keyalg RSA -validity 365 -keysize 2048 -keystore <PATH TO KEYSTORE>
Export client certificate from
keystore(only for two-way authentication):keytool -export -alias <ALIAS NAME> -keystore <PATH TO KEYSTORE> -rfc -file <FILE PATH TO CLIENT CERTIFICATE>
Import client certificate into wallet (only for two-way authentication):
orapki wallet add -wallet <WALLET DIRECTORY> -trusted_cert -cert <FILE PATH TO CLIENT CERTIFICATE>
Send
truststoreandkeystoreto Data Lake server.Add TCPS protocol to the
listener.orafile.LISTENER = (DESCRIPTION_LIST = ... (DESCRIPTION = (ADDRESS = (PROTOCOL = TCPS)(HOST = <SERVER HOST NAME>)(PORT = 2484)) ) ... )
Add TCPS protocol to the
tnsnames.orafile, you need it for connection to oracle database with SQLPLUS command line tool.<SERVICE NAME>_secure = (DESCRIPTION = (ADDRESS_LIST = (ADDRESS = (PROTOCOL = TCPS) (HOST = <SERVER HOST NAME>) (PORT = 2484))) (CONNECT_DATA =(SERVER = DEDICATED) (SERVICE_NAME = <SERVICE NAME>)) (SECURITY =(MY_WALLET_DIRECTORY = <WALLET DIRECTORY>))) *<SERVICE NAME> - name of your main service, which stores your data
Add the Oracle Wallet location to the
sqlnet.oraandlistener.orafiles.WALLET_LOCATION = (SOURCE = (METHOD = FILE) (METHOD_DATA = (DIRECTORY = <WALLET DIRECTORY>)))
Set client authentication to the
sqlnet.oraandlistener.orafiles.For two-way authentication:
SSL_CLIENT_AUTHENTICATION = TRUE
For one-way authentication:
SSL_CLIENT_AUTHENTICATION = FALSE
Add TCPS protocol to the
sqlnet.orafile.SQLNET.AUTHENTICATION_SERVICES= (..., TCPS)
Restart oracle listener:
lsnrctl stop
lsnrctl start
Open port 2484 in firewall rules or stop firewall on the server.
Put truststore and keystore to this directory:
/opt/exabeam/config/common/kafka/ssl/Put downloaded Oracle JDBC driver (
ojdbc8.jar) to this directory:/opt/exabeam/data/lms/dblogAdd truststore and keystore to dblog jvm.options file:
Open jvm.options:
sudo vim /opt/exabeam/config/lms/dblog/jvm.options
Add this to the end of file:
-Djavax.net.ssl.trustStore=/opt/logstash/ssl/<TRUSTSTORE FILE NAME>
-Djavax.net.ssl.trustStoreType=JKS
-Djavax.net.ssl.trustStorePassword=<TRUSTSTORE PASSWORD>
# Uncomment and edit next three lines for two-way authentication
#-Djavax.net.ssl.keyStore=/opt/logstash/ssl/<KEYSTORE FILE NAME>#-Djavax.net.ssl.keyStoreType=JKS
#-Djavax.net.ssl.keyStorePassword=<KEYSTORE PASSWORD>
Configure
jdbc_connection_stringinlogstashdbloginput file for oracle database connection:Location of file:
sudo vim /opt/exabeam/config/lms/dblog/conf/logstash-dblog-input.conf
Set connection string:
jdbc:oracle:thin:@(DESCRIPTION=(ADDRESS=(PROTOCOL=TCPS)(HOST=<hostname>)(PORT=2484))(CONNECT_DATA=(SERVICE_NAME=<service_name>))
Example of logstash input file:
input {
# config example for connecting to Oracle
jdbc {
jdbc_driver_library =>"/opt/exabeam/data/lms/dblog/ojdbc8.jar"
jdbc_driver_class => "Java::oracle.jdbc.driver.OracleDriver"jdbc_connection_string => "jdbc:oracle:thin:@(DESCRIPTION=(ADDRESS=(PROTOCOL=tcps)(HOST=10.10.19.79)(PORT=2484))(CONNECT_DATA=(SERVICE_NAME=ORCL)))"# jdbc_user_id => "USERID"
jdbc_user => "system"
jdbc_password => "password"schedule => "* * * * *"
statement => "SELECT * from customers"
# use_column_value => true
# tracking_column => ID_FIELD
last_run_metadata_path => "/opt/logstash/config/.last_run"
}
}
Allow 3 minutes of processing and then check dblog logs to verify activity.
sudo journalctl -u exabeam-lms-dblog -e
A message like this should be found:
[2018-09-28T14:26:00,157][INFO ][logstash.inputs.jdbc ] (0.000767s) SELECT * from customers
Enable an Exabeam Data Lake Database Log Collector
Data Lake database collectors are disabled by default. After database collector configuration, collectors must be Enabled and then Started. See the scripts below.
Enable Database Collector
Run the following command to enable the Database Collector. This command must also be run after a server-side upgrade. The command also cleans up the last_run status before enabling the service.
cd /opt/exabeam/bin/lms
./lms-dblog-install
After running the script you will be asked to provide a userid - this is the jdbc_user_id that you entered into the configuration file in the previous section. You will then be asked to provide the user name and password that are linked to this User ID (see the example below). These credentials will be encrypted and stored and going forward, the User ID will be used to access the database.
Please enter the DB credentials for the target DB. Please make sure to remember the userid which will be used in the DB collector config.
Please enter userid: Key4567
Please enter the user name : Geraldine
Please enter the password: ReallyGoodPassword
Success! Data written to: secret/Key4567
Do you want to save another pair of credentials [y/n]:y
Please enter userid: Key1234
Please enter the user name : Petunia
Please enter the password: AnotherReallyGoodPassword
Success! Data written to: secret/Key1234
Do you want to save another pair of credentials [y/n]:n
Start Database Collector
Run the following command to start the Database collector:
cd /opt/exabeam/bin/lms
./lms-dblog-start
Check the Status of Database Collector
Run the following command to check the status of the Database collector:
cd /opt/exabeam/bin/lms
./lms-dblog-status
Stop Database Collector
Run the following command to stop the Database collector.
cd /opt/exabeam/bin/lms
./lms-dblog-stop
Disable Database Collector
Run the following command to disable the Database collector. This command will also clear the last_run status.
cd /opt/exabeam/bin/lms
./lms-dblog-uninstall
Health of Database Collector
There is a health check for Database Collector through the Health Status page in the UI.
If the collector is NOT enabled, the Health Status page will show the client as Healthy. The status will show also show as Healthy when the service is enabled and has been stopped by a user.
The status will display as Critical when the Database Collector is enabled and has failed.
