- Exabeam Data Lake Agent Log Collectors
- Prerequisites for Installing Log Collector Agent
- Install Exabeam Data Lake Log Collectors
- Configure Exabeam Data Lake Log Collectors
- Upgrade Exabeam Data Lake Log Collectors
- Uninstall Exabeam Data Lake Log Collectors
- Uninstall Exabeam Windows Log Collectors via PowerShell
- Uninstall All Exabeam Windows Log Collectors via MSI Package
- Uninstalling Exabeam Data Lake Log Collectors on Windows via MSI Silent Mode
- Uninstall Exabeam Data Lake Log Collectors on Linux & Ubuntu
- Remove an Uninstalled Collector from the Collector Management Page
- Exabeam Data Lake Database Log Collector
- Cisco eStreamer Log Collector in Exabeam Data Lake
- Debug an Exabeam Data Lake Log Collector Agent
Exabeam Data Lake Agent Log Collectors
Data Lake can collect the data from machines located anywhere, whether it is local, remote, or cloud. It provides an out-of-the-box, file-based collector and Windows event collector. It also supports organizations that collect:
Data from devices communicating via the Cisco eStreamer protocol
Logs via cloud applications (PAAS, IAAS, and SAAS)
Logs via databases
Most customer environments will utilize a combination of both server-side and agent connectors.
We can deploy and run local agents on machines from which logs must be collected and aggregated. We can also receive Syslogs that are sent to our Log Ingestor from your SIEM or another third-party security service such as FireEye, Symantec, and many others.
Regardless of the method by which Data Lake collects logs, once they are accepted by the Log Ingestor they are treated exactly the same.
Note
Data Lake is optimized to support up to 1,500 collectors for clusters with 2 or more hosts. For single host clusters, up to 700 collectors is supported. There may be up to a 10% EPS performance degradation and up to a 20% increase in search latency, based on the number of collectors.
Prerequisites for Installing Log Collector Agent
Notice
Data Lake i40 log collector agents do not support the following servers:
Ubuntu 12.04/14.04
If you are using one of these servers, you need to upgrade to a supported server before installing a Data Lake i40 log collector agent.
The following operating systems are supported by log collector agents:
Operating System | Collector Type | ||
|---|---|---|---|
File Collector | GZip Collector | Windows Events Collector | |
Windows Server 2008/R2 | ✓ | ✓ | ✓ |
Windows Server 2012/R2 | ✓ | ✓ | ✓ |
Windows Server 2016/2016 Core | ✓ | ✓ | ✓ |
Windows Server 2019 | ✓ | ✓ | ✓ |
CentOS 7.x/8.x | ✓ | ✓ | N/A |
Red Hat Enterprise Linux 8.x | ✓ | ✓ | N/A |
Ubuntu 16.04/18.04/20.04 | ✓ | ✓ | N/A |
Debian 9 | ✓ | ✓ | N/A |
The table below shows all the ports that Exabeam requires to either connect to or receive connections from. Ensure these ports are configured appropriately for data and communications traversal.
Source | Destination | Port | Protocol |
|---|---|---|---|
User Network | Exabeam Appliance | 22/TCP | SSH |
User Network | Exabeam Site Collector | 8484/TCP | HTTPS |
Log Sources (Syslog Forwarding) | Exabeam Appliance | 514/TCP/UDP | Syslog |
Exabeam Appliance | DNS Servers | 53/UDP | DNS |
Exabeam Appliance | Active Directory or LDAP Servers | 389/TCP or 636/TCP | LDAP and LDAPS |
Exabeam Appliance | NTP Servers | 123/UDP | NTP |
Exabeam Log Collectors (Log Ingestion) | Exabeam Site Collector | 9092/TCP 9093/TCP 9094/TCP | HTTPS |
Exabeam Log Collectors (Config and Health) | Exabeam Site Collector | 8484/TCP | HTTPS |
Navigate to the Settings > Collector Management.> Collectors
Click  to open the Collector Artifacts menu to get a list of SSL CERTIFICATES and Client Side Collector packages you can download.
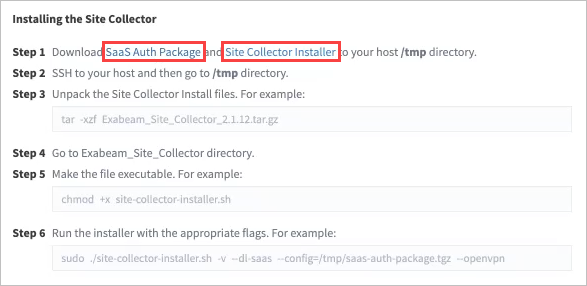 |
If you need an authentication certificates for a host running Linux, save the certs.tar.gz tarball. If the host is running Windows, save the certs.zip.
If you need to install a collector on a Linux-based system, save the collectors.tar.gz tarball. If the host is running Windows, save the collectors.zip or collectors.msi.
Install Exabeam Data Lake Log Collectors
The Exabeam log collector has two parts:
Exabeam Manager Service – Performs the configuration changes, monitors the health of the collector, performs upgrades, etc.
Exabeam Windows Event Collector/File Collector /GZip Collector – Monitors specific events or log files and pushes them to the Data Lake via the Site Collector.
Once the installation of the agent is complete, for on-premises deployments, the Exabeam Manager service is up and running and sending a heartbeat to Data Lake. For SaaS deployments, heartbeats are sent to Data Lake via the Exabeam Site Collector. (However, the collectors will need to be configured from theData Lake console before they start sending events to Data Lake via the Site Collector.)
Note
Watch a tutorial video that covers agent log collector installation on the Exabeam Community.
Default Installation Path for Windows: C:\Program Files
Default Installation Path for Linux: /opt/exabeam
Folder Structure
File Collector:
/Exabeam/File Log Manager
/Exabeam/Windows File Collector
Event Collector
/Exabeam/Event Log Manager
/Exabeam/Windows Event Collector
Gzip Collector:
/Exabeam/Gzip Log Manager
/Exabeam/Windows Gzip Collector
Install Exabeam Collectors on Windows
Install Exabeam Windows Collectors via MSI Package
Follow the steps below to install all or individual log collectors using MSI package for Windows. You can also choose to install individual log collectors using PowerShell on Windows.
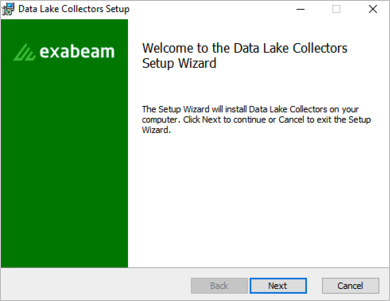
Download and then run the Data Lake Collectors Setup MSI file.
Click Next.
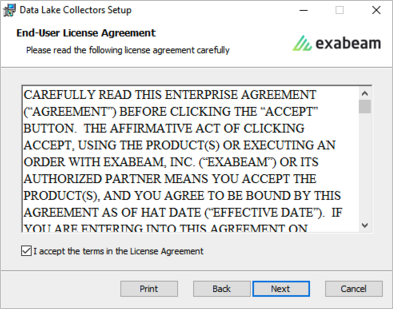
Accept the license agreement and then click Next.
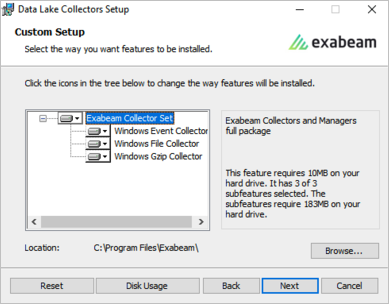
Choose the setup type. (To prevent misconfiguration, do not select the "Typical" option.)
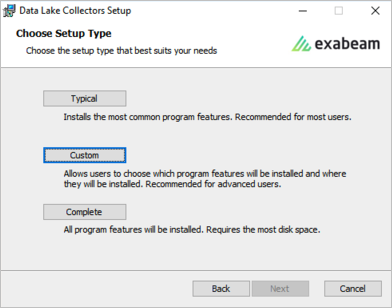
If you are installing all collectors, select Complete.
If you are installing individual collectors, select Custom. Select the collectors you need to install, and then click Next.
Enter the following collector settings for on-premises and cloud-delivered deployments:
For on-premises deployments:
Data Lake server IP/FQDN with the port 8484.
Kafka Connect string
Note
You can enter multiple IP:port pairs. Additionally, Exabeam generally uses port 9093.
For cloud-delivered deployments:
Site Collector IP/FQDN with the port 8484.
Site Collector IP/FQDN with the port 9093 string for Kafka Connect string configuration.
Note
You can enter multiple IP:port pairs. Additionally, Exabeam generally uses port 9093.
Path to the certificate archive:
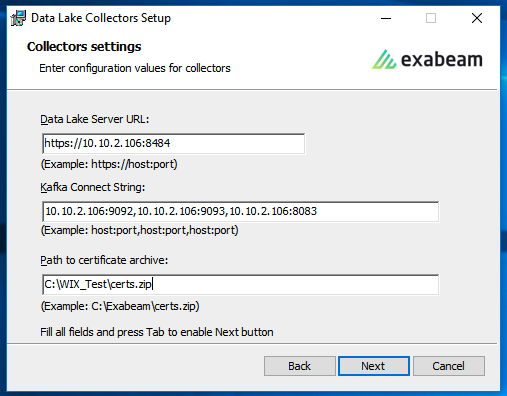
Click Next.
Click Install to initiate installation.
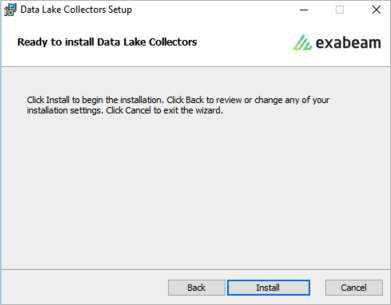
Click Yes to allow installation.
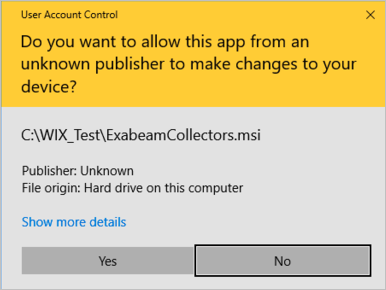
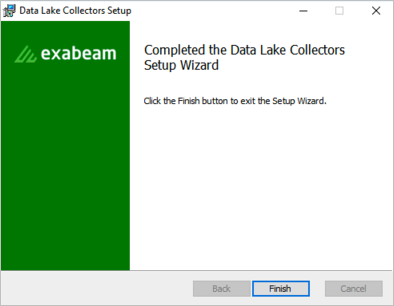
Allow the installation to complete, and then click Finish.
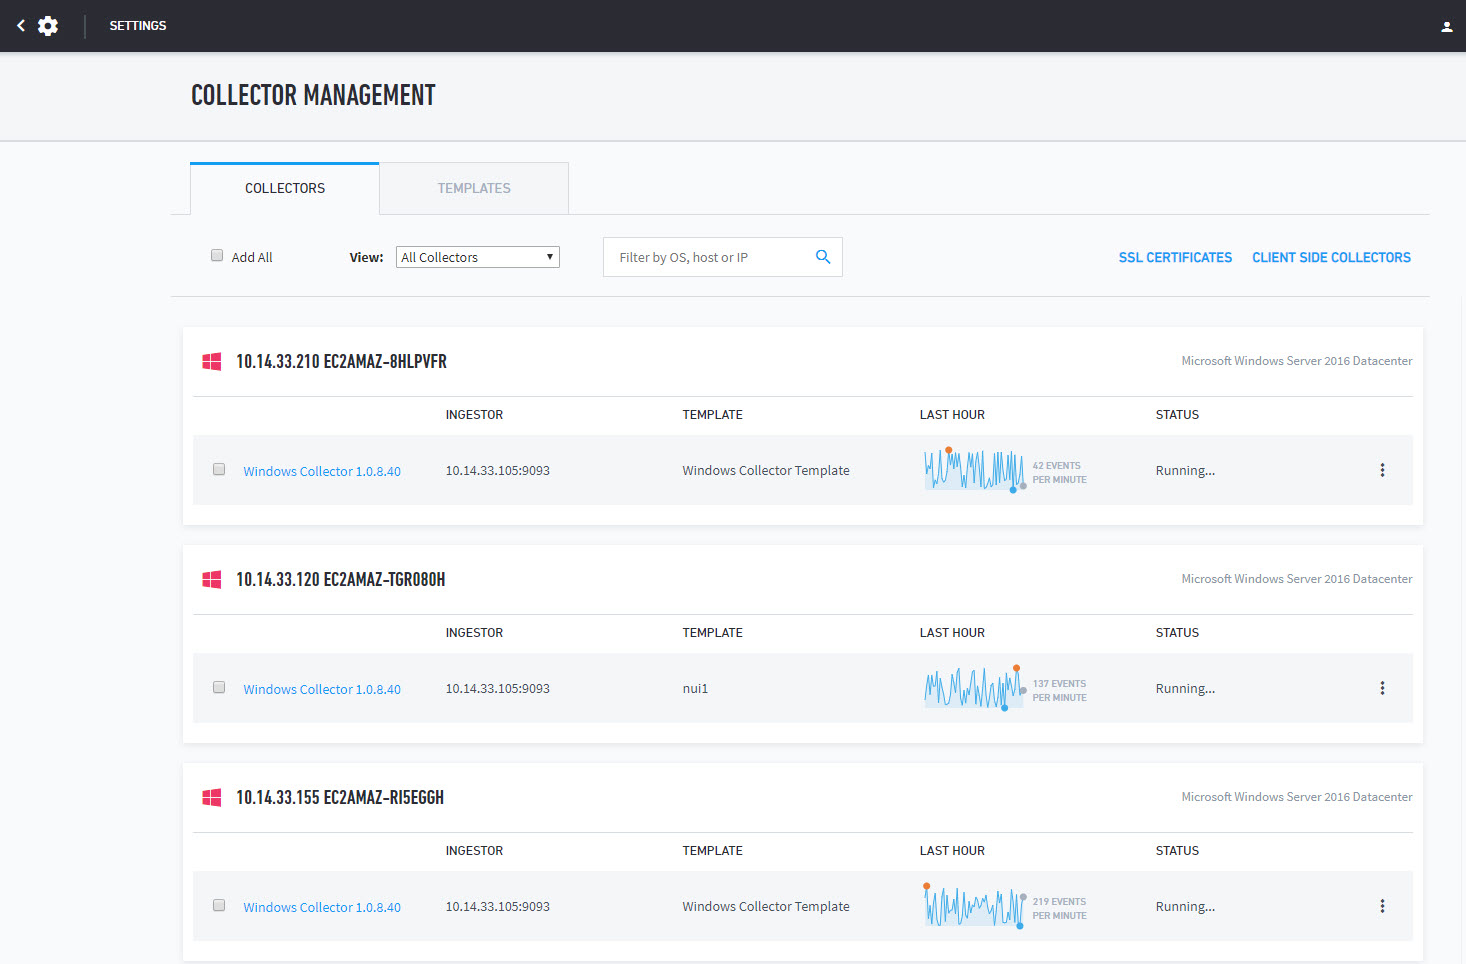
Ensure your newly configured collector appears on the Collector Management page, and is correctly configured. If your collector does not appear in the list, refer to Debug an Exabeam Data Lake Log Collector Agent for troubleshooting guidance.
Navigate to Settings > Collector Management. Your collector should appear in the collectors list. Also, it should have data posted to the LAST Hour graph and the STATUS is Running….
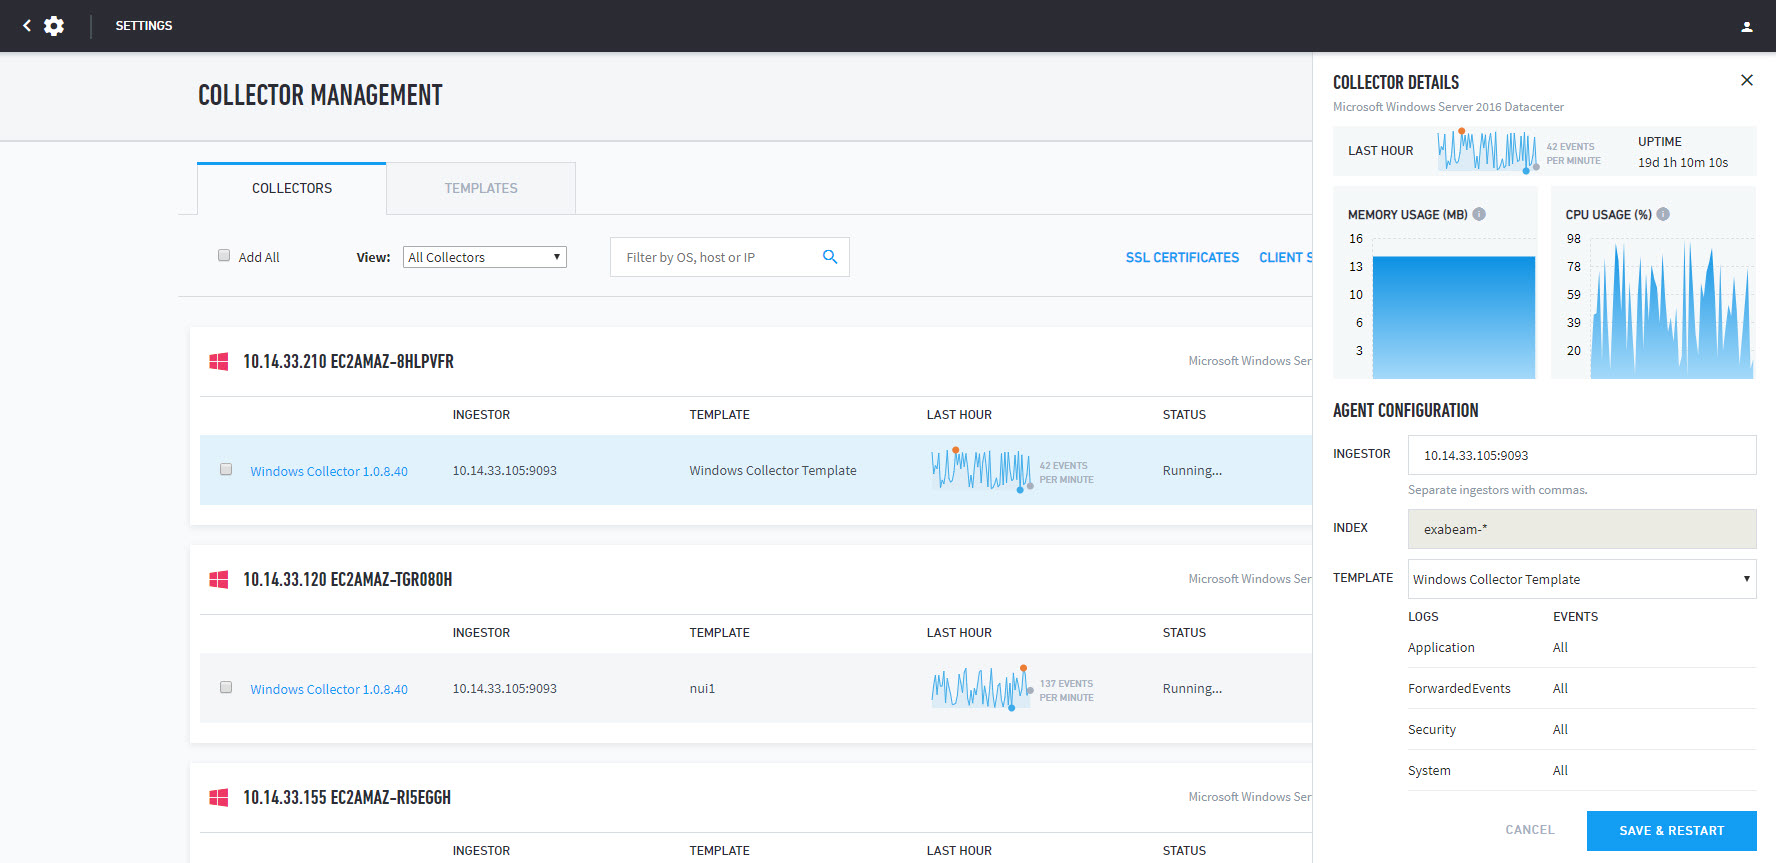
Select the collector in the list to access the Collectors Details panel, showing performance and collector configuration. Ensure parameters match the collector you configured.
Installing Exabeam Log Collectors on Windows via MSI Silent Mode
Data Lake supports silent (background) mode installations for MSI collectors and certificates packages. You must have administrator permissions to run the commands.
To install collectors in silent mode:
msiexec /i C:\WIX_Test\ExabeamCollectors.msi /qn SERVER_ADDRESS="https://[host_ip]:8484" PATH_TO_ZIPFILE="C:\WIX_Test\certs.zip" KAFKA_HOSTS="[host_ip]:9092,[host_ip]:9093,[host_ip]:8083" ADDLOCAL="FeatureFileCollector,FeatureEventCollectormsiexec /i C:\WIX_Test\ExabeamCollectors.msi /qn" SERVER_ADDRESS="https://[host_ip]:8484" PATH_TO_ZIPFILE="C:\WIX_Test\certs.zip" KAFKA_HOSTS="[host_ip]:9092,[host_ip]:9093,[host_ip]:8083" ADDLOCAL="FeatureFileCollector,FeatureEventCollector"
Install Exabeam Log Collectors via PowerShell Scripts
Follow the steps below to install individual log collectors on Windows via PowerShell scripts. You can also choose to install all or individual log collectors on Windows via MSI.
Unzip the collectors.zip package. One option you can use is Remote Desktop Connection if you are using Remote Desktop Protocol (RDP).
Run PowerShell as Administrator.
Set execution policy for PowerShell.
Set-ExecutionPolicy -ExecutionPolicy Unrestricted -Scope process
Run the script in Powershell to install the individual log collectors. You will be asked to input the following parameters:
Parameter | Description |
|---|---|
| This specifies whether the user agrees to the Data Lake license. Valid inputs are 'Yes' or 'No'. |
| This specifies the type of agent that the Exabeam Collector is paired with. For example, 'filebeat', 'winlogbeat', or 'gzipbeat'. |
| This specifies the installation path of the agent collector. For example, 'C:\Program Files' |
| This specifies the kafka ingestorSite Collector hosts that the collector will push the logs to. The ingestor hosts should be provided as a comma separated list such as 'Host_IP_1:PORT,HOST_IP_2:PORT'. |
| This specifies the url of the kafka ingestor serverSite Collector the collector will talk to, such as, 'https://SERVER_IP:PORT'. |
| This specifies the path to the certificate package that you downloaded before installation. Ensure the path to the archive with SSL certificates is an absolute path. See Collector Installation Prerequisites. |
Warning
If you run the install script with parameters, you may delete the entire directory containing the certificate when you run the uninstaller script.
If you run the install script without parameters, you install all beats agents by default. When you run the uninstaller script, the certificate directory remains.
For help and more details for parameters that the script supports, run the following command:
Get-Help .\install-exabeam-collector.ps1 -full
Navigate to the folder that contains the installer:
cd PATH_TO_EXACOLLECTOR_INSTALLER
To install Windows log collector, run the following command:
.\install-exabeam-collector.ps1 -agreeToLicense Yes -agentType "winlogbeat" -kafkaHosts <site_collector_host:site_collector_kafka_port> -dlServerUrl https://<site_collector_host>:8484 -certificatePkg "C:\Exabeam\certs.zip"
To install file log collector, run the following command:
.\install-exabeam-collector.ps1 -agreeToLicense Yes -agentType "filebeat" -kafkaHosts <site_collector_host:site_collector_kafka_port> -dlServerUrl https://<site_collector_host>:8484 -certificatePkg "C:\Exabeam\certs.zip"
To install Gzip log collector, run the following command:
.\install-exabeam-collector.ps1 -agreeToLicense Yes -agentType "gzipbeat" -kafkaHosts <site_collector_host:site_collector_kafka_port> -dlServerUrl https://<site_collector_host>:8484 -certificatePkg "C:\Exabeam\certs.zip"
The collector is now installed and the Exabeam Log Collector services are running automatically. The following commands can be used to start or stop the services manually using PowerShell.
For exabeat managing filebeat:
Start-Service "Exabeam File Log Manager"
Stop-Service "Exabeam File Log Manager"
Restart-Service "Exabeam File Log Manager"
For Exabeam event log manager:
Start-Service "Exabeam Event Log Manager"
Stop-Service "Exabeam Event Log Manager"
Restart-Service "Exabeam Event Log Manager"
For Exabeam gzip log manager:
Start-Service "Exabeam Gzip Log Manager"
Stop-Service "Exabeam Gzip Log Manager"
Restart-Service "Exabeam Gzip Log Manager"
For filebeat:
Start-Service "Exabeam File Collector"
Stop-Service "Exabeam File Collector"
Restart-Service "Exabeam File Collector"
For winlogbeat:
Start-Service "Exabeam Event Collector"
Stop-Service "Exabeam Event Collector"
Restart-Service "Exabeam Event Collector"
For gzipbeat:
Start-Service "Exabeam Gzip Collector"
Stop-Service "Exabeam Gzip Collector"
Restart-Service "Exabeam Gzip Collector"
Ensure your newly configured collector appears on the Collector Management page, and is correctly configured.
Navigate to Settings > Collector Management. Your collector should appear in the collectors list. Also, it should have data posted to the LAST Hour graph and the STATUS is Running….
|
Select the collector in the list to access the Collectors Details panel, showing performance and collector configuration. Ensure parameters match the collector you configured.
|
Install Exabeam Linux and Ubuntu Log Collectors
Follow the steps below to install individual log collectors on Linux and Ubuntu. This will install Exabeat (the Collector Manager) and File Collector.
Untar the collectors.tar.gz package. One option you can use is tar -xvf collectors.tar.gz.
Install all or individual log collectors using the commands below. The "-t" parameter controls which beats are being installed.
To install all beats, run the following command for SaaS and on-premises deployments.
For cloud-delivered:
sudo ./install-exabeam-collector.sh -a Y -kh {SC_HOST:KAFKA_PORT}
-s https://{SC_HOST}:8484 -c {FULL_CERTIFICATE_PKG_PATH}
For on-premises:
sudo ./install-exabeam-collector.sh -a Y -kh {KAFKA_HOST:KAFKA_PORT} -s https://{DL_HOST}:8484 -c {FULL_CERTIFICATE_PKG_PATH}
To install file collectors only, run the following command:
For cloud-delivered:
sudo./install-exabeam-collector.sh -a Y -kh {SC_HOST:KAFKA_PORT} -s
https://{SC_HOST}:8484 -c {FULL_CERTIFICATE_PKG_PATH} -t "filebeat"
For on-premises:
sudo ./install-exabeam-collector.sh -a Y -kh {KAFKA_HOST:KAFKA_PORT} -s
https://{DL_HOST}:8484 -c {FULL_CERTIFICATE_PKG_PATH} -t "filebeat"
To install Gzip collectors only, run the following command:
For cloud-delivered:
sudo ./install-exabeam-collector.sh -a Y -kh {SC_HOST:KAFKA_PORT} -s https://{SC_HOST}:8484 -c {FULL_CERTIFICATE_PKG_PATH} -t "gzipbeat"For on-premises:
sudo ./install-exabeam-collector.sh -a Y -kh {KAFKA_HOST:KAFKA_PORT} -s https://{DL_HOST}:8484 -c {FULL_CERTIFICATE_PKG_PATH} -t "gzipbeat"
Optionally, you can set only IP address or DNS hostname for Data Lake and Kafka if they are on the same server machine with default ports.
For cloud-delivered:
sudo ./install-exabeam-collector.sh -a Y -S {SC_HOST} -c {FULL_CERTIFICATE_PKG_PATH} -t "{collector type}"For on-premises:
sudo ./install-exabeam-collector.sh -a Y -S {DL_HOST} -c {FULL_CERTIFICATE_PKG_PATH} -t "{collector type}"
The collector(s) are now installed and the Exabeam Log Collector services are running automatically.
Manually Start, Stop, or Restart Exabeam Linux and Ubuntu Log Collector Services
Use the following commands to start, stop, and restart the services manually:
For CentOS 7.x and 8.x, RedHat 7.x and 8.x, and Ubuntu 18.04 and 20.04
For exabeat managing filebeat:
sudo systemctl start exabeam-file-log-manager
sudo systemctl stop exabeam-file-log-manager
sudo systemctl restart exabeam-file-log-manager
For filebeat:
sudo systemctl start exabeam-file-collector
sudo systemctl stop exabeam-file-collector
sudo systemctl restart exabeam-file-collector
For exabeat managing gzipbeat:
sudo systemctl start exabeam-gzip-log-manager
sudo systemctl stop exabeam-gzip-log-manager
sudo systemctl restart exabeam-gzip-log-manager
For gzipbeat:
sudo systemctl start exabeam-gzip-collector
sudo systemctl stop exabeam-gzip-collector
sudo systemctl restart exabeam-gzip-collector
For CentOS 6 and RedHat 6
For file-exabeat:
sudo service exabeam-file-log-manager start
sudo service exabeam-file-log-manager stop
sudo service exabeam-file-log-manager restart
For filebeat:
sudo service exabeam-file-collector start
sudo service exabeam-file-collector stop
sudo service exabeam-file-collector restart
For exabeat managing gzipbeat:
sudo service exabeam-gzip-log-manager start
sudo service exabeam-gzip-log-manager stop
sudo service exabeam-gzip-log-manager restart
For gzipbeat:
sudo service exabeam-gzip-collector start
sudo service exabeam-gzip-collector stop
sudo service exabeam-gzip-collector restart
Configure Exabeam Data Lake Log Collectors
Once the collectors have been successfully deployed on the system, each collector must be started. Collector configuration is done through the Data Lake user interface.
Note
Screenshots are for illustrative purposes only and should not be referenced for configuration details.
Log on to Data Lake.
Click the settings icon at the bottom of the left-hand toolbar.

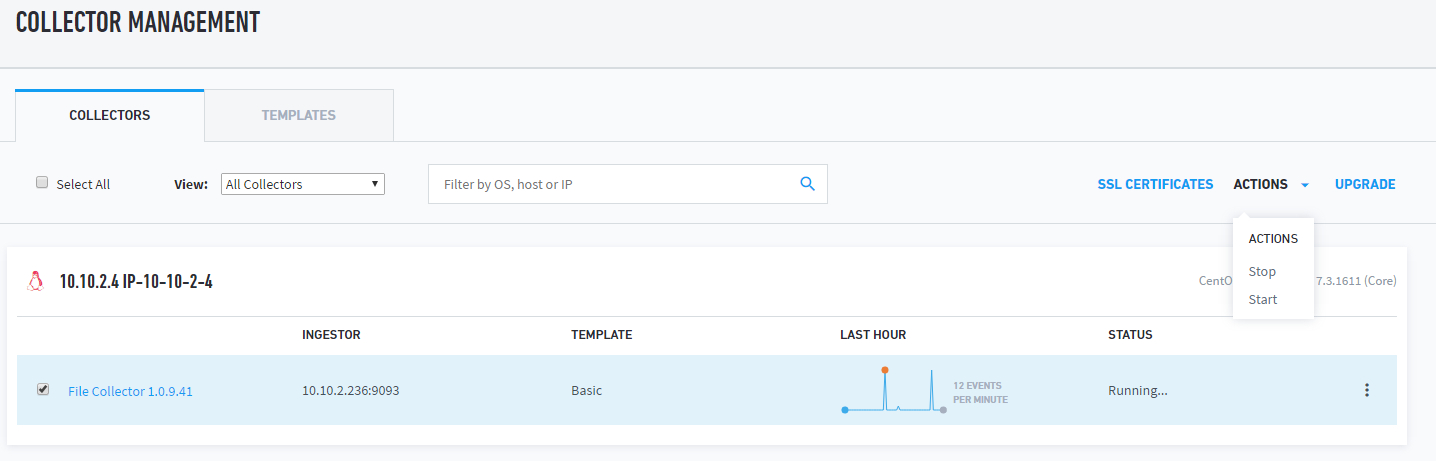
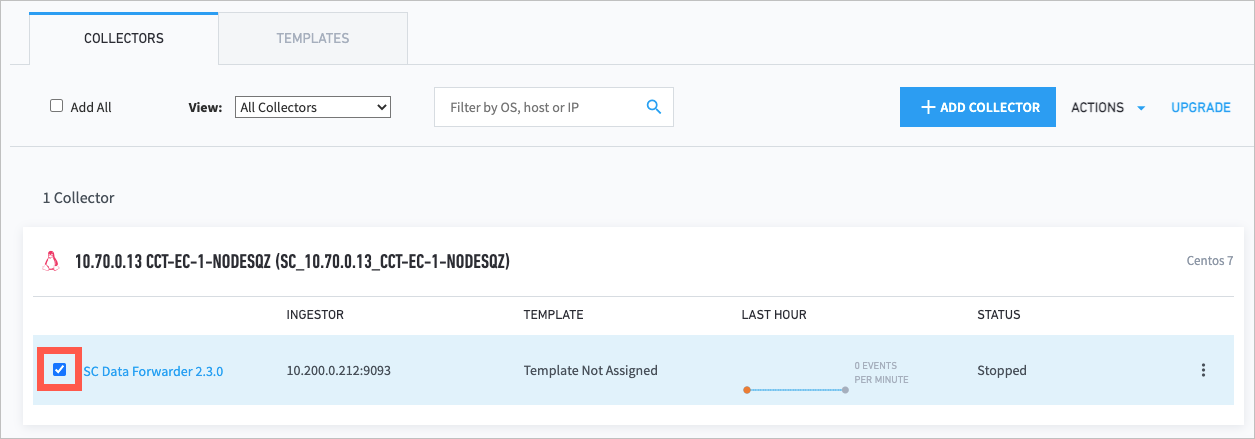
Under the Collector Management tile select Collectors. The Collector Management page will list all of your collectors and give an overall look at the status of each one.
The first time a user accesses this page the Template status will read 'Template Not Assigned'. Once a collector is configured, the Template status will display the configured template name. For more information on templates, see Templates.
Get to Know the Data Lake Log Collector Details Panel
The Collector Details panel can be accessed by clicking on the collector's title, the 'Template not Assigned' text when applicable, and the vertical ellipses to the right of each collector. Users can edit agent configuration information from here and view a summary of the collector health.
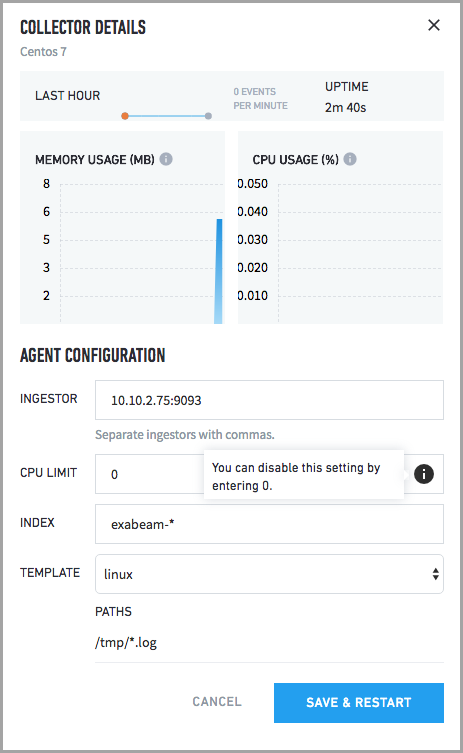 |
Ingestor – This is the IP:PORT of the Data Lake Site Collector node where this collector is gathering data. If your deployment contains multiple Data Lake Site Collector nodes, add the IP address of each node to this field as a comma-separated list.
Index – The name of the index where the data collected by this collector is stored. This cannot be changed.
Template – This shows the template that is applied to the collector. The template list will be pre-filtered to show only the template types that can be applied to the selected collector.
In order for any configuration changes to take effect, you must click SAVE & RESTART.
Limit Collector CPU Usage
Administrators can configure the CPU usage of the Data Lake collectors. In cases where the collectors are consuming CPU resources that are needed for other services, the collector resources can be throttled.
The configuration is supported on RHEL 7 and Centos 7 on systems where the systemd service manager version is 213 and above. If the system is incompatible, an error will be shown.
Note that limiting the collector's CPU usage might impact the ability of the collector to send high events per second. In extreme cases it is possible for logs to be lost if the collector is processing them at a rate that is less than the log retention rate.
To set a CPU LIMIT, navigate to Settings > Collector Management > Collectors. Select the vertical ellipsis drop-down menu of the collector you'd like to edit and click Collector Details.
 |
Start Exabeam Data Lake Log Collectors
There are two methods for starting collectors:
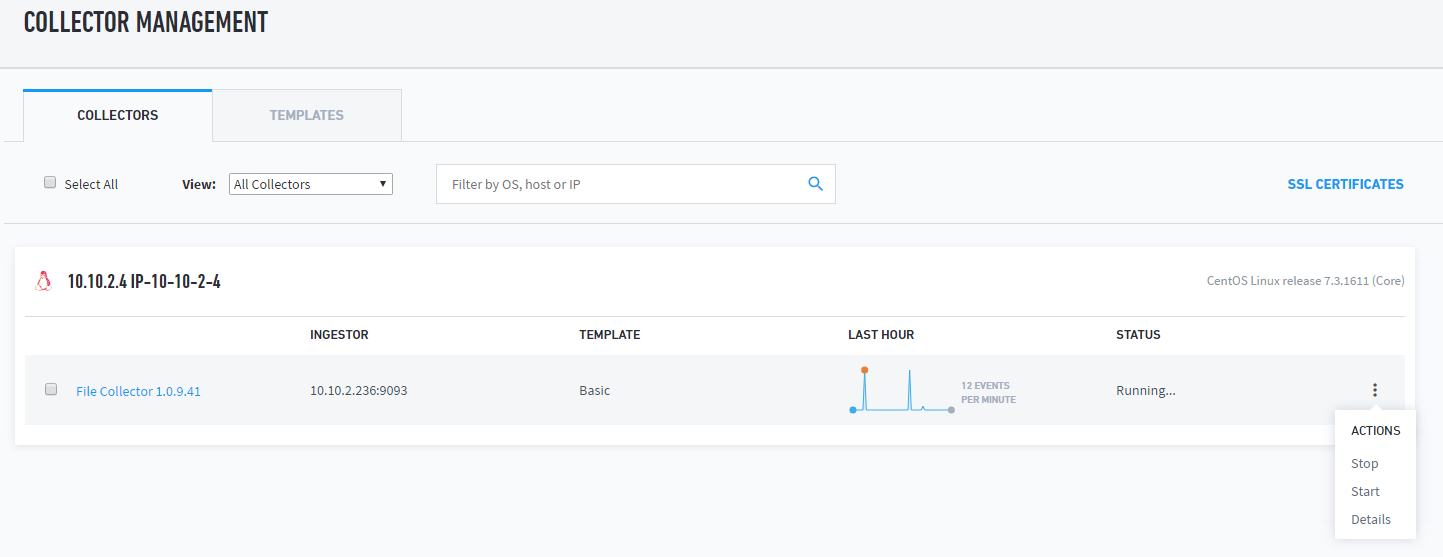
Individually – Selecting the vertical ellipsis to the right gives you the options to Start or Stop the collector as well as open a Details panel.
Grouped – Select the check box to the left of each collector that you would like to start. This will activate an Actions menu at the top right of the page:
Exabeam Data Lake Log Collector Templates
While collectors can be configured individually it is likely that in large environments the same configuration will be used for a set of collectors. For example, an administrator would set the same configuration for collecting logs from all Windows Domain Controllers or all Unix Servers. Assigning a configuration to a set of multiple collectors is defined through templates.
Create an Exabeam Data Lake Log Collector Template
To create a template, navigate to Settings > Collector Management > Collectors. You will arrive at the Collector Management page. Select the Templates tab to see a list of your existing templates. If you have not yet created any templates, this page will be empty.
Select Create Template at the top right. This will open the template creation menu:
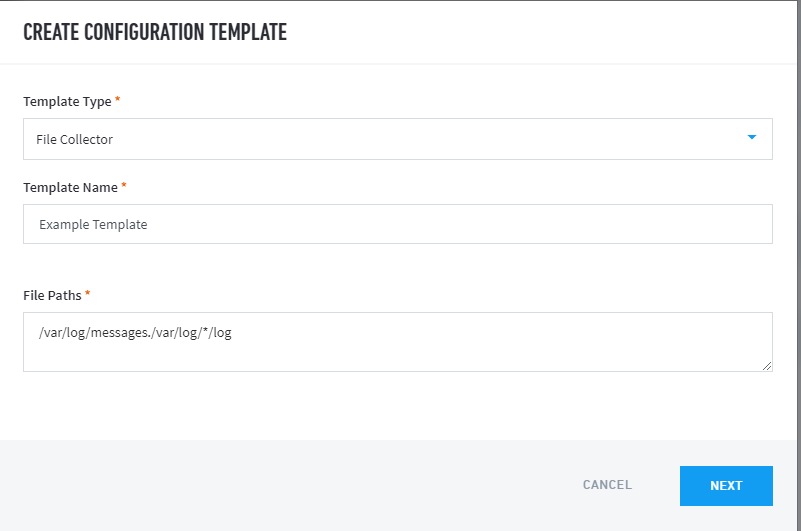 |
Name your collector and choose a service type.
File /Gzip Collectors: Installed on Windows or Linux hosts
As in the image below, you will be expected to list files or directories to monitor (e.g., /
var/log/messages, /var/log/*.log).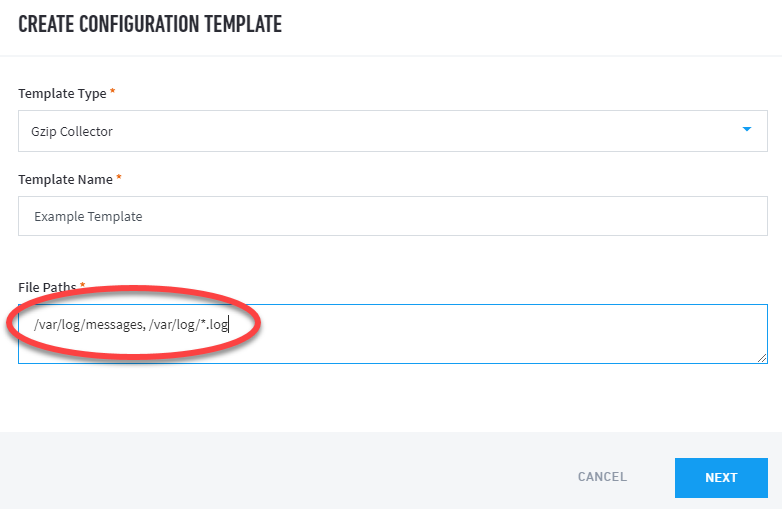
Note
For Gzip collectors, you must enter a list of Gzipped files (e.g.,
/var/log/*.gz) or directories that contain only Gzipped files. This is because Gzipbeat processes each file if finds as Gzipped file and will try to unzip them.
Click Next.
Optionally, apply the template to servers. The left panel lists all of the available collectors; clicking a server will add it to the right panel of selected servers.
Click Save & Restart to save the template. If you have placed any collectors in the Selected Servers panel then all of those collectors will have the template applied to them and they will also be restarted. The restarting process is necessary when a new template has been applied to a collector.
Here is a Windows DHCP configuration example:
DHCP service can have several
*.logfiles in\\Windows\System32\dhcpfolder which DHCP service needs exclusive access to these files:DhcpSrvLog-Mon.log DhcpV6SrvLog-Mon.log j50.log j50tmp.log
If a filebeat collector is started with the template
*.log, it will lead to file access conflicts and generate DHCP service errors. The correct configuration template is\\Windows\System32\dhcp\<dhcp_service>*.log.
Windows Log Collector: Installed on Windows hosts
For collectors installed on Windows hosts, select
Windows Event Collectoras the Template Type. In the Windows Log Category section, select log and event codes categories to be collected.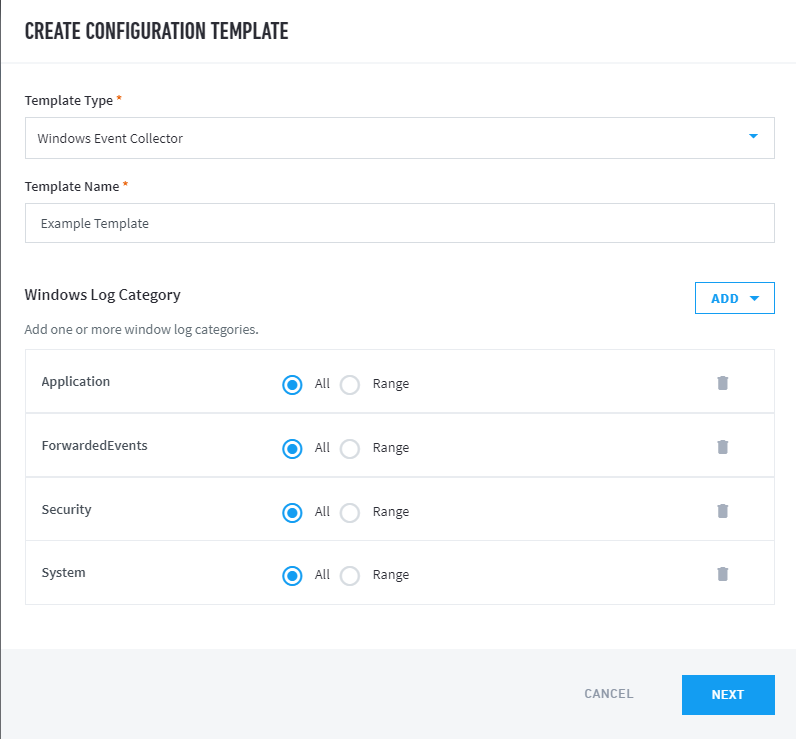
You can select all of the logs or alternatively the value is a comma-separated list. The accepted values are individual event IDs to include (e.g. 4624), or a range of event IDs to include (e.g. 4700-4800).
Note
If you specify more than 22 individual event IDs to include, Windows will prevent Data Lake from reading the event log because it limits the number of conditions that can be used in an event log query. Therefore use ranges wherever possible.
Click Next.
Optionally, apply the template to servers. The left panel lists all of the available collectors; clicking a server will add it to the right panel of selected servers.
Click Save & Restart to save the template. If you have placed any collectors in the Selected Servers panel then all of those collectors will have the template applied to them and they will also be restarted. The restarting process is necessary when a new template has been applied to a collector.
|
Upgrade Exabeam Data Lake Log Collectors
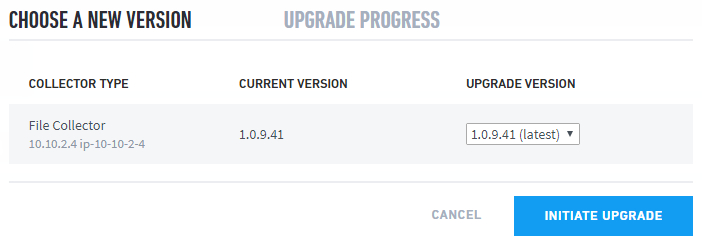
A collector (or a set of collectors of the same type) can be upgraded through the UI. Navigate to the Collector Management Page from the Settings Page and select a collector (or group of collectors). The option to Upgrade will appear in the upper right corner.
|
The upgrade process will show the deployment server, the current version of the collector being upgraded, and the version that the collector will be upgraded to. The upgrade process might take a few minutes; when it is complete, the status on the Collector Management Page will indicate a successful or failed upgrade.
 |
Uninstall Exabeam Data Lake Log Collectors
This will uninstall the services created for the Collector Manager (Exabeat) and the paired collector, as well as remove the collector folder all together.
Note
After a log collector is uninstalled, it may continue to be listed on the Collector Management page in the Data Lake application until it has been inactive for 15 days. If a record of the collector is still displayed on the page after 15 days, it can be manually removed. See Remove an Uninstalled Collector from the Collector Management Page.
Uninstall Exabeam Windows Log Collectors via PowerShell
Run the following command to uninstall the Exabeam Collector:
cd PATH_TO_EXACOLLECTOR_INSTALLER
.\uninstall-exabeam-collector.ps1

# uninstall a particular collector
.\uninstall-exabeam-collector.ps1 -agentType "AGENT_TYPE"

# uninstall collector regardless deregistration failure
.\uninstall-exabeam-collector.ps1 -force

# get help menu of the uninstallation script
Get-Help .\uninstall-exabeam-collector.ps1 -full
Uninstall All Exabeam Windows Log Collectors via MSI Package
Follow the steps below to uninstall all log collectors using MSI package for Windows. You can also uninstall collectors using on Windows via PowerShell.
Run the Data Lake Collectors Setup .MSI file.
Click Next.
Click Remove, and then click Next.
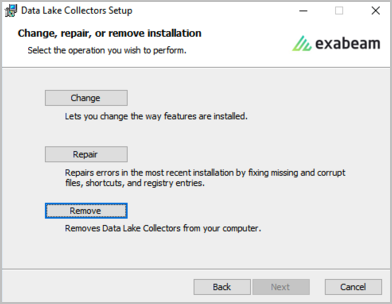
Click Remove to initiate uninstallation.
Click Yes to allow uninstallation.
Allow the installation to complete, and then click Finish.
Verify the absence of collector(s) at Settings > Data Lake Collector Manager.
Uninstalling Exabeam Data Lake Log Collectors on Windows via MSI Silent Mode
Data Lake supports silent (background) mode installations for MSI collectors and certificates packages. You must have administrator permissions to run the commands.
To uninstall collectors in silent mode:
msiexec /x C:\WIX_Test\ExabeamCollectors.msi /qn
Verify the presence or absence of collectors at Settings > Data Lake Collector Manager.
Uninstall Exabeam Data Lake Log Collectors on Linux & Ubuntu
Run the following command to uninstall the Exabeam Collector. The “-t” parameter controls which log collectors are being uninstalled.
CentOS/RedHat 7.x+ and Ubuntu 14+
cd PATH_TO_EXACOLLECTOR_INSTALLER
sudo ./uninstall-exabeam-collector.sh
sudo ./uninstall-exabeam-collector.sh -t AGENT_TYPE
sudo ./uninstall-exabeam-collector.sh -f # force to uninstall regardless of deregistration failure
Remove an Uninstalled Collector from the Collector Management Page
After a log collector is uninstalled, it may continue to be listed on the Collector Management page until it has been inactive for 15 days. If a record of the collector is still displayed on the page after 15 days, it can be manually removed.
Note
This procedure does not uninstall or deactivate collectors. It should only be carried out on collectors that have already been uninstalled for more than 15 days.
Navigate to Settings > Collector Management > Collectors.
Select the checkbox for the collector that you want to remove.
From the Actions drop-down menu, click Remove.
From the Remove Collectors dialog, click Remove.
If the collector has been uninstalled for more than 15 days, the collector is removed from the Collectors Management page. If the collector has not been uninstalled for more than 15 days, the following message displays: "The agent cannot be removed at this time because it has been active within the last 15 days."