Configure Pre-Built Rules via a Context Table
When you use a context table to configure a pre-built Attack Surface Insights rule, the context table is leveraged to tag entities in your environment with the appropriate labels and security criticality. This option reduces rule maintenance because you can modify the context table to pull users or devices within specific groups or OUs.
Before beginning the steps below, make sure you have completed the necessary prerequisite of confirming that Active Directory or Microsoft Entra ID context tables, with source user and device data, exist in your environment. For more information, see Confirm Source Context Tables for Rule Conditions in the Prerequisites.
When you have confirmed the existence of the necessary user and device source context tables, you must create specific custom context tables that will filter data from the source tables. The chart below lists the required tables, and the information needed to create them, in Context Management. For more information, see Working with Filtered Context Tables.
Context Table Name | Context Table Type | Key Column | Context Table Filter Condition |
|---|---|---|---|
Privileged User | Key Only (single column) | Primary Login (Email Format) |
|
Service Accounts | Key Only (single column) | Primary Login (Email Format) |
OR
|
Critical Devices | Key Only (single column) | Hostname |
OR
NoteA filtered table for critical devices will work only if the critical servers in your environment are included in your OU. Alternately, create a single-column custom context table, that is not connected to another source. The single column should be named Hostname and populated manually with critical device hostnames. |
Domain Controllers | Key Only (single column) | Hostname | For AD: For Microsoft Entra ID: |
To configure a rule using a context table:
On the New-Scale Security Operations Platform home page, navigate to Security Management column and click the Attack Surface Insights tile.
At the top of the page, select the tab for a specific type of entities in your environment: Users or Devices.
Click Set Rules in the top right corner. The Rules panel opens and displays the existing rules.
Identify the rule you want to configure with new conditions. Click the Options menu (
 ) on the right side of the rule and select Edit. An Edit Rule dialog box opens.
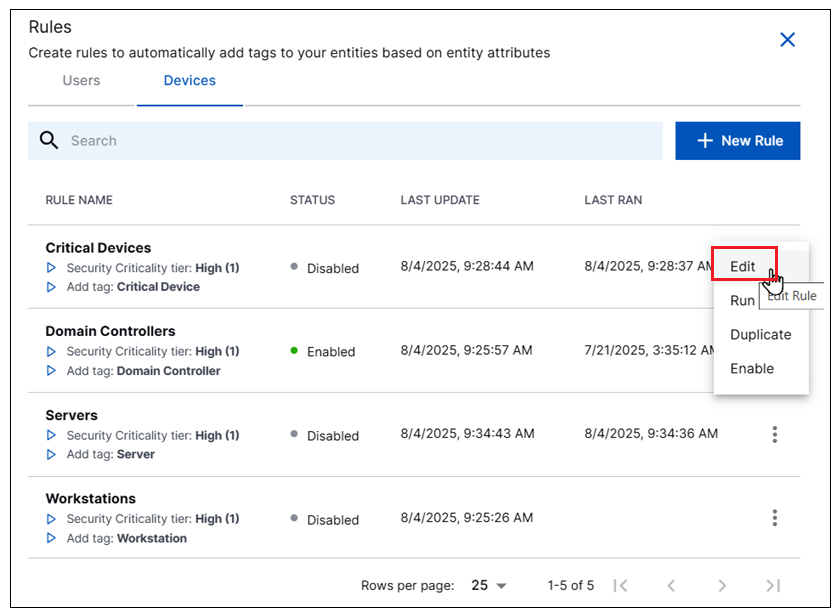
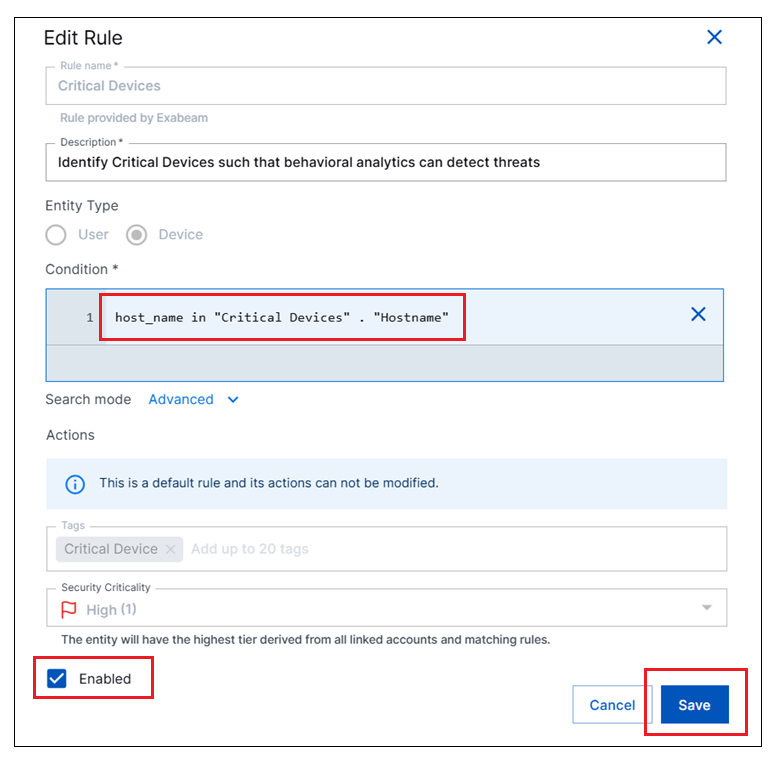
In the dialog box, do the following:
Under the Condition field, select the Advanced option for Search mode.
In the Condition field, enter a query that leverages one of the filtered context tables you created. The query must identify the table and the column in the following format:
<field> in "<table_name>" . "column_name>"The chart below lists the rule condition for each of the required filtered context tables:
Context Table
ASI Rule Condition
Privileged User
email_address in "Privileged Users" . "Primary Login (Email Format)"Service Accounts
email_address in "Service Accounts" . "Primary Login (Email Format)"Critical Devices
host_name in "Critical Devices" . "Hostname"Domain Controllers
host_name in "Domain Controllers" . "Hostname"Click the Enabled check box to enable the rule.
Click Save to apply the modified rule logic.