- Introduction to Context Management
- Onboarding a Context Table
- Custom Context Tables
- Create a Custom Context Table by Importing a CSV File
- Create a Custom Context Table Using the Add Custom Option
- Working with Filtered Context Tables
- View and Interact with a Custom or Filtered Context Table
- View the Details Panel for a Custom or Filtered Context Table
- Edit the Configuration of Custom or Filtered Context Tables
- Active Directory Context Tables
- Prerequisites to Onboard an Active Directory Context Table
- Create an Active Directory Context Table
- View and Interact with an Active Directory Context Table
- View the Details Panel for an Active Directory Context Table
- Edit the Configuration of an Active Directory Context Table
- Default User Attribute Mapping for Active Directory
- Default Device Attribute Mapping for Active Directory
- Anomali Context Tables
- Prerequisites to Onboard an Anomali Context Table
- Create an Anomali Context Table
- View and Interact with an Anomali Context Table
- View the Details Panel for an Anomali Context Table
- Edit the Configuration of an Anomali Context Table
- Default IP Attribute Mapping for Anomali
- Default Domain Attribute Mapping for Anomali
- CrowdStrike Context Tables
- Microsoft Entra ID Context Tables
- Prerequisites to Onboard a Microsoft Entra ID Context Table
- Create a Microsoft Entra ID Context Table
- View and Interact with a Microsoft Entra ID Context Table
- View the Details Panel for a Microsoft Entra ID Context Table
- Edit the Configuration of a Microsoft Entra ID Context Table
- Default User Attribute Mapping for Microsoft Entra ID
- Default Device Attribute Mapping for Microsoft Entra ID
- Okta Context Tables
- Recorded Future Context Tables
- Prerequisites to Onboard a Recorded Future Context Table
- Create a Recorded Future Context Table
- View and Interact with a Recorded Future Context Table
- View the Details Panel for a Recorded Future Context Table
- Edit the Configuration of a Recorded Future Context Table
- Default IP Attribute Mapping for Recorded Future
- Default Domain Attribute Mapping for Recorded Future
- STIX/TAXII Context Tables
- Prerequisites to Onboard a STIX/TAXII Context Table
- Create a STIX/TAXII Context Table
- View and Interact with a STIX/TAXII Context Table
- View the Details Panel for a STIX/TAXII Context Table
- Edit the Configuration of a STIX/TAXII Context Table
- Default IP Attribute Mapping for STIX/TAXII
- Default Domain Attribute Mapping for STIX/TAXII
- Custom Context Tables
- Add Data to an Existing Context Table
- Using Context Data in Downstream Applications
- Pre-Built Context Tables
- Context Management APIs
- Troubleshooting Context Management
- Refresh Rates for Context Tables
Working with Filtered Context Tables
A filtered context table allows you to create a single table that incorporates data from one or more source context tables. You can filter the data in the new filtered table by defining conditions for the connected source tables. In this way, you can create smaller tables which can be leveraged in downstream processes to focus on specific subsets of your data. If data in the source context tables is updated, data in the filtered context table is also updated.
Tip
Example: You have two Active Directory context tables processing user data and you want to find all of the events that were performed by VPN users. You can create a filtered context table with both Active Directory context tables as its source. The new context table aggregates the users from both Active Directories into a single table. You can then configure a condition on the new table to filter for VPN users only. The new filtered context table can then be used in downstream products like Search, Correlation Rules, and Dashboards.
Note
Data in filtered context tables is refreshed based on the refresh rate of the connected source context tables.
When creating a filtered context table, the data from the connected sources is merged together using intersectional logic. The new context table can have only one key attribute, so if there is a difference in keys between the connected sources, the key is assigned based on the first source context table added.
To create a filtered context table, follow the procedure to Create a Custom Context Table Using the Add Custom Option. When you reach Step 11 in the procedure, follow the steps below to define the filter conditions you want to use to extract data from the connected source tables. You can add conditions in one group or in multiple groups, depending on the complexity required.
To define filter conditions:
Click Attribute and select a field attribute you want to use as a filter.
Click Operator and select an option that filters the data in the Value field in a specific way. Options include:
Equals
Contains
Equals Ignoring Case
Starts With
Not Starts With
Not Equals
Note
When the
Not Starts Withor theNot Equalsoperators are used to define a condition, rows with empty or null values for the conditioned attribute in the parent table will be included in the filtered table.Click Value and enter the value a field should equal or contain in order to be displayed in the new table.
Example:

If you want to define another condition, click AND or OR, depending on how you want the next condition to be related to the first condition. Select an Attribute, Operator, and Value for the new condition.
You can continue adding conditions to the group. But if you started adding conditions with an OR relationship, each condition within the group must be an OR condition.
Example:

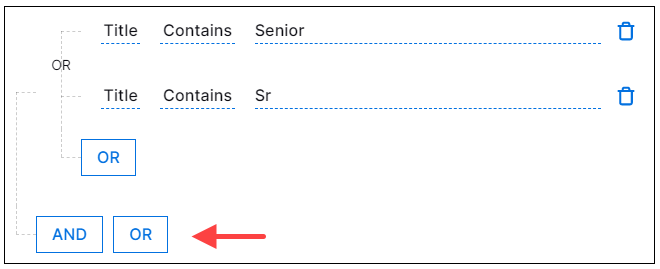
If you need a filter condition with a different logical relationship, you will need to start a new group. Click the AND or OR option below the first group of conditions. A new group is added to the filter conditions.
Example:

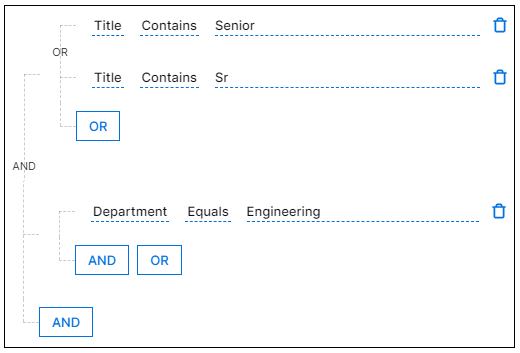
Select an Attribute, Operator, and Value for a new condition in the new group.
Example:

Continue adding conditions to the new group or add additional groups as needed. When you have defined all the necessary conditions, return to Create a Custom Context Table Using the Add Custom Option and continue with Step 12 .
