
- Connector Migration Overview
- Cloud Collectors Overview
- Navigate the Cloud Collectors UI
- Which Collector to Use?
- Hybrid Deployment Experience
- Supported Regions for Cloud Collectors
- Access the Cloud Collectors Service
- Set up a New Cloud Connectors Instance
- Early Access Cloud Collectors
- Armis Cloud Collector
- Armis Context Collector
- AWS Inspector Cloud Collector
- AWS Redshift Cloud Collector
- Cybereason Cloud Collector
- Google Workspace Context Cloud Collector
- OneLogin Cloud Collector
- Palo Alto Networks SaaS Security Cloud Collector
- Rest API Context Cloud Collector
- Symantec CloudSOC Cloud Collector
- Troubleshooting Cloud Collectors
Configure the Armis Context Collector based on the Rest API Context Collector
The Armis Context Collector collects context data from REST API endpoints from Armis. The collector offers configurable context data collection from REST API endpoints, streamlines log ingestion, and supports custom API integrations. The collector provides customizable parameters that include dynamic variables to allow you to tailor API requests. You can easily insert these parameters in request configurations to ensure compatibility with various vendor APIs. The multiple pagination strategies available for configuration enable you to choose the most suitable approach based on the vendor REST API.
Refer to the following sections for more details.
Understand Key Terminologies
This section includes more information about important terms or concepts used within the collector configuration page. Learning the essential definitions, roles, and relationships of critical terms will help you to seamlessly configure the REST API context collector.
Request Headers – Request headers provide metadata about the API request. The metadata includes information such as authentication details, content type, and caching preferences.
Request Parameters – In a REST API, these are values sent by the client to the API server as part of an HTTP request. These values are used for specifying or modifying the data being requested or submitted.
Request Methods (GET or POST) – These are the two most commonly used HTTP request methods. The GET request is used for retrieving data from the API server. The POST request is used for submitting data to the API server.
Pagination – It is the practice of dividing large datasets into smaller, manageable pages when retrieving data from an API. Pagination enables efficient data handling and provides a structured way to navigate between pages.
Response Body Attribute – It is used for extracting a value from the response body that identifies the next page of data to retrieve.
Response Header Attribute – Name(s) of attribute(s) in the response header that contain next-page information. It is used for extracting the next-page value from the response header.
Web-linking – Web-linking in response headers is commonly used for pagination by including Link headers with rel="next" and rel="prev". These headers help clients such as browsers, search engines, APIs to understand how to navigate between paginated resources efficiently. Refer to the following example of Pagination in Response Headers.
HTTP/1.1 200 OKLink: <https://example.com/page2>;; rel="next",<https://example.com/page0>;; rel="prev"
Timestamp Format – The format for the timestamp depends on the API you want to work with. APIs require timestamp to synchronize data, ensure accurate event ordering, or implement request validation. For example, you can send a request with a timestamp to an API that processes time-sensitive data.
Following are the widely used timestamp formats.
EPOCH MSEC: Represents the timestamp in epoch milliseconds. For example, 1738231737108 corresponds to Thursday, January 30, 2025 10:08:57.108 AM
EPOCH SEC: Represents the timestamp in epoch seconds. For example, 1738231737 corresponds to Thursday, January 30, 2025 10:08:57.000 AM
CUSTOM: Represents a user-defined timestamp format. For example, yyyy-MM-dd'T'HH:mm:ss.SSS'Z'; Thursday, January 30, 2025 10:08:57.108 AM would be represented as 2025-01-30T10:08:57.108Z.
Auth (Authentication Type) – Authentication type for authenticating the log source. The supported authentication types are: Basic, JWT, OAuth 2.0, and Static Token.
Use Dynamic Variables
The REST API Cloud Collector supports use of variables to configure the collector. Variables are placeholders for different values in the API request that need to be computed for every API request. The collector supports the following types of variables.
Predefined variables
Custom variables
Predefined Variables
While configuring the collector, you can use the variables that are are predefined by Exabeam. Refer to the following example to know more about the usage of predefined variables.
For the Static Token authentication type, click the copy icon to copy the variable reference of this field ${authentication.staticToken}. Use this value in Authorization Expression for every API request.
Static Token –
f408018a-38c7-467c-9c7e-0ab77df12345Authorization Expression –
Bearer ${authentication.staticToken}Value computed during evaluation –
Bearer f408018a-38c7-467c-9c7e-0ab77df51495
Note
The copy icon next to each variable lets you to quickly copy its reference name to your clipboard for later use and helps you add variables effortlessly and minimize configuration errors.
Custom Variables
The custom variables are user-defined variables. These variables are evaluated for every API request and their values are determined based on the response of the previous API request.
Refer to the following screenshot for an example of custom variable.
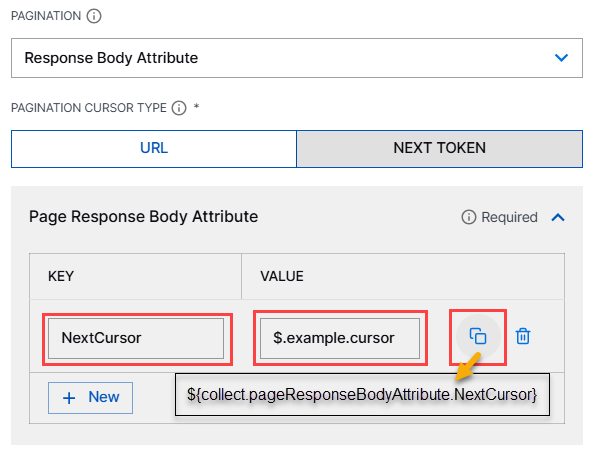
Note
The copy icon next to each variable lets you to quickly copy its reference name to your clipboard for later use and helps you add variables effortlessly and minimize configuration errors.
Refer to the following example of usage of custom variables in pagination.
Vendor API | Pagination Configuration | API Call |
|---|---|---|
Base Request GET https://example.com/events?event_start_time=${startTime}&event_end_time=${endTime}Sample API Response {
"data": [
{
"event": "login",
"timestamp": "2025-01-30T00:00:00Z",
...
}
],
"pagination": {
"nextCursor": "fdjbrt45834h23ebfe23843583eeu",
"totalItems": 1
}
}The vendor provides a cursor handle/pointer in the API response which you can use for fetching the next page of results from the API. In the example, For this example, assume that the Vendor API requires you to send the cursor as an HTTP Request Parameter called cursor in the API request to get the next set of results. Refer to the Pagination configuration column for configuration details. |
| With this pagination configuration, the API call initiated by the collector appears as follows.
|
Set up the Armis Context Collector
Set up the Armis Context Collector to continuously ingest data from API that the you want to configure.
Before you configure the Armis Context Collector, ensure that you complete the prerequisites.
Log in to the New-Scale Security Operations Platform with your registered credentials as an administrator.
Navigate to Collectors > Cloud Collectors.
Click New Collector.
Click REST API Context.
Specify a name for the context collector.
Select the data source Devices.
Proceed to configure request, pagination, authentication, processing, and settings.
(Optional) SITE – Select an existing site or to create a new site with a unique ID, click manage your sites. Adding a site name helps you to ensure efficient management of environments with overlapping IP addresses.
By entering a site name, you associate the logs with a specific independent site. A sitename metadata field is automatically added to all the events that are going to be ingested via this collector. For more information about Site Management, see Define a Unique Site Name.
(Optional) TIMEZONE – Select a time zone applicable to you for accurate detections and event monitoring.
By entering a time zone, you override the default log time zone. A timezone metadata field is automatically added to all events ingested through this collector.
A cloud collector determines whether Daylight Saving Time (DST) is active based on the current date and automatically adjusts the time by adding or subtracting one hour, ensuring more accurate time reporting.
To confirm that the New-Scale Security Operations Platform communicates with the service, click Test Connection.
Click Install.
A confirmation message informs you that the new Cloud Collector is created.
Configure the API Request
In the Request tab, specify details for request to be sent the REST API server.
REQUEST URL – Enter the URL expression for data collection. For example, https://abc.armis.com/api/v1/search/?aql=in:devices&length=1000&from=${collect.pageResponseBodyAttribute.from}
Ensure that you add the pagination query parameter at the later part of the URL.
REQUEST METHOD – Select the API request method: GET to retrieve data from a server through an API.
Configure Pagination
Refer to the following description for each of the pagination options.
PAGINATION – Select Response Body Attribute. Refer to the vendor specific REST API documentation to determine the pagination type you need.
PAGINATION CURSOR TYPE – Select the pagination cursor type NEXT TOKEN.
URL (PATH TO CURSOR KEY) – This option is not applicable.
NEXT TOKEN (Page Response Body Attribute) – Select this option if the vendor REST API provides a token or a handle to use for fetching the next set of results. The key is a custom variable name of your choice and the value is the JSON path to the attribute.
KEY – Enter
from.VALUE – Enter
$.data.next.
Note
Click the copy icon next to each variable to quickly copy its reference name to your clipboard for later use. Using this icon you can add variables effortlessly and minimize configuration errors.
Refer to the Configure Event Processing and Additional Settings section to know how to specify a JSON path.
TIMESTAMP FORMAT – Select the CUSTOM format for the timestamp to send a request to the API. For more information about the timestamp format, refer to the Understand Key Terminologies section.
Configure Authentication
In the AUTH section, select one of the following authentication types based on what the API that you want to integrate supports.
AUTHENTICATION TYPE – Select OAuth 2.0.
LOGIN URL – Enter the login URL of the access token. For example, https://abc.armis.com/api/v1/access_token/, in which abc.armis.com is a host name.
Authentication Type | Description |
|---|---|
None | Retain the default option None if you do not want to use authentication. |
OAuth 2.0 | Select to enter URL, headers and parameters for authentication via the OAuth 2.0 protocol.
|
Configure Event Processing and Additional Settings
In the Processing tab, specify the following details.
PATH TO CONTEXT – Specify a JSON Path to individual events within the collection HTTP response. The JSON Path determines the property within the response body that contains events that you want the collector to collect. Retain the value $.data.results[*].
The collector retrieves events from the Vendor API JSON response based on the JSON Path you specify. Ensure that the JSON Path directs to the desired events in the API response. Check the Events Extracted section in the Test Connection results to confirm that the JSON Path is fetching the correct events.
COLLECTION TIMEOUT – In the SETTINGS tab, for COLLECTION TIMEOUT, enter the maximum execution time for the data collection job, in seconds.