Migrate Custom Context Tables
 |
Expected Duration: | 5 to 10 minutes per context table |
Access Required: |
|
In Data Lake, context tables are sometimes included in query searches, correlation rules, and dashboard visualizations. The same is true for the New-Scale Security Operations Platform, where context tables are managed in a centralized New-Scale Context Management service. If any of your Data Lake queries rely on data in a custom context table, it makes sense to migrate that content before migrating the saved searches, correlation rules, or dashboard visualizations.
Tip
Only migrate custom context tables from Data Lake. In New-Scale Context Management, threat intelligence tables are already available as built-in context tables (one table for domains and another for IP addresses). Context tables that process data from other sources, such as identity providers, must be created in the Context Management service itself. For more information see Onboarding a Context Table in the Context Management Administration Guide.
If you need to migrate a Data Lake search or correlation rule query that includes a threat intelligence table, you can replace the use of the threat table by using lookup fields that are enriched with threat intelligence context data. For example, search for malicious content using is_ioc:true. Or search for specific threat intelligence data with ioc_types or ioc_fields. For more information, see Enriched Threat Intelligence Field Lookup in the Context Management Administration Guide.
The following diagram provides a high level overview of the import/export process.
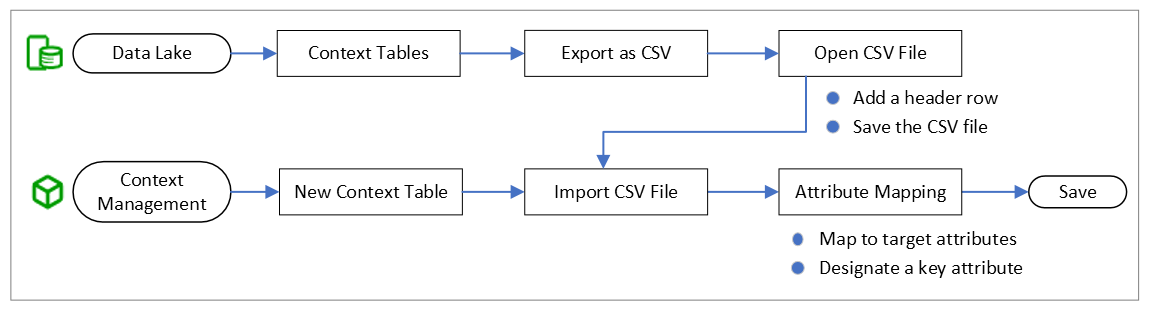
To migrate a custom context table from Data Lake to Context Collectors, follow the export/import steps below.
Log into Data Lake and navigate to Settings > Context Management > Context Tables. Then open a specific custom context table.
Above the open table, click Export as CSV. The table downloads in a CSV format.
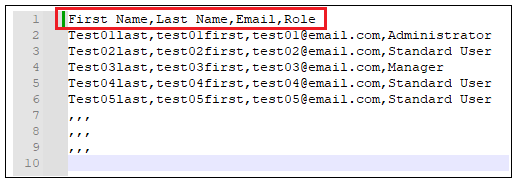
Open the CSV file and add a row at the top that will serve as a header row. Enter a header row value for each column and save the changes to the CSV file. You must complete this step before you import the CSV file to New-Scale Context Management.
Log into the New-Scale Security Operations Platform, locate the Security Management tab, and select the Context Management tile. The Context Management Overview tab opens.
In the top right of the Overview tab, click New Context Table and select the Import CSV option.
In the Import CSV dialog box, enter the context table name from Data Lakein the Context Table Name field, select a Context Type, and click Select File to upload the CSV file.
Click Review Mapping and do the following in the Review Attribute Mapping dialog box:
Add an attribute for each row in the Target Attributes column. You can select from existing attributes or add a custom attribute.
Click the key icon (
 ) next to one attribute to designate it as the key attribute for the context table.
For detailed information about this procedure, see Create a Custom Context Table by Importing a CSV File in the Context Management Administration Guide.
Click Review and review a preview of the first few entries in the table to ensure the data is being imported correctly.
Click Add Data. The CSV data is uploaded to the new context table.
Click View Your Table to open the new context table and view the imported data.