- Exabeam Site Collector
- Exabeam Site Collector Network Ports
- Exabeam Site Collector Specifications
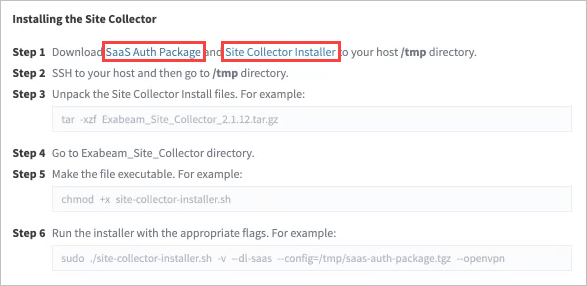
- Install Exabeam Site Collector
- Upgrade Exabeam Site Collector
- Advanced Exabeam Site Collector Customizations
- Supported Exabeam Site Collector Changes
- Configure Transport Layer Security (TLS) Syslog Ingestion
- Direct Kafka Input to Exabeam Site Collector
- Add a Secondary Syslog Destination
- Remove a Syslog Destination
- Filter Incoming Syslog Events in Exabeam Site Collector
- Filtering Outbound Logs in Exabeam Site Collector
- Metadata Collected by Site Collector and Supported Agents
- Add OpenVPN After Exabeam Site Collector Installation
- Supported Exabeam Site Collector Changes
- Troubleshoot for Exabeam Site Collector
- Scenario 1: Collector or its status does not appear in the console and no logs reach destination
- Scenario 2: Collector is healthy but no logs are transmitted or received
- Scenario 3: Exabeam Advanced Analyticsunable to pull LDAP data
- Scenario 4: Kafka Google Cloud Storage (GCS) collectors have not appeared on Data Lake
- Scenario 5: If logs are not uploaded to GCS where logs are not on Data Lake
- Scenario 6: Unable to accept incoming syslog, active directory context, Splunk logs, or Incident Responder integrations
- Scenario 7: Cannot send after transport endpoint shutdown
- Scenario 8: Too many arguments in command /tools/config.parser.sh
- Other scenarios
- Capture Site Collector Diagnostics Using Exabeam Support Package
- Install and Upgrade Exabeam Site Collector for On-premises and Legacy Deployments
- Prerequisites
- Install Site Collector for Exabeam Data Lake On-premises Deployments
- Installing Site Collector for Exabeam Advanced Analytics On-premises Deployments
- Upgrade Site Collector for Exabeam Data Lake On-premises Deployments
- Upgrade Site Collector for Exabeam Advanced Analytics On-premises Deployments
- Uninstall Exabeam Site Collector
- Migrate to the New-Scale Site Collectors Service
- A. Glossary of Terms
Install and Upgrade Exabeam Site Collector for On-premises and Legacy Deployments
Configure and gather information as outlined in this section before attempting to install or upgrade your site collector.
Prerequisites
Ensure your environment met all requirements before running a site collector installation. Please review prerequisites listed in Install Exabeam Site Collector in addition to the following:
Have the following information for all log sources that will send data to the site collector:
Product and vendor
Hostname and IP address
Network zone of the log source
Ingest method and access port
Log throughput capacity in events per second (EPS)
Log storage capacity in GB
Associated site collector
Routes through firewalls and proxies are not supported in on-premises deployments
On-premises Instructions by Deployment
Select the instructions that best matches your deployment environment:
Install Site Collector for Exabeam Data Lake On-premises Deployments
Installing Site Collector for Exabeam Advanced Analytics On-premises Deployments
Upgrade Site Collector for Exabeam Data Lake On-premises Deployments
Upgrade Site Collector for Exabeam Advanced Analytics On-premises Deployments
Install Site Collector for Exabeam Data Lake On-premises Deployments
For Data Lake in Appliance or Virtual Deployments Only
Follow these instructions for a fresh Exabeam Site Collector installation if your logs are to be sent to Exabeam Data Lake destination deployed on an appliance or virtual platform (excluding Exabeam SaaS Cloud).
Ensure your environment has met all requirements before running a site collector installation.
In Data Lake, navigate to Settings > Collector Management > Collectors.
Click
 to open the Collector Artifacts menu.
Download the Site Collector Auth Package and Site Collector Installation Package. These packages contain all required configurations and authentication data needed to access your SaaS tenant and installation package.
Use
scp(secure copy) to place the files in the/tmpdirectory of the site collector host. (For help with this command, runman scp.scp <source_host>:<directory>/<package_file> <site_collector>:<directory>/package_file>
Start a new terminal session using the an account with administrator rights. Initiate a screen session. This is mandatory and will prevent accidental termination of your session.
screen -LS [yourname]_[todaysdate]
Go to the
/tmpdirectory and unpack the installation package only.cd /tmp tar -xzf <install_filename>.tar.gz
Go to the
Exabeam_Site_Collectordirectory.cd Exabeam_Site_Collector
Make the files executable.
chmod +x site-collector-installer.sh
Run following installation commands:
sudo ./site-collector-installer.sh -v --dl-on-prem --config=/tmp/sc-auth-package.tgz
Once installation is complete, the prompt will return
Site collector installer complete.To verify that the site collector source has been installed, log into the Data Lake and navigate to Settings > Collector Management > Collectors to see the list of configured collectors.

You can also send a test message via syslog and confirm it arrived at the destination via Data Lake after several minutes:
echo "test message [date_time] from [hostname|host_ip]" | nc localhost 514
If your site collector does not appear in the list and the test message did not reach its destination, review the known common scenarios in Troubleshoot for Exabeam Site Collector that can be resolved immediately.
Installing Site Collector for Exabeam Advanced Analytics On-premises Deployments
Follow these instructions for a fresh Exabeam Site Collector installation if your logs are to be sent to Exabeam Advanced Analytics destination deployed on an appliance or virtual platform (excluding Exabeam SaaS). In this configuration, you will not be able to view the status or health of the site collector in the Advanced Analytics console.
Ensure your environment has met all requirements before running a site collector installation.
Download SaaS Site Collector installation files from the Exabeam Community.
Place the files in the
/tmpdirectory of the site collector host.Start a new terminal session using the an account with administrator rights. Initiate a screen session. This is mandatory and will prevent accidental termination of your session.
screen -LS [yourname]_[todaysdate]
Go to the
/tmpdirectory and unpack the downloaded file.cd /tmp tar -xzf <filename>.tar.gz
Go to the
Exabeam_Site_Collectordirectory.cd Exabeam_Site_Collector
Make the files executable.
chmod +x site-collector-installer.sh
Based on your expected load, execute one of the following installation commands:
Installing site collector without EPS limit
sudo ./site-collector-installer.sh -v --aa-on-prem --aa-listener=<listener_ip>:514
Installing site collector with EPS limit
sudo ./site-collector-installer.sh -v --aa-on-prem --aa-listener=<listener_ip>:514 --eps-limit=2048
Once installation is complete, the prompt will return
Site collector installer complete.Site collector operational checks must be run at the site collector host. You can send a test message via syslog and confirm it arrived at the destination, using:
echo "test message [date_time] from [hostname|host_ip]" | nc localhost 514
If no logs arrive at the destination after a few minutes, review the known common scenarios in Troubleshoot for Exabeam Site Collector that can be resolved immediately.
Upgrade Site Collector for Exabeam Data Lake On-premises Deployments
For Data Lake in Appliance or Virtual Deployments Only
The following instructions are for an Exabeam Site Collector upgrade if your logs are sent to Exabeam Data Lake deployed on Exabeam hardware or virtual platform (excluding Exabeam SOC Platform).
Ensure your environment has met all requirements before running a site collector upgrade.
In Data Lake, navigate to Settings > Collector Management > Collectors.
Click
to open the Collector Artifacts menu.Download the Site Collector Auth Package and Site Collector Installation Package. These packages contain all required configurations and authentication data needed to access your on-prem tenant and installation package.
Place the files in the
/tmpdirectory of the site collector host.Start a terminal session to the site collector and initiate a screen session.
screen -LS [yourname]_[todaysdate]
Go to the
/tmpdirectory and unpack the downloaded files.cd /tmp tar -xzf <filename>.tar.gz
Go to the
Exabeam_Site_Collectordirectory.cd Exabeam_Site_Collector
Make the files executable.
chmod +x site-collector-installer.sh
Run following upgrade commands:
sudo ./site-collector-installer.sh -v --dl-on-prem --upgrade --config=/tmp/sc-auth-package.tgz
To verify that the site collector source has been upgraded, log into the Data Lake and navigate to Settings > Collector Management > Collectors to see the list of configured collectors.
You can also send a test message via syslog and confirm it arrived at the destination via Data Lake after several minutes:
echo "test message [date_time] from [hostname|host_ip]" | nc localhost 514
If your site collector does not appear in the list and the test message did not reach its destination, review the known common scenarios in Troubleshoot for Exabeam Site Collector that can be resolved immediately.
Upgrade Site Collector for Exabeam Advanced Analytics On-premises Deployments
For Advanced Analytics in Appliance or Virtual Deployments, in Unmanaged Mode Only
The following instructions are for an Exabeam Site Collector upgrade if your logs are sent to Exabeam Advanced Analytics deployed on Exabeam hardware or virtual platform (excluding Exabeam SaaS Cloud).
Ensure your environment has met all requirements before running a site collector upgrade.
Download SaaS Site Collector installation files from the Exabeam Community.
Place the files in the
/tmpdirectory of the site collector host.Start a terminal session to the site collector and initiate a screen session.
screen -LS [yourname]_[todaysdate]
Go to the
/tmpdirectory and unpack the downloaded files.cd /tmp tar -xzf <filename>.tar.gz
Go to the
Exabeam_Site_Collectordirectory.cd Exabeam_Site_Collector
Make the files executable.
chmod +x site-collector-installer.sh
Based on your expected load, execute one of the following upgrade commands:
Upgrade site collector without EPS limit
sudo ./site-collector-installer.sh -v --aa-on-prem --upgrade --aa-listener=<listener_ip>:514
Upgrade site collector with EPS limit
sudo ./site-collector-installer.sh -v --aa-on-prem --upgrade --aa-listener=<listener_ip>:514 --eps-limit=2048
Site collector operational checks must be run at the site collector host. You can send a test message via syslog and confirm it arrived at the destination, using:
echo "test message [date_time] from [hostname|host_ip]" | nc localhost 514
If the test message did not reach its destination, review the known common scenarios in Troubleshoot for Exabeam Site Collector that can be resolved immediately.