- Exabeam Data Lake Architecture Overview
- Exabeam Product Deployment in On-premises or Virtual Environments
- Administrator Operations
- User Management
- Exabeam Data Lake Role-based Access Control
- Exabeam Data Lake Object-based Access Control
- Exabeam Data Lake Secured Resources Overview
- Third-Party Identity Provider Configuration
- Audit Log Management in Data Lake
- Common Access Card (CAC) Authentication
- Set Up LDAP Server
- Set Up LDAP Authentication
- Azure AD Context Enrichment
- Adding a User to Exabeam Data Lake
- User Password Policies
- User Engagement Analytics Policy
- Exabeam Threat Intelligence Service
- Threat Intelligence Service Prerequisites
- Connect to Threat Intelligence Service through a Proxy
- View Threat Intelligence Feeds
- Threat Intelligence Context Tables
- View Threat Intelligence Context Tables
- Assign a Threat Intelligence Feed to a New Context Table
- Create a New Context Table from a Threat Intelligence Feed
- Using Threat Intelligence Service with Data Lake
- Check ExaCloud Connector Service Health Status
- Index Management
- Parser Management
- Forwarding to Other Destinations
- Syslog Forwarding Management in Exabeam Data Lake
- Syslog Forwarding Destinations
- Configure Log Forwarding Rate
- How to Forward Syslog to Exabeam Advanced Analytics from Exabeam Data Lake
- How to Forward Syslog from Exabeam Data Lake to Non-Exabeam External Destinations
- Exabeam Data Lake Selective Forwarding using Conditions
- How to Configure Exabeam Data Lake Log Destinations for Correlation Rule Outcomes
- Forward Exabeam Data Lake Incident to Exabeam Incident Responder
- Syslog Forwarding Management in Exabeam Data Lake
- Cluster Operations
- Cross-cluster Search in Exabeam Data Lake
- Prerequisites for Exabeam Data Lake Cross-cluster Search
- Remote Cluster Management for Exabeam Data Lake Cross-cluster Search
- Register a Remote Cluster in Exabeam Data Lake for Cross-cluster Search
- Exabeam Data Lake Cross-cluster Health Monitoring and Handling
- How to Enable/Disable/Delete Exabeam Data Lake Remote Clusters for Cross-cluster Search
- Exabeam Data Lake Remote Cluster Data Access Permissions for Cross-cluster Search
- System Health Page
- A. Technical Support Information
- B. List of Exabeam Services
- C. Network Ports
- D. Supported Browsers
Administrator Operations
Exabeam Licenses
Exabeam products require a license in order to function. These licenses determine which Exabeam products and features you can use. You are not limited by the amount of external data you can ingest and process.
There are multiple types of Exabeam product licenses available. Exabeam bundles these licenses together and issues you one key to activate all purchased products. For more information on the different licenses, see Types of Exabeam Product Licenses.
License Lifecycle
When you first install Exabeam, the installed instance uses a 30 day grace period license. This license allows you to try out all of the features in Exabeam for 30 days.
Grace Period
Exabeam provides a 30-day grace period for expired licenses before products stop processing data. During the grace period, you will not experience any change in product functionality. There is no limit to the amount of data you can ingest and process.
When the license or grace period is 14 days away from expiring, you will receive a warning alert on the home page and an email.
You can request a new license by contacting your Exabeam account representative or by opening a support ticket.
Expiration Period
When your grace period has ended, you will start to experience limited product functionality. Please contact your Exabeam representative for a valid license and restore all product features.
For Data Lake license expirations, health alerts and health checks will continue to work. Exabeam Threat Intelligence Services (TIS) and Telemetry will stop working.
You will receive a critical alert on the home page and an email.
License Alerts
License alerts are sent via an alert on the home page and in email when the license or grace period is 14 days away from expiring and when the grace period expires.
The home page alert is permanent until resolved. You must purchase a product license or renew your existing license to continue using Exabeam.
To check the status and details of your license, go to Settings  > Admin Operations > Licenses.
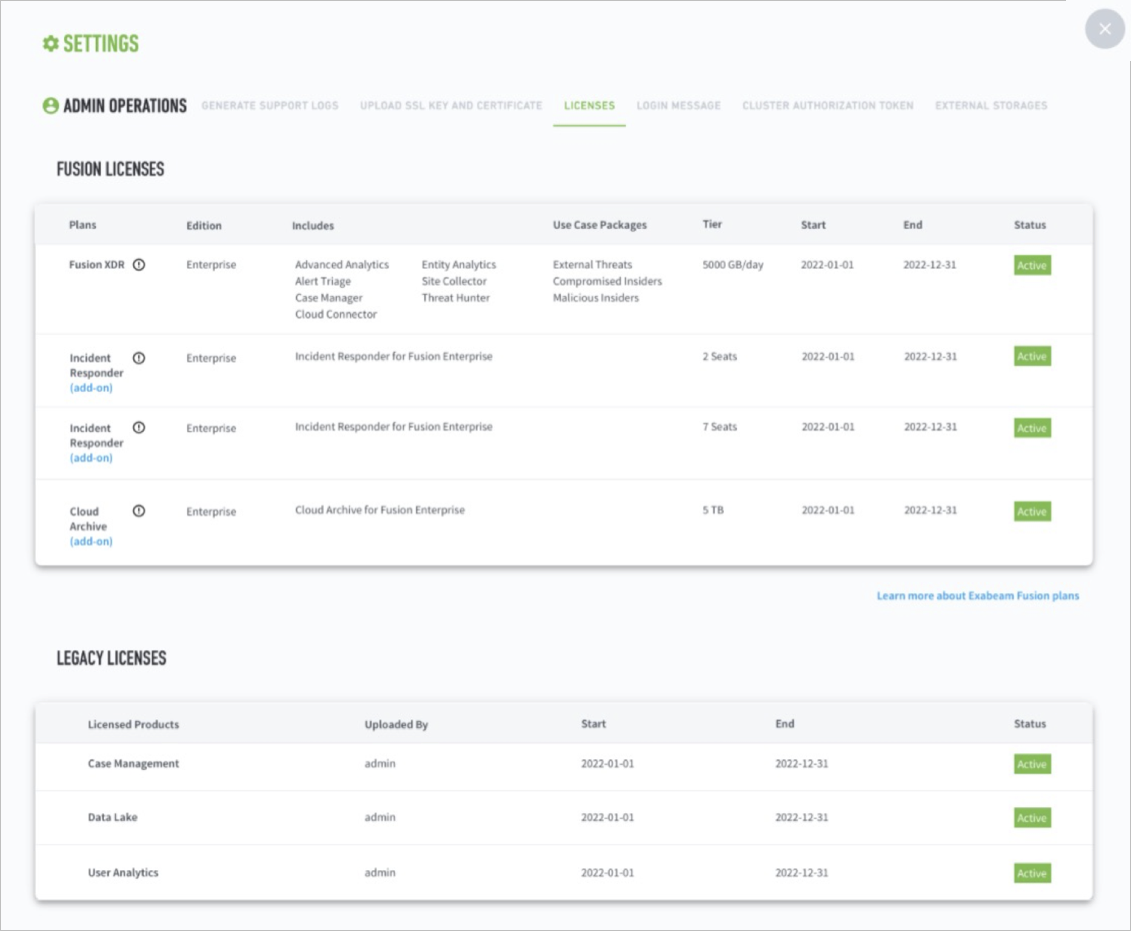
Types of Exabeam Product Licenses
Exabeam licenses specify which products you have access to and for how long. We bundle your product licenses together into one license file. All products that fall under your Exabeam platform share the same expiration dates.
Data Lake product licenses:
Data Lake – The Data Lake license provides you with unlimited collection, ingestion, and secure data storage without volume-based pricing. The data ingested by Data Lake can be used by Advanced Analytics for analysis and Incident Responder during incident investigations.
Exabeam Threat Intelligence Services (TIS) – TIS provides real-time actionable intelligence into potential threats to your environment by uncovering indicators of compromise (IOC). It comes fully integrated with the purchase of a Data Lake license. TIS also allows access to telemetry.
After you have purchased or renewed your product licenses, proceed to Download a License.
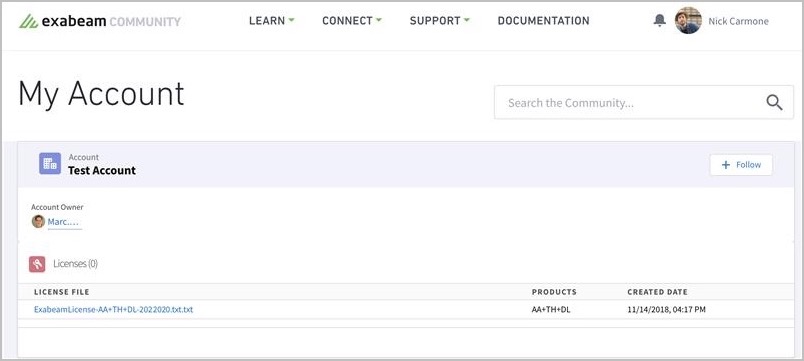
Download an On-premises or Cloud Exabeam License
You can download your unique customer license file from the Exabeam Community.
To download your Exabeam license file:
Log into the Exabeam Community with your credentials.
Click on your username.
Click on My Account.
Click on the text file under the License File section to start the download
After you have downloaded your Exabeam license, proceed to Apply a License.
Configure Custom UI Port in Data Lake
The WebCommon base URL, along with its port number, is hard-coded in the Data Lake Application config file.
Customers with an on-premise solution have the ability to configure a custom UI port. Customers with a cloud-delivered solution will need to contact the Exabeam Customer Success Team to have this configured for your environment.
To configure a custom UI port in Data Lake:
Set the web_common_external_port variable.
Ensure the variable is set in
/opt/exabeam_installer/group_vars/all.yml:web_common_external_port: <UI_port_number>.Note
If this variable is not set, access to the custom UI port may be lost after upgrading.
Navigate to the DLA config folder:
cd /opt/exabeam/config/lms/server/default/
Open the
application_default.conffile in an editor:vim application_default.conf
Set the webcommonBaseUrl port value to the desired value:
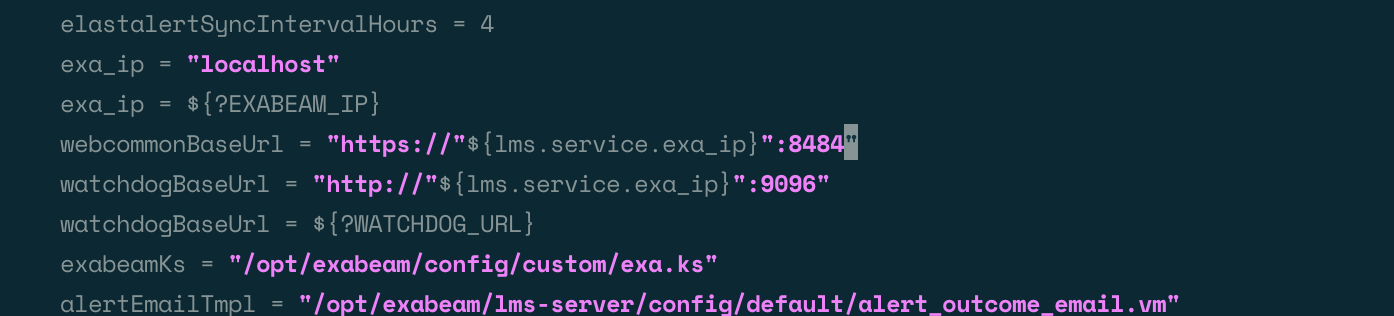
Save and exit.
Restart Data Lake:
systemctl restart exabeam-lms-server
Adding Nodes to a Cluster
Hardware and Virtual deployments only
The steps below walk through the process of adding nodes to an existing cluster or upgrading from a standalone to multi-node deployment. The prompts ask a series of questions regarding how you want your node cluster configured.
Before you begin, ensure you have:
Your Exabeam credentials
IP addresses of your Master and Worker nodes
Credentials for inter-node communication (Exabeam can create these during fresh installation if they do not already exist).
Caution
Before adding nodes to your cluster, please ensure the current storage capacity for these items are below the following thresholds:
For Data Lake:
85% on Elasticsearch hot node
85% on Elasticsearch warm nodes
70% on Kafka service
Note
Exabeam does not support removing nodes from a cluster.
Warning
Do not increase the number of nodes in a cluster by more than 50% during any given batch of node additions. For example, if you want to have a cluster of 100 nodes grown from a cluster of 20 nodes, run the operation by starting with a batch of 10 nodes and then incrementally add nodes in batches no larger than 50% of the node count.
Review cluster performance before adding more nodes. Ensure that the cluster status is healthy, and nodes have completed rebalancing.
Add Nodes
Run the following:
/opt/exabeam_installer/init/exabeam-multinode-deployment.sh
Menu options will appear. Select Add new nodes to the cluster. The following example adds 2 nodes to an existing cluster:
How many nodes do you wish to add? 2Enter the IP(s) of the new node(s). The following example assigns the IP to 2 nodes, where there is a Master Node (existing), and two new Worker Nodes (
node 11andnode 12):Note
Any given cluster cannot have more than one master node. Please enter
lms_slaveas the role.What is the IP address of node 11 (localhost/127.0.0.1 not allowed)? 10.10.2.88 What are the roles of node 11? ['lms_master', 'lms_slave']: lms_slave What is the IP address of node 12 (localhost/127.0.0.1 not allowed)? 10.10.2.89 What are the roles of node 12? ['lms_master', 'lms_slave']: lms_slave
This step repeats until all nodes have IP addresses assigned.
NTP is important for keeping the clocks in sync. If a local NTP server exists, please input that information. If no local NTP server exists, but the servers do have internet access, use the default
pool.ntp.org. Only choosenoneif there is no local NTP server and no internet access.What's the NTP server to synchronize time with? Type 'none' if you don't have an NTP server and don't want to sync time with the default NTP server group from ntp.org. [pool.ntp.org] pool.ntp.orgIf the user has internal DNS servers, add them here. If not, select No.
Would you like to add any DNS servers? [y/n] nOverride the Docker and Calico default subnets if there are any conflicting networks in the user's domain. If not, answer no to both.
Note
If you change any of the docker networks, the product will automatically be uninstalled prior to being redeployed.
Would you like to override the default docker BIP (172.17.0.1/16)? [y/n] n
Enter the new docker_bip IP/CIDR (minimum size /25, recommended size /16): 172.18.0.1/16
Would you like to override the calico_network_subnet IP/CIDR (10.50.48.0/20)? [y/n] n
The cluster is now configured.
Replicating Logs Across Exabeam Data Lake Clusters
You can configure Data Lake so that your Data Lake logs are replicated to a backup system.
Before proceeding, ensure you have two independent Data Lake clusters (the primary and a backup). These clusters must have the same number of nodes, running the same version of Data Lake, and enough storage capacity to hold the same amount of data based on retention settings.
Note
All steps below refer to the backup cluster.
Establish a CLI session with the backup cluster of your deployment.
Set the primary IP address (where 10.10.2.88 is the primary Data Lake IP) as the environment variable in the terminal.
export PrimaryDataLakeMaster=10.10.2.88
Copy the Keystore and Truststore files from the primary system to the backup system.
scp exabeam@${PrimaryDataLakeMaster}:/opt/exabeam/config/common/kafka/ssl/kafka-host1.keystore.jks ~/primary.kafka.keystore.jks

scp exabeam@${PrimaryDataLakeMaster}:/opt/exabeam/config/common/kafka/ssl/kafka-host1.truststore.jks ~/primary.kafka.truststore.jks

. /opt/exabeam/bin/shell-environment.bash
Add the data replication location:
/opt/exabeam/bin/lms/add-dr-location.py --dl-master $PrimaryDataLakeMaster  \
--kafka-keystore-path ~/primary.kafka.keystore.jks  \
--kafka-keystore-password exabeam \
--kafka-truststore-path ~/primary.kafka.truststore.jks \
--kafka-truststore-password exabeam
Ingesting Logs into Exabeam Data Lake
Ingestion via syslog is automatically enabled by default. However, you must configure your syslog source host to send logs to the proper Data Lake destination IP/port.
Important
If you are running a multi-node Data Lake cluster with any Syslog sources, Exabeam strongly recommends having a load balancer with two site collectors behind it to mitigate any potential data loss.
Additionally, you must use the cert (<alias>-exa-ca.pem) provided in the customer artifacts package, which is provided during onboarding, if using Transport Layer Security (TLS).
If you are sending logs via syslog,
use port 515/TCP for TLS syslogs
use 514/TCP or UDP for syslogs without TLS.
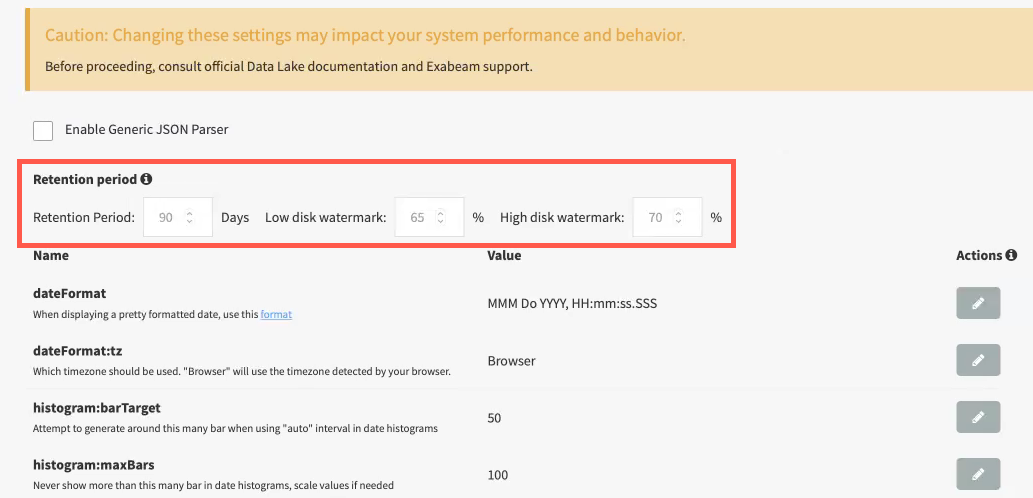
Exabeam Data Lake Retention Settings
This feature provides the ability to remove old data based on a customizable retention policy so that the storage on the cluster can be reclaimed for newer data. Events in indices that exceed the retention period are deleted automatically and when an index is empty, the index is deleted as well.
Warning
Once the data deleted, it is lost permanently. Please implement archiving to prevent data loss.
For example, an index was created for events ingested on 01/01/2020 and events in the system are retained for 90 days. With this retention policy, all events and the index are deleted on 03/31/2021 at midnight GMT.
Note
The default setting is 90 days retention. The retention settings are configured during the initial set up after customers subscribe to Data Lake.
Users cannot modify retention settings in Data Lake deployed on the SOC Platform. If you believe these settings need to be modified, contact customer support.
For auditing purposes, the system keeps a trail of deletions.
To set your retention period, navigate to Settings > Index Management > Advanced Settings.
Enter the number of days that logs are to be retained and click SAVE.
Exabeam Data Retention and Enforcement
A number of triggers have been implemented in Data Lake to enforce data retention policy in order to ensure log ingestion continuity.
Data retention by time is the most common criteria for retaining logs. Retention based on a set period cannot be disabled.
The default retention period is 90 days.
Data purging is strictly enforced once data aging has reached the expiration point.
Archiving can be configured for the data set to be purged. (Options are available to archive to AWS S3 or NAS for on-premises deployment while Exabeam Cloud Archive is available for SOC Platform deployments.) If archiving is not configured, Data Lake will purge expired indices regardless.
Data retention by space implements purging based on low and high watermarks, meaning, storage limits that trigger archiving and purging. To adjust watermarks for your clusters, navigate to Settings > Index Management > Advanced Settings. Watermarks cannot be disabled.
Low watermark—Data storage capacity is approaching undesirable or unsafe levels when the low watermark is exceeded. The oldest data (even if it is not 90 days old) is archived and then purged to return storage capacity to an acceptable level. The default low watermark is 75% of storage capacity.
High watermark—Data storage capacity has approached a level considered unsafe for operation. This is indicative of under-provisioned worker nodes. Purging of old indexes is triggered in order to ensure ingestion continuity. The default high watermark is 80% of storage capacity.
Data purge by day
Purge a whole day’s index will be archived and purged based on a date schedule. Please implement archiving first before committing a data purge.
Remote Archiving NAS and AWS S3 from Data Lake
Hardware and Virtual Deployments Only
Logs from Data Lake can be offloaded to a remote archive destination based on a data retention policy. This is especially helpful in certain scenarios, such as:
Retaining data for audit, compliance, and incident investigations
Intermediate storage location during system migration
Storage cost benefits and optimization of hot/warm cluster
You can use an AWS S3 bucket (provided by customer) or NAS appliance (provided by customer) as destinations for sending snapshots of your daily indices for long-term archiving. Logs can be archived in JSON and/or default Elasticsearch snapshot formats.
In order to leverage remote archives, please note the following limitations:
Only one destination can be active, either AWS S3 or NAS (running NFS v.4)
Only one snapshot or retrieval job can run at a time (filenames will have the format
snapshot-exabeam-[yyyy].[mm].[dd])Data Lake automatically creates and archives one snapshot per retention policy
The external archive destination is owned, managed, and provided by the customer.
Archiving Prerequisites
The following tasks must be run to deploy remote archiving in your environment:
Ensure network access to the remote archive destination
Obtain AWS S3 credential keys (if applicable)
Archive and Restoration Performance
Without network connectivity considerations, these are the approximate processing times for:
Archive for 1 TB index = 8-10 hours
Restoration for 1 TB index = 2 hours
Retention Policies for Exabeam Data Lake Logs
Hardware and Virtual Deployments Only
Data Lake data retention policy dictates when the data will be automatically moved to an archive destination.
Archiving will run when a retention policy is in place. It is mandatory to set a retention policy for archiving to be enabled.
The default retention policy is set to 90 days. If the retention policy is shortened while archiving is enabled, then the new retention policy is applied. For example, when shortening the policy from 90 to 60 days, the system begins archiving logs 50 days or older. This 10-day lead is to ensure that archiving is completed before data is deleted.
Set Up an Archive Destination for Exabeam Data Lake Logs
Hardware and Virtual Deployments Only
Data Lake logs can be archived to an AWS S3 bucket or a NAS mount point. However, only one destination is supported at a time. You cannot schedule multiple archive tasks to multiple destinations.
Moving snapshots off hosts will consume significant amounts of system resources. It is advised that on-premise deployments use local NAS mount points while deployments in AWS use S3.
Note
Data Lake archiving, with the exception of ensuring archive task completion, does not include archive monitoring and purging archive destination. You will not be notified when your archive destination has reached its critical disk capacity. Please review the monitoring options for your archive destination from your vendor.
Set Up AWS S3 Archive Destination
Before configuring an AWS S3 archive destination, ensure you have the following:
Each Data Lake node must have read/write permissions on the AWS S3 bucket
Each Data Lake node must be included in its security group for accepted network traffic
AWS S3 bucket name and region
AWS access key ID
AWS secret access key
Base path of the AWS S3 bucket
To configure and enable an AWS archive destination:
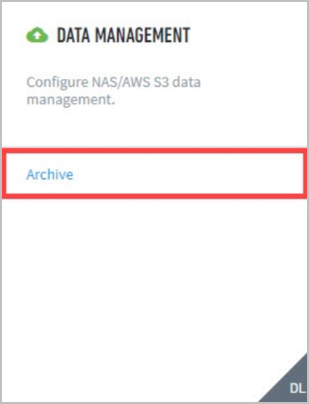
Navigate to Settings > Data Management > Archive.
Click Add Destination.
Select S3.
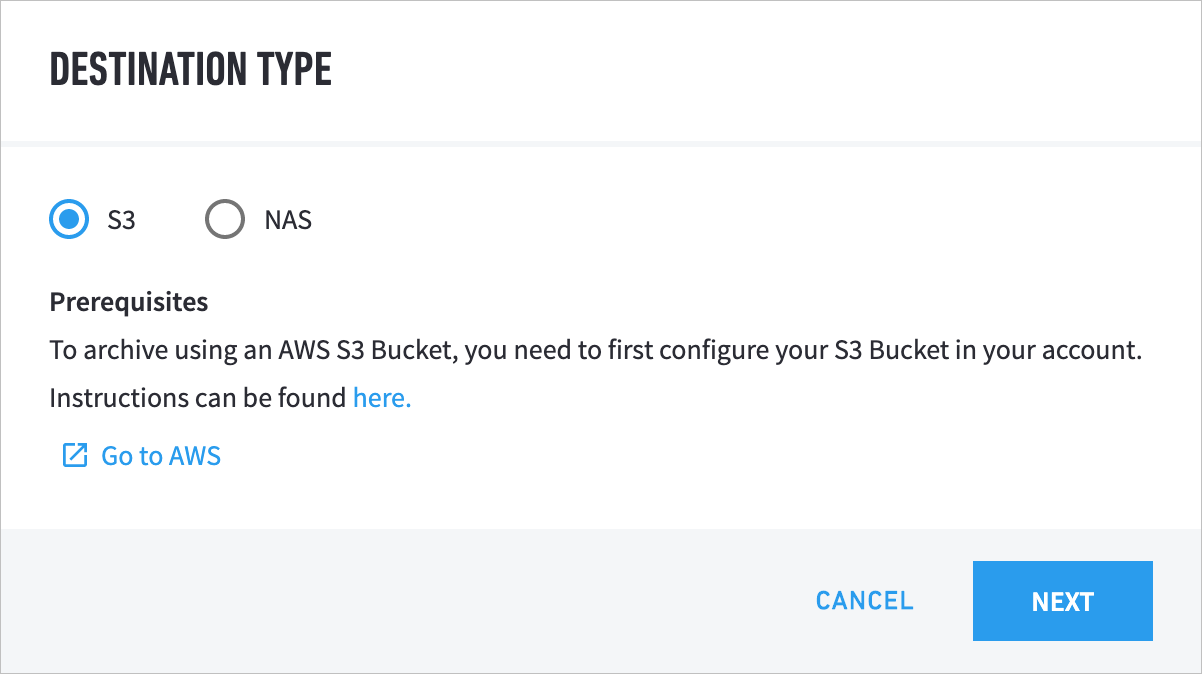
Note
You need to use a pre-existing Amazon S3 bucket. If you do not have one, click CANCEL to close the window. Come back to this flow once you have created an Amazon S3 bucket.
Click NEXT.
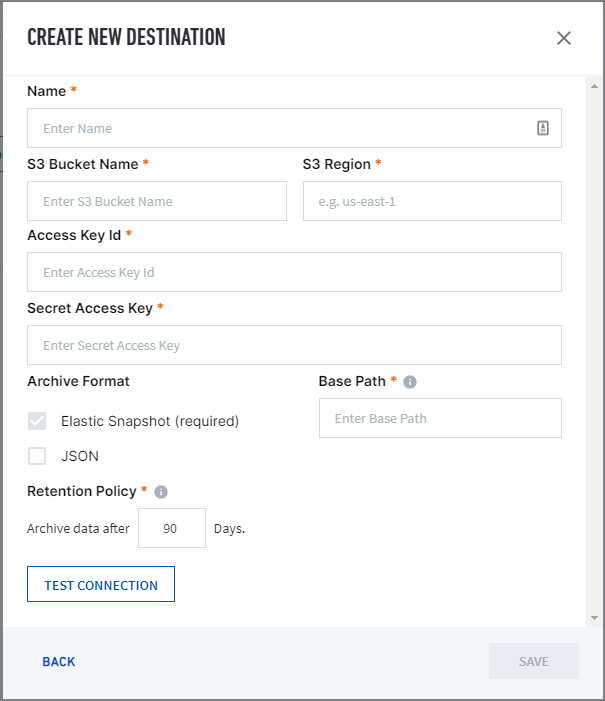
Fill out the required fields and click SAVE.
Go to Archive Destination Management to edit and enable your archive destination.
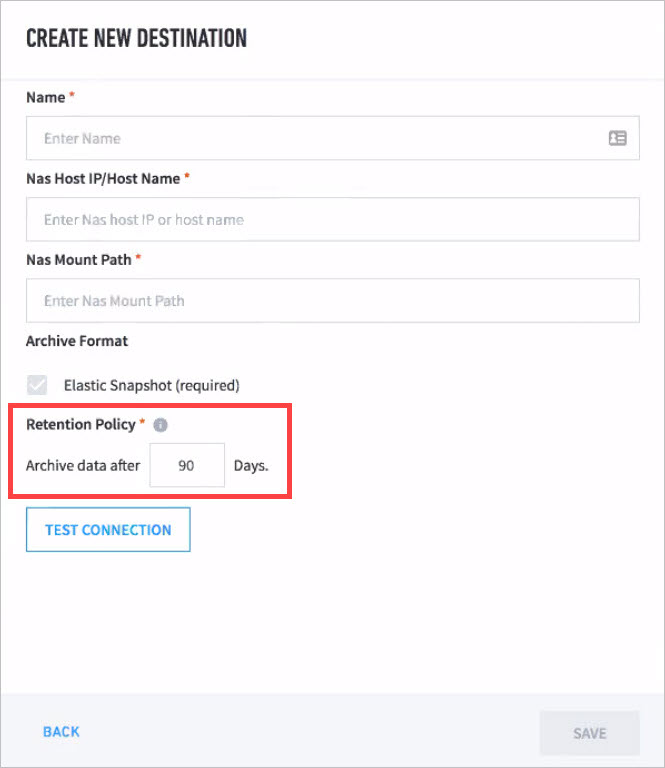
Set Up NAS Archive Destination
Before configuring a NAS archive destination, ensure you have the following:
Each Data Lake node must have read/write permissions on the NAS mountpoint
Each Data Lake node must be included in its security group for accepted network traffic
Hostname or IP of the NAS endpoint
Mount path at the destination host
Destination must be in NFS v.4 filesystem format
Group and user IDs (
gidanduid) for archive folders and directories must be1000
To configure and enable an NAS archive destination:
Navigate to Settings > Data Management > Archive.
Click Add Destination.
Select NAS.
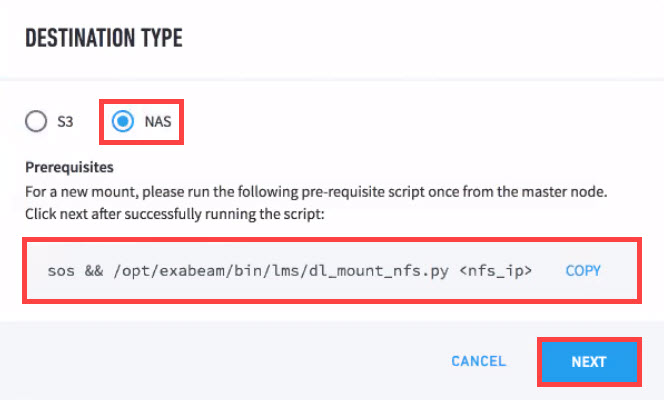
Copy the prerequisite script displayed in the UI and then run it from the master node.
Click NEXT to proceed to the configuration menu.
Fill in the required fields.
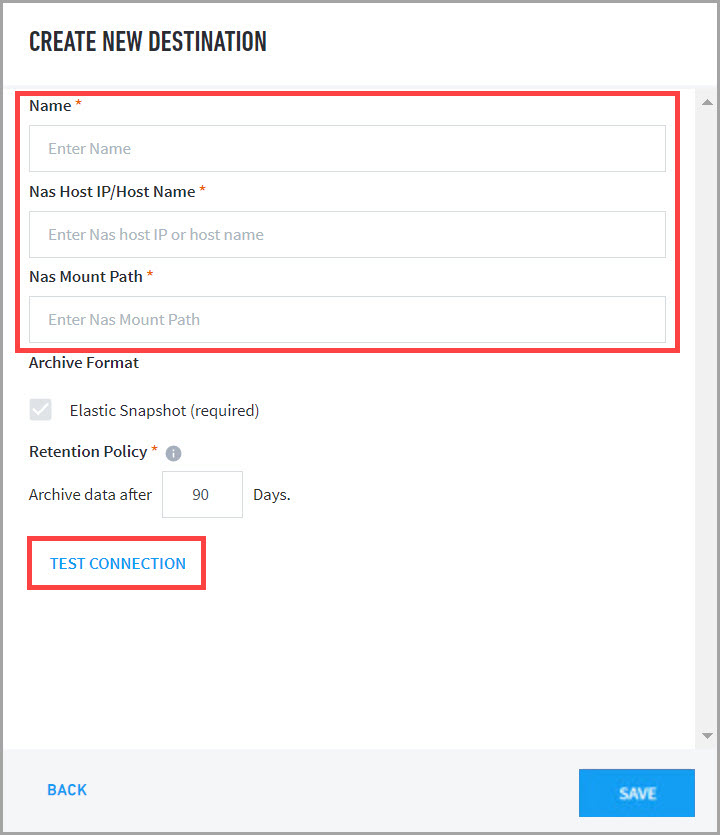
Click TEST CONNECTION.
Once testing returns a
Test was successful!message, click SAVE to apply the configuration.
Archive Destination Management for Exabeam Data Lake Logs
Hardware and Virtual Deployments Only
Assuming your Data Lake archive source and destination has been configured, this section details archive destination management, including steps to enable, edit, or delete your archive destination.
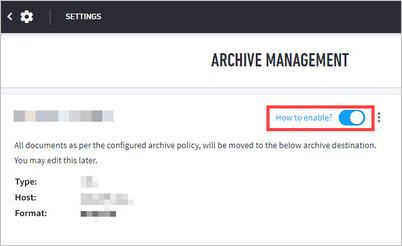 |
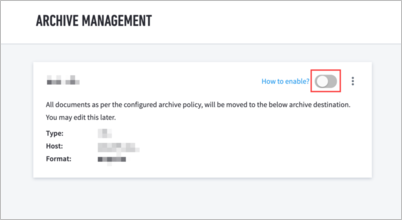
Enable Archiving
Once you have set up an archive destination, enable a destination for your archive and thereby activate the retention policy and archiving. Only destinations that are correctly configured will produce an actionable Enable toggle.
To enable archiving:
Navigate to Settings > Data Management > Archive.
If this is the initial setup, it is important to first click on “How to enable?” which will generate the following prompts.
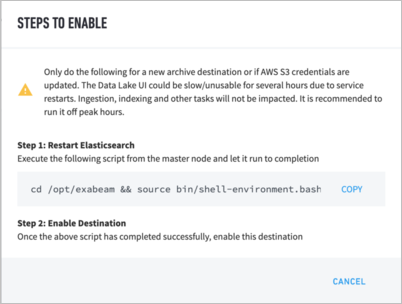
You need to execute the commands via SSH to the master node host, if you meet any of the following conditions:
Setting up the archive destination for the first time (for Archive purposes)
Setting up the archive destination for the first time (for Restore purposes)
AWS credentials were updated for this destination (for either Archive or Restore)
After the above command finishes on the command line, you need to click How to enable? and follow its instructions to activate the archive destination. (This step is only needed for Archive. Please DO NOT enable this for Restore.)
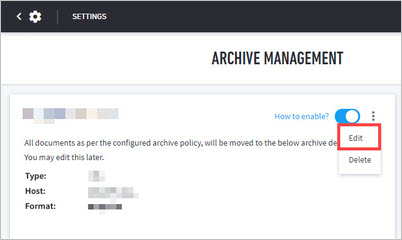
Edit Archive Destination
You may on occasion change the destination repository. Your archive NAS may be at maximum capacity and a new NAS is introduced, or your organization needs to use a different S3 bucket. If you do not have a destination already, use this menu to create one.
To edit an archive destination:
Navigate to Settings > Data Management > Archive.
Click the vertical ellipsis to expand the submenu and then click Edit.
In the Edit Destination menu, fill in the required fields and select Archive Format you want supported.
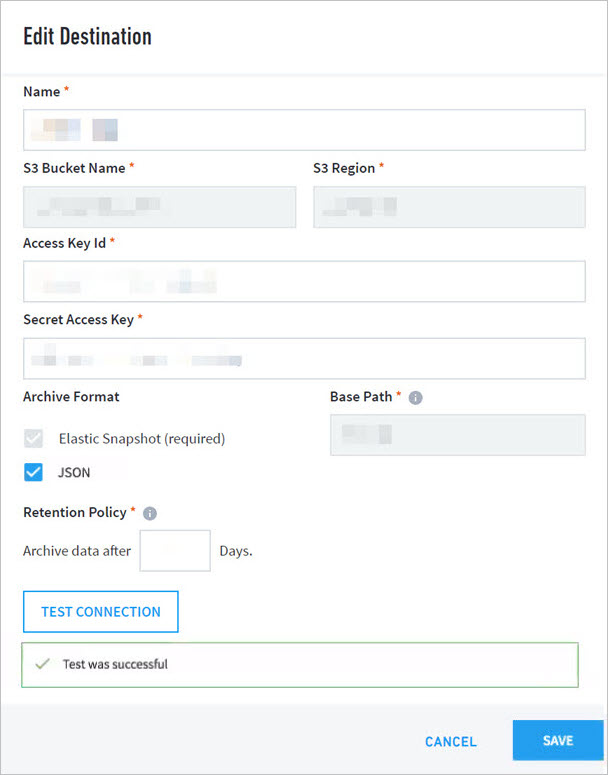
Note
Archive Format: Optionally, select the JSON checkbox to enable Data Lake logs archiving. JSON logs cannot be restored. They are solely for use outside of Data Lake.
Click TEST CONNECTION.
Once testing returns
Test was successful!, click SAVE to apply the configuration.Click How to enable? and follow its instructions to activate the archive destination.
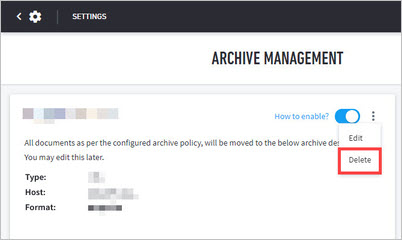
Delete Archive Destination
As only one destination can be configured for archiving, you will need to delete any existing archive destination in order to configure a new destination (e.g. a new S3 bucket).
Navigate to Settings > Data Management > Archive.
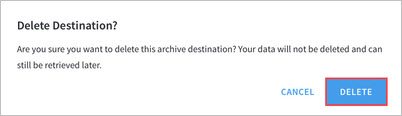
At ARCHIVE MANAGEMENT, click Delete.
Click DELETE to confirm the cluster deletion.
Restore Data to Exabeam Data Lake
Hardware and Virtual Deployments Only
Snapshots should be restored on a separate dedicated cluster, as it is critical not to disrupt the performance of the ingestion cluster. Restoration assumes the restore cluster has sufficient disk space to restore the data.
Warning
Restoring snapshots to the ingestion cluster is not supported as there could be a significant impact on cluster performance. Also, restored indices may be unexpectedly deleted due to retention policy configuration on the ingestion cluster.
Prerequisites
A separate Data Lake cluster has been set up for restoring archived data
The cluster status is green
The cluster is not ingesting any logs
Using the UI, set up the archive destination (the destination from which the data can be restored) with the right credentials. This is the destination from which the data can be restored
You can only restore from an archive destination that was created by a different Data Lake cluster using the automatic archive policy
Configure the archive destination and follow the prompts to ensure that the data can be listed and read from the archive destination
Leave the toggle in the Archive destination setup, to off or Disabled state (as this is applicable only for Archive scenario)
Restore Snapshots
There is one snapshot per index per day. The snapshot name contains the date of the index.
To restore a snapshot:
Log into the Data Lake UI and then navigate to the Settings > Archive.
Click ADD DESTINATION.
Select NAS for the Destination Type and run the command shown via SSH on the master node of the restore cluster. Be sure to update
<nas_ip>with the IP of the NAS server and<nas_mount_path>(last field in command) with the mount point on the NFS server. When the command completes on the restore cluster, it will restart Data Lake services.Back in the Data Lake UI select NEXT. At CREATE NEW DESTINATION, give the destination a name and then enter the NAS IP and NAS mount path (as in previous step).
Click TEST CONNECTION and then SAVE if the test was successful.
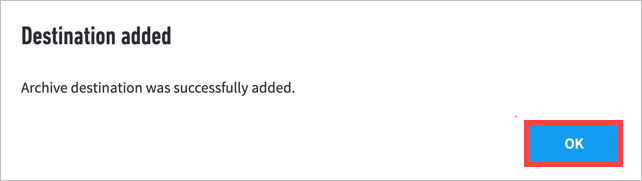
A message will display once the destination is added. Click OK to close the window.
At the Archive Management UI, do not enable the destination.
Via SSH to the master node host, run the following:
cd /opt/exabeam
&& source bin/shell-environment.bash && clear && /opt/exabeam/bin/lms/es_archive_keystore.py
List the available indices to restore.
# If you are not sure about the es_commands.py, use the '--help' switch for all available options for the archive command
python /opt/exabeam/bin/lms/es_commands.py archive --help
# To list available snapshots
python /opt/exabeam/bin/lms/es_commands.py archive -l
Snapshot filenames will have the format
snapshot-exabeam-[yyyy].[mm].[dd].To restore an index, run the command below using the index name from the list of available indices.
python /opt/exabeam/bin/lms/es_commands.py archive -r <index_name>
Delete Snapshots from the Archive
You can quickly delete archived snapshots that you no longer need to free up space in the NFS drive.
List the available snapshots in the archive.
python /opt/exabeam/bin/lms/es_commands.py archive -l
Note
The following is an example of the format used in snapshot file names:
snapshot-exabeam-[yyyy].[mm].[dd].To delete a snapshot, run the following command:
python /opt/exabeam/bin/lms/es_commands.py archive -d <snapshot-exabeam-YYYY.MM.DD>
Set Up LDAP Import
During this stage of the setup, Exabeam will connect to your LDAP servers and query them for user and computer information. We then store the attributes to our own database. Going forward Exabeam will poll your LDAP servers once every 24 hours and update the local copy to reflect the latest state changes.
Navigate to Settings > Import LDAP > LDAP Server.
At the Import LDAP UI, you can add servers.
Or, float your pointer to the right of existing LDAP server to click edit (pencil icon) or delete (trash can icon) records.