- Exabeam Data Lake Architecture Overview
- Exabeam Product Deployment in On-premises or Virtual Environments
- Administrator Operations
- User Management
- Exabeam Data Lake Role-based Access Control
- Exabeam Data Lake Object-based Access Control
- Exabeam Data Lake Secured Resources Overview
- Third-Party Identity Provider Configuration
- Audit Log Management in Data Lake
- Common Access Card (CAC) Authentication
- Set Up LDAP Server
- Set Up LDAP Authentication
- Azure AD Context Enrichment
- Adding a User to Exabeam Data Lake
- User Password Policies
- User Engagement Analytics Policy
- Exabeam Threat Intelligence Service
- Threat Intelligence Service Prerequisites
- Connect to Threat Intelligence Service through a Proxy
- View Threat Intelligence Feeds
- Threat Intelligence Context Tables
- View Threat Intelligence Context Tables
- Assign a Threat Intelligence Feed to a New Context Table
- Create a New Context Table from a Threat Intelligence Feed
- Using Threat Intelligence Service with Data Lake
- Check ExaCloud Connector Service Health Status
- Index Management
- Parser Management
- Forwarding to Other Destinations
- Syslog Forwarding Management in Exabeam Data Lake
- Syslog Forwarding Destinations
- Configure Log Forwarding Rate
- How to Forward Syslog to Exabeam Advanced Analytics from Exabeam Data Lake
- How to Forward Syslog from Exabeam Data Lake to Non-Exabeam External Destinations
- Exabeam Data Lake Selective Forwarding using Conditions
- How to Configure Exabeam Data Lake Log Destinations for Correlation Rule Outcomes
- Forward Exabeam Data Lake Incident to Exabeam Incident Responder
- Syslog Forwarding Management in Exabeam Data Lake
- Cluster Operations
- Cross-cluster Search in Exabeam Data Lake
- Prerequisites for Exabeam Data Lake Cross-cluster Search
- Remote Cluster Management for Exabeam Data Lake Cross-cluster Search
- Register a Remote Cluster in Exabeam Data Lake for Cross-cluster Search
- Exabeam Data Lake Cross-cluster Health Monitoring and Handling
- How to Enable/Disable/Delete Exabeam Data Lake Remote Clusters for Cross-cluster Search
- Exabeam Data Lake Remote Cluster Data Access Permissions for Cross-cluster Search
- System Health Page
- A. Technical Support Information
- B. List of Exabeam Services
- C. Network Ports
- D. Supported Browsers
Exabeam Threat Intelligence Service
The Exabeam Threat Intelligence Service delivers up-to-date threat indicators, on a daily basis, to Data Lake deployments. Threat indicator data is stored in context tables that are associated with each feed. These threat indicators provide enhanced data based on curated threat intelligence.
The table below lists the categories of threat indicators provided by each threat intelligence feed and the rules that leverage each feed.
Note
All of the threat intelligence feeds, except the TOR network category, provide curated threat intelligence from ZeroFox. The TOR network feed is an open source data feed.
IoC Category | Rules |
|---|---|
Ransomeware IP IP addresses associated with ransomware attacks |
|
Threat IP IP addresses associated with ransomware or malware attacks |
|
Reputation Domain Domain names and URLs associated with sites that often contain malware, drive-by compromises, and more |
|
Web Phishing Domain names associated with phishing or ransomware | WEB-UD-Phishing |
TOR IP IP addresses associated with the TOR network |
|
Cloud-delivered deployments of Advanced Analytics and Data Lake connect to the Threat Intelligence Service (TIS) through an Exabeam Data Service (EDS) cloud connector, as shown in the image below. The cloud connector service provides authentication and establishes a secure connection to the Threat Intelligence Service. The cloud connector service collects updated threat indicators from the Threat Intelligence Service and makes them available within Advanced Analytics and Data Lake on a daily basis.
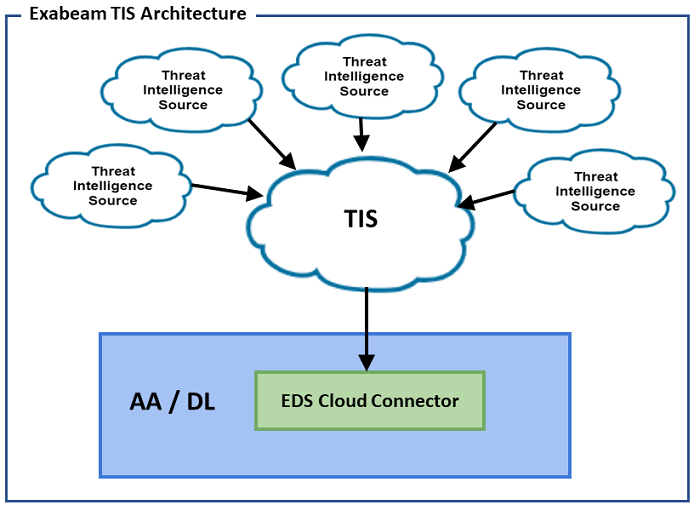 |
For on-premise deployments of Advanced Analytics and Data Lake, threat indicators are downloaded directly from the Threat Intelligence Service on a daily basis.
For more information about the Threat Intelligence Service, contact your technical account manager.
Threat Intelligence Service Prerequisites
Before configuring Threat Intelligence Service, ensure your deployment meets the following prerequisites:
Advanced Analytics i46 or later Data Lake i24 or later with a valid license
At least 5 Mbps Internet connection
Access to https://api.cloud.exabeam.com over HTTPS port 443
DNS resolution for Internet hostnames (this will only be used to resolve to https://api.cloud.exabeam.com)
Note
Ensure dynamic access is enabled as the IP address may change. Also, for this reason, firewall rules for static IP and port addresses are not supported.
Connect to Threat Intelligence Service through a Proxy
Hardware and Virtual Deployments Only
The communication between Threat Intelligence Service and Data Lake occurs over a secure HTTPS connection.
If connections from your organization do not make use of a web proxy server, you may skip this section. Threat Intelligence Service is available automatically and does not require additional configuration.
If connections from your organization are required to go through a web proxy server to access the Internet, follow the steps below to provide the necessary configuration.
Note
Configuration is required for each of your Data Lake deployments.
Warning
If your proxy performs SSL Interception, it will replace the SSL certificate from the Exabeam Threat Intel Service (ETIS) with an unknown certificate during the SSL negotiation, which will cause the connection to ETIS to fail. If possible, disable SSL Interception for the IP address of your Exabeam products. If SSL cannot be disabled, contact Exabeam Customer Success for further assistance.
Before configuring Threat Intelligence Service, ensure your deployment meets the following prerequisites:
At least 5 Mbps Internet connection
Access to https://api.cloud.exabeam.com over HTTPS port 443
DNS resolution for Internet hostnames (this will only be used to resolve to https://api.cloud.exabeam.com)
Note
Ensure dynamic access is enabled as the IP address may change. Also, for this reason, firewall rules for static IP and port addresses are not supported.
Establish a CLI session with the master node of your Exabeam deployment.
Open the custom file
/opt/exabeam/config/common/cloud-connection-service/custom/application.conf
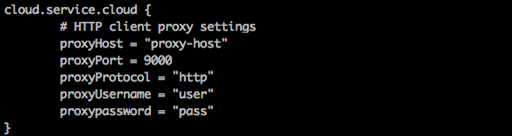
Add the following section to the custom file and configure the parameters
proxyHost,proxyPort,proxyUsername, andproxyPassword.Note
Be sure to choose the appropriate settings based on whether the proxy uses http or https. Additionally, always use quoted strings for
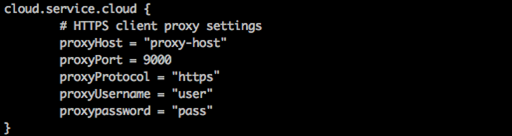
proxyHost,proxyProtocol,proxyUsername, andproxyPassword.HTTP:
HTTPS:
Stop and then restart the cloud connector service in your product:
source /opt/exabeam/bin/shell-environment.bashcloud-connection-service-stopcloud-connection-service-start
Restart Exabeam Directory Service (EDS):
eds-stop
eds-start
Note
Important Note: The username and password values are hashed in Data Lake i24 and later. After Cloud Connection Service (CCS) is restarted (step 4), the username and password are hashed using a 128 bit AES key, and these hashed values are stored in the local secrets store. In the config file, the username and password values are replaced by the hashed values.
If you subsequently want to change the values, replace the hashed values with new plain text values and restart the CCS service.
As soon as the deployment can successfully connect to Threat Intelligence Service, threat intelligence feed data is pulled and saved in context tables. Threat intelligence feeds and context table are viewable from the Data Lake Settings page. For more information see the following:
View Threat Intelligence Feeds
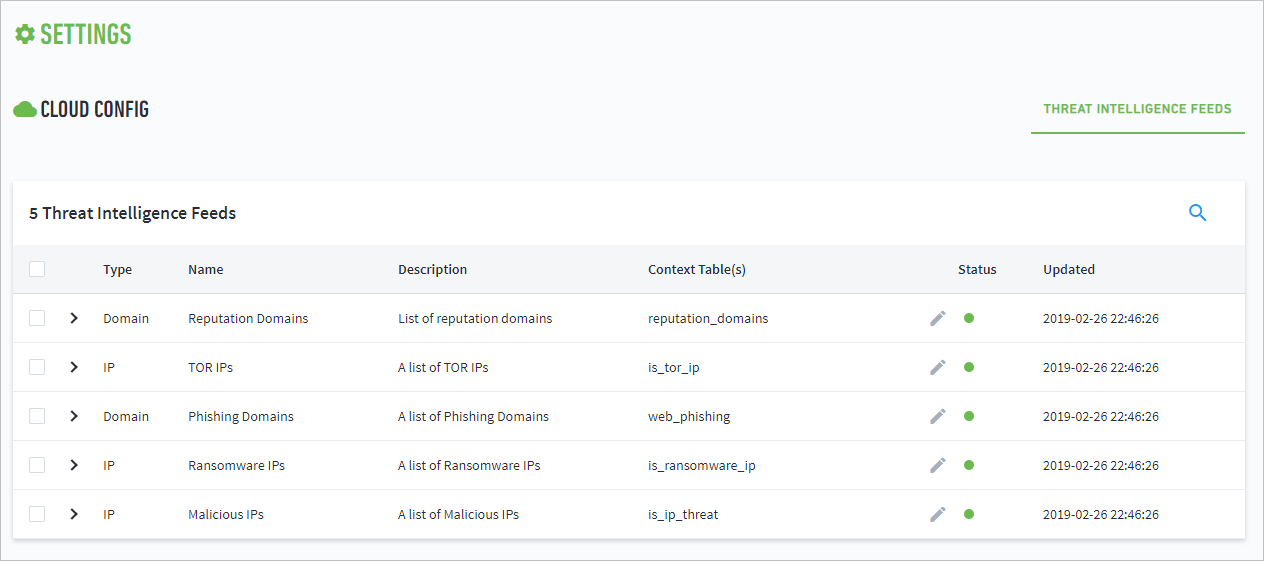
To view threat intelligence feeds in Data Lake, open the Settings page. Navigate to the Cloud Config tile and select Threat Intelligence Feeds.
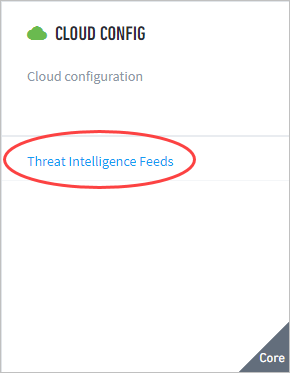 |
The Threat Intelligence Feeds page displays a list of the feeds provided by the cloud-based Exabeam Threat Intelligence service. The list includes the following information about each feed:
Type: The type of feed (for example, domain list, IP list, etc.)
Name: The name of the feed (given by the cloud-based service)
Description: A short description of the feed
Context Tables: The context tables associated with the feed
Status: Indicates the availability of the feed in the cloud-based service
Updated: The date and time the feed was last updated from the cloud service
 |
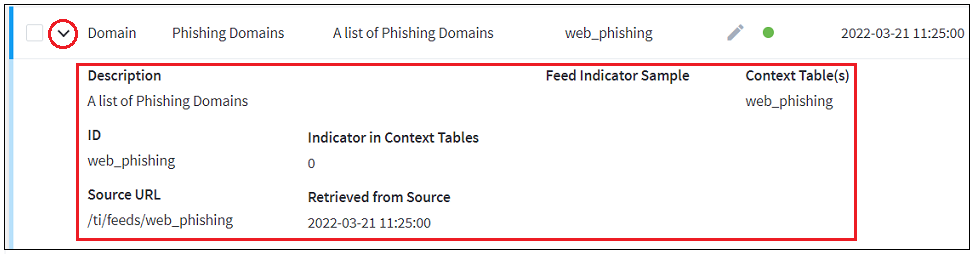
To view additional detailed information about a specific feed, click the arrow to the left of the feed. An additional view expands with more information, including ID, Source URL, Indicator in Context Tables, Retrieved from Source, and Feed Indicator Sample.
 |
For information about context tables and how they are related to threat intelligence feeds, see Threat Intelligence Context Tables.
Threat Intelligence Context Tables
Data provided by threat intelligence feeds is stored in context tables associated with each feed. By default, feeds are initially associated with existing context tables. As a result, when your Data Lake deployment is connected to the Threat Intelligence Service, it immediately begins collecting threat intelligence data.
In Advanced Analytics, the data in context tables can be leveraged by creating rules that match log events to indicators stored in a threat intelligence context table. If the RuleExpression logic finds a match, an event can be identified as malicious without further analysis.
In Data Lake, the data in context tables can help to enrich log event data.
For more information about working with context tables, see the following:
Note
To view a sample list of Threat Intelligence Service indicator sources see the Exabeam Community.
View Threat Intelligence Context Tables
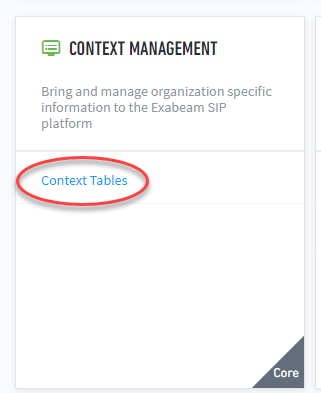
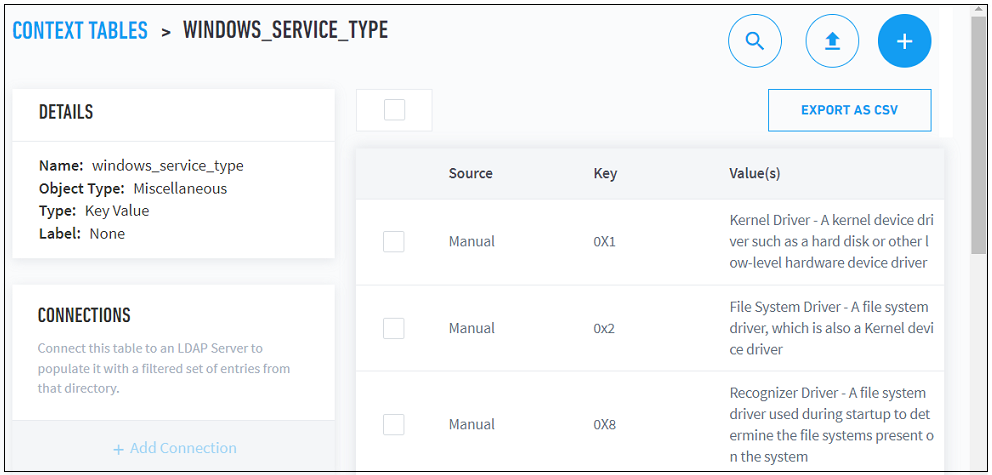
To view the current context tables provided by the Threat Intelligence Service, log into your instance of Data Lake and open the Settings page. Navigate to the Context Management tile and select Context Tables.
 |
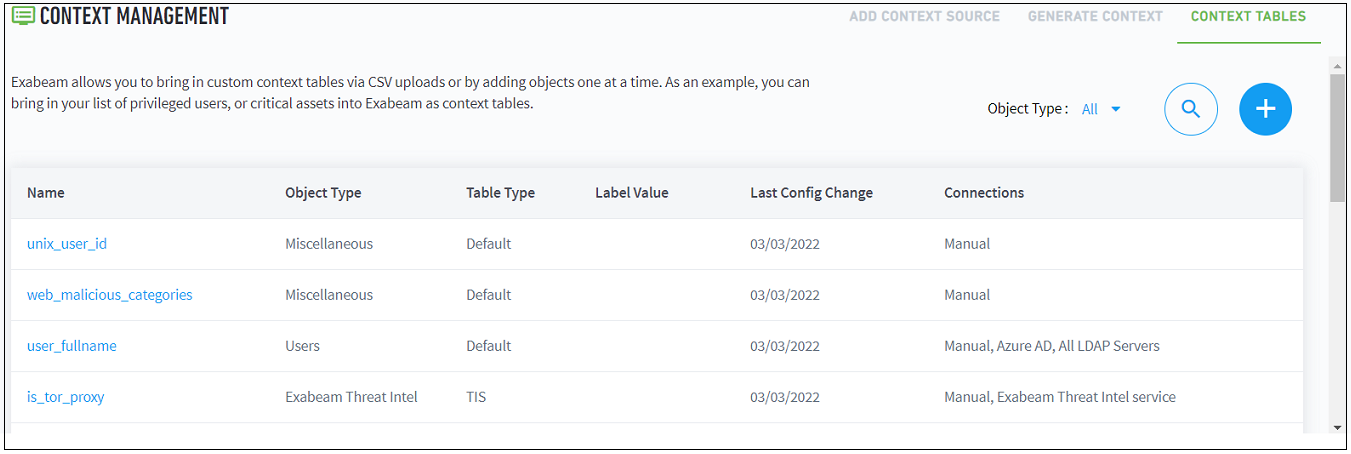
The Context Tables page displays a list of all the context tables currently provided by the Exabeam Threat Intelligence service. To locate a specific context table, scroll through the list or use the search feature  .
.
 |
To view information about keys and values associated with a specific context table, click the table name. A new expanded view of the table is displayed.
 |
Assign a Threat Intelligence Feed to a New Context Table
Some threat intelligence feeds are pre-assigned to specific context tables. However, you can easily add, remove, or change feed assignments. You can configure feed assignments in one of two ways, individually or in bulk.
Note
You cannot unassign default context table mappings.
Individual Feed Assignment
To change the assignment of a single threat intelligence feed to one or more context tables:
Navigate to the Threat Intelligence Feeds page, as described in View Threat Intelligence Feeds.
Find the feed whose context table assignments you want to change and, in the Status column, click edit
 . A list of the available context tables opens.
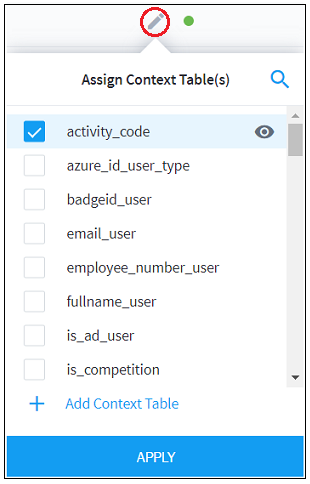
Use the check boxes on the left of each context table to assign or unassign the threat intelligence feed. A single feed can be assigned or unassigned to multiple context tables.
To view the existing threat indicators in a specific context table, click view
 . A new window opens and displays a list of keys and values for the indicators included in the context table. Click OK to close the window.
When you've finished assigning or unassigning the feed to specific context tables, click Apply to save the updated assignments.
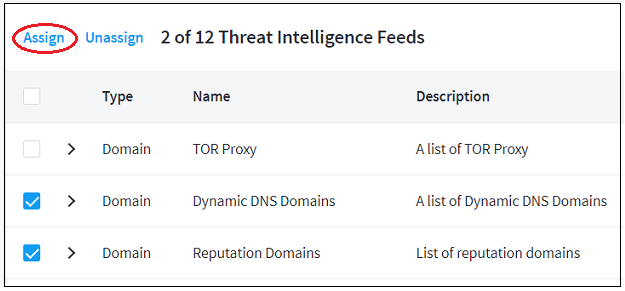
Bulk Feed Assignment
To change the assignment of multiple threat intelligence feeds to one or more context tables:
Navigate to the Threat Intelligence Feeds page, as described in View Threat Intelligence Feeds.
Use the check boxes on the left of each feed to select multiple feeds whose assignment you want to change.
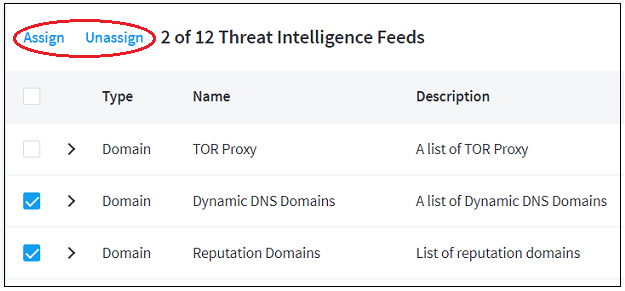
At the top of the feeds list, click Assign or Unassign, depending on what changes you want to make.
Assign: A list of the available context tables opens in a new window. Use the check boxes on the left to select context tables. To see the indicators included in each table, click view
. When you've completed your table selections, click Assign. All of the specified feeds will be assigned to the selected context tables.Unassign: All of the specified feeds will be unassigned from their context tables.
Create a New Context Table from a Threat Intelligence Feed
New context tables can be created from specific threat intelligence feeds. You can create new context tables in one of two ways, from an individual feed or from multiple feeds in bulk.
Create a Table from a Single Feed
To create a new context table from a single threat intelligence feed:
Navigate to the Threat Intelligence Feeds page, as described in View Threat Intelligence Feeds.
Find the feed from which you want to create a new content table and, in the Status column, click edit
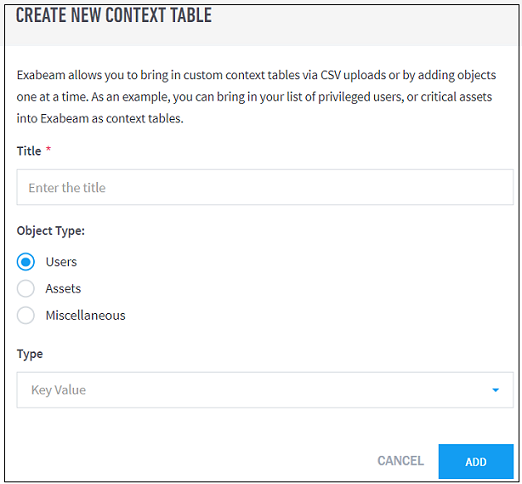
. A list of the existing context tables opens.At the bottom of the list, select the Add Context Table option. A set of options for creating a new context table is displayed.
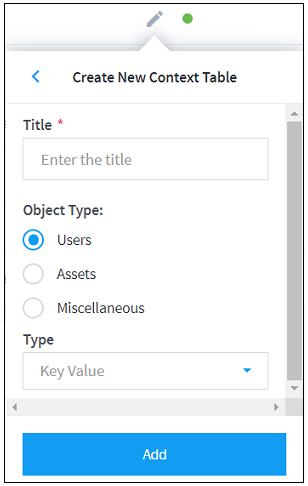
Enter the Title, Object Type, and Type information to define the new context table.
Click Add to save the new context table.
Create a Table from Multiple Feeds
To create a new context table from a bulk selection of threat intelligence feeds:
Navigate to the Threat Intelligence Feeds page, as described in View Threat Intelligence Feeds.
Use the check boxes on the left of each feed to select multiple feeds from which you want to create a new context table.
At the top of the feeds list, click Assign. A list of the existing context tables opens.
At the bottom of the list, select the Add Context Table option. A set of options for creating a new context table is displayed.
Enter the Title, Object Type, and Type information to define the new context table.
Click Add to save the new context table.
Using Threat Intelligence Service with Data Lake
Within Data Lake, Threat Intelligence Service feeds enrich log event data with the following fields:
is_threat_src_ip – Checks if the event’s source IP is associated with malware traffic.
is_threat_dest_ip – Checks if the event’s destination IP is associated with malware traffic.
is_ransomware_src_ip – Checks if the event’s source IP is associated with ransomware campaigns.
is_ransomware_dest_ip – Checks if the event’s destination IP is associated with ransomware campaigns.
is_tor_src_ip – Checks if the event’s source IP is associated with TOR exit nodes.
is_tor_dest_ip – Checks if the event’s destination IP is associated with TOR exit nodes.
is_reputation_domain – Checks if the event’s domain activity is associated with malware traffic.
is_phishing_uri– Checks if the event’s domain activity is associated with phishing attacks.
Use these fields to focus searches, create dashboards, create visualizations, and more in the Data Lake UI.