- Exabeam Data Lake Architecture Overview
- Exabeam Product Deployment in On-premises or Virtual Environments
- Administrator Operations
- User Management
- Exabeam Data Lake Role-based Access Control
- Exabeam Data Lake Object-based Access Control
- Exabeam Data Lake Secured Resources Overview
- Third-Party Identity Provider Configuration
- Audit Log Management in Data Lake
- Common Access Card (CAC) Authentication
- Set Up LDAP Server
- Set Up LDAP Authentication
- Azure AD Context Enrichment
- Adding a User to Exabeam Data Lake
- User Password Policies
- User Engagement Analytics Policy
- Exabeam Threat Intelligence Service
- Threat Intelligence Service Prerequisites
- Connect to Threat Intelligence Service through a Proxy
- View Threat Intelligence Feeds
- Threat Intelligence Context Tables
- View Threat Intelligence Context Tables
- Assign a Threat Intelligence Feed to a New Context Table
- Create a New Context Table from a Threat Intelligence Feed
- Using Threat Intelligence Service with Data Lake
- Check ExaCloud Connector Service Health Status
- Index Management
- Parser Management
- Forwarding to Other Destinations
- Syslog Forwarding Management in Exabeam Data Lake
- Syslog Forwarding Destinations
- Configure Log Forwarding Rate
- How to Forward Syslog to Exabeam Advanced Analytics from Exabeam Data Lake
- How to Forward Syslog from Exabeam Data Lake to Non-Exabeam External Destinations
- Exabeam Data Lake Selective Forwarding using Conditions
- How to Configure Exabeam Data Lake Log Destinations for Correlation Rule Outcomes
- Forward Exabeam Data Lake Incident to Exabeam Incident Responder
- Syslog Forwarding Management in Exabeam Data Lake
- Cluster Operations
- Cross-cluster Search in Exabeam Data Lake
- Prerequisites for Exabeam Data Lake Cross-cluster Search
- Remote Cluster Management for Exabeam Data Lake Cross-cluster Search
- Register a Remote Cluster in Exabeam Data Lake for Cross-cluster Search
- Exabeam Data Lake Cross-cluster Health Monitoring and Handling
- How to Enable/Disable/Delete Exabeam Data Lake Remote Clusters for Cross-cluster Search
- Exabeam Data Lake Remote Cluster Data Access Permissions for Cross-cluster Search
- System Health Page
- A. Technical Support Information
- B. List of Exabeam Services
- C. Network Ports
- D. Supported Browsers
Forwarding to Other Destinations
Syslog Forwarding Management in Exabeam Data Lake
Note
SaaS Cloud deployments only support TCP 515 with TLS.
SaaS Cloud deployments support Syslog forwarding but must be configured by an Exabeam technical representative. Please gather the relevant sources and destinations and then contact your Exabeam technical representative to enable Syslog forwarding.
Data Lake can be configured to send all, or a subset of, ingested logs to Advanced Analytics or other destinations via Syslog. This capability allows you to send your logs to an Advanced Analytics instance and/or third-party destination.
If you also have deployed an instance of Advanced Analytics, we strongly recommend using this functionality, as logs ingested by Data Lake can be consumed immediately by Advanced Analytics for threat detection.
Follow the instructions in Syslog Forwarding to Advanced Analytics to forward logs ingested from Data Lake to Advanced Analytics.Or, follow the instructions in Syslog Forwarding to External Destinations to forward all logs ingested from Data Lake to external destinations.
Then follow the instructions in Selective Forwarding via Conditions.
Syslog Forwarding Destinations
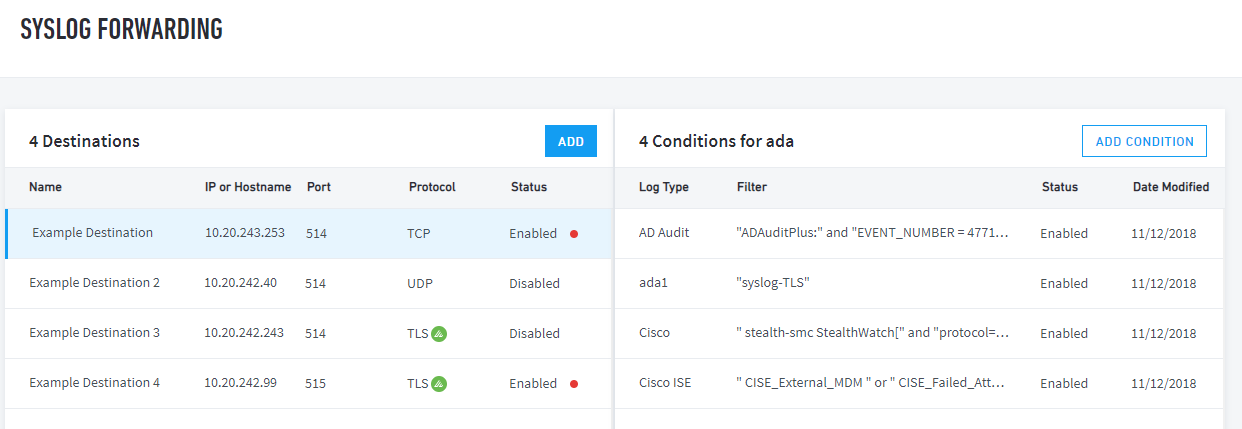 |
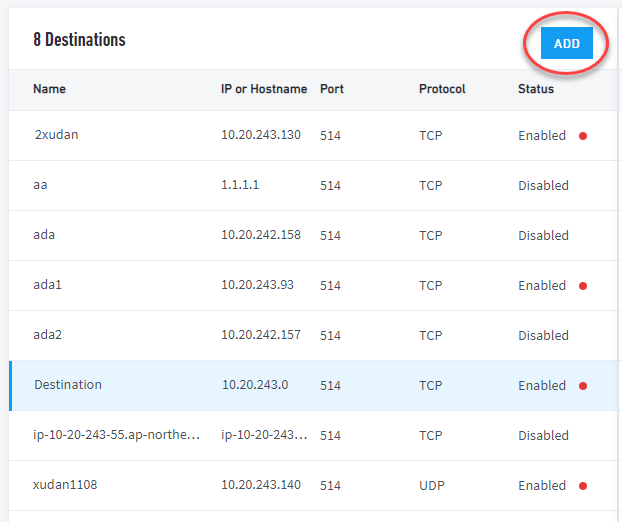
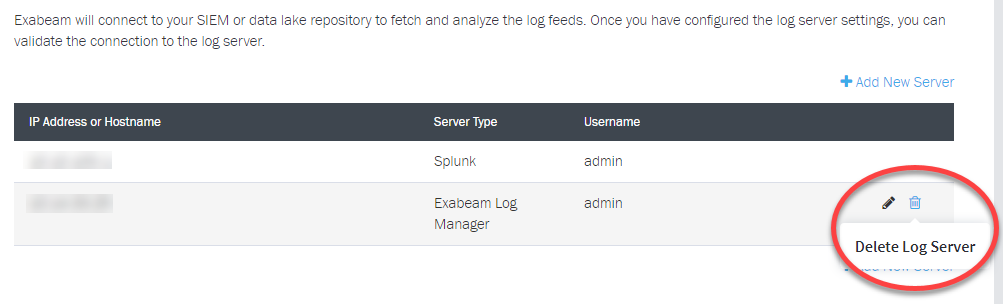
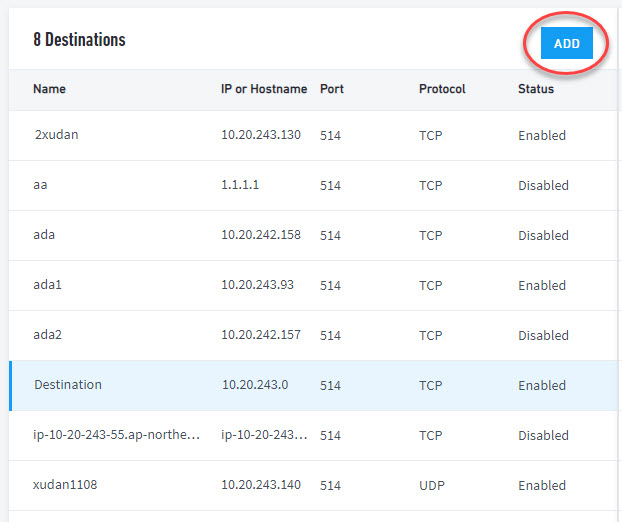
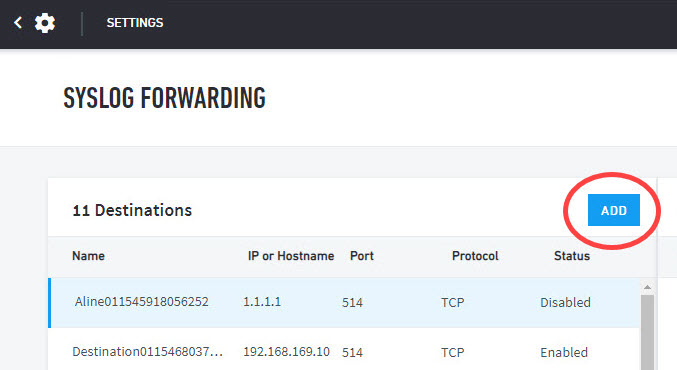
The Syslog Forwarding menu provides details and settings for Data Lake log forwarding recipients. The Destinations section lets you add a new syslog destination (either internal or external destinations) and access a list of your configured syslog destinations.
 |
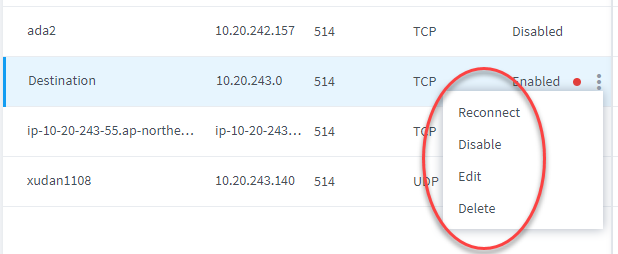
Hover over any syslog destination to enable additional actions, such as:
Reconnect – If the destination is disconnected, attempt to manually reconnect the destination.
Note
If the configured destination is Exabeam Advanced Analytics, then forwarding automatically reconnects when Advanced Analytics service returns.
Disable – Disable syslog forwarding to the destination.
Edit – Edit the destination (name, hostname or IP, port, and protocol).
Delete – Remove the destination and all associated conditions.
 |
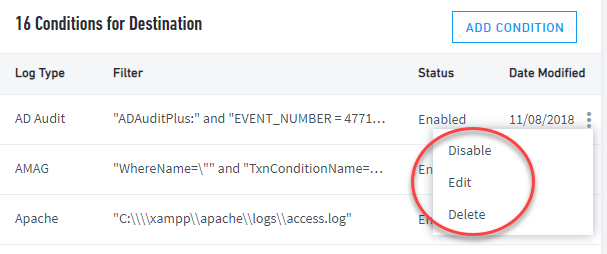
The Conditions section lets you add a new log filters (or "conditions") and access a list of your configured filters.
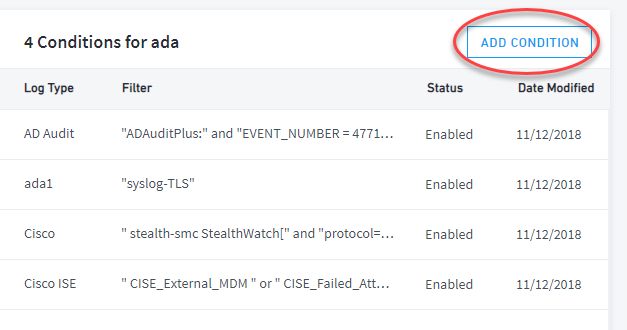 |
Hover over any condition to enable additional actions, such as:
Disable – Disable condition.
Edit – Edit the condition (log type and filter expression).
Delete – Remove the condition.
 |
Configure Log Forwarding Rate
The log forwarding volume from source to destination must balanced such that the destination is not overwhelmed by too many logs pushed to it while the source is not throttled too much that there is a backlog of un-ingested logs. By default, Exabeam Data Lake does not enforce a log forwarding cap. Defining a throughput rate is optional and allows you to fine tune the data flow to suit your organization’s needs. You can adjust the flow at any given time as log volumes and deployments change.
When defining the log forwarding limit, consider:
The limit must be from 3000 to 55000 events per second (EPS) per destination
A different EPS limit can be set for each syslog forwarding destination (maximum 6 forwarding destinations per Data Lake cluster)
Data Lake will hold temporary logs that have not been transmitted for 2 – 2.5 days in Kafka (depending on capacity) before purging logs that have been forwarded
Define the limit with a reasonable upper cap as messages over the limit will be processed with delay
TCP log forwarding is strongly recommended rather than UDP
Where Exabeam Advanced Analytics is the destination of forwarded logs, the maximum forwarding rate is 11,000 EPS per active Log Ingestion and Messaging Engine (LIME) instance in Advanced Analytics
To adjust the log forwarding limit for a log destination:
Navigate to Settings > Log Forwarding > Log Destinations.
In the Syslog Forwarding menu, select the log destination to edit.
If there is no log destination configured, select Add a Destination create a recipient. For more information, see Syslog Forwarding Management in Exabeam Data Lake).
Click Enable Rate Limit and then enter a log throughput rate between 3,000 to 55,000 events per second. Log messages over the limit will be processed with delay.
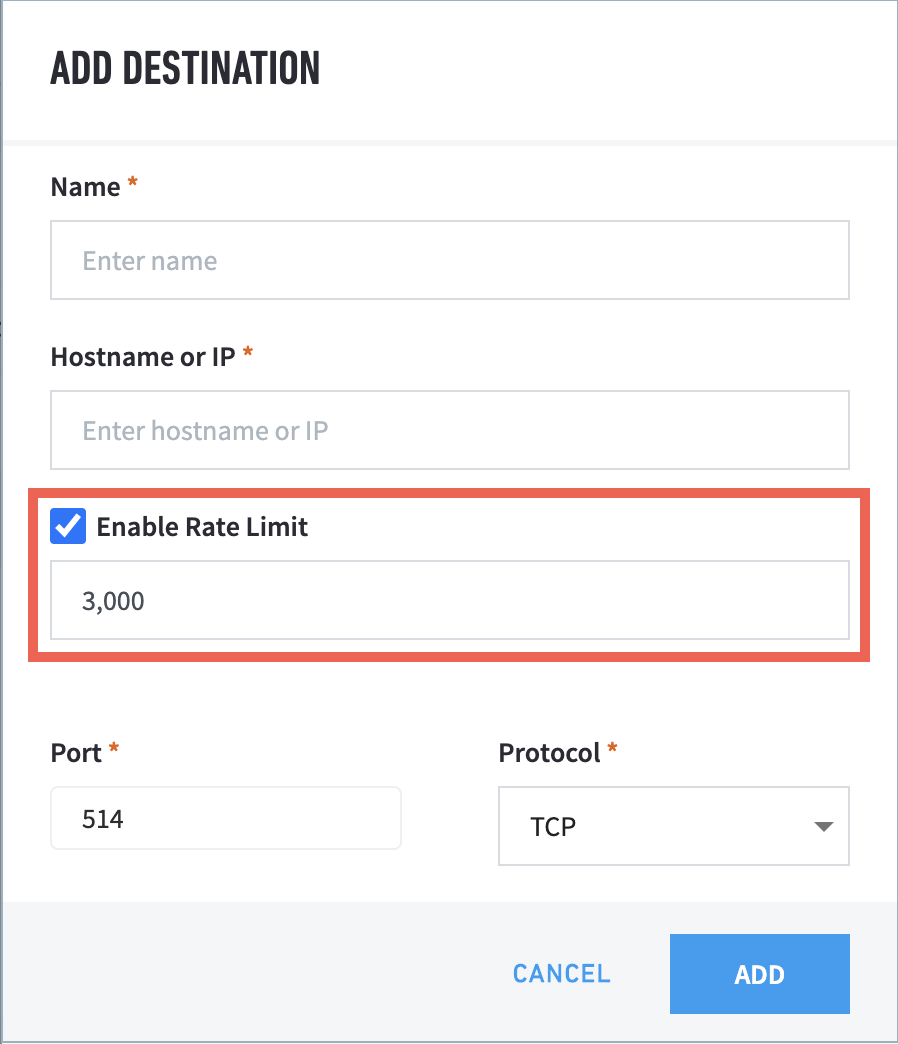
Click Save or Add to apply the configuration. No service restarts are necessary.
How to Forward Syslog to Exabeam Advanced Analytics from Exabeam Data Lake
This process will configure your Data Lake product to forward ingested logs to your Advanced Analytics product via syslog. A best practice is to forward only necessary logs to Advanced Analytics.
Required:
Before you begin, please ensure you have the following:
Permissions to adjust log ingestion settings in Advanced Analytics
Permissions to adjust log forwarding settings in Data Lake (see Configure Log Forwarding Rate )
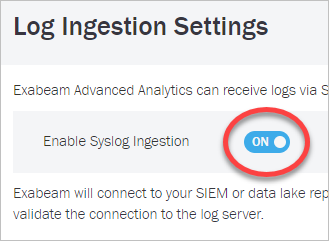
Enable Syslog Ingestion in Advanced Analytics.
Log in to the Advanced Analytics product, and then navigate to Admin Settings > Log Management > Log Ingestion Settings.
Toggle the Enable Syslog Ingestion setting to ON.
If you previously added Data Lake as a server, then delete it. Otherwise, skip to step 1d.
Click Next.
Configure Advanced Analytics as your syslog destination.
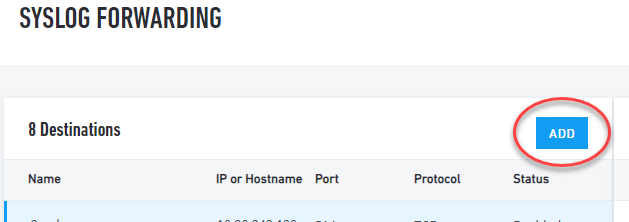
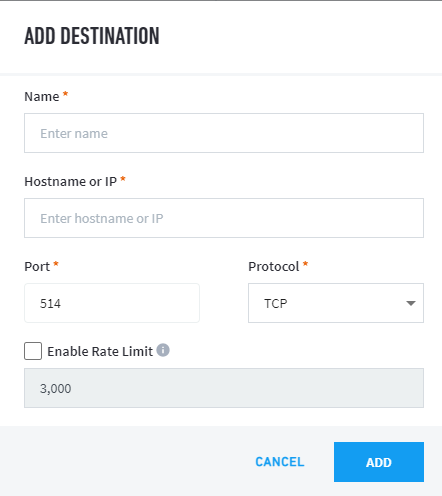
Log in to the Data Lake product, and then navigate to Settings > Log Forwarding > Log Destinations.

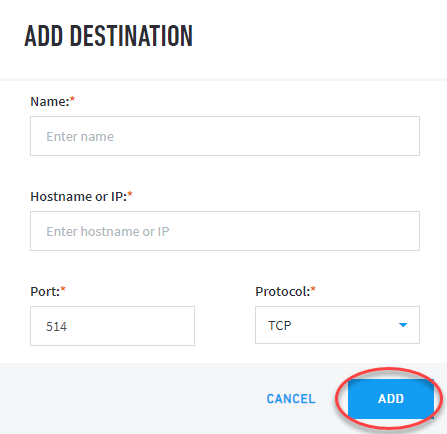
Click Add in the Destinations box.
Enter a Name, Hostname or IP, and Port, and then select a Protocol.
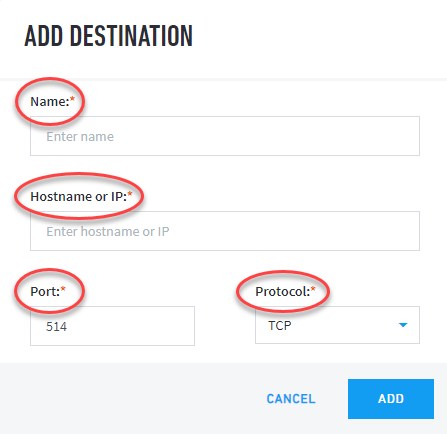
Click Add.
Optionally, configure any forwarding Conditions.
Verify that the Advanced Analytics instance is receiving logs by running the following:
sudo tcpdump -i eno1 'port Syslog_port'
How to Forward Syslog from Exabeam Data Lake to Non-Exabeam External Destinations
This process will configure your Data Lake product to forward ingested logs to external non-Exabeam destinations via syslog.
Required:
An external destination configured to ingest syslog data
Permissions to adjust log forwarding settings in Data Lake (see Configure Log Forwarding Rate )
Log in to the Data Lake product, and then navigate to Settings > Log Forwarding > Log Destinations.
Click Add in the Destinations box.
Enter a Name, Hostname or IP, and Port, and then select a Protocol.
Click ADD.
Optionally, configure any forwarding Conditions.
Verify that the external destination is receiving logs.
Exabeam Data Lake Selective Forwarding using Conditions
Conditions let you filter and then forward the logs that are ingested into Data Lake to your Syslog destination via Syslog for threat detection.
Conditions are based on log types. When you create a filter, select the type of log that you wish to forward from a predefined menu.
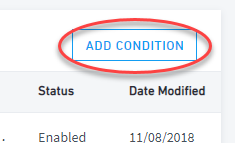
To add a new condition:
Log in to the Data Lake product, and then navigate to Settings > Log Forwarding > Log Destinations.
Select an existing destination, or click ADD to create a new destination (either Advanced Analytics or external).
Click Add Condition.
Select the log type that you want to forward. The default filter condition is automatically entered into the Filter Expression box .
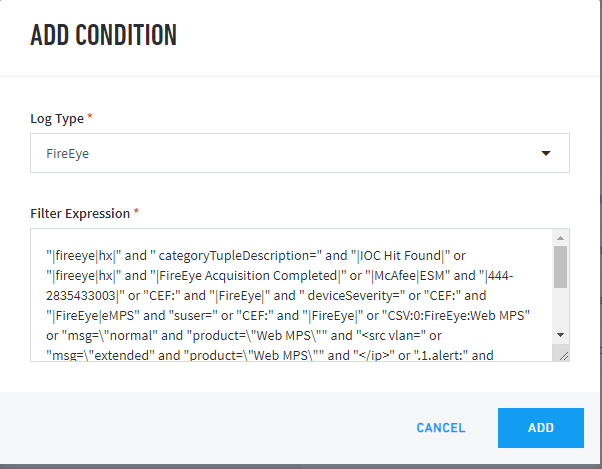
Note
The default filter expression for the selected log type may not work in your deployment, in which case you need to edit the expression in the next step.
Optionally, edit the filter condition according to your business needs. See Editing Condition Filters.
Click Add.
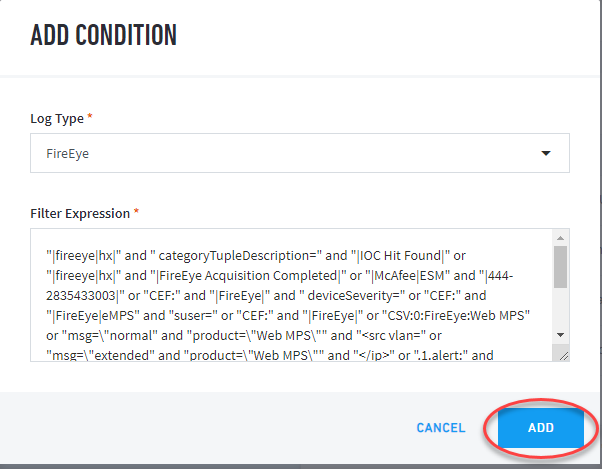
The condition will appear in the condition list and is automatically enabled.
Editing Condition Filters
In condition filters, string matching is applied to raw log text. There is no distinction between field names and content.
Consider the following when creating condition filters:
Regular expressions are not supported
Text strings in condition filters need to be braced with double-quotes
The
oroperator will be used when combining multiple conditions in the filterDestinations will need an escape character (
\) before the address to be applied in filteringParenthesis is not supported
The
andBoolean takes precedence overorin the logic order
Here are some example:
| event must contain |
| event must contain both |
| event must contain both |
| event must contain |
| event must contain both |
How to Configure Exabeam Data Lake Log Destinations for Correlation Rule Outcomes
In addition to syslog forwarding to multiple recipients, you can filter the content further using correlation rules.
To incorporate correlation rules with log forwarding:
Create a Destination Record.
Navigate to Settings > Log Forwarding > Log Destinations and then click Add.
Fill in the destination fields.
Select Enable Rate Limit and specify the limit. This rate limit allows you to limit the number of logs forwarded to Advanced Analytics.
Click ADD. Your new record should appear in the Syslog Forwarding list of destinations.
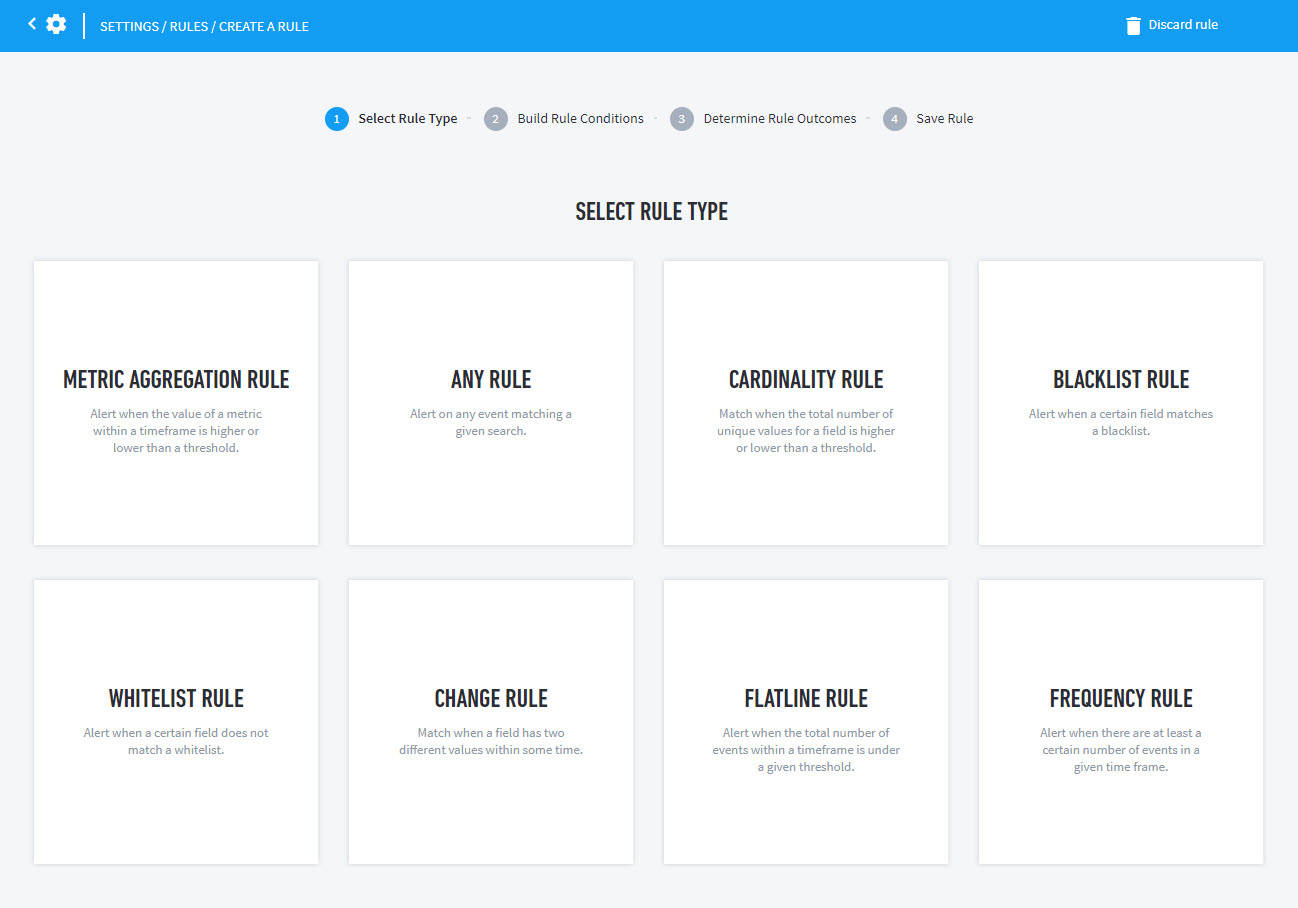
Direct the outcome of a correlation rule to your destination. The following is an example of creating new a correlation rule.
Navigate to Settings > Correlation Rules > Correlation Rules, and then click CREATE.
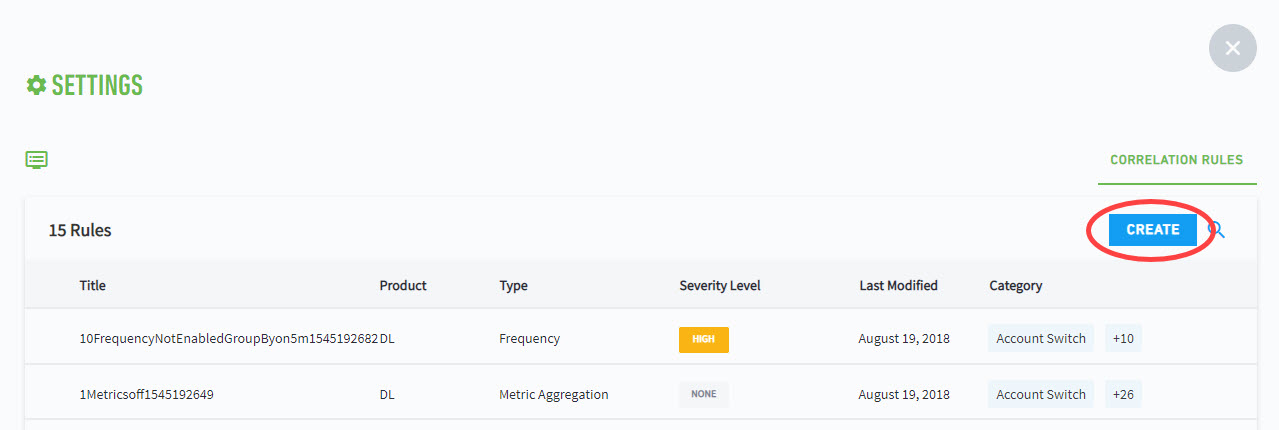
Select the correlation rule type that will activate log forwarding to your destination.
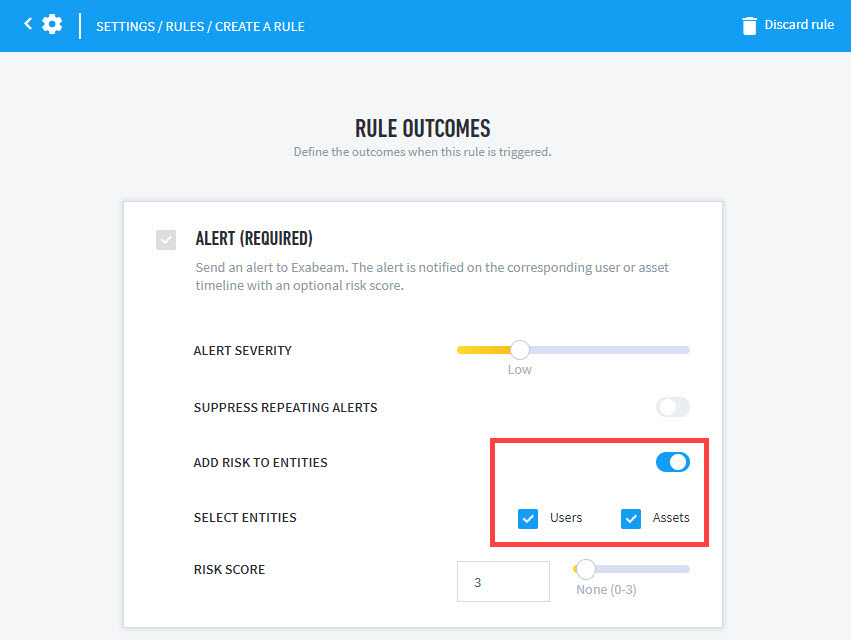
At the Determine Rule Outcomes step, enable ADD RISK TO ENTITIES. Click User and/or Assets as the entity timeline to append data to, if your destination is an Advanced Analytics platform.
Click NEXT to the Save Rule step to complete the correlation rule creation.
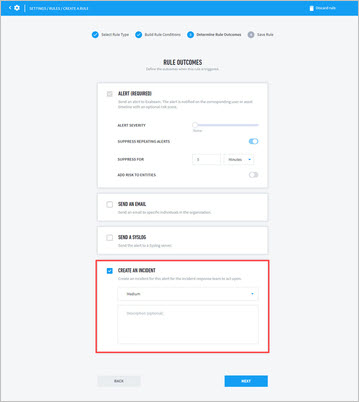
Forward Exabeam Data Lake Incident to Exabeam Incident Responder
Hardware and Virtual Deployments Only
If you have Exabeam Incident Responder in your environment, you can produce incidents directly into it using triggers generated by correlation rules.
Warning
It is required that your Incident Responder host has parsers to receive payloads from Data Lake. Otherwise, Data Lake forwarded items will not produce incidents.
Note
Ensure routing and access is enabled to and from port 9875 for data transport at the Data Lake and Incident Responder hosts.
To Setup Incident Forwarding, you must establish an Incident Responder destination:
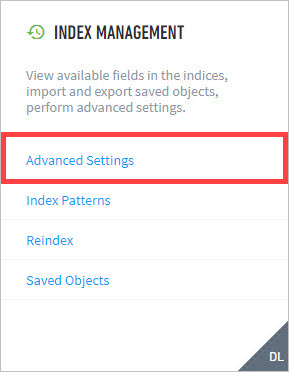
Navigate to Settings > Index Management > Advanced Settings.
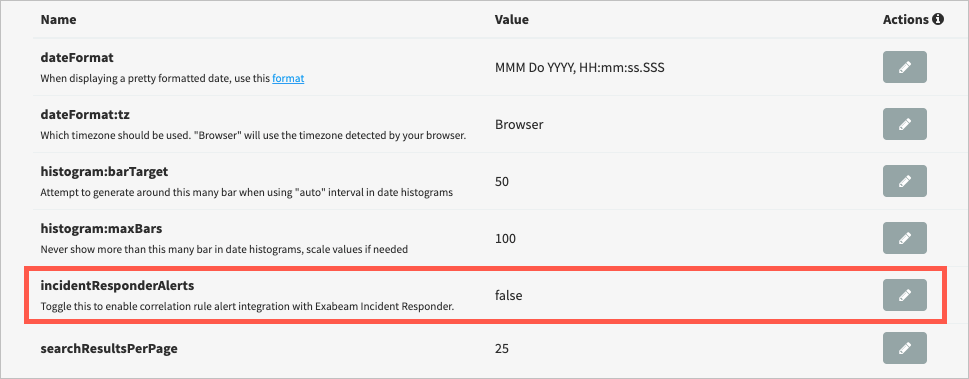
Click the Edit icon to change the status of incidentResponderAlerts. A status of “false” indicates that incident forwarding is disabled.
Click the Enable checkbox and then the Save icon to enable forwarding to Exabeam Incident Responder.

Edit the
ir.outcomesetting in/opt/exabeam/config/lms/server/default/application.confat the Data Lake master host with the Incident Responder host and port information.ir.outcome { enabled = true syslogservers = [ { host = "<hostname>" port =9875 } ] }Restart Data Lake to apply incident forwarding changes.
lms-server-stop; sleep 5; lms-server-start
In the Data Lake UI, create a rule to utilize the incident forwarding:
Navigate to Settings > Correlation Rules.
Click Create to build a new rule or select an existing rule to edit.
During rule creation in the Rule Outcomes menu, click CREATE AN INCIDENT and fill in the incident descriptors based on your organization's security policies.
Proceed with the remainder of rule creation process.