- Exabeam Data Lake Architecture Overview
- Exabeam Product Deployment in On-premises or Virtual Environments
- Administrator Operations
- User Management
- Exabeam Data Lake Role-based Access Control
- Exabeam Data Lake Object-based Access Control
- Exabeam Data Lake Secured Resources Overview
- Third-Party Identity Provider Configuration
- Audit Log Management in Data Lake
- Common Access Card (CAC) Authentication
- Set Up LDAP Server
- Set Up LDAP Authentication
- Azure AD Context Enrichment
- Adding a User to Exabeam Data Lake
- User Password Policies
- User Engagement Analytics Policy
- Exabeam Threat Intelligence Service
- Threat Intelligence Service Prerequisites
- Connect to Threat Intelligence Service through a Proxy
- View Threat Intelligence Feeds
- Threat Intelligence Context Tables
- View Threat Intelligence Context Tables
- Assign a Threat Intelligence Feed to a New Context Table
- Create a New Context Table from a Threat Intelligence Feed
- Using Threat Intelligence Service with Data Lake
- Check ExaCloud Connector Service Health Status
- Index Management
- Parser Management
- Forwarding to Other Destinations
- Syslog Forwarding Management in Exabeam Data Lake
- Syslog Forwarding Destinations
- Configure Log Forwarding Rate
- How to Forward Syslog to Exabeam Advanced Analytics from Exabeam Data Lake
- How to Forward Syslog from Exabeam Data Lake to Non-Exabeam External Destinations
- Exabeam Data Lake Selective Forwarding using Conditions
- How to Configure Exabeam Data Lake Log Destinations for Correlation Rule Outcomes
- Forward Exabeam Data Lake Incident to Exabeam Incident Responder
- Syslog Forwarding Management in Exabeam Data Lake
- Cluster Operations
- Cross-cluster Search in Exabeam Data Lake
- Prerequisites for Exabeam Data Lake Cross-cluster Search
- Remote Cluster Management for Exabeam Data Lake Cross-cluster Search
- Register a Remote Cluster in Exabeam Data Lake for Cross-cluster Search
- Exabeam Data Lake Cross-cluster Health Monitoring and Handling
- How to Enable/Disable/Delete Exabeam Data Lake Remote Clusters for Cross-cluster Search
- Exabeam Data Lake Remote Cluster Data Access Permissions for Cross-cluster Search
- System Health Page
- A. Technical Support Information
- B. List of Exabeam Services
- C. Network Ports
- D. Supported Browsers
Cluster Operations
Hardware and Virtual Deployments Only
Configuring Exabeam Directory Services Data Retention in Exabeam Data Lake
Hardware and Virtual Deployments Only
Note
To configure this feature, please contact your Exabeam technical representative.
By default, the retention policy for Exabeam Directory Services (EDS) data is 30 days. Therefore, LDIF (LDAP Data Interchange Format) files collected daily from the LDAP (Lightweight Directory Access Protocol) server(s) are retained for 30 days.
In general, the 30-day default period is suitable for the average customer and does not affect product behavior performance. However, some customers may need to reprocess older events, which may include events related to users or assets that are no longer active, and won’t be found in the current context tables. In this specific case, the events will be reprocessed but might not be able to leverage the historical contextual information.
To configure the EDS data retention period:
Access the EDS custom application.conf file:
/opt/exabeam/config/common/eds/custom/application.confAdd the value here, where
Nis the total number of retention days:EDS.Defaults.RetentionPeriod = N daysStop, and then start EDS again:
eds-stop
eds-start
Re-Assign to a New IP (Appliance Only)
Hardware Deployments Only
Note
These instructions apply to Exabeam appliances only. For instructions on re-assigning IPs in virtual deployments, please contact Exabeam Customer Success by opening a case at Exabeam Community.
Set up a named session to connect to the host. This will allow the process to continue in the event you lose connection to the host.
screen -LS [session_name]
Enter the cluster configuration menu.
source /opt/exabeam_installer/init/exabeam-multinode-deployment.sh
From the list of options, choose
Change network settings.Choose
Change IP of cluster hosts.Choose
Change IP(s) of the cluster - Part I (Before changing IP).You will go through a clean up of any previous Exabeam installations.
Do you want to continue with uninstalling the product? [y/n] yAcknowledge the Exabeam requisites.
**********************************************************************
Part I completed. Nuke successful. Product has been uninstalled.
***Important***
Before running Part II, please perform these next steps below (Not optional!):
- Step 1 (Manual): Update the IPs (using nmtui or tool of choice)
- Step 2 (Manual): Restart network (e.g., systemctl restart network)
**********************************************************************
Please enter 'y' if you have read and understood the next steps: [y/n] y
Open the
nmtuito change IP addresses of each host in the cluster where the IP address will be changed.sudo nmtui
Go to Edit Connection and then select the network interface.
The example below shows the menu for the network hardware device
eno1. Go to ETHERNET > IPv4 CONFIGURATION.
Warning
Please apply the correct subnet CIDR block when entering
[ip]/[subnet]. Otherwise, network routing will fail or produce unforeseen circumstances.Set the configuration to MANUAL, and then modify the IP address in Addresses.
Click OK to save changes and exit the menu.
Restart the network services.
sudo systemctl restart network
Enter the cluster configuration menu again.
/opt/exabeam_installer/init/exabeam-multinode-deployment.sh
Choose
Change network settings.Choose
Change IP of cluster hosts.Choose
Change IP(s) of the cluster - Part II (Before changing IP)Acknowledge the Exabeam requisites.
**********************************************************************
Please make sure you have completed all the items listed below:
- Complete Part I successfully (nuke/uninstall product)
- (Manual) Update the IPs (using nmtui or tool of choice)
- (Manual) Restart network (e.g., systemctl restart network)
**********************************************************************
Do you want to continue with Part II? [y/n] y
Provide the new IP of the host.
What is the new IP address of [hostname]? (Previous address was 10.70.0.14)[new_host_ip]Update your DNS and NTP server information, if they have changed. Otherwise, answer
n.Do you want to update your DNS server(s)? [y/n] n Do you want to update your NTP server? [y/n] n
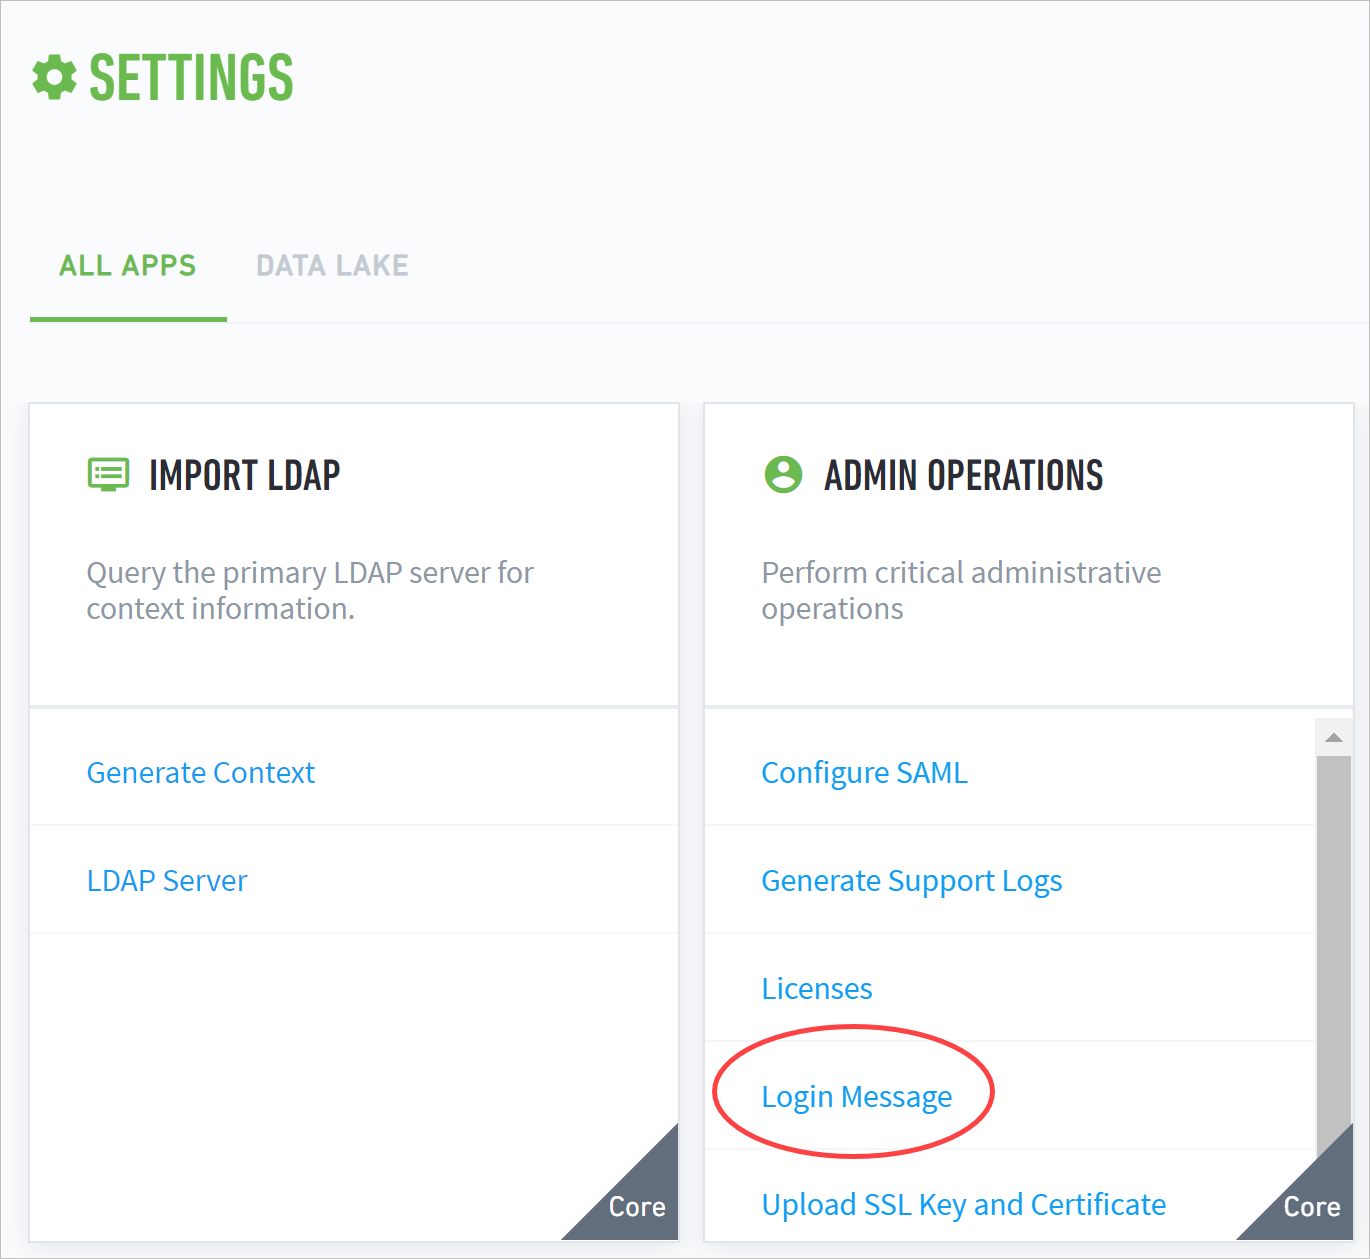
Display a Custom Login Message
You can create and display a custom login message for your users. The message is displayed to all users before they can proceed to login.
To display a custom login message:
On a web browser, log in to your Exabeam web console using an account with administrator privileges.
Navigate to Settings > Admin Operations > Login Message.
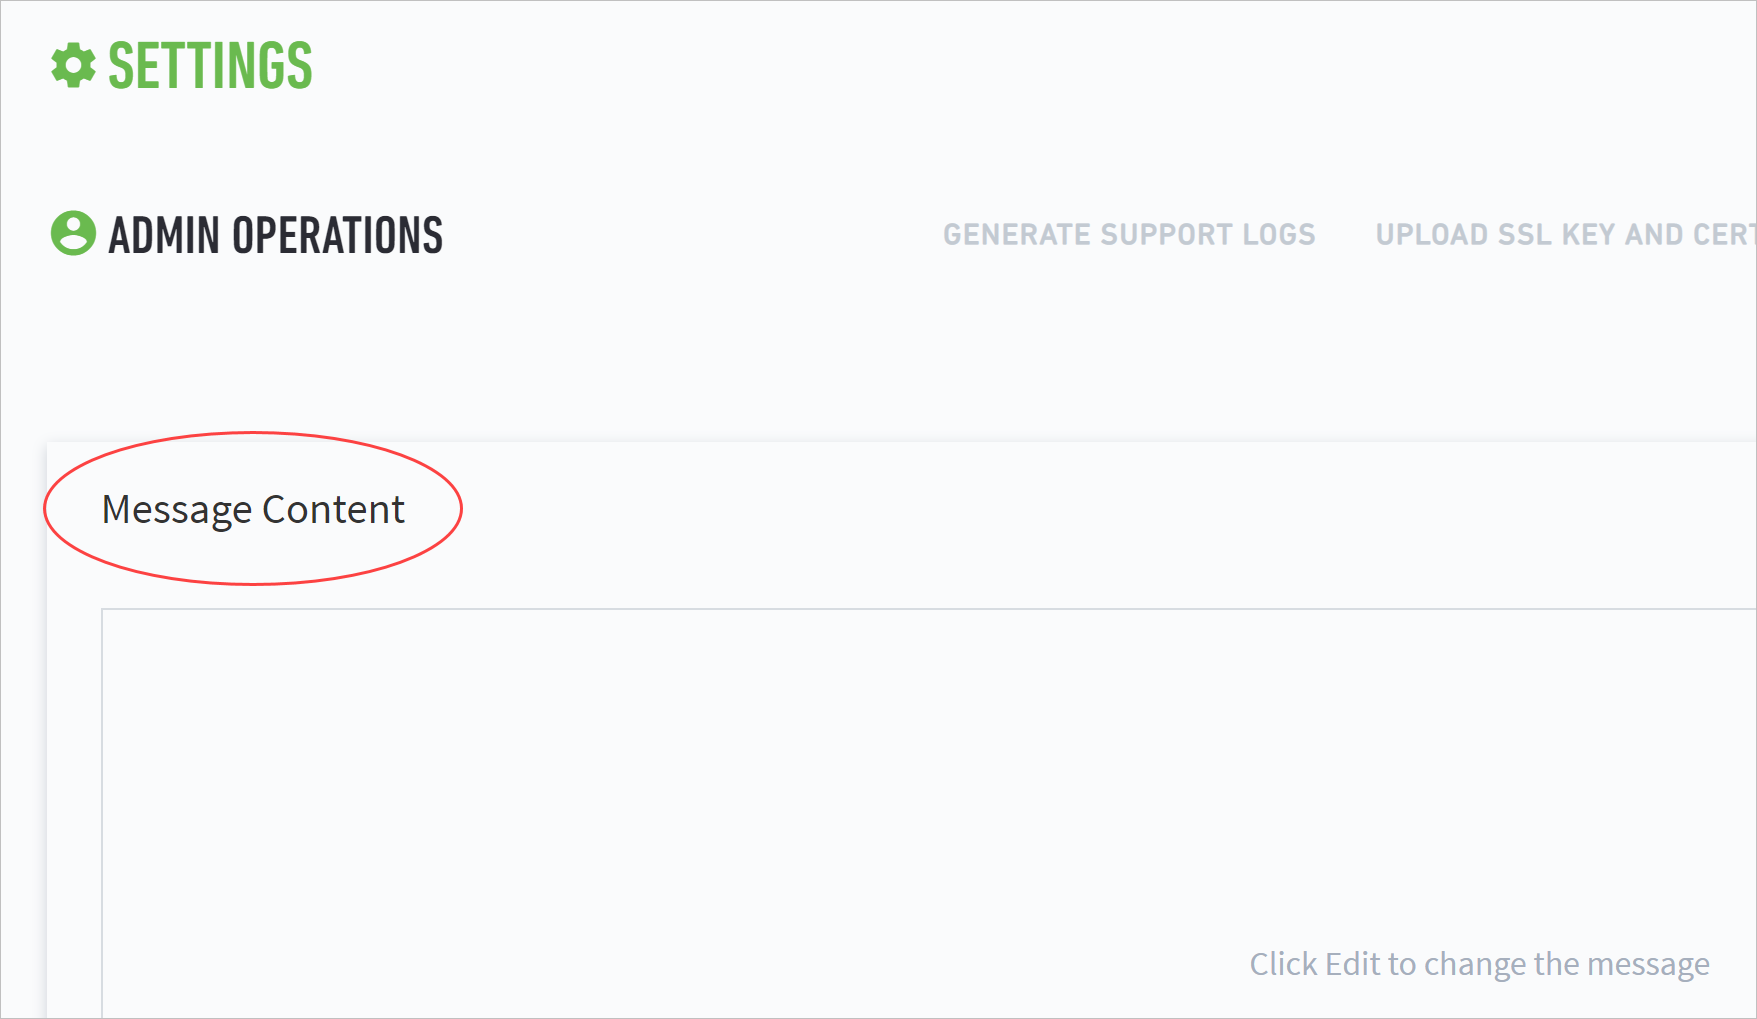
Click EDIT.

Enter a login message in Message Content.
Note
The message content has no character limit and must follow UTF-8 format. It supports empty lines between text. However, it does not support special print types, links, or images.
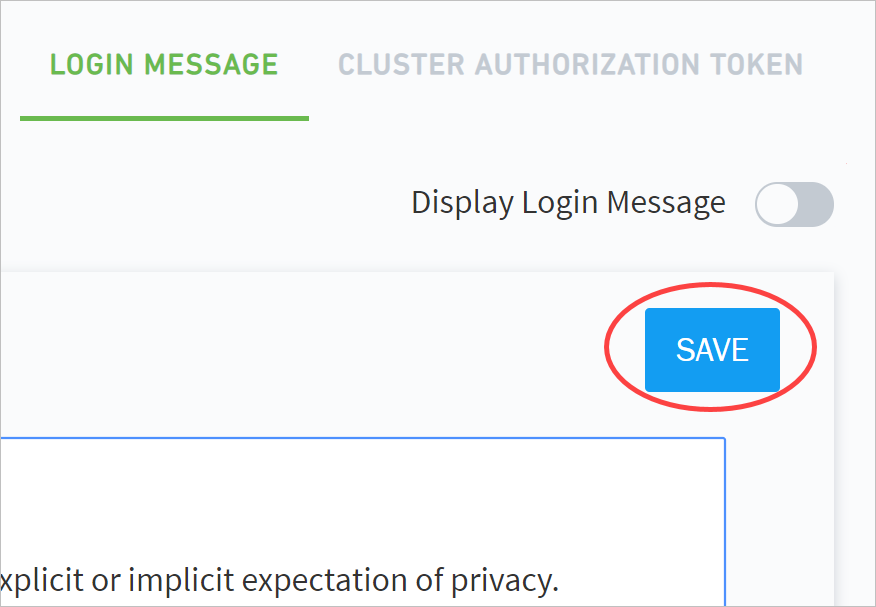
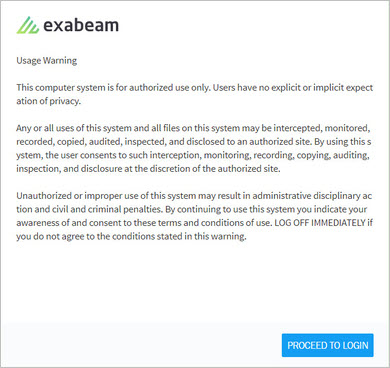
A common type of message is a warning message. The following example is a sample message:
Usage Warning
This computer system is for authorized use only. Users have no explicit or implicit expectation of privacy.
Any or all uses of this system and all files on this system may be intercepted, monitored, recorded, copied, audited, inspected, and disclosed to an authorized site. By using this system, the user consents to such interception, monitoring, recording, copying, auditing, inspection, and disclosure at the discretion of the authorized site.
Unauthorized or improper use of this system may result in administrative disciplinary action and civil and criminal penalties. By continuing to use this system you indicate your awareness of and consent to these terms and conditions of use. LOG OFF IMMEDIATELY if you do not agree to the conditions stated in this warning.
Note
This sample warning message is intended to be used only as an example. Do not use this message in your deployment.
Click SAVE.
Click the Display Login Message toggle to enable the message.
Note
You can hide your message at any time without deleting it by disabling the message content.
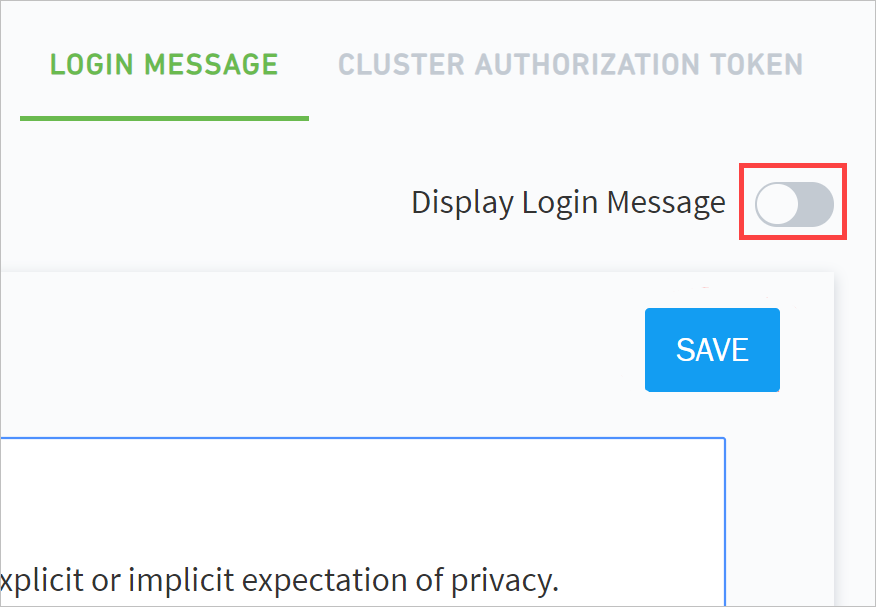
Your custom login message is now shared with all users before they proceed to the login screen.
 |
Exabeam Cluster Authentication Token
The cluster authentication token is used to verify identities between clusters that have been deployed in phases as well as HTTP-based log collectors. Each peer cluster in a query pool must have its own token. You can set expiration dates during token creation or manually revoke tokens at any time.
Note
This operation is not supported for Data Lake versions i40.2 through i40.5. For i40.6 and higher, please see the Contents of the exabeam-API-docs.zip file section of the following document: Exabeam Saas API Documentation.
To generate a token:
Go to Settings > Core > Admin Operations > Cluster Authentication Token.
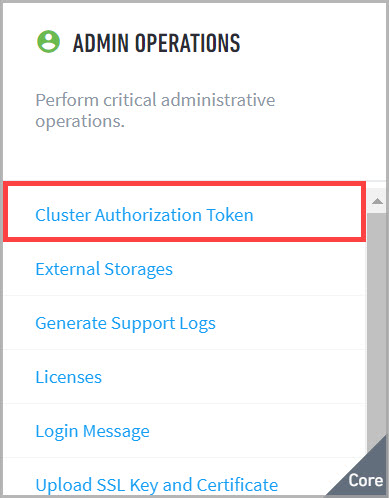
The Cluster Authorization Token page appears.
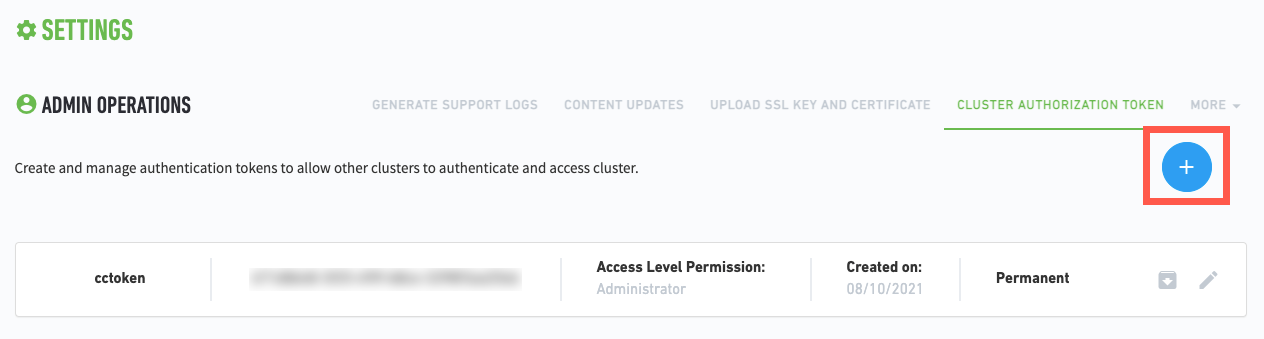
Click
 .
.The Setup Token dialog box appears.
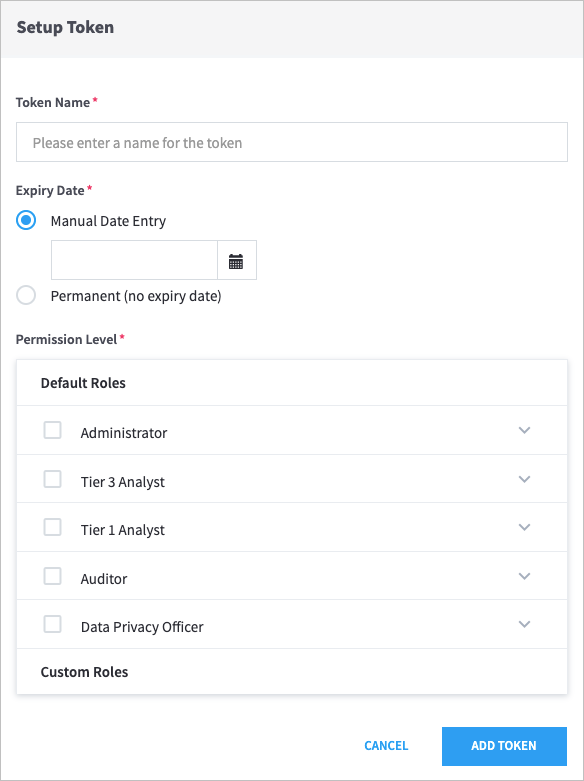
Enter a Token Name, and then select an Expiry Date.
Important
Token names can contain only letters, numbers, and spaces.
Select the Default Roles for the token.
Click Add Token.
Use this generated file to allow your API(s) to authenticate by token. Ensure that your API uses
ExaAuthTokenin its requests. For curl clients, the request structure resembles the following:curl -H "ExaAuthToken:<generated_token>" https://<external_host>:<api_port>/<api_request_path>