- Exabeam Data Lake Architecture Overview
- Exabeam Product Deployment in On-premises or Virtual Environments
- Administrator Operations
- User Management
- Exabeam Data Lake Role-based Access Control
- Exabeam Data Lake Object-based Access Control
- Exabeam Data Lake Secured Resources Overview
- Third-Party Identity Provider Configuration
- Audit Log Management in Data Lake
- Common Access Card (CAC) Authentication
- Set Up LDAP Server
- Set Up LDAP Authentication
- Azure AD Context Enrichment
- Adding a User to Exabeam Data Lake
- User Password Policies
- User Engagement Analytics Policy
- Exabeam Threat Intelligence Service
- Threat Intelligence Service Prerequisites
- Connect to Threat Intelligence Service through a Proxy
- View Threat Intelligence Feeds
- Threat Intelligence Context Tables
- View Threat Intelligence Context Tables
- Assign a Threat Intelligence Feed to a New Context Table
- Create a New Context Table from a Threat Intelligence Feed
- Using Threat Intelligence Service with Data Lake
- Check ExaCloud Connector Service Health Status
- Index Management
- Parser Management
- Forwarding to Other Destinations
- Syslog Forwarding Management in Exabeam Data Lake
- Syslog Forwarding Destinations
- Configure Log Forwarding Rate
- How to Forward Syslog to Exabeam Advanced Analytics from Exabeam Data Lake
- How to Forward Syslog from Exabeam Data Lake to Non-Exabeam External Destinations
- Exabeam Data Lake Selective Forwarding using Conditions
- How to Configure Exabeam Data Lake Log Destinations for Correlation Rule Outcomes
- Forward Exabeam Data Lake Incident to Exabeam Incident Responder
- Syslog Forwarding Management in Exabeam Data Lake
- Cluster Operations
- Cross-cluster Search in Exabeam Data Lake
- Prerequisites for Exabeam Data Lake Cross-cluster Search
- Remote Cluster Management for Exabeam Data Lake Cross-cluster Search
- Register a Remote Cluster in Exabeam Data Lake for Cross-cluster Search
- Exabeam Data Lake Cross-cluster Health Monitoring and Handling
- How to Enable/Disable/Delete Exabeam Data Lake Remote Clusters for Cross-cluster Search
- Exabeam Data Lake Remote Cluster Data Access Permissions for Cross-cluster Search
- System Health Page
- A. Technical Support Information
- B. List of Exabeam Services
- C. Network Ports
- D. Supported Browsers
User Management
Exabeam Data Lake Role-based Access Control
Customers are able to control the responsibilities and activities of their SOC team members with Role-based Access Control (RBAC). Local users, LDAP users or SAML authenticated users will be assigned roles within Exabeam.
Each user can be assigned one or more roles and the responsibilities of those roles are determined by the permissions their role allows. If users are assigned more than one role, that user receives the permissions of both roles.
In conjunction with RBAC, Data Lake also uses object-based access control which manages the viewing and editing of objects. For more information, see Exabeam Data Lake Object-based Access Control.
Note
If a user is assigned multiple roles with conflicting permissions, Exabeam enforces the role having more permission. For example, if a role with lighter permission and a role with full permission are both assigned to a user, then the user will have full permission.
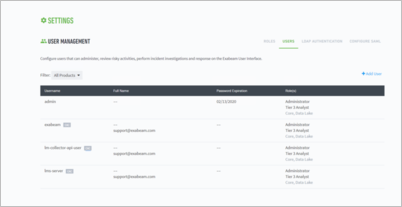
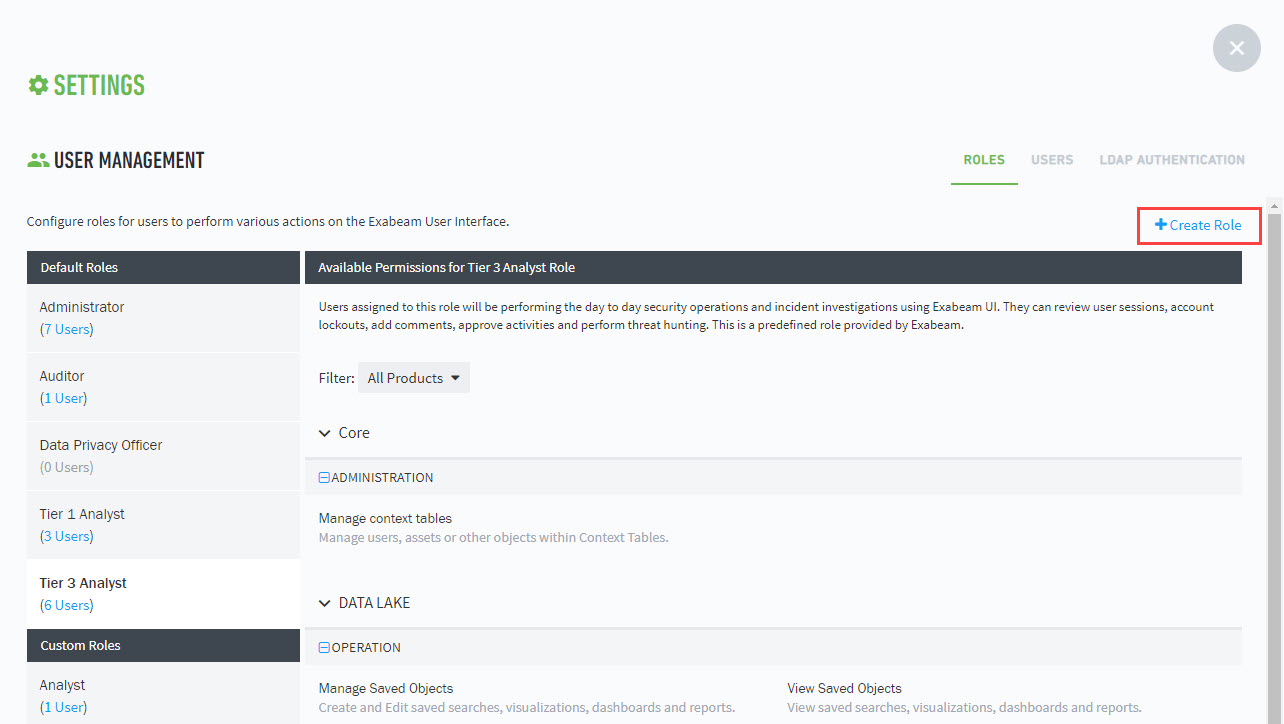
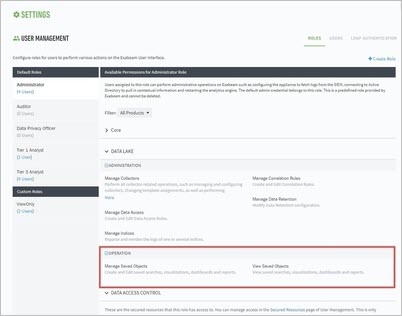
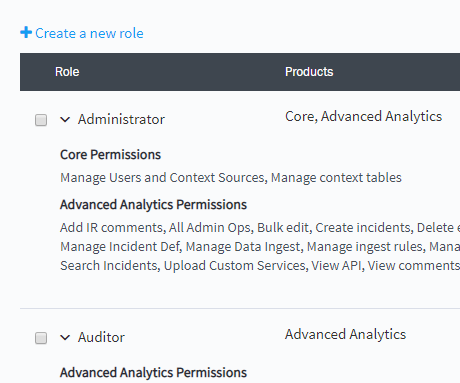
To access the Roles page, navigate to Settings > User Management > Roles.
Caution
The Exabeam-created managed users in Web Common that appear as native users on the Users tabs of Settings > User Management. These accounts are service accounts that are necessary for Exabeam's basic functionality and should not be altered or deleted. These particular accounts are Common Access Card (CAC) accounts. They login through encryption certificates only and resetting or changing their passwords is not possible.
 |
Below is a table listing the CAC service accounts and their functions. These accounts cannot be disabled or deleted.
Account Name | Description |
|---|---|
| Used for out of the box content. |
| This is account allows log/remote agent collectors to connect to Data Lake. Connecting to Data Lake is necessary for management and collector metrics, and the authentication is based on highly secure TLS authentication using secured certificates. |
| Reserved user for core Data Lake service. |
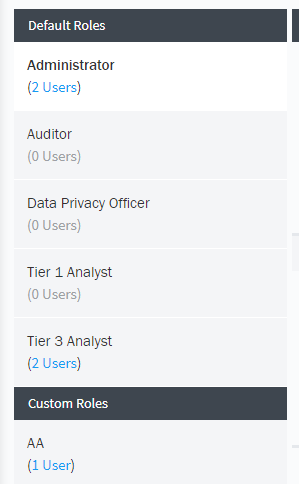
Out-of-the-Box Access Roles
Exabeam provides pre-configured access roles that restrict a user's tasks, actions, and views. A user may have more than one role. When a task, action, or view has more than one role associated to a user, the role with the greater access is applied.
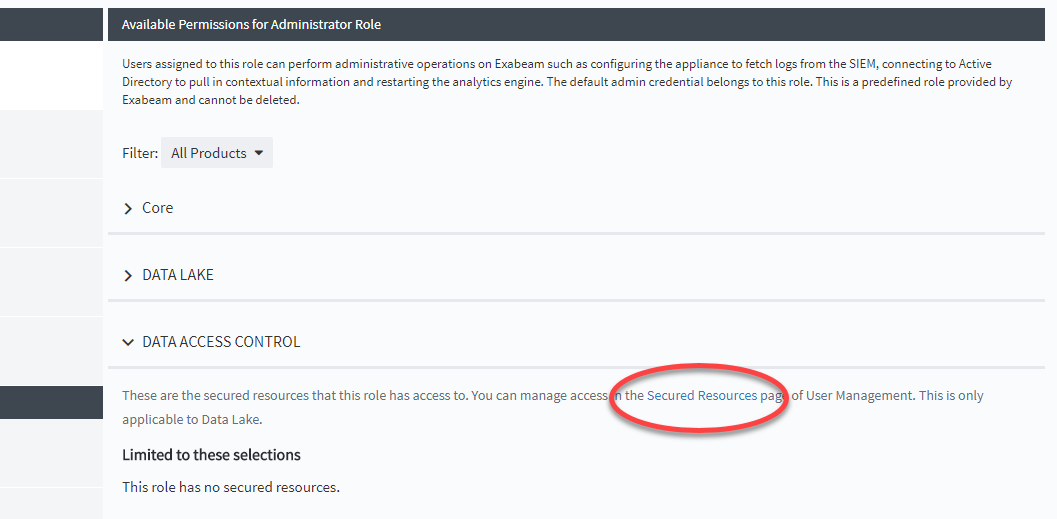
Administrator: This role is intended for administrative access to Exabeam. Users assigned to this role can perform administrative operations on Exabeam, such as configuring the appliance to fetch logs from the SIEM and connecting to Active Directory to pull in contextual information. The default admin credential belongs to this role. This is a predefined role provided by Exabeam and cannot be deleted.
Default permissions include:
Permission | Description |
|---|---|
[default Data Lakepermissions] | By default, all users of the Data Lake have the following permissions: Perform Search, View and Edit Saved Searches, View and Edit Saved Visualizations, View and Edit Saved Dashboards. |
Manage context tables | Manage users, assets or other objects within Context Tables. |
Manage Users and Context Sources | Manage users and roles in the Exabeam Security Intelligence Platform, as well as the context sources used to enhanced the logs ingested (e.g. assets, peer groups, service accounts, executives). |
Manage Correlation Rules | Create and Edit Correlation Rules. |
Manage Collectors | Perform all collector-related operations, such as managing and configuring collectors, changing template assignments, as well as performing start/stop operations. |
Manage Exabeam Reports | Update and reload the list of the Exabeam reports. |
Manage Data Retention | Modify Data Retention configuration. |
Manage Data Access | Create and Edit Data Access Rules. |
Manage Indices | Reparse and reindex the logs of one or several indices. |
Manage Saved Objects | Create, edit, share saved object (such as dashboards, visualizations, searches). |
View Saved Objects | View-only saved object (such as dashboards, visualizations, searches). |
Auditor: Users assigned to this role have only view privileges within the Exabeam UI. They can view all activities within the Exabeam UI, but cannot make any changes. This is a predefined role provided by Exabeam.
Default permissions include:
Permission | Description |
|---|---|
Manage Saved Objects | Create and edit saved searches, visualizations, dashboards, and reports. |
View Saved Objects | View saved searches, visualizations, dashboards, and reports. |
Tier 1 Analyst: Users assigned to this role are junior security analysts or incident desk responders who supports the day-to-day enterprise security operation and monitoring. This is a predefined role provided by Exabeam.
Default permissions include:
Permission | Description |
|---|---|
[default Data Lake permissions] | By default, all users of the Data Lake have the following permissions: Perform Search, View and Edit Saved Searches, View and Edit Saved Visualizations, View and Edit Saved Dashboards. |
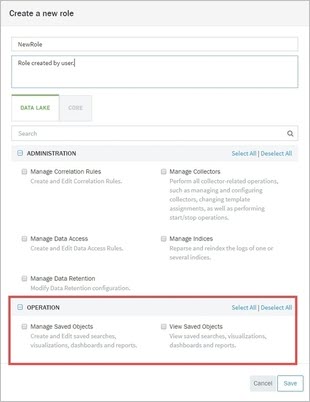
Creating Custom Roles
Roles assigned to Exabeam users determine the level of access to tasks and data. Exabeam provides standard out-of-the-box roles that cannot be edited. However, you create new roles using the same access features and adjust accordingly.
To create a new role, navigate to
Settings > User Management > Roles, and then click Create Role.
or
Settings > User Management > Users > Add User, and then click Create a new role.
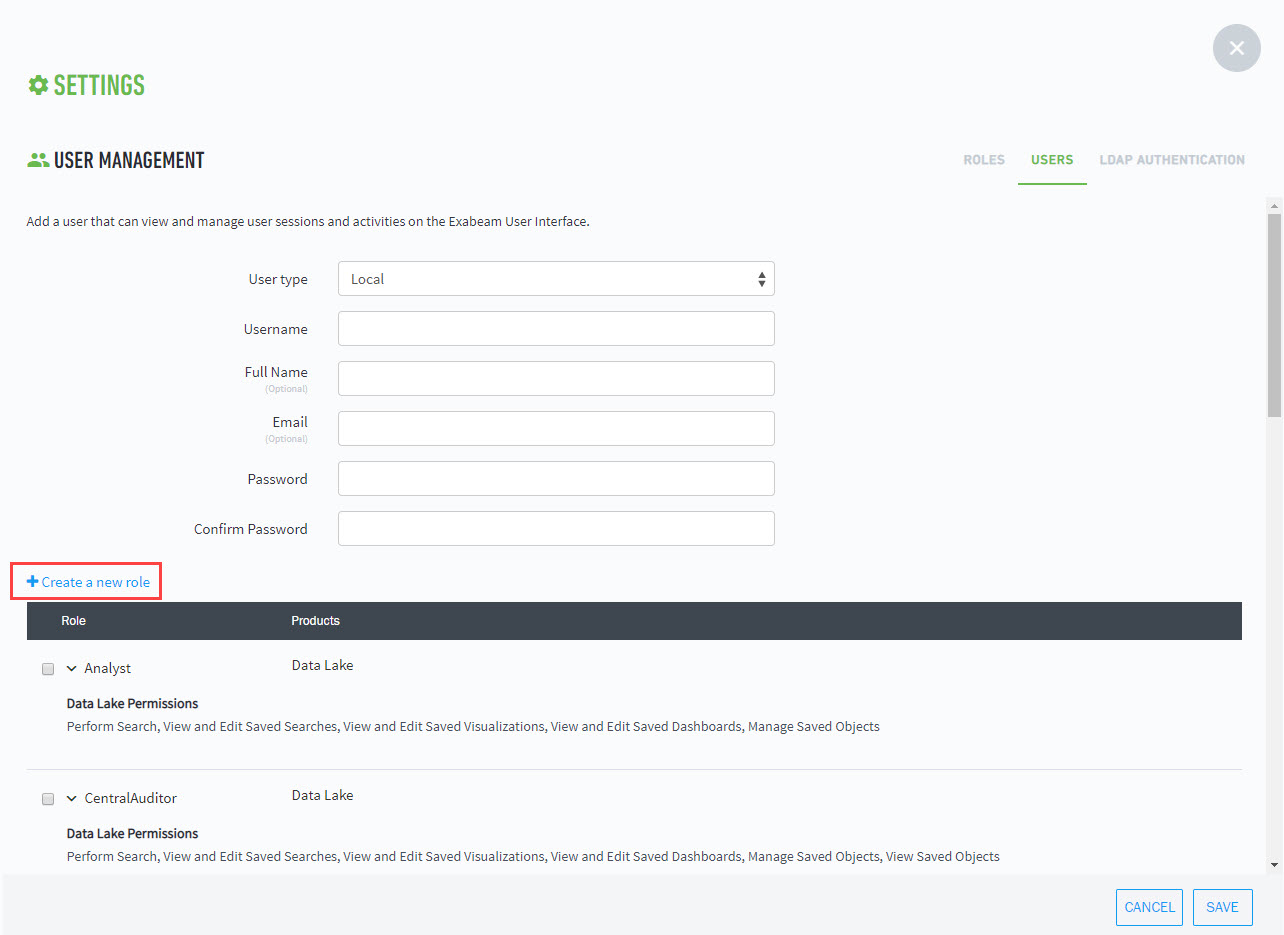
Fill in the fields and enable features in the DATA LAKE tab, as needed.
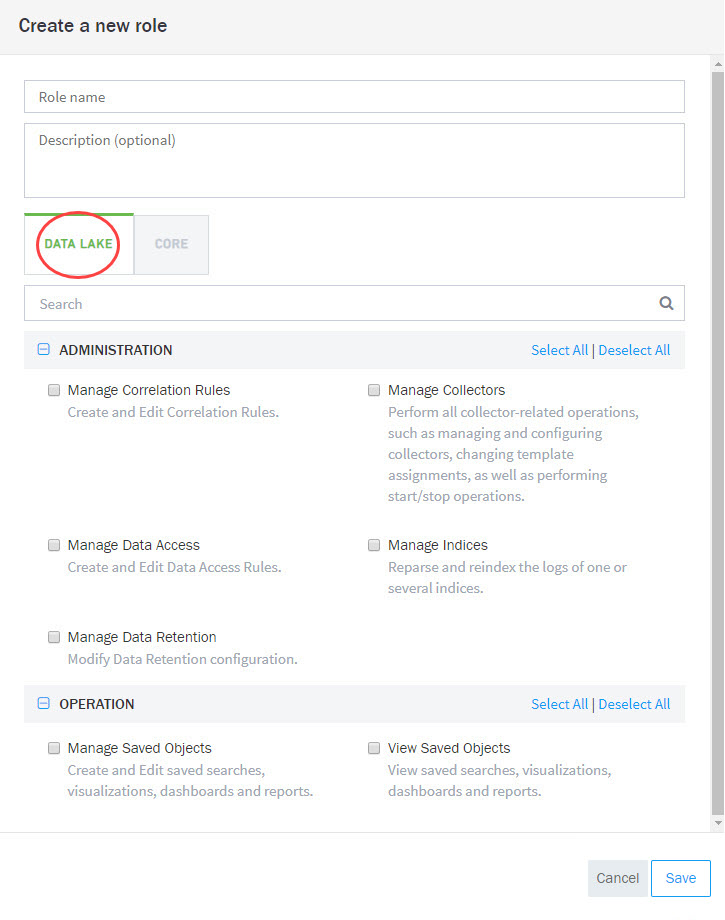
Click the CORE tab and enable the listed features, as needed.

Click Save to make the role available to add or associate with users.
Exabeam Data Lake View-only Access Control
A role that has View Saved Objects permission does not automatically have the right to Manage Saved Objects (create, edit, and delete). The two permissions are independent of each other and a role must have both permissions in order to manage a saved object. A role with View Saved Object permission but without Manage Saved Objects permission will not be able to manage the object.
 |
However, by default out-of-the-box roles provided by Exabeam have View and Manage Saved Objects permissions, and cannot be edited.
 |
Note
Role-based permissions override Object-based permissions. For example, if Manage Saved Objects is off in all the roles associated with a user, then the user is limited to running searches (without the ability to save, create, etc.). If one role of a collection of roles associated with a user has Manage Saved Objects, then the user has permission to search, save, create, and view objects. (For more information on object-based permissions, see Exabeam Data Lake Object-based Access Control.) Users with view-only privileges will receive a banner message on the Search page:

For more information on configuring access for saved objects, see Data Lake User Guide > Access Restrictions for Saved Objects.
Exabeam Data Lake Object-based Access Control
OBAC vs RBAC
Object-based access control (OBAC) manages the viewing and editing of tangible output products such as searches, visualizations, dashboards, and reports. Workflow is shared amongst user groups (defined by roles). Exabeam Data Lake Role-based Access Control (RBAC) manages execution (task-based) permissions within the Exabeam platform. Both forms of access control can restrict access dependent on roles. OBAC can be implemented in conjunction with RBAC, where objects can be displayed but executing tasks on those objects are managed or limited based on role privileges. OBAC is independent from role management in that objects can allow all actions based on RBAC, but OBAC can limit certain operations to the given role. OBAC manages objects by granting and restricting view and/or edit abilities to roles. OBAC permissions are not inherited from parent objects nor are they shared with child objects.
Managing Data Migration of Existing Objects
To view saved objects, your must have View Saved Objects permission selected in at least one of the roles assigned to you. Additionally, you must change access permissions per each object by setting configurations in Manage Saved Objects. Access permissions must be changed for each saved object individually.
Note
New objects are by default saved with Private settings (managed and viewed only by the object originator). Only the object originator can change Share settings to Public or Role-based access, where None, View and Edit, and View-only are managed.
Exabeam Data Lake Secured Resources Overview
Secured resources allow you to control access to logs based on a search filter. For example, a secured resource can define logs from sensitive applications, sources, or geographies. Once configured, users are only able to view and utilize specific sets of data for their searches, visualizations, dashboards, scheduled reports, or correlation rules.
For example, restrict data access based on:
Log feeds from specific sources (e.g., Application logs from a business sensitive app can only be accessed by the SOC team).
Host, source or sourcetype (e.g., Access to logs of a specific database is restricted to a role).
Search keywords or fields (e.g., Logs of the executive users can only be accessed by specific roles).
This section walks through adding and managing secured resources within the Data Lake UI.
Configure Exabeam Data Lake Log Access with Secured Resources
Secured resources allow you to control access to logs based on a search filter. Use the Secured Resources page to add, manage, and make additional changes to your secured resources.
The top-right of the page provides helpful management actions, including:
Manage Access – Open the Manage Data Access Control page to limit access to roles within your organization.
Add – Add a new secured resource.
Search – Search for a secured resource.
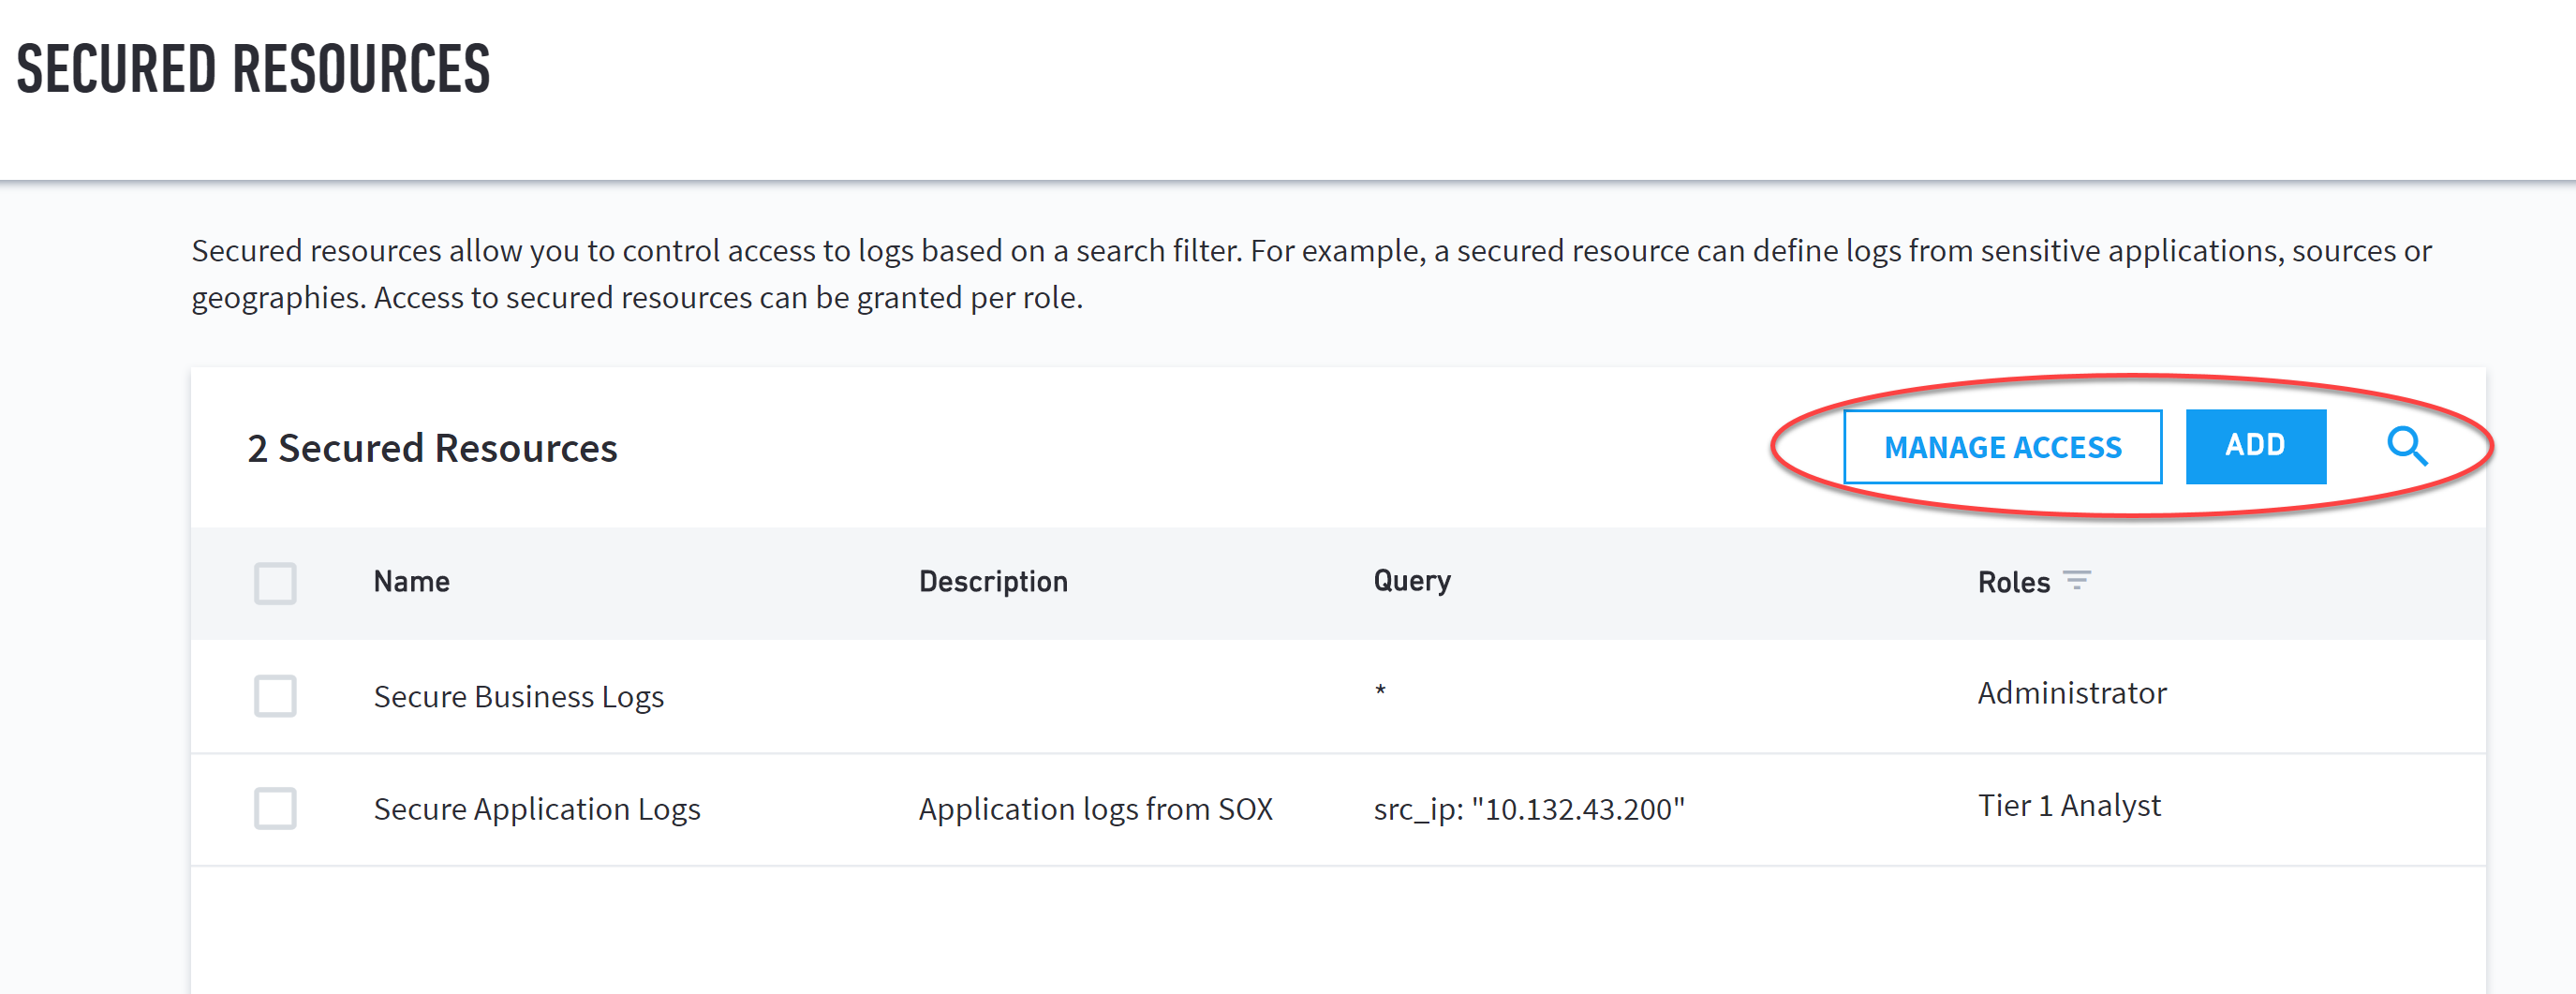 |
The secured resources table displays information regarding your secured resources, including:
Name – Name of the secured resource.
Description – Brief description of the secured resource.
Query – Search query matching the log events for the secured resource.
Roles – Role(s) allowed to view the secured resource.
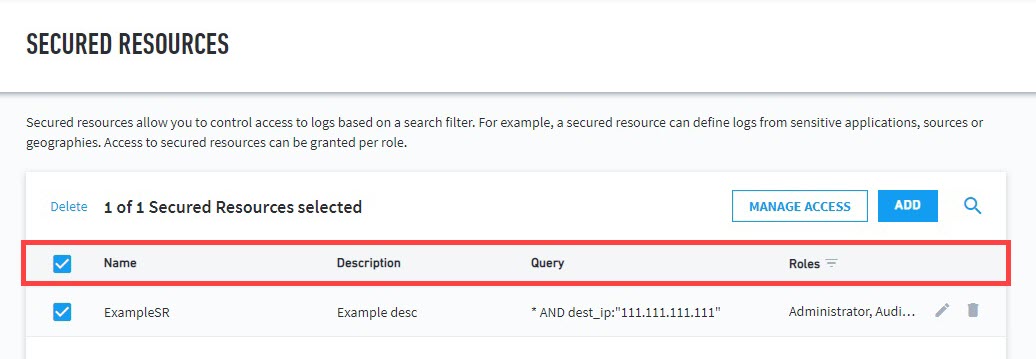 |
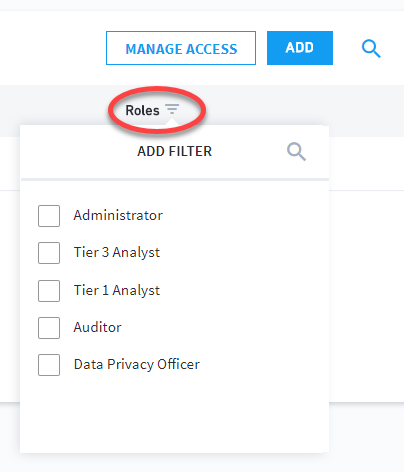
Filter the table according to roles by clicking the lined-triangle next to the Roles column header.
 |
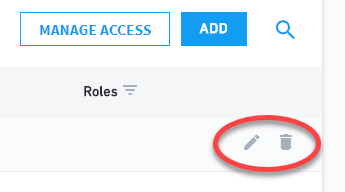
Hover over a secured resource in the table to edit (name, description, and query) or delete it.
 |
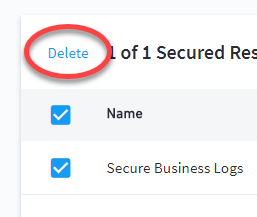
Additionally, you can delete resources by selecting them in the table and then clicking Delete.
 |
Adding a Secured Resource in Exabeam Data Lake
Secured resources is a role-base search filter that applies restrictions to the data being searched. Before applying which roles have access, you must define the secured resource being filtered.
To add a secured resource:
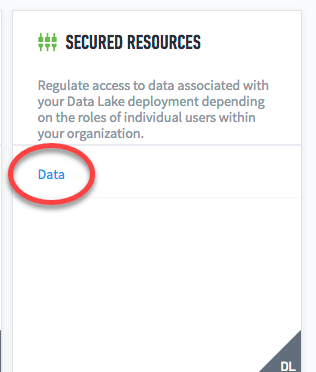
Navigate to Settings > Secured Resources > Data. This link takes you to the Secured Resources page.
On the secured resources page, click Add.
Note
If this is your first secured resource, the Add button appears in the middle of the secured resources page. If this is not your first secured resource, the Add button appears at the top-right of the secured resources table.
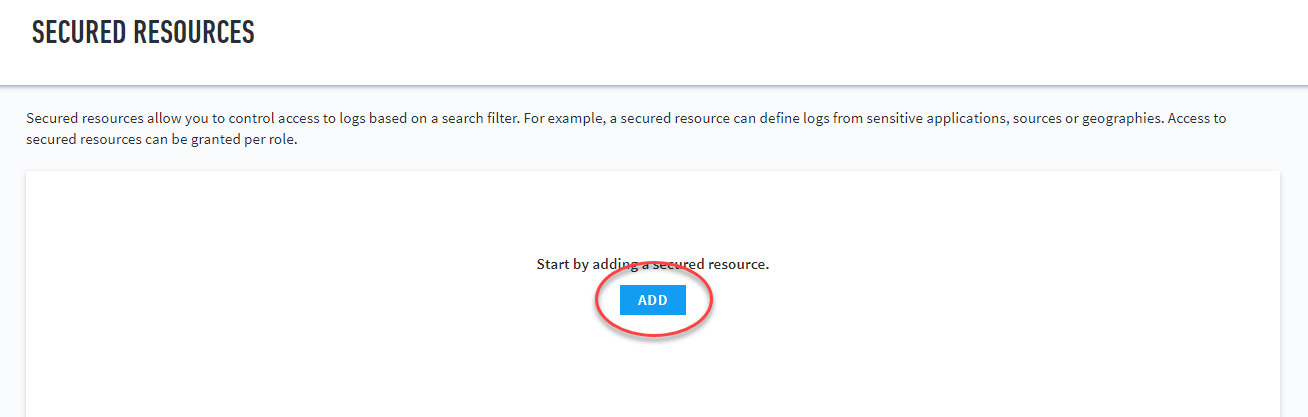
(Add button location when adding your first secured resource.)
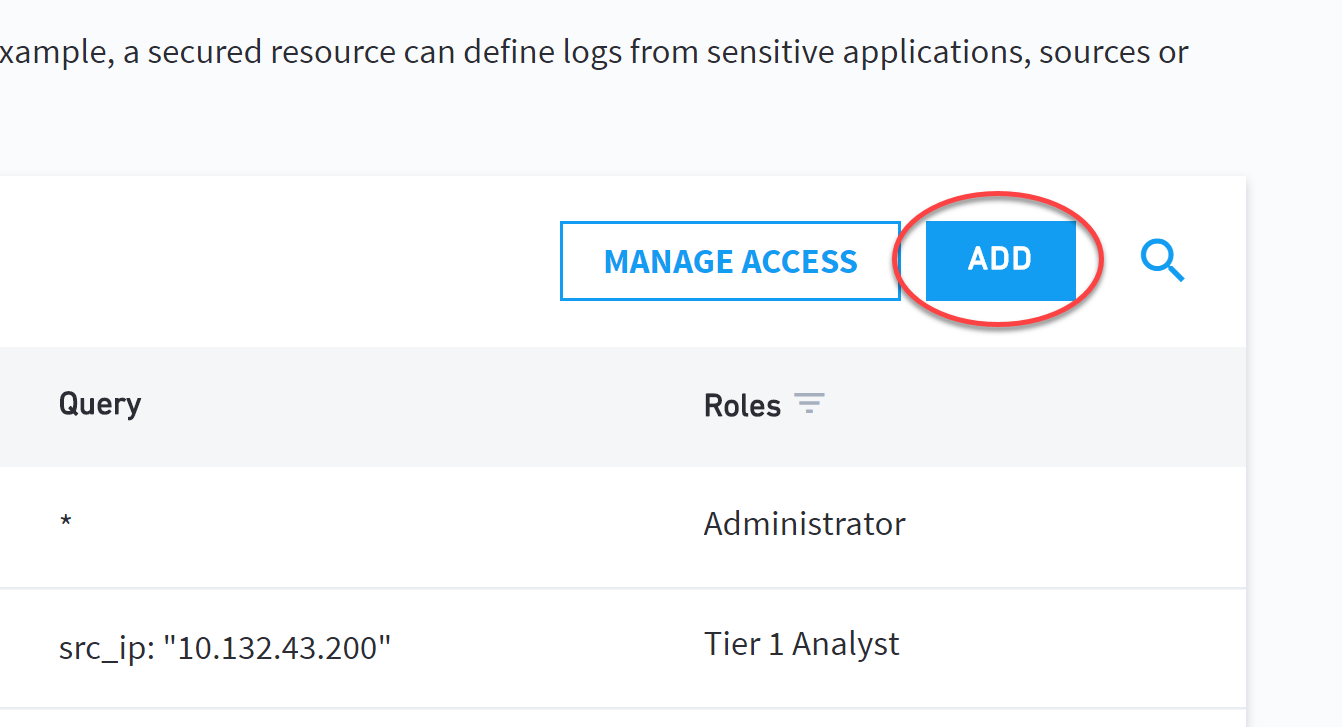
(Add button location when adding additional secured resources.)
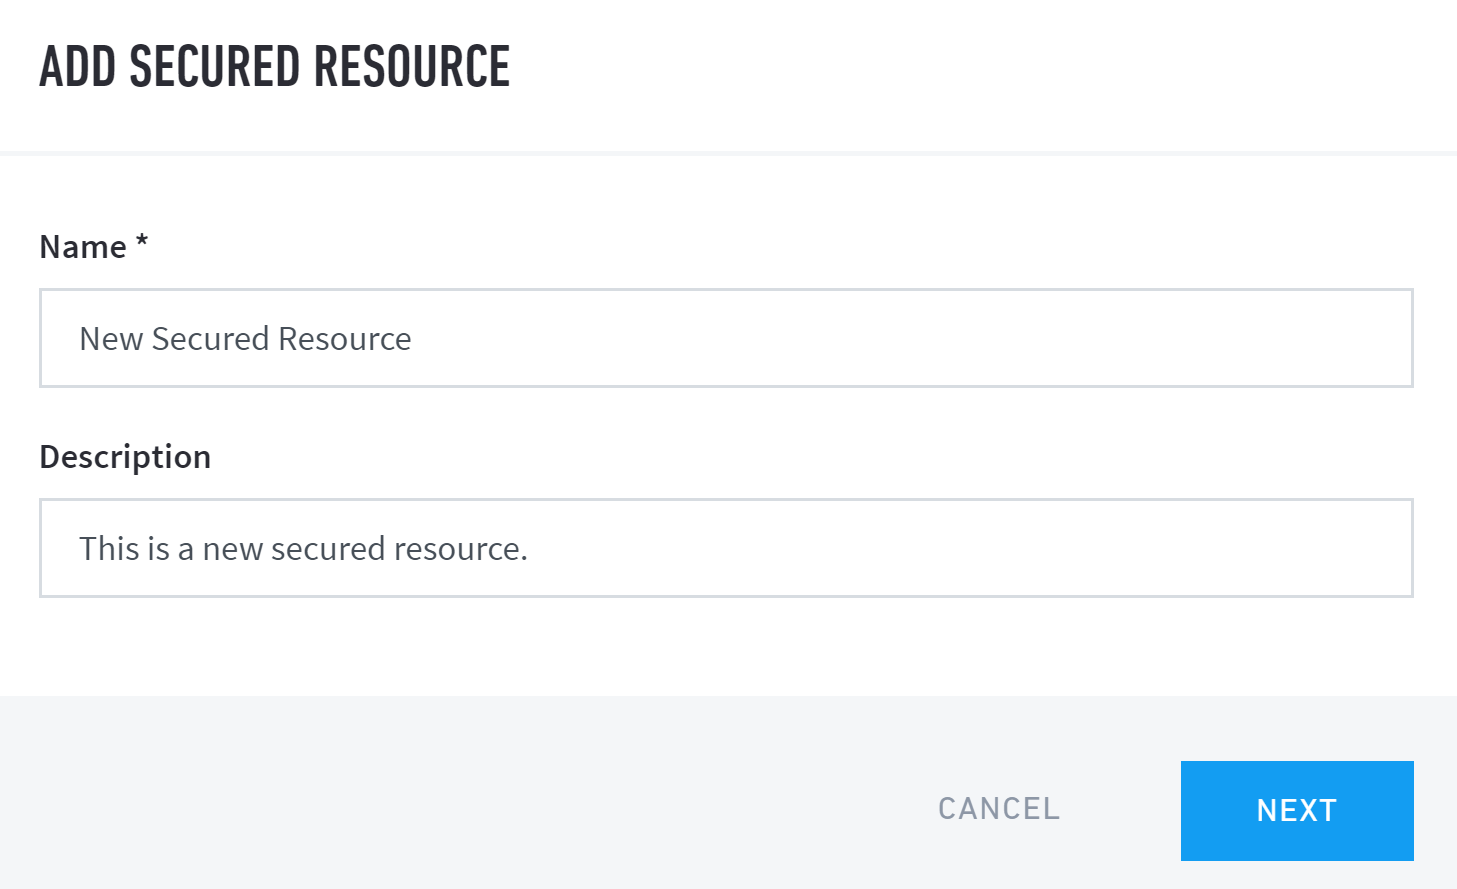
Enter a name and description for the new secured resource, and then click Next.
Enter the search query that matches the log events you want to secure, and then press enter on your keyboard to run the query.
Warning
Typing "*" prevents access to any logs by anyone unless they are granted permission.
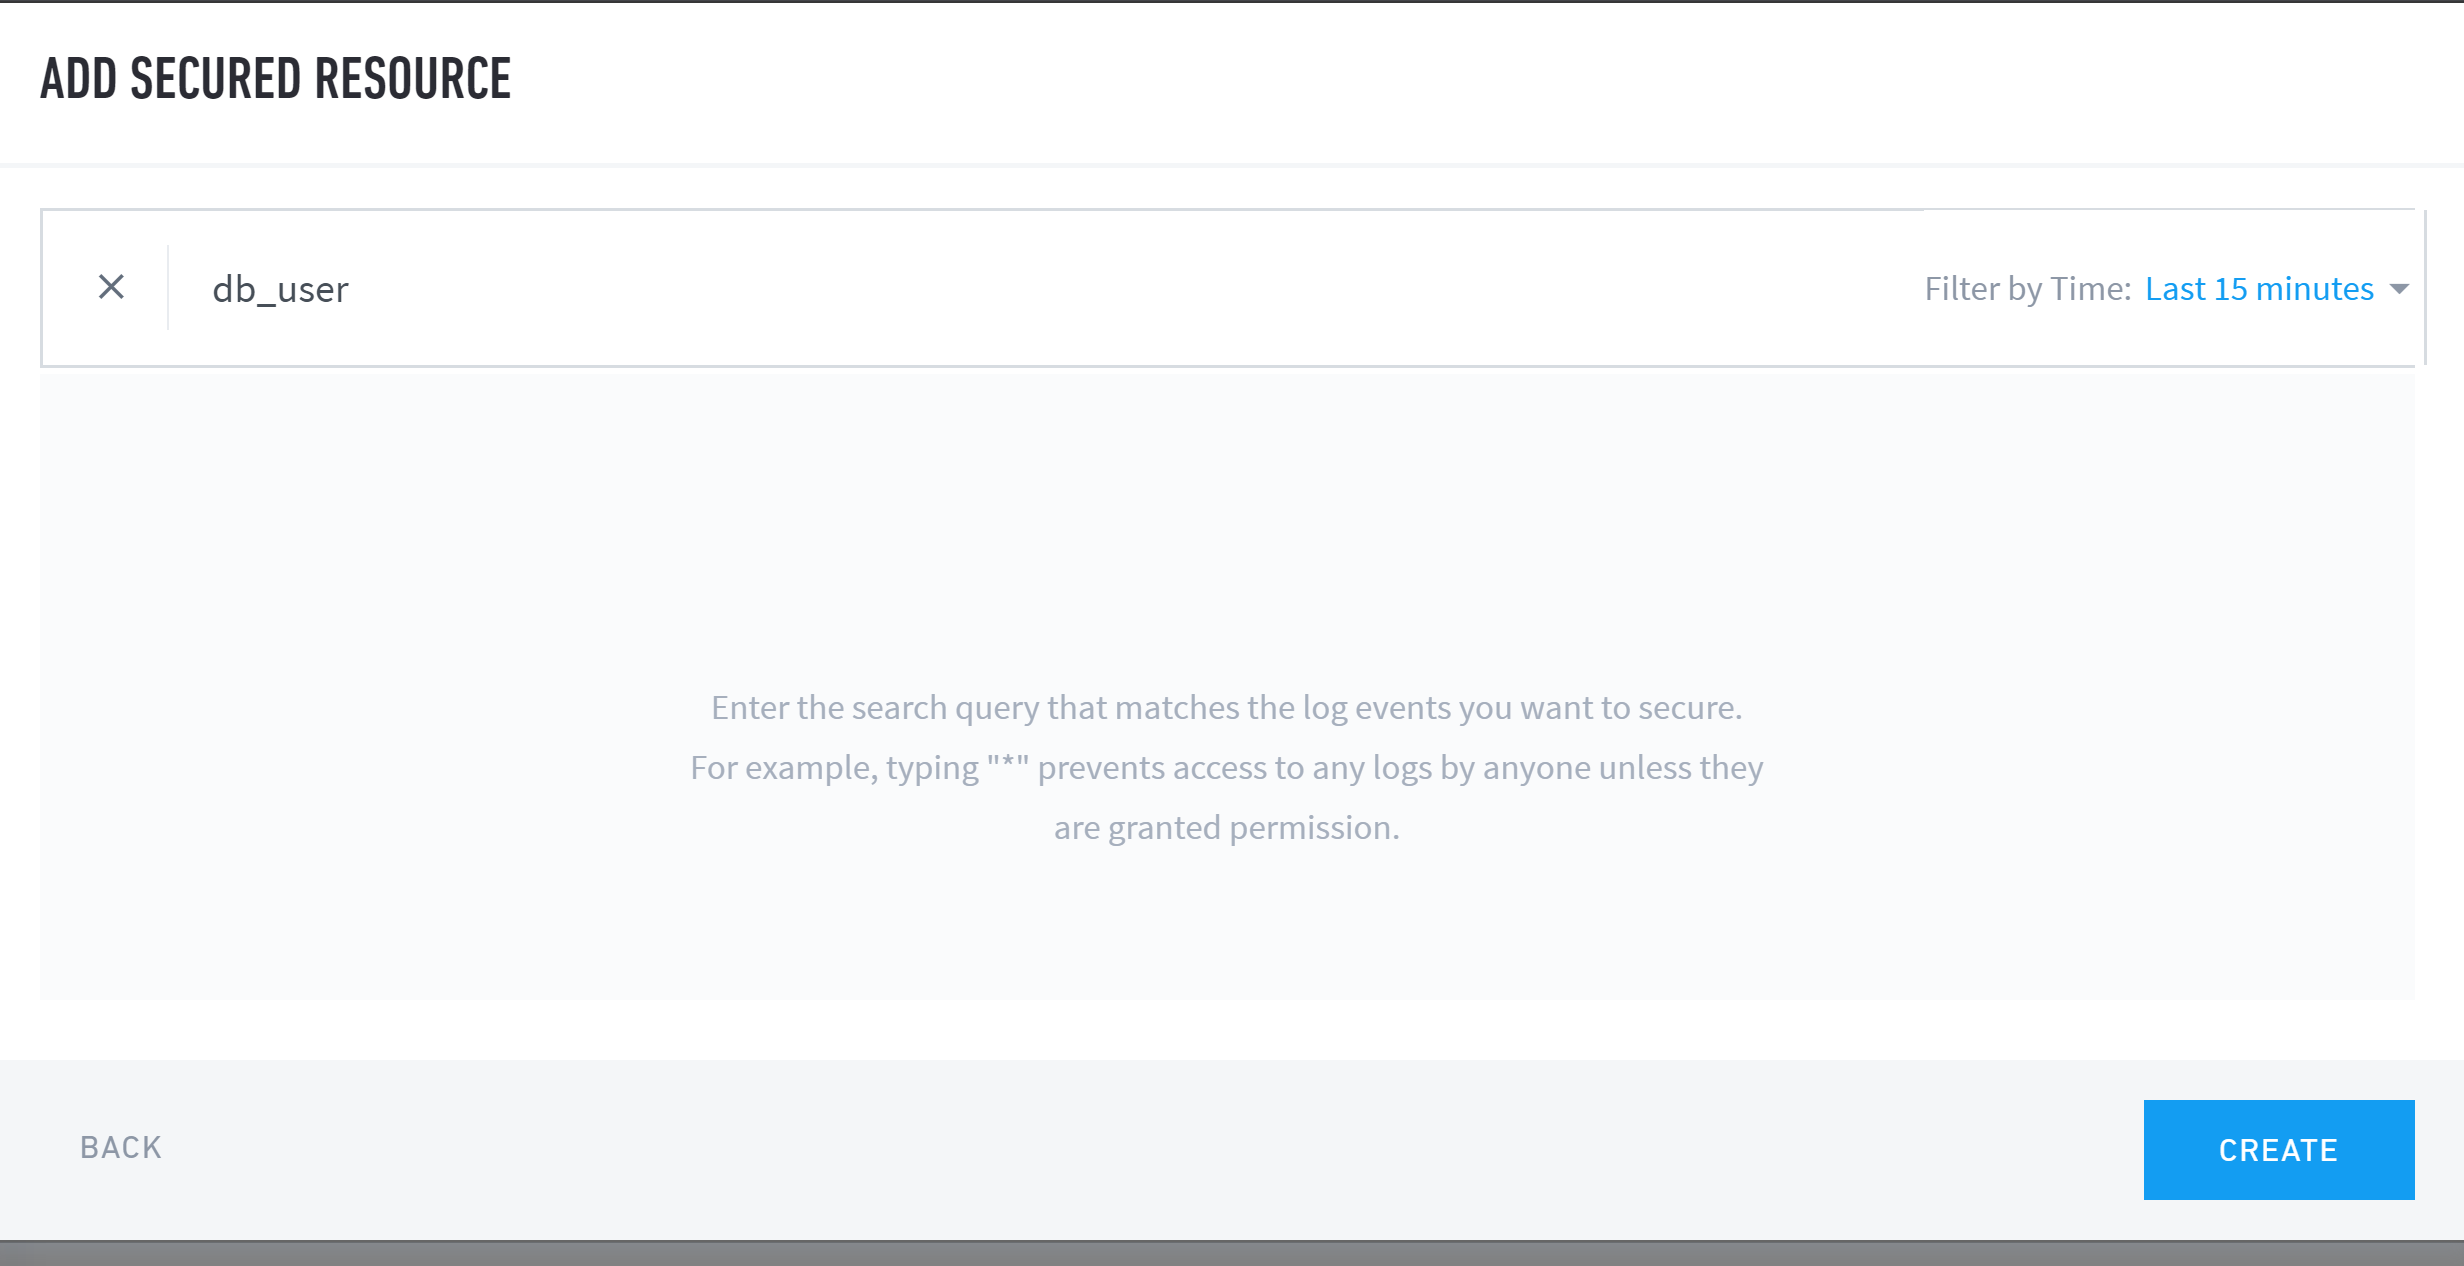
Review the query results. Edit and re-run the query (step 4, above) until you receive the desired results.
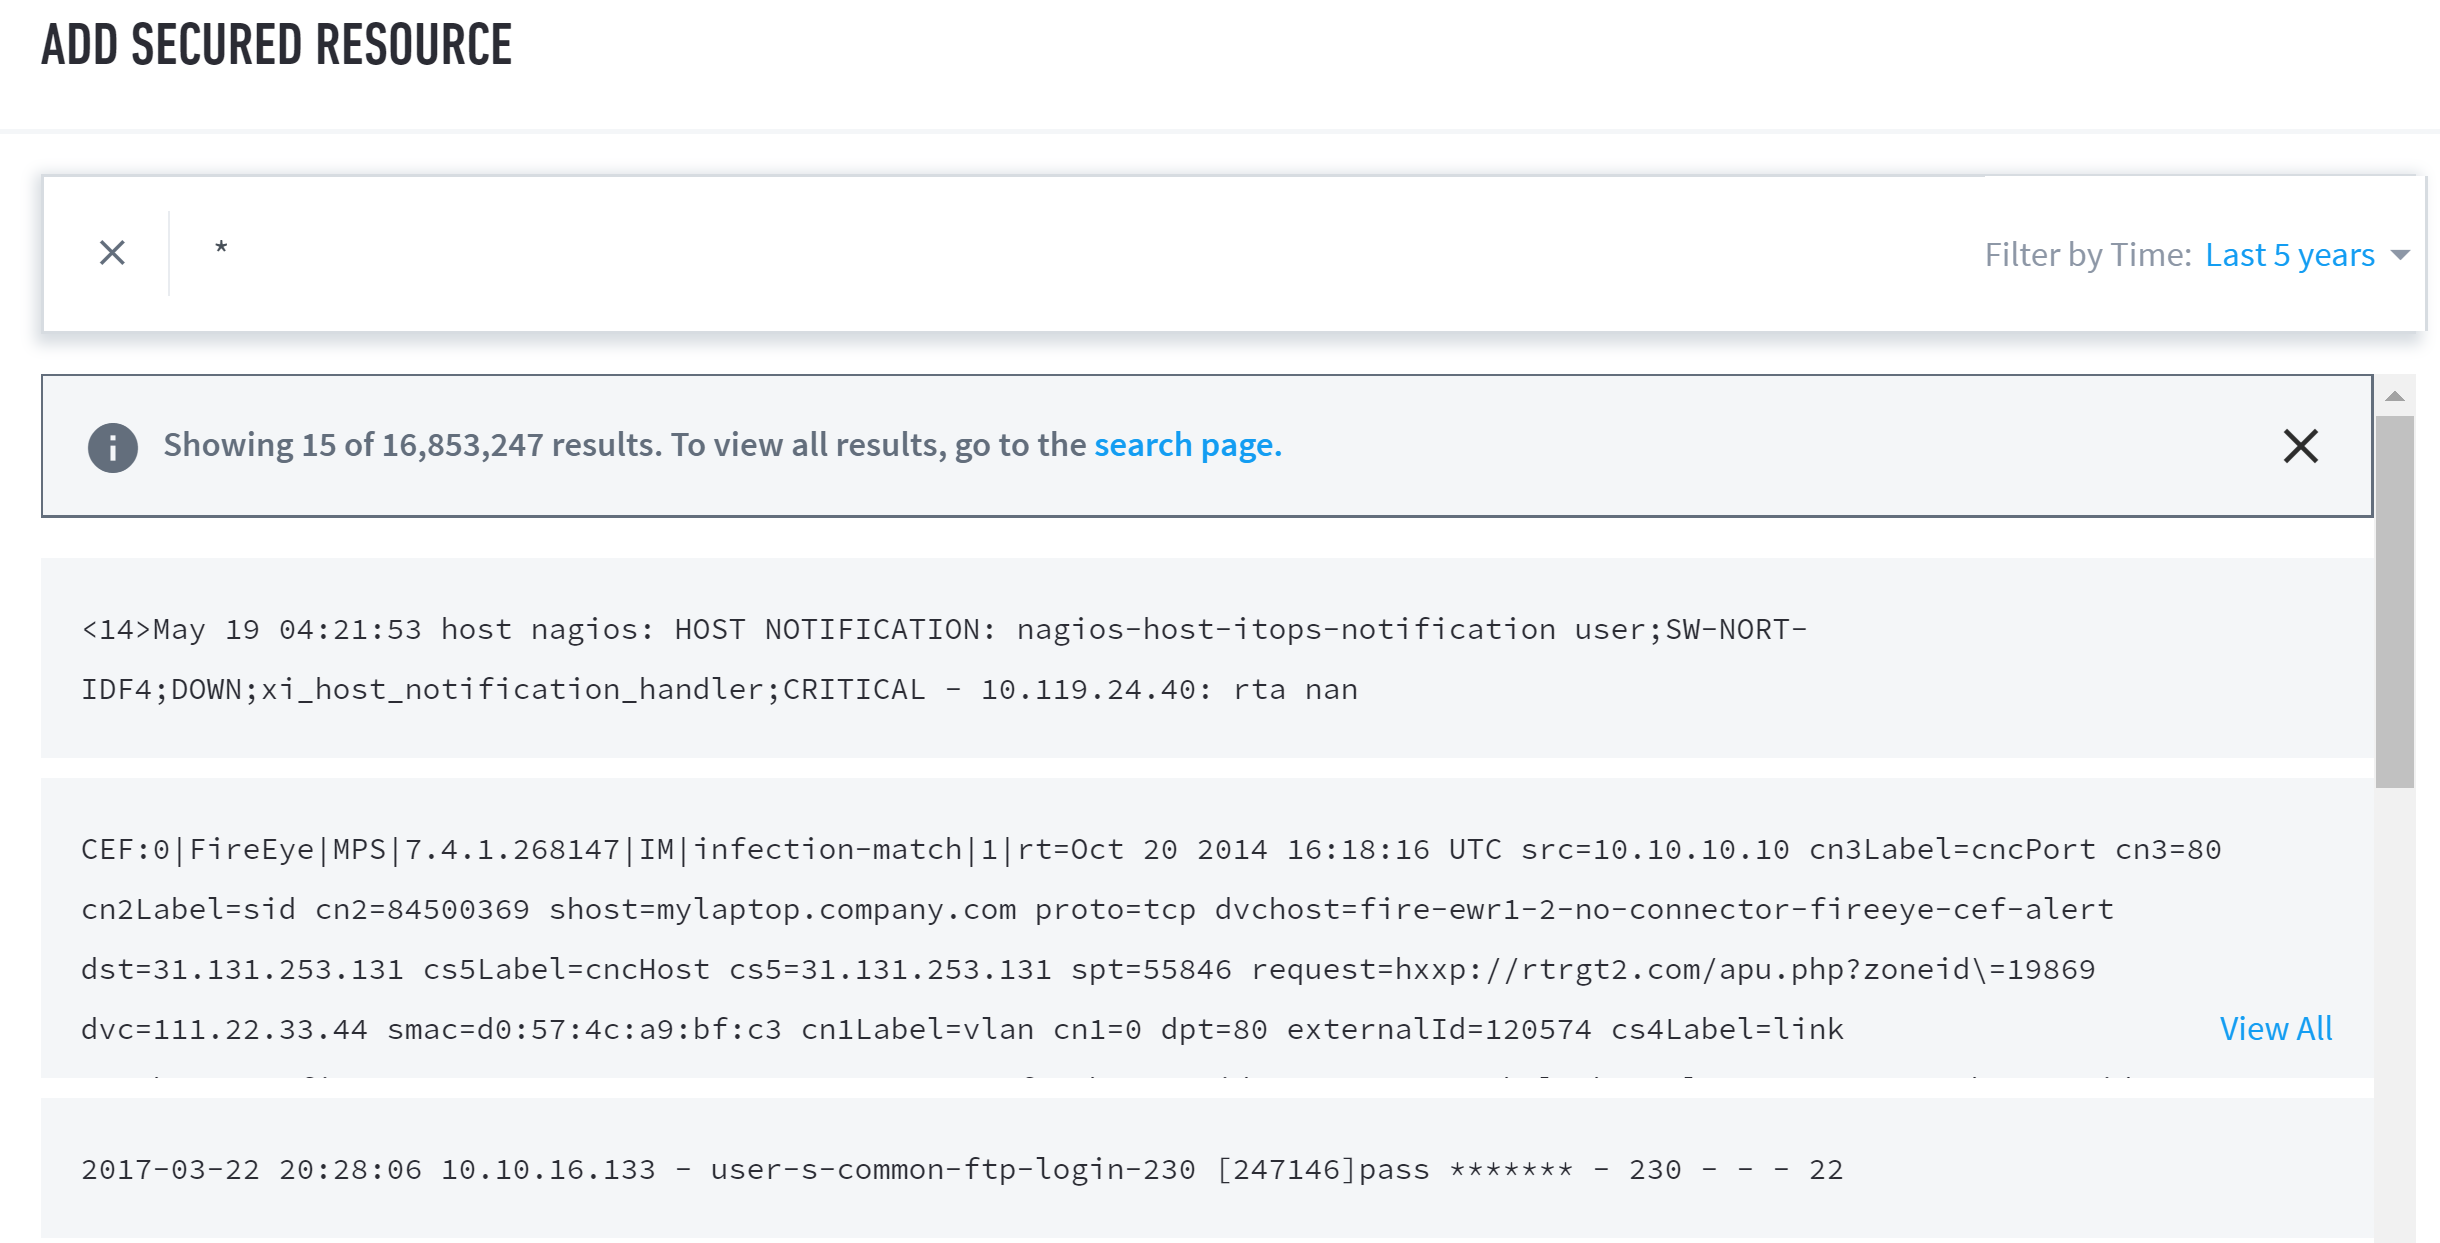
Once your query is ready, click Create.
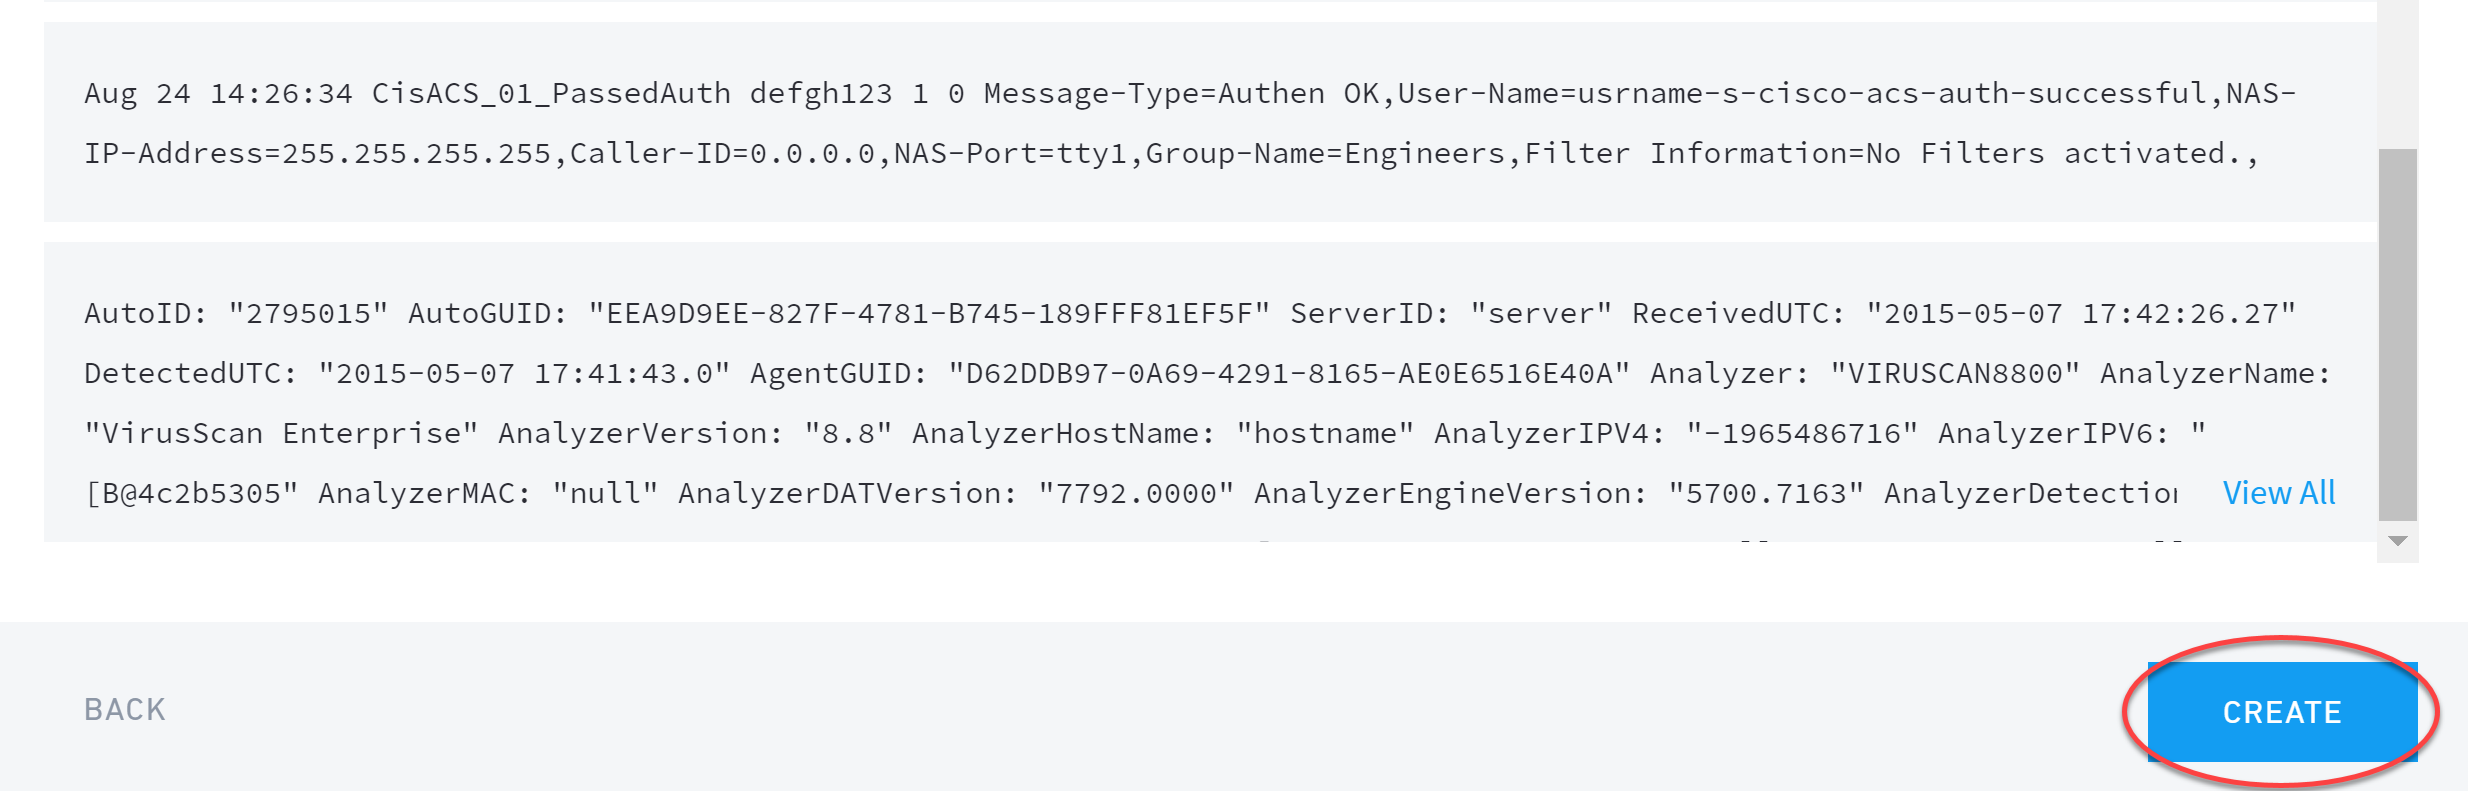
Your new secured resource(s) appear in the secured resource table in the Secured Resources page. Now, you can manage access to the secured resource(s) for users in your organization.
Managing Exabeam Data Lake Data Access to Secured Resources
Secured resources allow you to control access to logs based on a search filter. Access to secured resources is based on a user's role. To grant roles access secured resources, configure associations on the Secure Resources page:
Navigate to Settings > User Management > Roles.
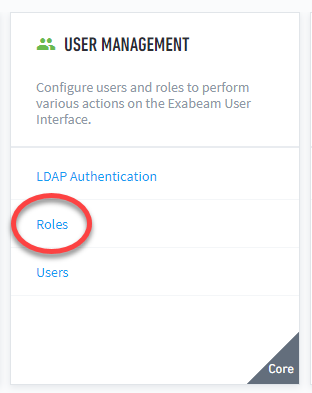
Select any role from the list of default and custom roles.
Click the Secured Resources link. This link takes you to the Secured Resources page.
On the secured resources page, click Manage Access.

Select a role from the Roles panel, and then select secured resource(s) by clicking the appropriate checkbox(es).
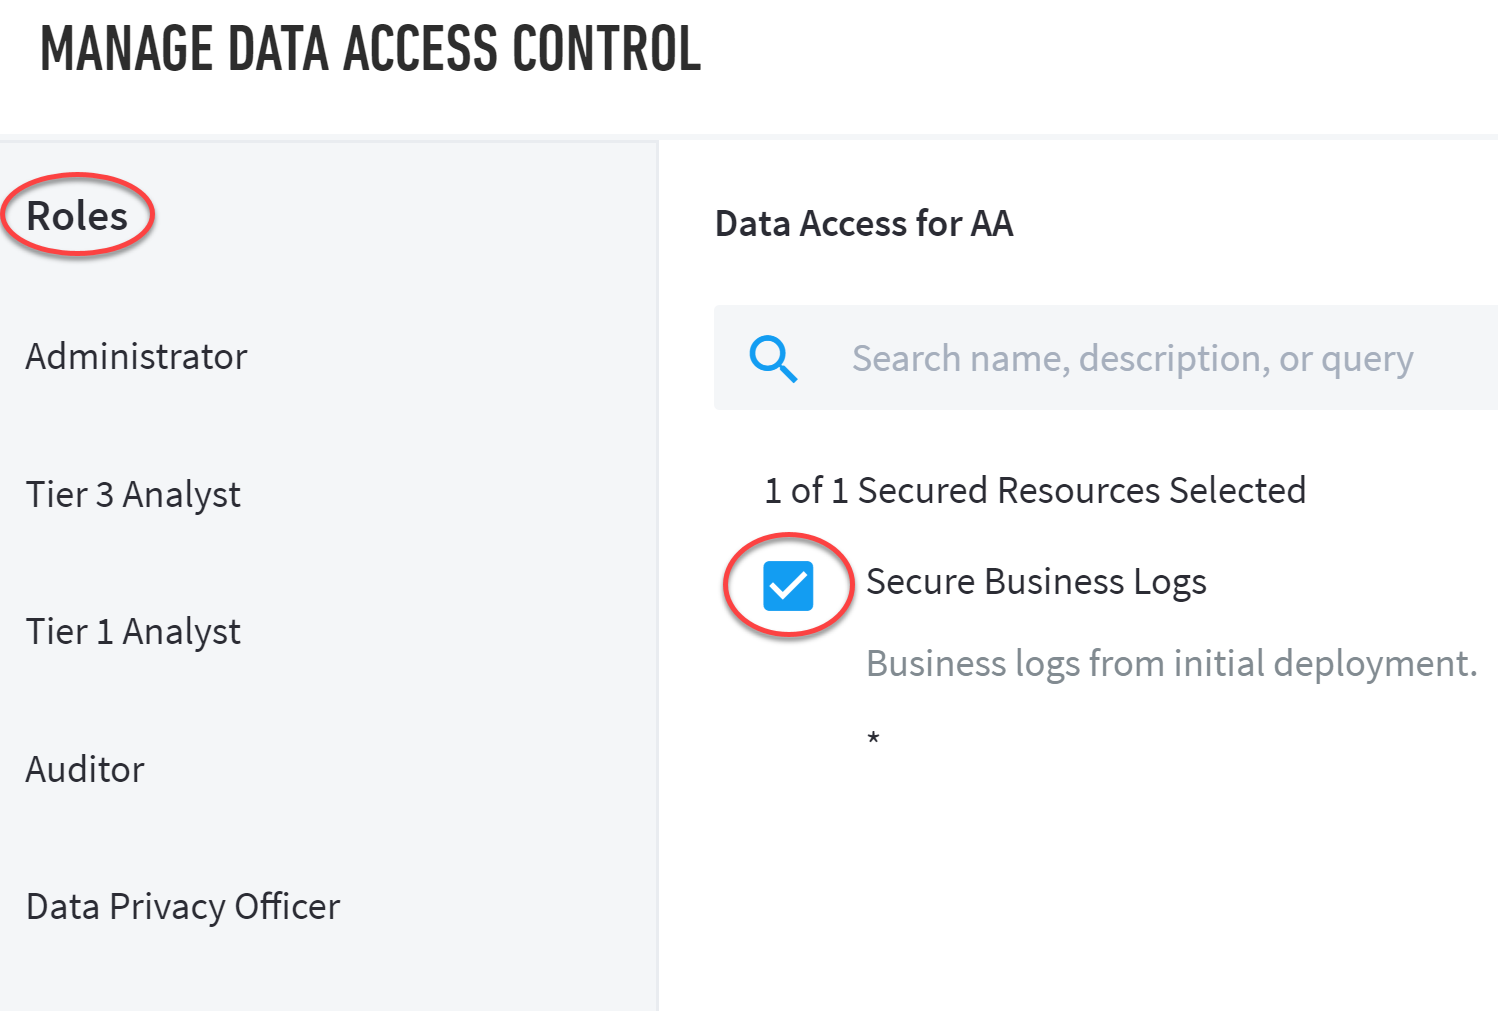
Click Save.
Important
To support data access for specific users, the Limit access to these selections toggle will be turned on so that any user assigned to that role is restricted to access the selected secured resources in this list. They cannot access resources which are not explicitly allowed.
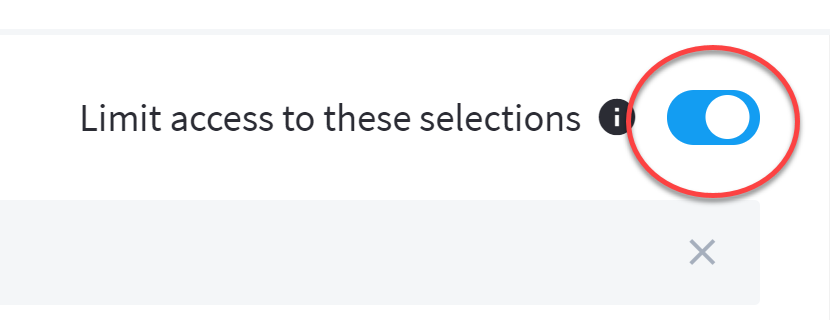 |
Third-Party Identity Provider Configuration
Exabeam supports integration with SAML 2.0 compliant third-party identity providers (IdPs) for single sign-on (SSO), multi-factor authentication, and access control. Once an IdP is added to your product, you can make IdP authentication mandatory for users to log in to the product, or you can allow users to log in through either the IdP or local authentication.
Note
You can add multiple IdPs to your Exabeam product, but only one IdP can be enabled at a time.
Add Exabeam to Your SAML Identity Provider
This section provides instructions for adding Exabeam to your SAML 2.0 compliant identity provider (IdP). For detailed instructions, refer to your IdP's user guide.
The exact procedures for configuring IdPs to integrate with Exabeam vary between vendors, but the general tasks that need to be completed include the following (not necessarily in the same order):
Begin the procedure to add a new application in your IdP for Exabeam (if needed, refer to your IdP's user guide for instructions).
In the appropriate configuration fields, enter the Exabeam Entity ID and the Assertion Consumer Service (ACS) URL as shown in the following:
Entity ID:
https://<exabeam_primary_host>:8484/api/auth/saml2/<identity_provider>/login
ACS URL:
https://<exabeam_primary_host>:8484/api/auth/saml2/<identity_provider>/handle-assertion
Important
Make sure that you replace
<exabeam_primary_host>with the IP address or domain name of your primary host. The only acceptable values for <identity_provider> are the following:adfsgooglepingoktaothers
If you are using Microsoft AD FS, Google IdP, Ping Identity, or Okta, enter the corresponding value from the preceding list. For all other IdPs, enter
others. All of the values are case sensitive.In the attribute mapping section, enter descriptive values for the following IdP user attributes:
Email address
First name
Last name
Group
Username (this attribute is optional)
Note
The actual names of these user attributes may vary between the different IdPs, but each IdP should have the corresponding attributes.
For example, if Primary email is the user email attribute in your IdP, you could enter
EmailAddressas the descriptive value. The following is an example of a completed attribute map in Google IdP: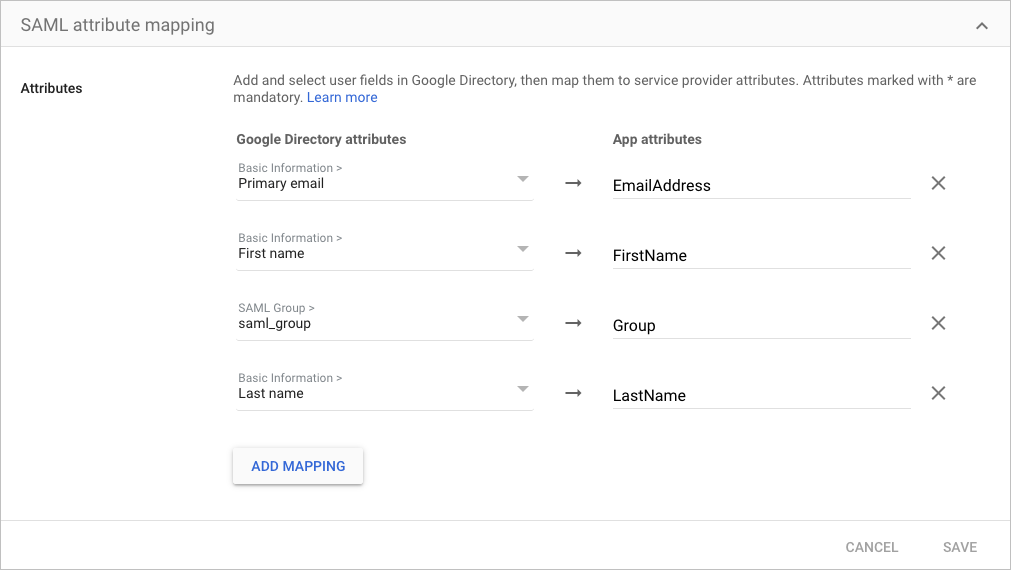
Important
When you Configure Exabeam for SAML Authentication, you need to use the same descriptive values to map the Exabeam query attributes with the corresponding IdP user attributes.
Complete any additional steps in your IdP that are necessary to finish the configuration. Refer to your IdP user guide for details.
Copy the IdP's connection details and download the IdP certificate or, if available, download the SAML metadata file.
Note
You need either the connection details and the IdP certificate or the SAML metadata file to complete the integration in Exabeam.
From the main menu on the left, select Apps and then click Web and mobile apps.
From the Add app drop-down menu, click Add custom SAML app.
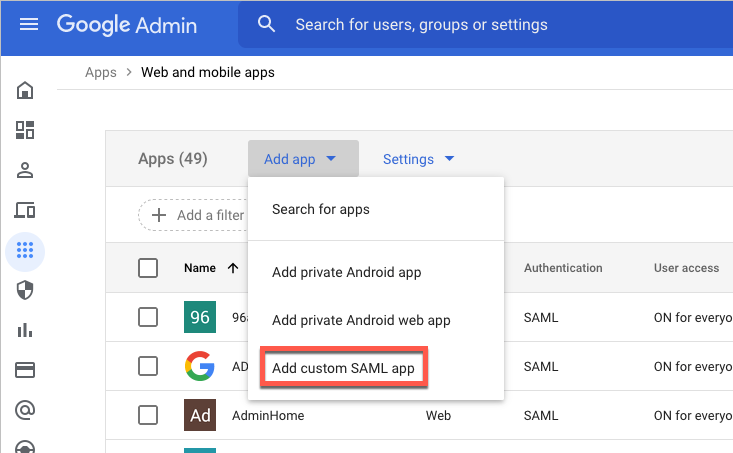
The App Details section opens.
In the App name field, enter a name.
Under App icon, click the blue circle, navigate to an image file that can be used as an icon and click to upload it.
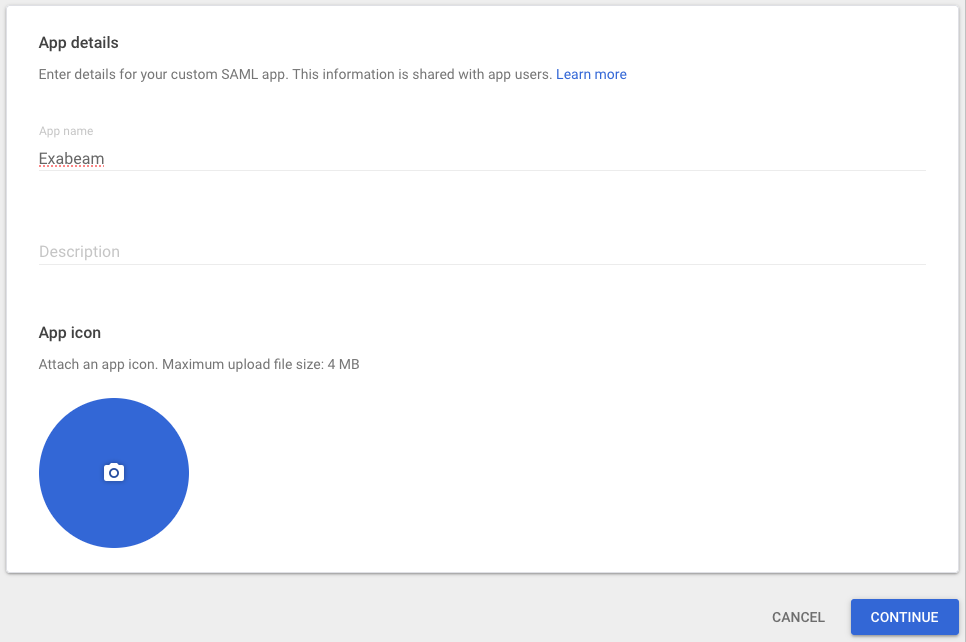
Click Continue.
The Google Identity Provider Details section opens.
Click Download IdP Metadata.
Note
The IdP metadata file needs to be uploaded to Exabeam when you Configure Exabeam for SAML Authentication.
Click Continue.
The Service Provider Details section opens.
Enter the ACS URL and Entity ID as shown in the following:
ACS URL:
https://<exabeam_primary_host>:8484/api/auth/saml2/google/handle-assertion
Entity ID:
https://<exabeam_primary_host>:8484/api/auth/saml2/google/login
Note
Make sure that you replace
<exabeam_primary_host>with the IP address or domain name of your primary host.Click Continue.
The Attribute Mapping section opens.
Click Add Mapping, and then from Select field drop-down menu, select Primary email.
Repeat the previous step for each of the following attributes:
Primary email
First name
Last name
Group
In the App attributes fields, enter descriptive values for the attributes.
For example, for the Primary email attribute, you could enter
EmailAddressfor the descriptive value. The following is an example of a completed attribute map:Important
When you Configure Exabeam for SAML Authentication, you need to use the same descriptive values to map the Exabeam query attributes with the corresponding IdP user attributes.
Click Continue.
The details page opens for your Exabeam app.
In the User Access panel, click the Expand panel icon to begin assigning the appropriate organizational units and groups to your Exabeam app and manage its service status.
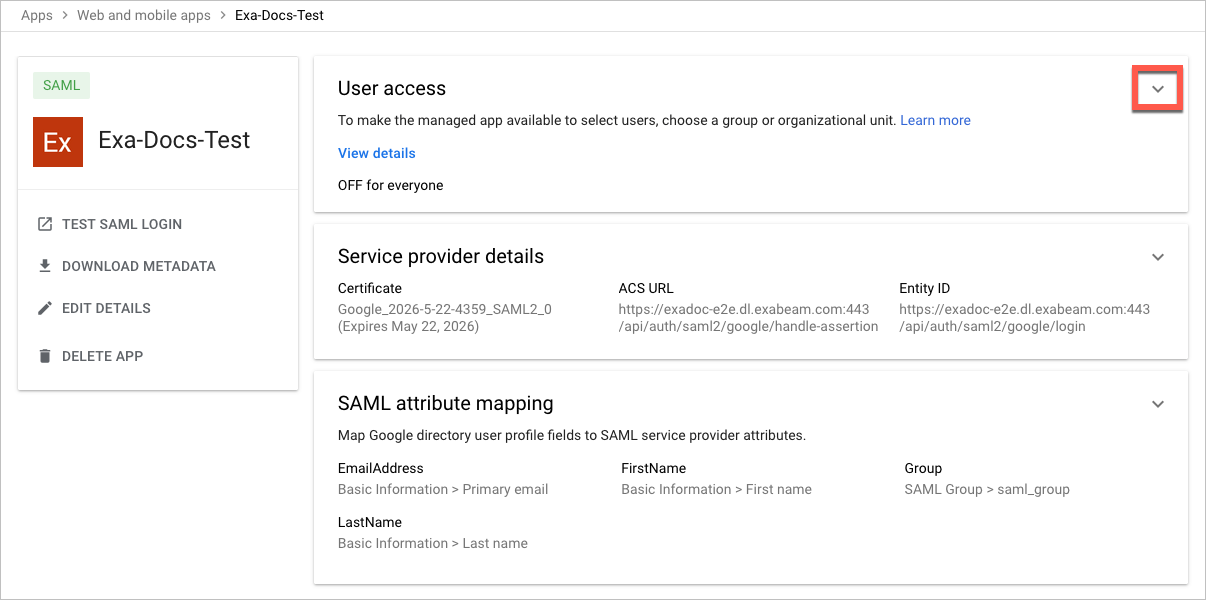
You are now ready to Configure Exabeam for SAML Authentication.
Note
The following instructions include procedural information for configuring both Azure AD and Exabeam to complete the IdP setup.
Log in to Microsoft Azure and navigate to Enterprise Applications.
Create an Exabeam enterprise application by doing the following:
Click New application, and then click Create your own application.
The Create your own application dialog box appears.
In the What's the name of your app field, type a name for the app (for example, "Exabeam-SAML").
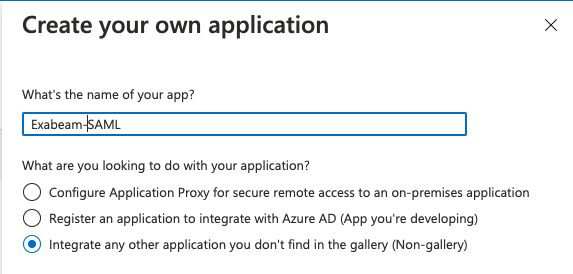
Select Integrate any other application you don't find in the gallery (Non-gallery).
Click Create.
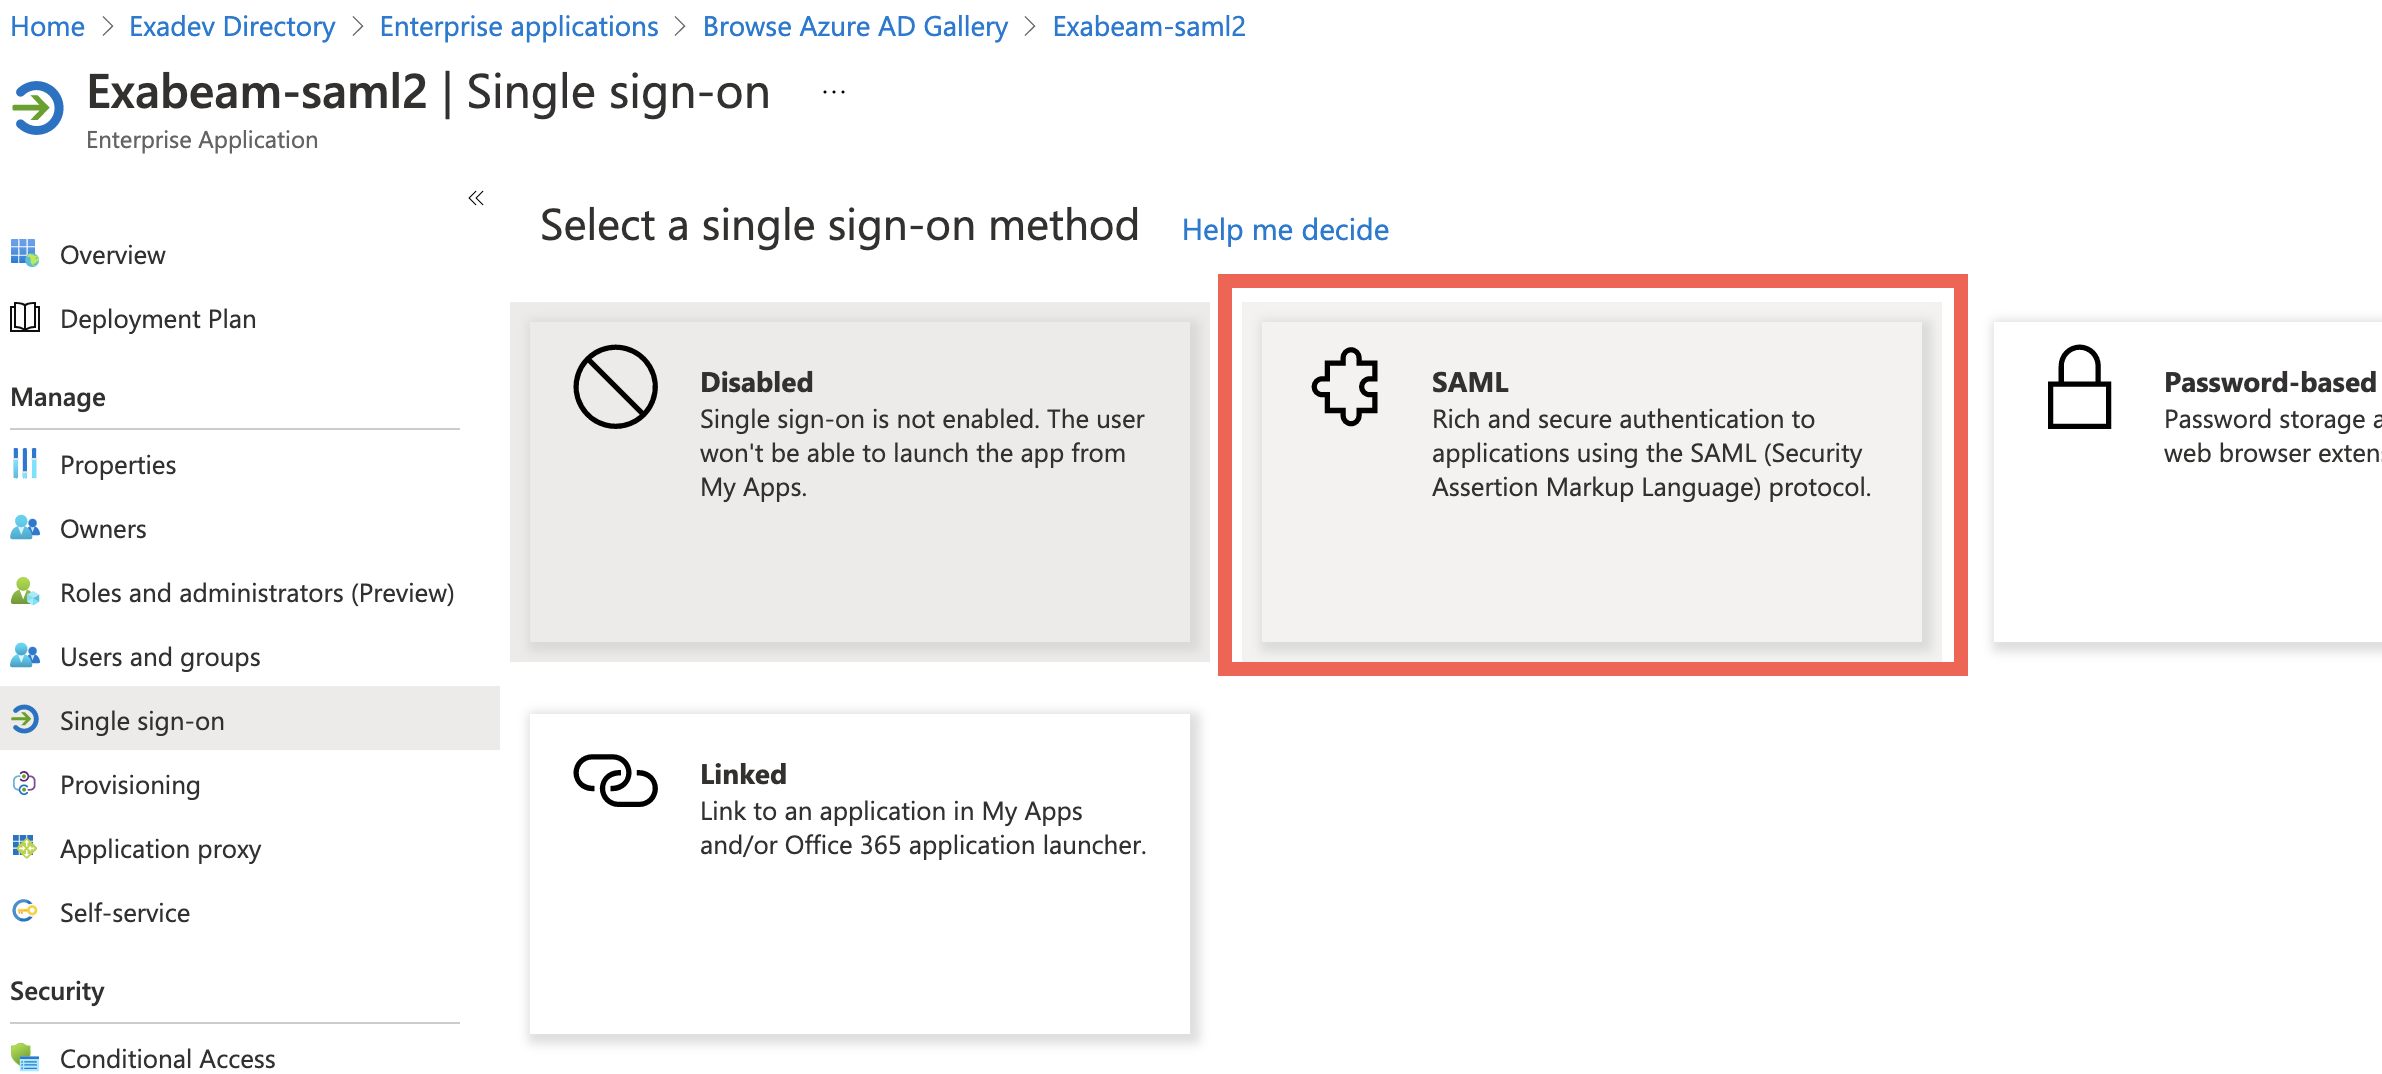
On the Enterprise Application page, locate and click the application that you added in step 2.
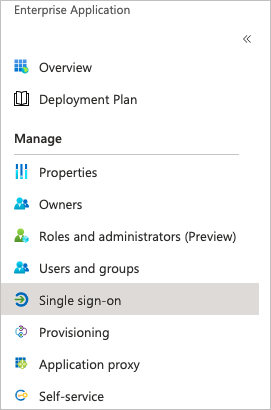
In the Manage section, click Single sign-on.
Click the SAML tile.
In the Basic SAML Configuration box (
 ), click Edit, and then do the following:
In the Identifier (Entity ID) field, enter the following: https://<exabeam_primary_host>:8484/api/auth/saml2/others/login
Note
Make sure that you replace
<exabeam_primary_host>with the IP address or domain name of your primary host.In the Reply URL (Assertion Consumer Service URL) field, enter the following: https://<exabeam_primary_host>:8484/api/auth/saml2/others/handle-assertion
Note
Make sure that you replace
<exabeam_primary_host>with the IP address or domain name of your primary host.Click Save.
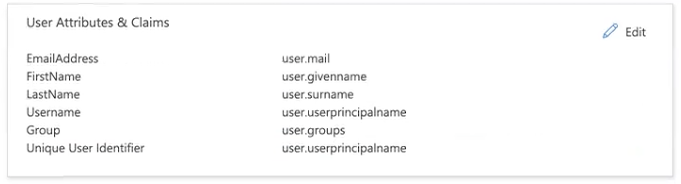
In the User Attributes & Claims box (
 ), click Edit, and then map the Azure objects to your Exabeam field attributes.
Click the row for the user.mail claim.
The Manage claim dialog box appears.
In the Name field, type the name of the appropriate Exabeam field attribute.
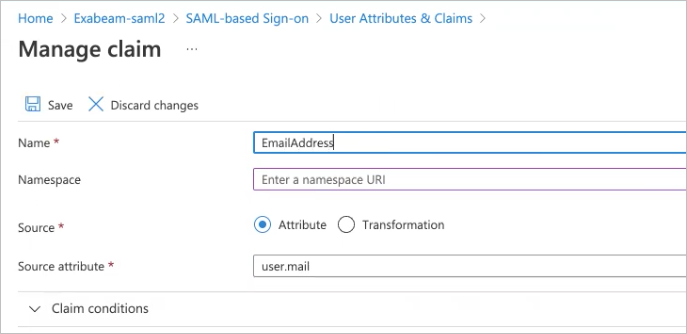
If needed, clear the value in the Namespace field to leave it empty.
Click Save.
Repeat steps a through d as needed for the following claims:
user.givenname
user.userprincipalname
user.surname
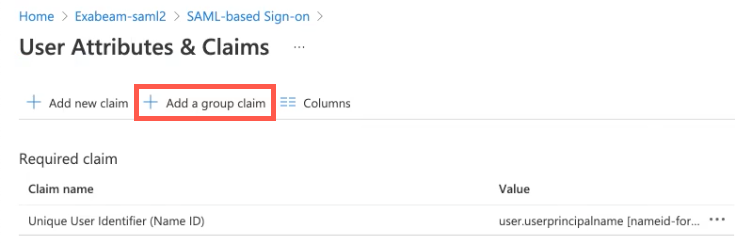
Click Add a group claim.
In the Group Claims dialog box, select Groups assigned to the application.
From the Source attribute drop-down list, select Group ID.
In the Advanced Options section, select the checkbox for Customize the name of the group claim.
In the Name (required) field, type Group.
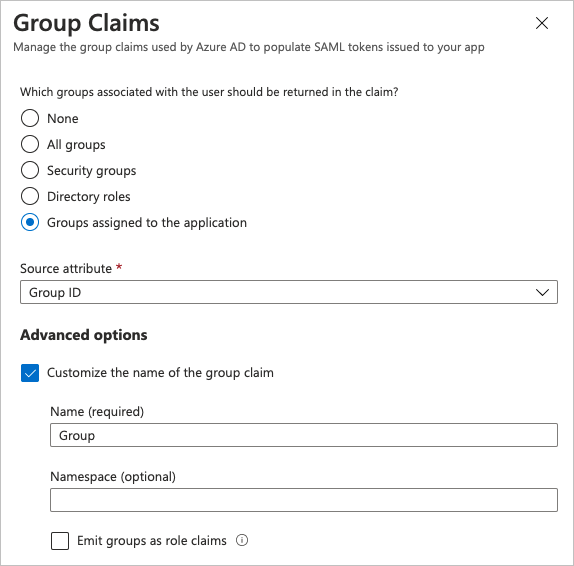
Click Save.
The Group claim is added to the User Attributes & Claims box.
In the SAML Signing Certificate box (
 ), download the Federation Metadata XML certificate to upload to Exabeam.
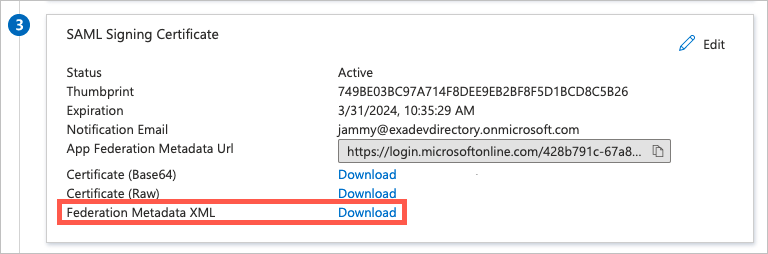
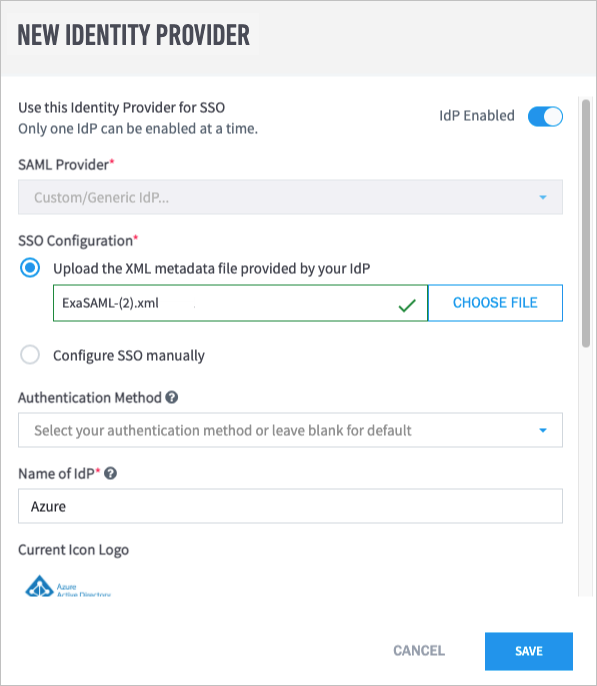
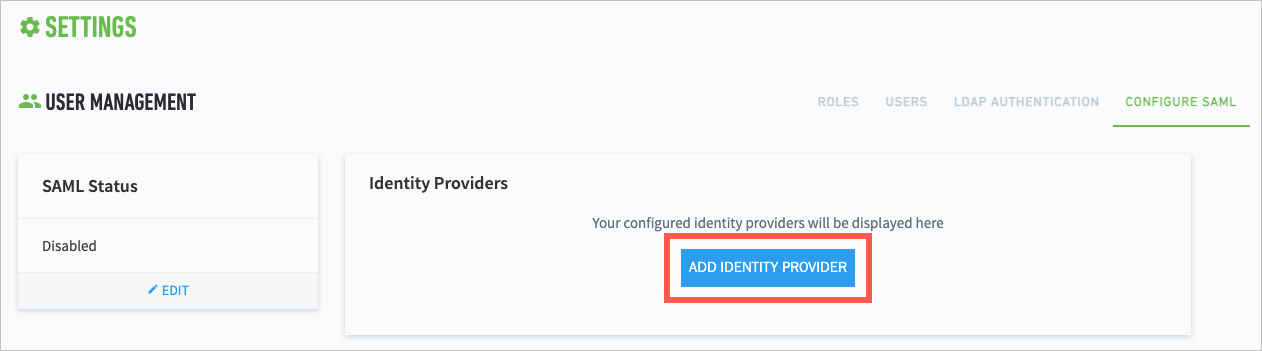
In Exabeam, navigate to Settings > User Management > Configure SAML, and then click Add Identity Provider.
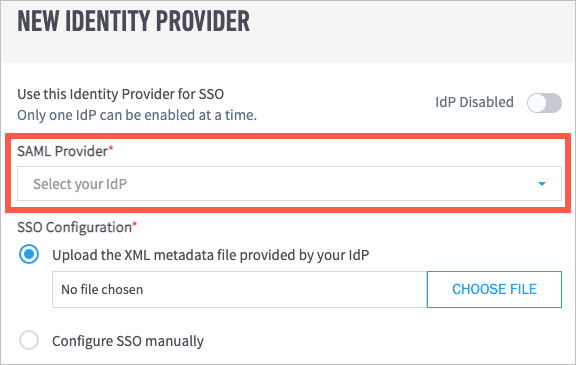
The New Identity Provider dialog box appears.
From the SAML Provider drop-down list, select Custom/Generic IdP.
Under SSO Configuration, select Upload the XML metadata filed provided by your IdP, and then choose the Federation Metadata XML file that was downloaded in step 8.
In the Name of IdP field, type a name (for example, "Azure").
In the Upload IdP logo field, click Choose File, and then select a PNG file of the logo that you want to use.
Note
The PNG logo file size cannot exceed 1 MB.
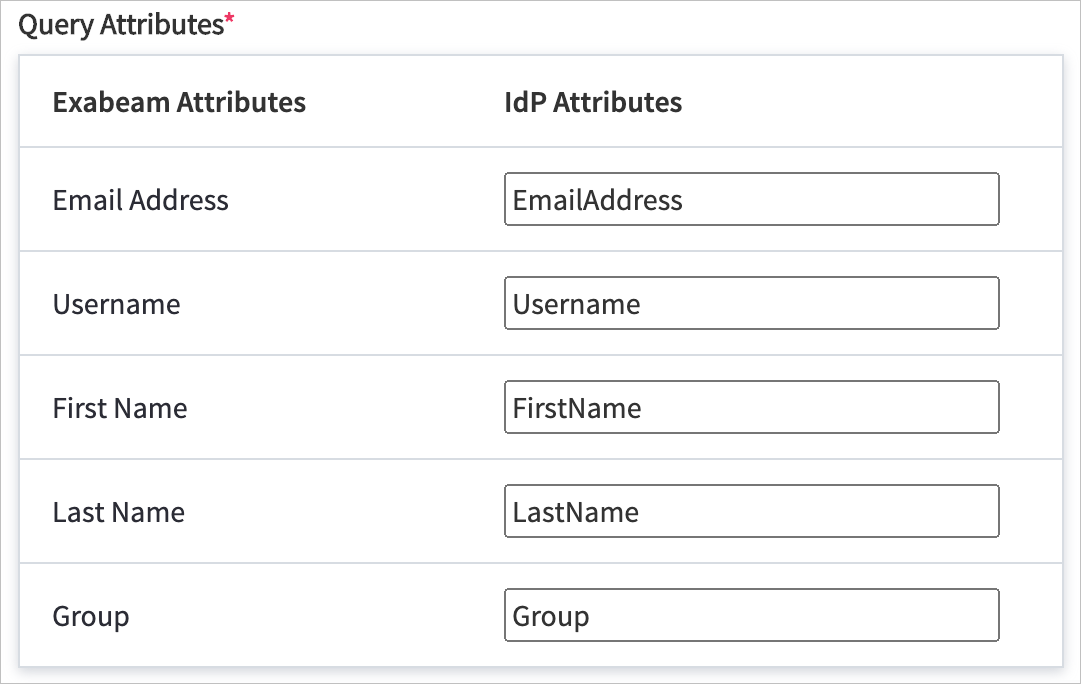
In the Query Attributes section, enter the appropriate IdP attribute values for each field that you defined in step 7.
Important
The IdP attribute values must match the values that you defined in step 7.
Click Save.
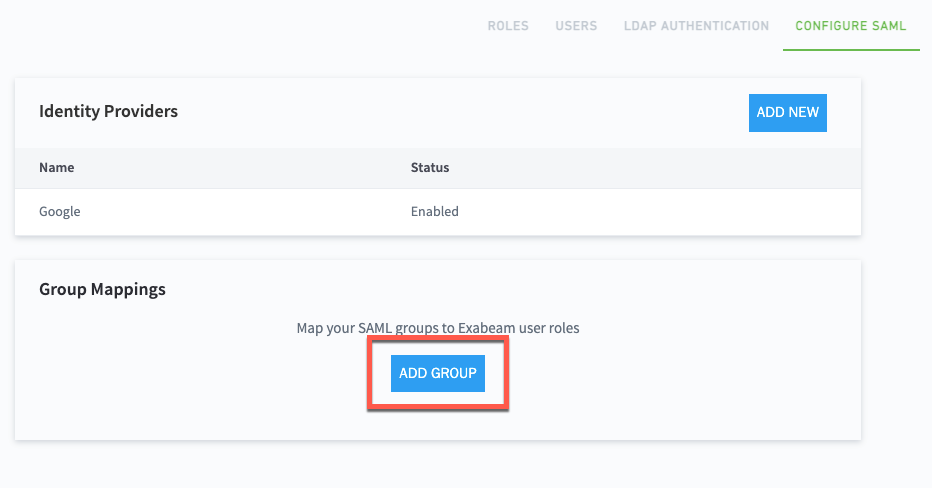
Azure now appears as an identity provider in the Configure SAML tab of the User Management page, and a Group Mappings section also appears.
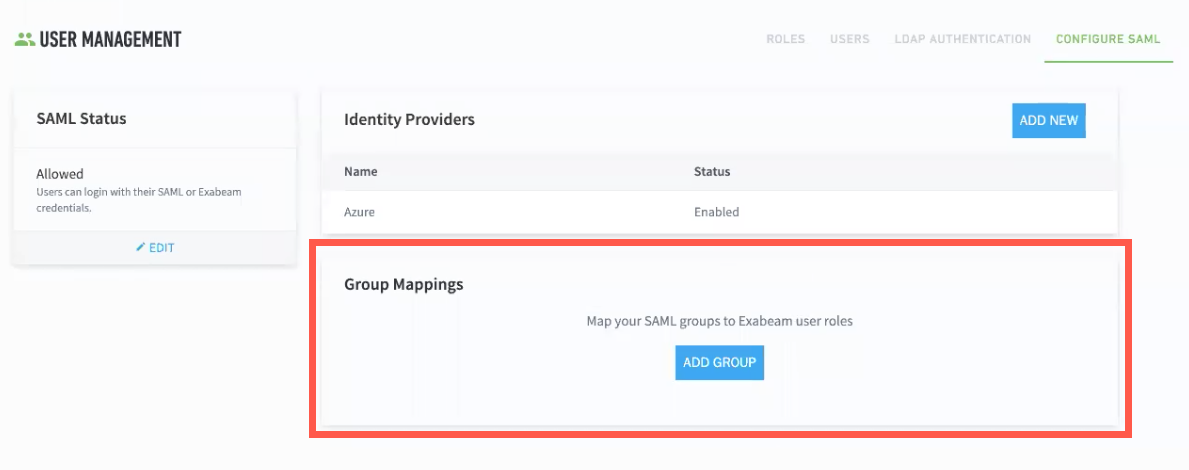
To map a SAML group to Exabeam user roles, do the following:
On the home page of Azure, click Groups.
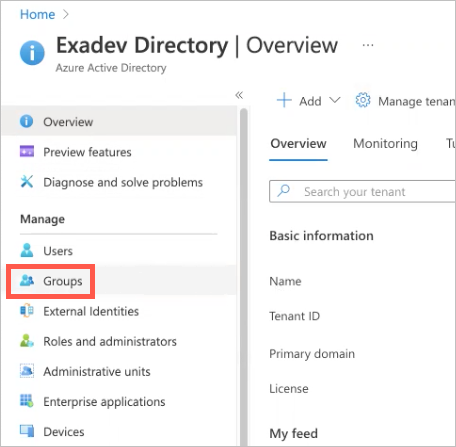
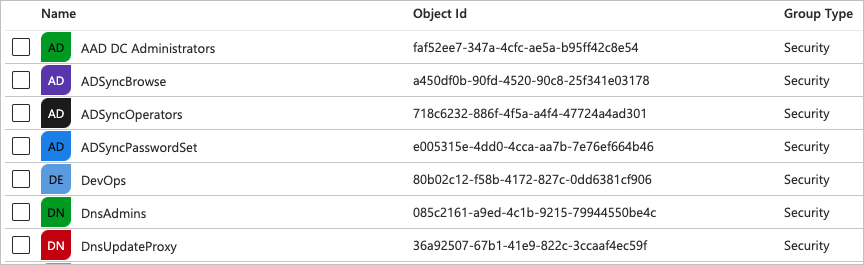
From the Object Id column, copy the ID for the Azure group that you want to map.
In Exabeam, on the Configure SAML tab of the User Management page, click Add Group.
The Edit Group Mapping dialog box appears.
From the Identity Provider drop-down menu, select Others.
In the Group Name field, paste the object ID that you copied in step b.
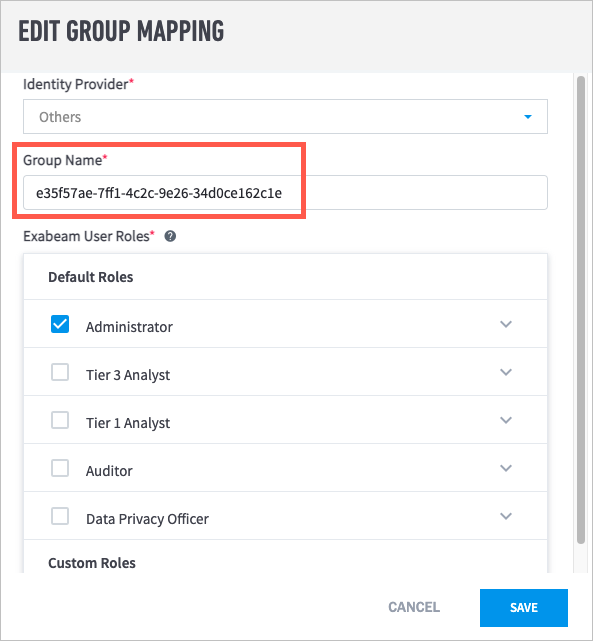
Select the Exabeam User Roles that you want to assign to the group.
Click Save.
Repeat steps a through g for each Azure group that you want mapped to user roles.
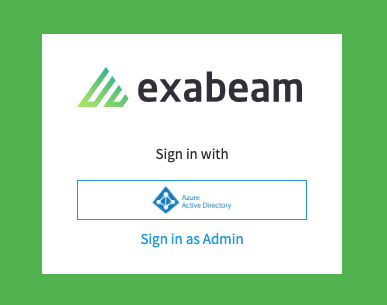
To verify that Azure has been successfully configured, log out of Exabeam and look for the Azure Active Directory option on the sign-on screen.
Configure Exabeam for SAML Authentication
Important
Before you begin this procedure, you need to Add Exabeam to Your SAML Identity Provider.
Log in to your Exabeam product.
Navigate to Settings
 > User Management > Configure SAML.
Click Add Identity Provider.
From the SAML Provider drop-down menu, select your IdP.
Note
If your IdP is not listed, select Custom/Generic IdP.
With the information that you collected in step 5 of Add Exabeam to Your SAML Identity Provider, do one of the following:
If you have an XML metadata file from your IdP, select Upload the XML metadata provided by your IdP, and then click Choose File to locate and upload the file from your computer.
If you do not have a metadata file, select Configure SSO manually and then do the following:
Click Choose File to locate and upload the IdP certificate from your computer.
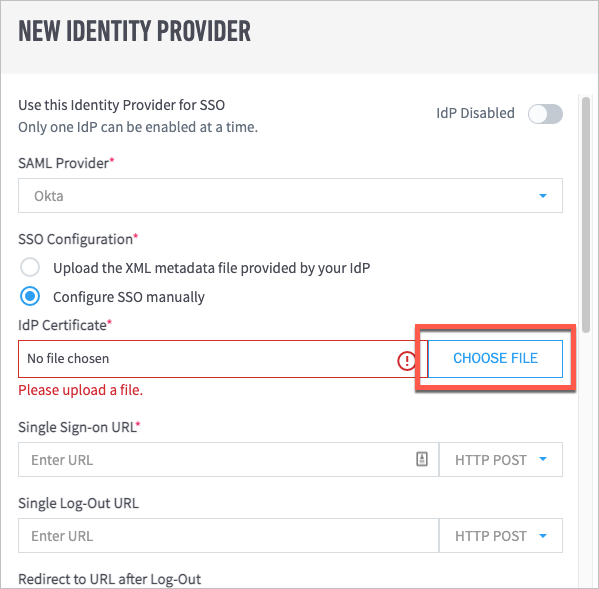
In the Single Sign-on URL field, enter the appropriate URL, and then select either HTTP POST or HTTP REDIRECT as needed from the drop-down menu.
(Optional) In the Single Log-Out URL and Redirect to URL after Log-Out fields, enter the appropriate URLs.
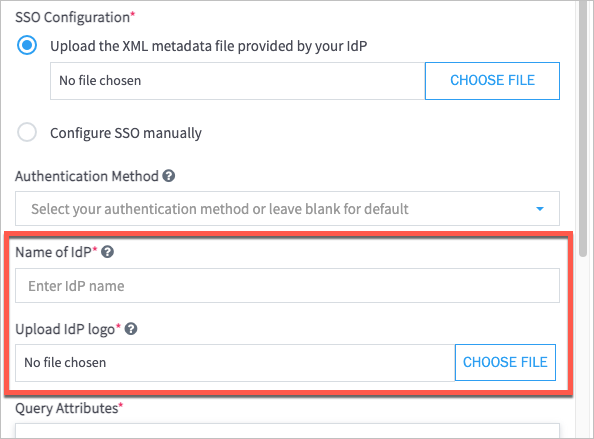
If you selected Custom/Generic IdP in the previous step, do the following:
In the Name of IdP field, enter a name.
Under Upload IdP Logo, click Choose File to locate and upload an IdP logo image in PNG format.
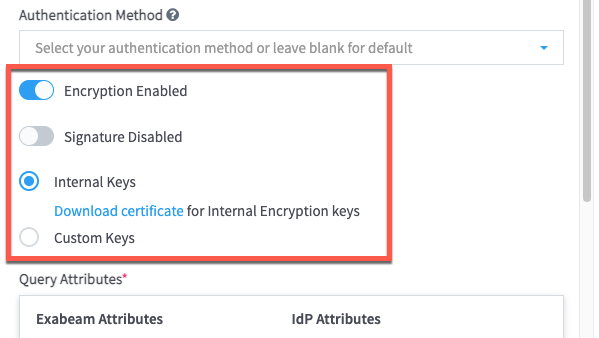
(Optional) From the Authentication Method drop-down menu, select an authentication method.
Note
Leave the field blank to accept the IdP's default method.
If you are using AD FS and want to enable encryption, click the Encryption Disabled toggle to enable it (the toggle turns blue when enabled), and then configure the following encryption options that apply to your environment:
In the Query Attributes table, map the Exabeam query attributes to the corresponding IdP user attributes by entering the same descriptive values that you did in Add Exabeam to Your SAML Identity Provider, as demonstrated in the following example:
(Optional) If you are ready to enable the IdP, click the IdP Disabled toggle. When the IdP is enabled, the toggle turns blue.
Note
You can add multiple IdPs to your Exabeam product, but only one IdP can be enabled at a time.
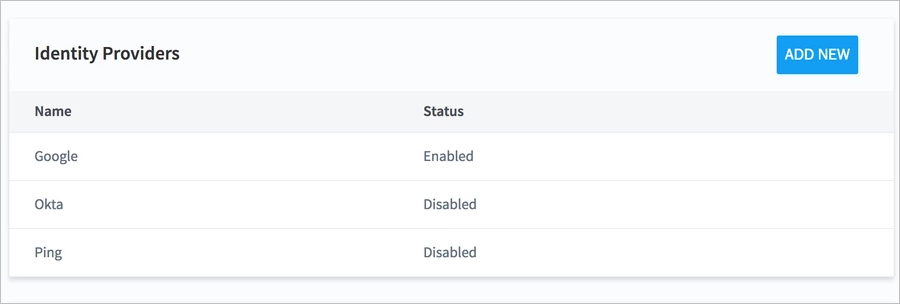
Click Save. Your identity provider now appears in the Identity Providers table.
To complete the configuration, you need to map your SAML groups to Exabeam user roles. For instructions, see Map SAML Groups to Exabeam User Roles.
Map SAML Groups to Exabeam User Roles
After adding a third-party identity provider (IdP) to your Exabeam product, you need to map the IdP user groups to the appropriate user roles in Exabeam. For example, if in your IdP you have an "Advanced Analyst" user group that needs the permissions included in the Tier 3 Analyst (Advanced Analytics) role, you can map the group to that role. Each group can be mapped to one or more roles as needed.
Navigate to Settings
>Core >User Management > Configure SAML.In the Group Mappings section (which appears below the Identity Providers table), click Add Group.
The New Group Mapping dialog box appears.
From the Identity Provider drop-down menu, select the IdP that you want to map.
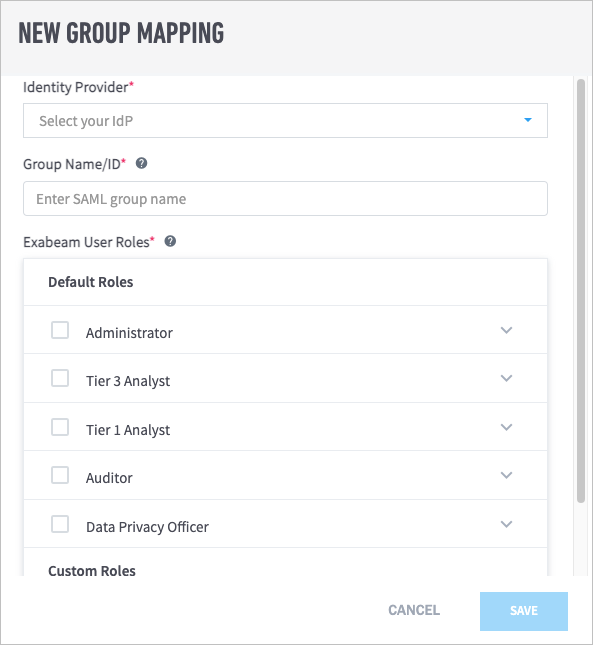
In the Group Name/ID field, enter the group name or ID as it is listed in the IdP.
Important
Group names are case sensitive.
In the Exabeam User Roles list, select the checkboxes for the role(s) that you want to assign to the group.
Click Save.
Manage SAML Login Status
You can make authentication through your selected identity provider (IdP) mandatory for users to log in, or you can allow users to log in through either the IdP or local authentication. You can also disable your selected IdP so that users can only log in through local authentication.
Navigate to Settings
> > User Management > Configure SAML.In the SAML Status box, select a login status for your IdP.
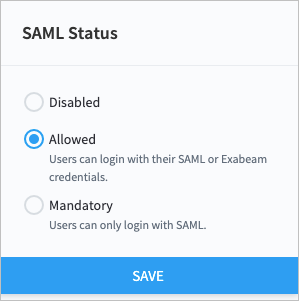
Click Save.
Enable or Disable Identity Providers
Note
You can add multiple identity providers (IdPs) to your Exabeam product, but only one IdP can be enabled at a time.
Navigate to Settings > > User Management > Configure SAML.
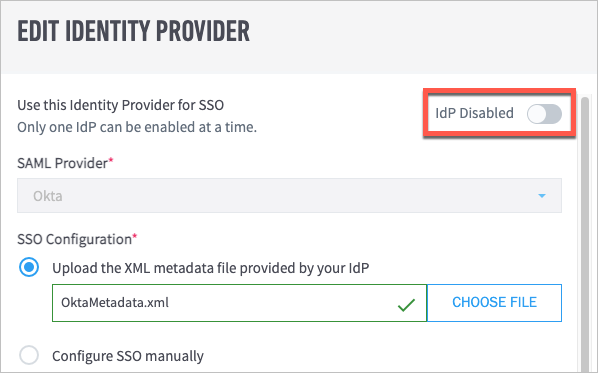
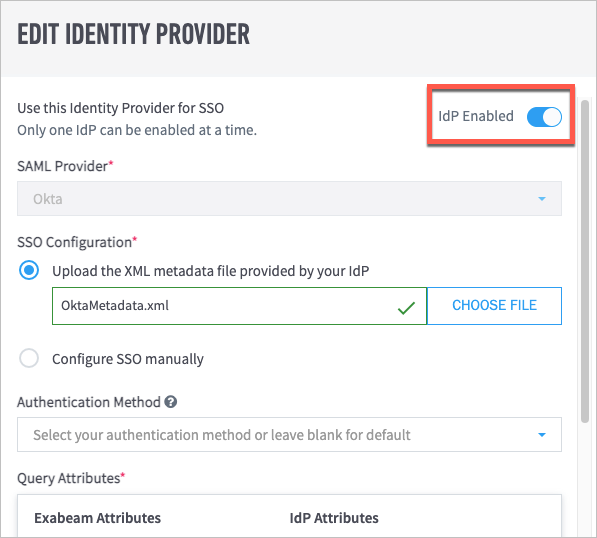
Move your pointer over the IdP that you want to enable or disable, and click the edit icon.
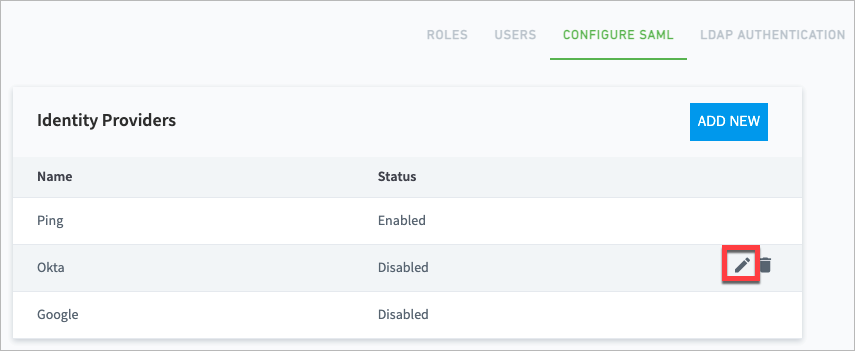
The Edit Identity Provider dialog box opens.
Click the IdP Enabled/Disabled toggle to enable or disable the IdP as needed.
The toggle is blue when the IdP is enabled and gray when it is disabled.
Audit Log Management in Data Lake
There are a host of reasons to audit user activity. Insider threat show up in the form of unusual queries to sensitive information or unauthorized configuration changes. Perhaps your organization is undergoing an internal audit. Data Lake's audit mechanism centralizes important and useful data for generating reports or help fill gaps in an investigation.
How Audit Logging Works
Specific activities related to Exabeam product administrators and users are logged, including activities within the UI as well as configuration and server changes. This is especially useful for reviewing activities of departed employees as well as for audits (for example, GDPR).
The following events are logged:
|
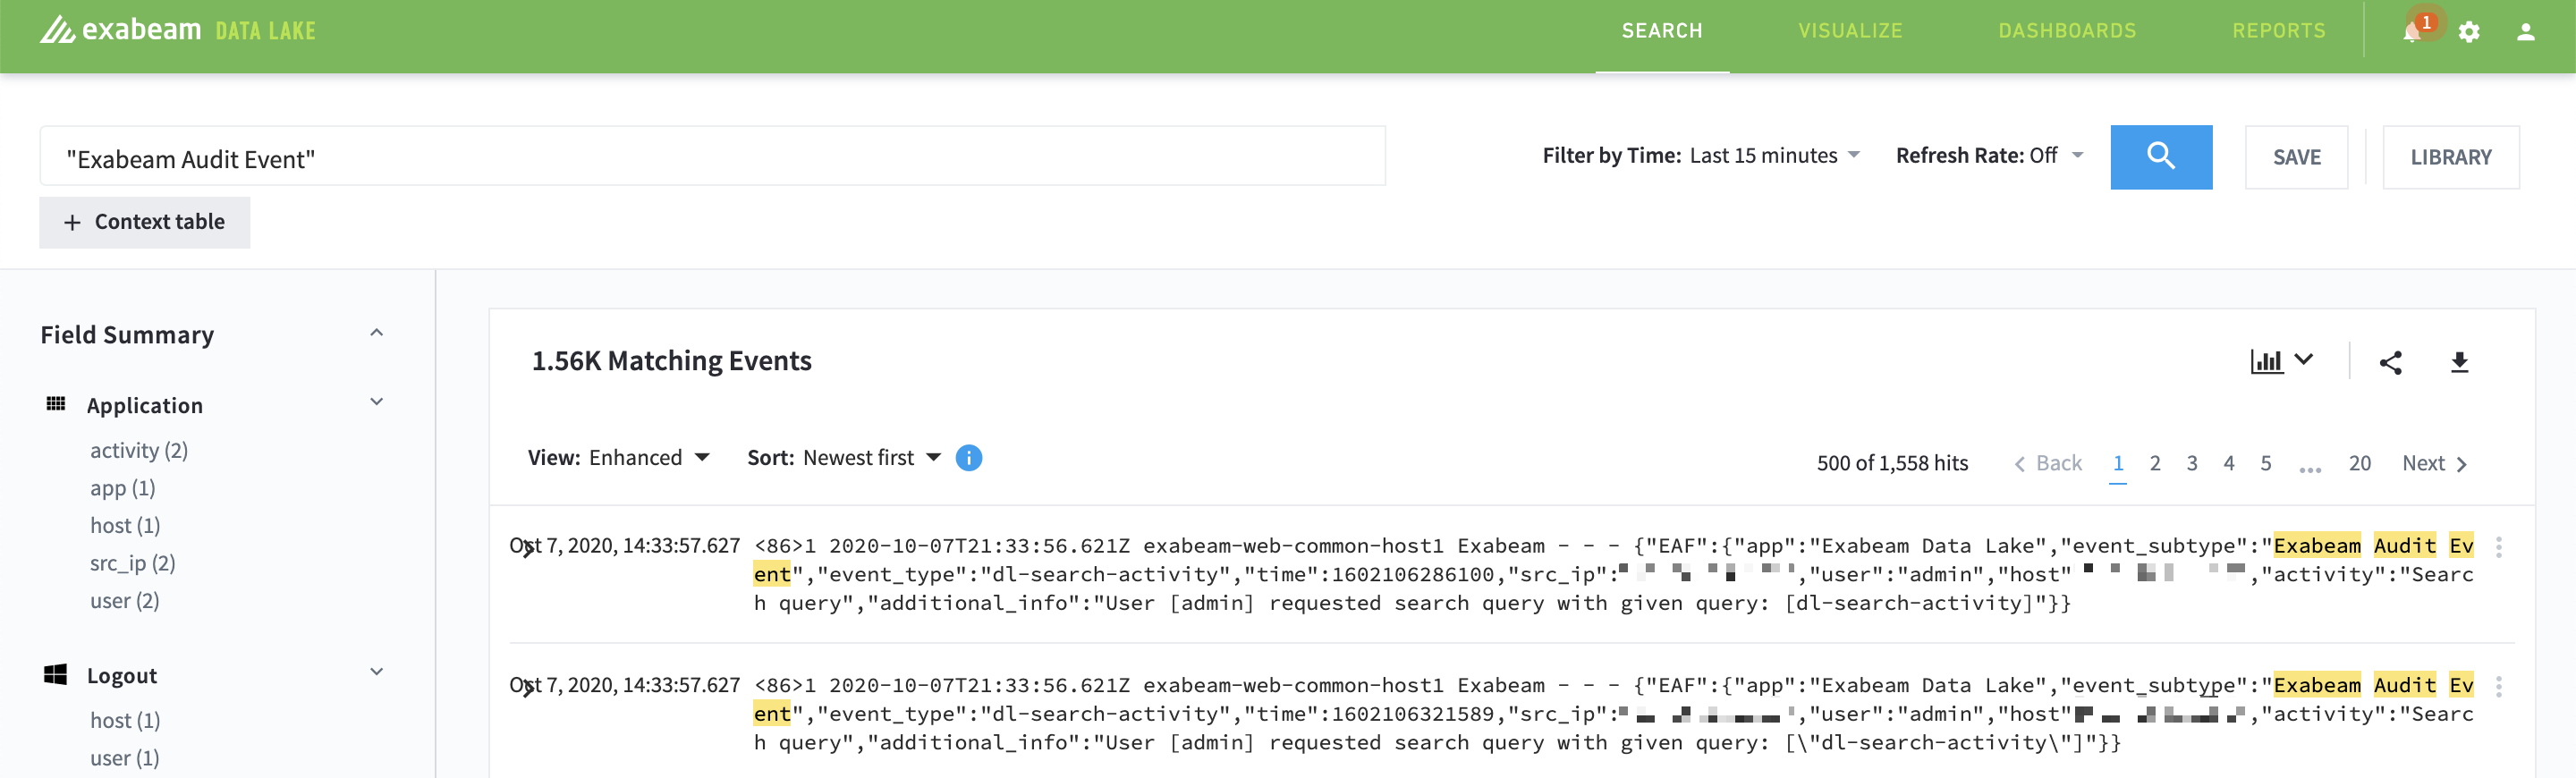
When you enable audit and configure the message feeding back into Data Lake, you can query these audit log through the Data Lake UI as you can with any other logs filtering, using the event_subtype Exabeam Audit Event.
Audit Log Retention
Hardware and Virtual Deployments Only
The Exabeam audit logs are activity logs for user and asset activity in your organization. The logs are held for 90 days by default and retention can be extended up to 365 days.
Retention time is found in /opt/exabeam/config/common/web/custom/application.conf, where webcommon.audit.retentionPeriod determines the number of days logs are held. The range may be 1 to 365 days.
What Fields Are in the Audit Data Logs
Audit data in Data Lake contains event logs for user activity committed within the product. In the same manner as other event logs, audit event logs can be forwarded to Exabeam Advanced Analytics via Syslog Forwarding.
The default retention time for audit data is 90 days.
The following table lists the fields for each event being stored.
Element | Comment |
|---|---|
| Exabeam Data Lake |
| Type categories:
|
| Exabeam Audit Event |
| Time of event |
| Currently authenticated user’s IP address |
| Currently authenticated user’s username |
| Type categories:
|
| Host IP address |
| The activity containing the search, query, etc. |
| Indicates whether the message has been sent to Syslog |
How to Enable Audit Logging
Audit logging is not enabled by default. Syslog notification must configured with it messages sent to the Data Lake host.
Navigate to Settings > Notifications > Setup Notifications.
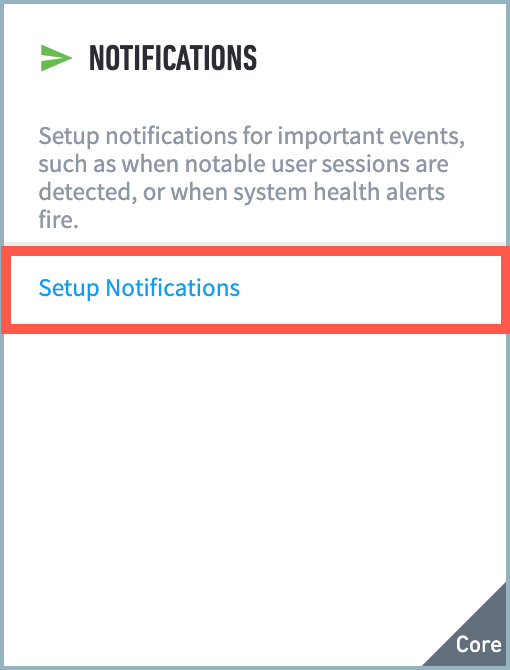
Click
 to expand the menu and then select Syslog notifications.
In the configuration menu, use the IP or FQDN of your Data Lake master host in the IP/Hostname field.
Select DL Audit.
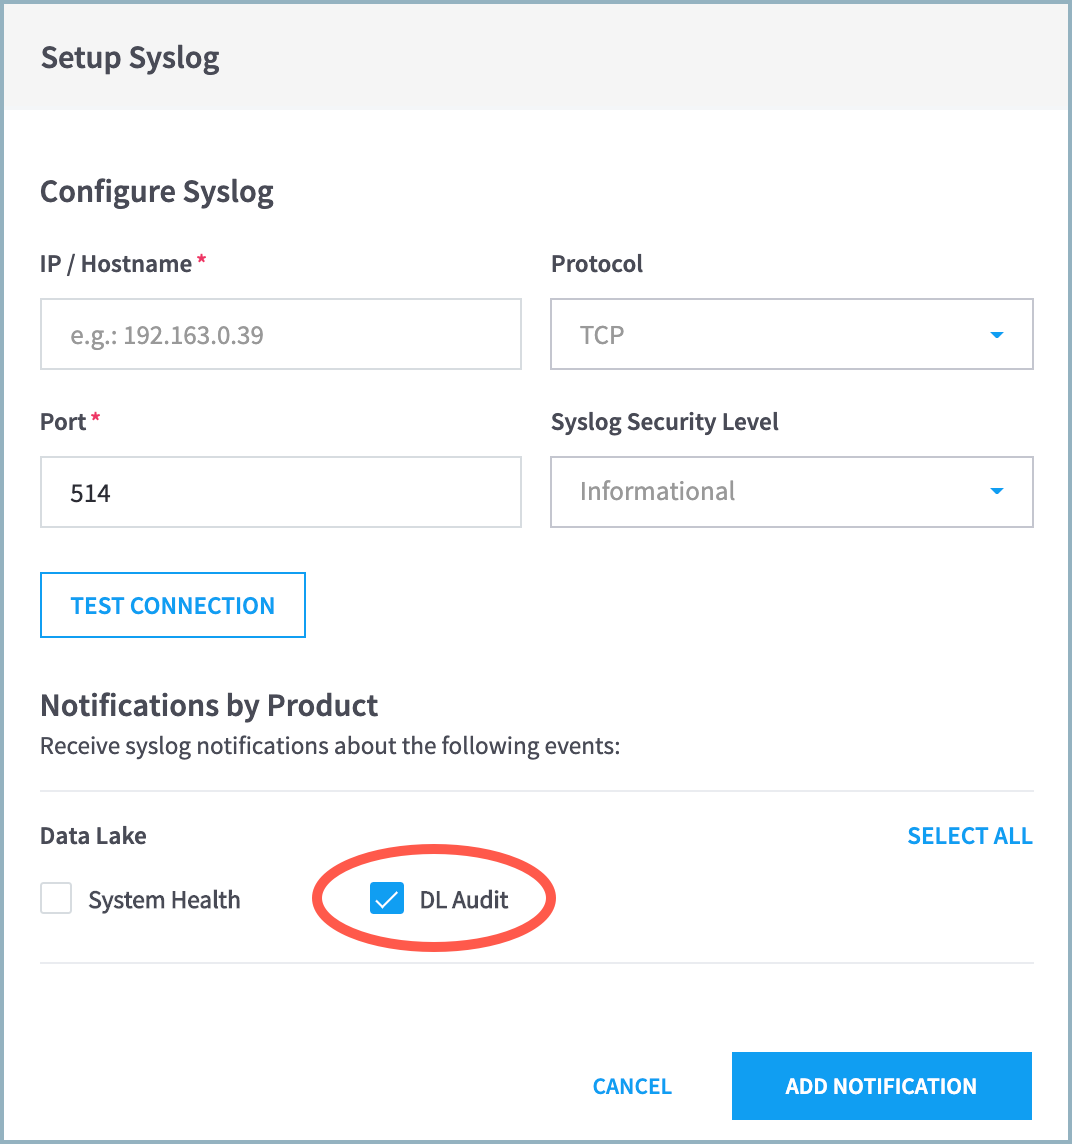
Click ADD NOTIFICATION to create the record.
Audit event logs will start writing to Data Lake immediately.
How to Access Audit Data
You can view, create reports, export, etc. audit data like you would for any event log in Data Lake . Apply queries with the event subtype Exabeam Audit Event as a filter.
 |
Common Access Card (CAC) Authentication
Exabeam supports Common Access Card (CAC) authentication. CAC is the principal card used to enable physical spaces, and it provides access to computer networks and systems. Analysts have CAC readers on their workstations to read their Personal Identity Verification (PIV) credentials and authenticate them to use various network resources.
Note the following restrictions:
Configure CAC users that are authorized to access Exabeam from the Exabeam User Management page.
During the user provisioning, the CAC analysts must be assigned roles. The roles associated with a CAC user will be used for authorization when they login.
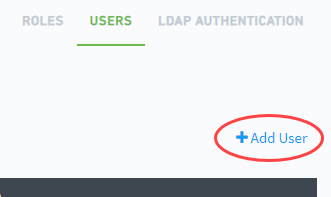
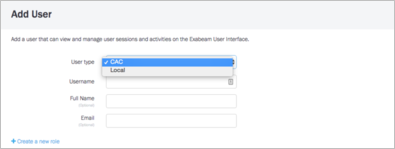 Figure 3. Add User menu
Configure Client Certificates
Retrieve your
ca.pemfile to/home/exabeamdirectory at the master node.Run the following commands on the master node (note that an alias of
cacbundleis applied to the certificate being installed):source /opt/exabeam/bin/shell-environment.bash docker cp ca.pem exabeam-web-common-host1:/ docker exec exabeam-web-common-host1:/ keytool -import -trustcacerts -alias cacbundle -file ca.pem -keystore /opt/exabeam/web-common/config/custom/truststore.jks -storepass changeit -noprompt
Note
With
docker exec exabeam-web-common-host1,exabeam-web-common-host1does not resolve to the docker container. As a result, you must query docker ps and find the container ID or use–name exabeam-web-common-host1.Note
If you need to remove the alias, use the following command:
docker exec -it exabeam-web-common keytool -delete -alias cacbundle
Located in
/opt/exabeam/config/common/web/custom/application.conf, thesslClientAuthflag must be set totrue, as shown in the following example:webcommon { service { interface = "0.0.0.0" #hostname = "<hostname>" port = 8484 https = true sslKeystore = "$EXABEAM_HOME/config/custom/keystore.jks" sslKeypass = "password" # The following property enables Two-Way Client SSL Authentication sslClientAuth = trueTo install client certificates for CAC, add the client certificate bundle to the trust store on the master host.
To verify the contents of the trust store on the master host, run the following:
# For Exabeam Data Lake
sudo docker exec exabeam-web-common-host1 /bin/bash -c "keytool -list -v -keystore /opt/exabeam/config/custom/truststore.jks -storepass changeit"

# For Exabeam Advanced Analytics
 sudo docker exec exabeam-web-common /bin/bash -c "keytool -list -v -keystore /opt/exabeam/config/custom/truststore.jks -storepass changeit"
When you have completed the configuration changes, restart
web-common.source /opt/exabeam/bin/shell-environment.bash; web-common-restart
Configure a CAC User
To associate the credentials to a login, create a CAC user by navigating to Settings > User Management > Users > Add User and select CAC in User type.
Ensure that the
usernamematches theCNattribute of the CAC user.If LDAP authentication is enabled, use LDAP group mapping to enable the users.
Configure an LDAP Server for CAC Authentication
To configure an Active Directory server for CAC authentication, follow the instructions in Set Up LDAP Server and Set Up LDAP Authentication for using Active Directory servers to manage CAC user access.
After LDAP is configured, the identity held by the Active Directory server is used to grant or deny CAC card access to Exabeam.
Delete a CAC User Account
CAC user accounts in Advanced Analytics and Data Lake are deleted by removing the users from the Mongo database.
As the Exabeam user, source the environment.
$ sos
Find the user that you want to delete by running the following command. The example below is set to find the user with the
idname ofjohndoe.mongo --quiet exabeam_user_db --eval 'db.exabeam_user_collection.find({_id:"johndoe"})'The output is as follows:
{ "_id" : "johndoe", "email" : "", "password" : "6008c8a26014989270343e9bb40548360a400a425523cc3636954dac33f", "passwordReset" : false, "roles" : [ ], "passwordLastChanged" : NumberLong("1427907776669"), "lastLoginAt" : NumberLong(0), "failedLoginCount" : 0, "fromLDAP" : false, "passwordHistory" : [ { "hashAlgorithm" : "sha256", "password" : "6008c8a26014989270343e9bb40548360a400a425523cc3636954dac33f", "salt" : "[B@3bd37f64" } ], "salt" : "[B@3bd37f64", "hashAlgorithm" : "sha256" } Note: If you don't receive output, that means the user does not exist in the database. Make sure you spelled the id correctly and run the command again. To delete the user, run the following command:mongo --quiet exabeam_user_db --eval 'db.exabeam_user_collection.remove({_id:"johndoe"})'Output if the user was successfully deleted: WriteResult({ "nRemoved" : 1 }) Note: If you don't receive output, the user was not successfully deleted. Make sure you spelled the id correctly and run the command again.Refresh the page in the UI and the user that was deleted should be removed from the user list.To delete the user, run the following command:
mongo --quiet exabeam_user_db --eval 'db.exabeam_user_collection.remove({_id:"johndoe"})'If the user is successfully deleted, the output is as follows:
WriteResult({ "nRemoved" : 1 })
Set Up LDAP Server
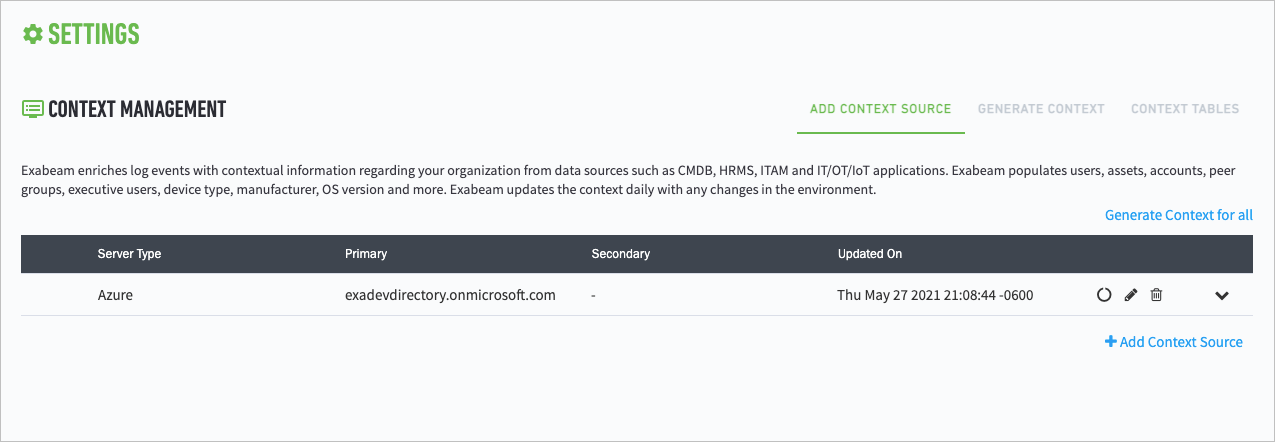
If you are adding an LDAP server for the first time, then the ADD CONTEXT SOURCE page displays when you reach the CONTEXT MANAGEMENT settings page. Otherwise, a list of LDAP Server appears, click Add Context Source to add more.
Select a Source Type:
Microsoft Active Directory
NetIQ eDirectory
Microsoft Azure Active Directory
The add/edit CONTEXT MANAGEMENT page displays the fields necessary to query and pull context information from your LDAP server(s), depending on the source chosen.
For Microsoft Active Directory:
Primary IP Address or Hostname – Enter the LDAP IP address or hostname for the primary server of the given server type.
Note
For context retrieval in Microsoft Active Directory environments, we recommend pointing to a Global Catalog server. To list Global Catalog servers, enter the following command in a Windows command prompt window:
nslookup -querytype=srv gc.tcp.acme.local. Replaceacme.localwith your company's domain name.Secondary IP Address or Hostname – If the primary LDAP server is unavailable, Exabeam falls back to the secondary LDAP server if configured.
TCP Port – Enter the TCP port of the LDAP server. Optionally, select Enable SSL (LDAPS) and/or Global Catalog to auto-populate the TCP port information accordingly.
Bind DN – Enter the bind domain name, or leave blank for anonymous bind.
Bind Password – Enter the bind password, if applicable.
LDAP attributes for Account Name – This field auto-populated with the value
sAMAccountName. Please modify the value if your AD deployment uses a different value.
For NetIQ eDirectory:
Primary IP Address or Hostname – Enter the LDAP IP address or hostname for the primary server of the given server type.
Secondary IP Address or Hostname – If the primary LDAP server is unavailable, Exabeam falls back to the secondary LDAP server if configured.
TCP Port – Enter the TCP port of the LDAP server. Optionally, select Enable SSL (LDAPS) and/or Global Catalog to auto-populate the TCP port information accordingly.
Bind DN – Enter the bind domain name, or leave blank for anonymous bind.
Bind Password – Enter the bind password, if applicable.
Base DN – .
LDAP Attributes – The list of all attributes to be queried by the Exabeam Directory Service (EDS) component is required. When testing the connection to the eDirectory server, EDS will collect from the server a list of the available attributes and display that list as a drop down menu. Select the name of the attribute from that list or provide a name of your own. Only names for the LDAP attributes you want EDS to poll are required (i.e., not necessarily the full list). Additionally, EDS does not support other types of attributes, therefore you cannot add “new attributes” on the list below.
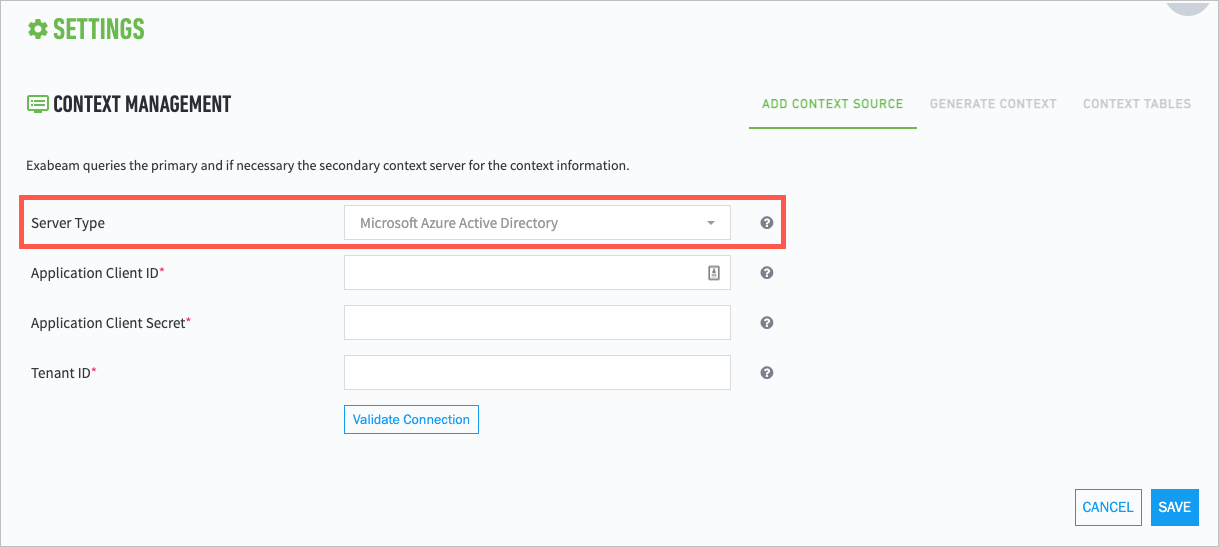
For Microsoft Azure Active Directory:
Application Client ID — In App Registration in Azure Active Directory, select the application and copy the Application ID in the Overview tab.
Application Client Secret — In App Registration in Azure Active Directory, select the application and click on Certificates & Secrets to view or create a new client secret.
Tenant ID — In App Registration in Azure Active Directory, select the application and copy the Tenant ID in the Overview tab.
Click Validate Connection to test the LDAP settings.
Note
If you selected Global Catalog for either Microsoft Active Directory or NetIQ eDirectory, this button displays as Connect & Get Domains.
Click Save to save your context source,
Set Up LDAP Authentication
In addition to local authentication Exabeam can authenticate users via an external LDAP server.
When you arrive at this page, by default the ‘Enable LDAP Authentication’ is selected and the LDAP attribute name is also populated. To change the LDAP attribute, enter the new account name and click Save. To add an LDAP group, select Add LDAP Group and enter the DN of the group you would like to add. Test Settings will tell you how many analysts Exabeam found in the group. From here you can select which role(s) to assign. It is important to note that these roles are assigned to the group and not to the individual analysts; if an analyst changes groups their role will automatically change to the role(s) associated with their new group.
Azure AD Context Enrichment
Important
For the Azure AD context enrichment feature to function, your organization must have a hybrid Active Directory deployment that uses Azure AD and either Microsoft AD or Microsoft ADDS.
Organizations using Azure Active Directory (AD) can enrich their event logs by adding user context. This feature automatically pulls user attribute information from Azure AD on a daily basis and enriches logs in real time. Pulled attributes include the following:
ID
userType
userPrincipalName
mailNickname
onPremisesSamAccountName
displayName
mail
Note
While context information from Azure AD is pulled daily, you can also perform manual pulls from Azure AD to immediately update information after changes to user accounts.
The following table lists the events that can be enriched with context from Azure AD:
Office 365 | Azure | Windows Defender | Windows |
|---|---|---|---|
Failed Sign in Alert Failed App Login App Login Sign in Alert Account Unlocked Account Password Changed Account Disabled Security Alert 1 Security Alert 3 Member Added Member Removed PowerBI Activity Hub Network Connection App Activity | App Activity App Login Core Directory | EventHubs Login PIM Activity Security Alert | Auth Events App Login Activity |
Set Up Azure AD Context Enrichment
Navigate to Settings > Core > Context Management > Add Context Source.
The Context Management page opens.
Click + Add Context Source.
From the Source Type drop-down menu, select Microsoft Azure Active Directory.
Provide the appropriate values for the following fields:
Application Client ID
Application Client Secret
Tenant ID
To generate the appropriate values for these fields, do the following:
Log in to Microsoft Azure.
Under Azure services, click App registrations.
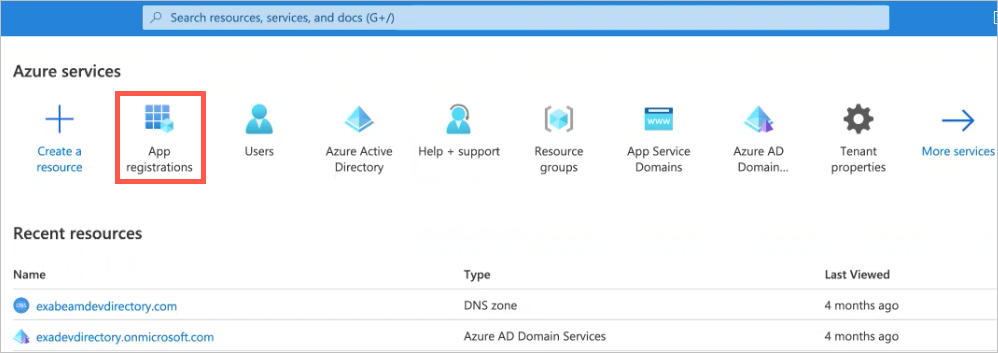
Click New registrations.
In the Name field, type a name for the app.
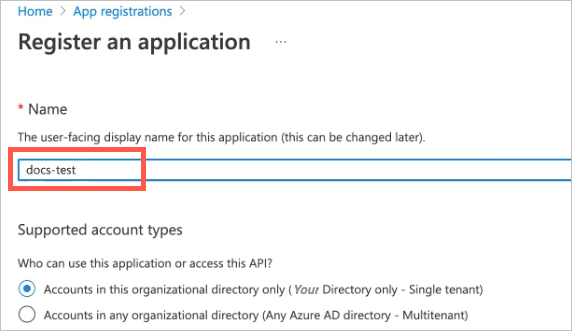
Under supported account types, ensure that the following setting is selected: Accounts in this organizational directory only (Your Directory only - Single tenant).
At the bottom of the page, click Register.
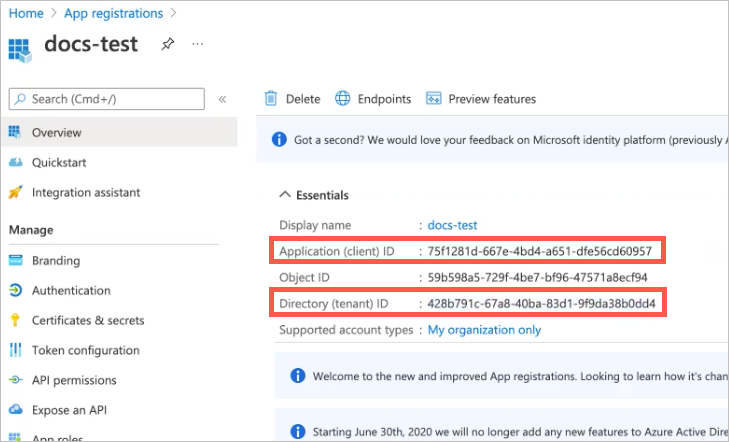
The Overview page for your new app appears.
Copy the Application (client) ID and paste it into the Application Client ID field in Exabeam; copy the Directory (tenant) ID and paste it into the Tenant ID field.
In the Manage menu, click API permissions.
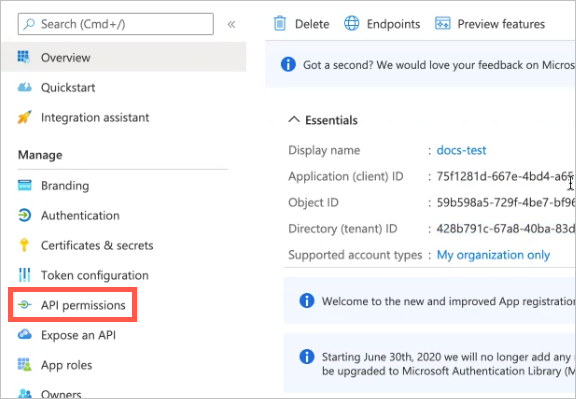
The API permissions page opens.
Click Add a permission.
The Request API permissions panel opens on the right.
Click the Microsoft Graph box.
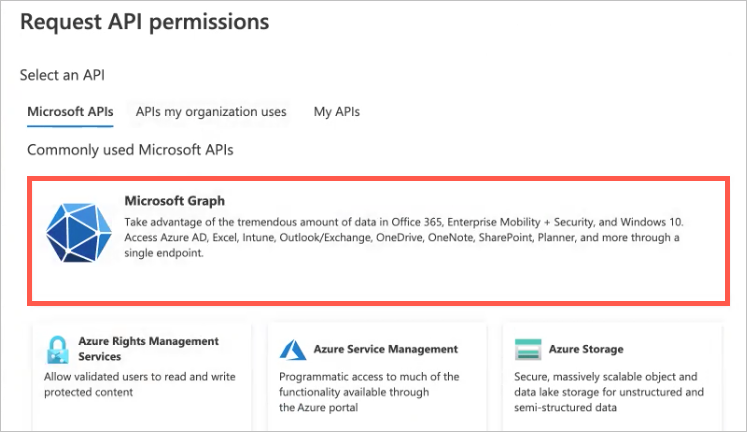
Click the Application permissions box.
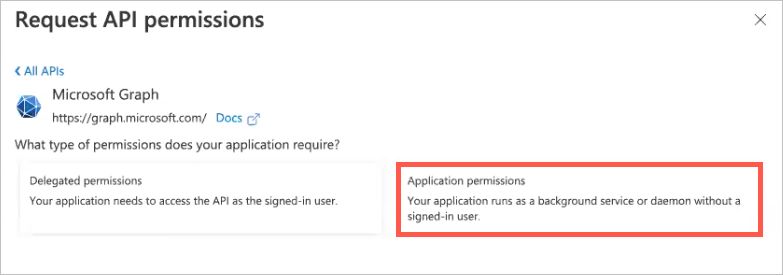
In the Select permissions text filter, type
directory.Click the Directory drop-down arrow, and then select Directory.Read.All.
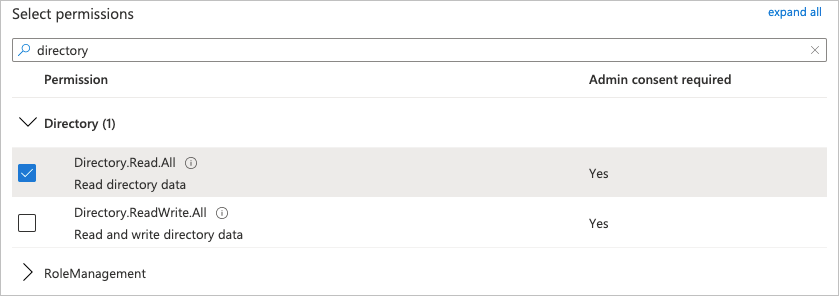
At the bottom of the panel, click Add permissions.
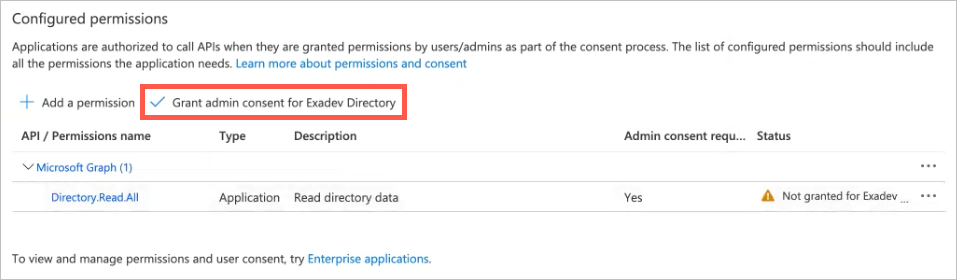
The panel closes and the added permission appears under Configured permissions.
Click Grant admin consent for Exadev Directory, and then click Grant admin consent confirmation.
In the Manage menu on the left, click Certificates & secrets.
The Certificates & secrets page opens.
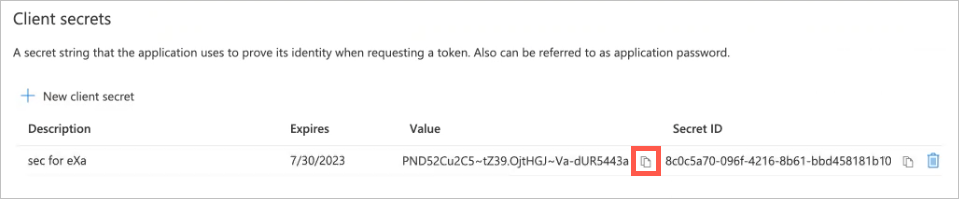
Click New client secret.
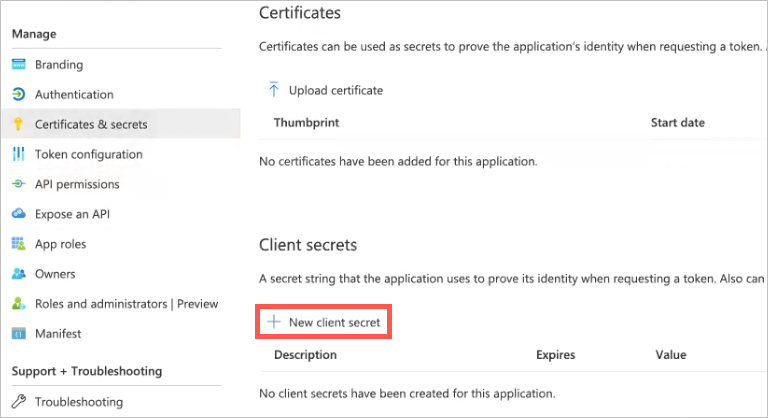
The Add a client secret panel opens on the right.
In the Description field, provide a description of the secret (such as what the secret is being used for).
From the Expires drop-down menu, select a time frame for when you want the secret to expire.
At the bottom of the panel, click Add.
The panel closes and the added secret appears in the Client secrets list.
Click the copy-to-clipboard icon for the secret Value, and then paste the value into the Application Client Secret field in Exabeam.
To test the connection with Azure AD, click Validate Connection.
A message displays to indicate whether the connection is successful.
If the connection is successful, click Save to complete the setup.
Azure AD is added to the list of data sources on the Context Management page.
Adding a User to Exabeam Data Lake
Data Lake users must be added in a separate process from your organization's LDAP service. User permissions to view and execute tasks are based on the role(s) a user is assigned. Actions and views where a user has more than one role designation will follow the permission with the greatest access privilege.
To add a new user in Data Lake:
Log in to your instance of the UI.
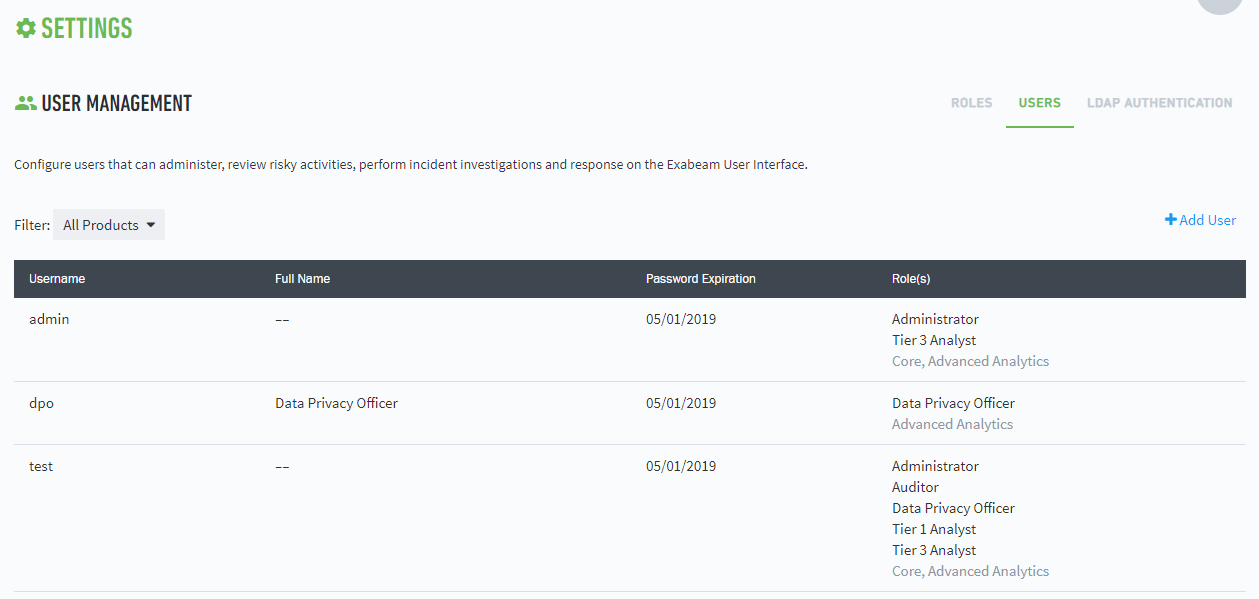
Click the settings icon at the top-right corner of any page, and then click Settings.
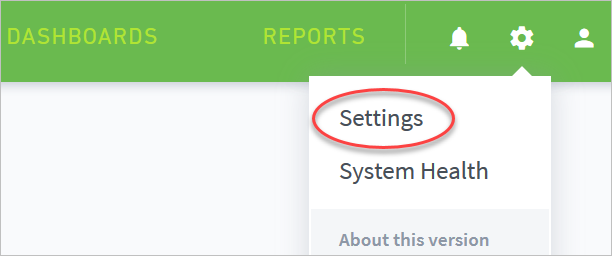
In the User Management section, click Users.
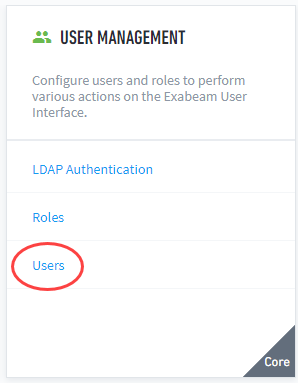
Click + Add User.
Enter the user details.
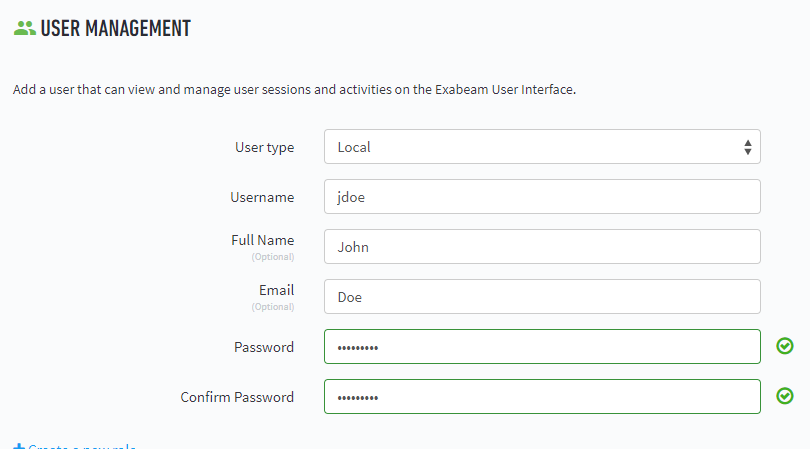
Select applicable roles.
Click SAVE.
The new user now appears on the User Management page.
 |
User Password Policies
Exabeam users must adhere to the following default password security requirements:
Passwords must:
Be between 8 to 32 characters
Contain at least one uppercase, lowercase, numeric, and special character
Contain no blank space
User must change password every 90 days
New passwords cannot match last 5 passwords
SHA256 hashing is applied to store passwords
Only administrators can reset passwords and unblock users who have been locked out due to too many consecutive failed logins
The management policies that are adjustable:
Strong password policy can be changed by editing the
webcommonblock in/opt/exabeam/config/common/web/custom/application.conf.webcommon { ... auth { defaultAdmin { username = "admin" password = "changeme" } ... passwordConstraints { minLength = 8 maxLength = 32 lowerCaseCount = 1 upperCaseCount = 1 numericCount = 1 specialCharCount = 1 spacesAllowed = false passwordHistoryCount = 5 # 0 to disable password history checking } failedLoginLockout = 0 # 0 to disable loginLockout passwordExpirationDays = 90 # 0 to disable password expiration passwordHashing = "sha256" # accept either sha256 or bcrypt as options } ... }Default idle session timeout is 4 hours. Edit the
silhouette.authenticator.cookieIdleTimeoutvalue (in seconds) in/opt/exabeam/config/common/web/custom/application.conf.silhouette.authenticator.cookieIdleTimeout = 14400
User Engagement Analytics Policy
Exabeam uses user engagement analytics to provide in-app walkthroughs and anonymously analyze user behavior, such as page views and clicks in the UI. This data informs user research and improves the overall user experience of the Exabeam Security Management Platform (SMP). Our user engagement analytics sends usage data from the web browser of the user to a cloud-based service called Pendo.
There are three types of data that our user engagement analytics receives from the web browser of the user. This data is sent to a cloud-based service called Pendo:
Metadata – User and account information that is explicitly provided when a user logs in to the Exabeam SMP, such as:
User ID or user email
Account name
IP address
Browser name and version
Page Load Data – Information on pages as users navigate to various parts of the Exabeam SMP, such as root paths of URLs and page titles.
UI Interactions Data – Information on how users interact with the Exabeam SMP, such as:
Clicking the Search button
Clicking inside a text box
Tabbing into a text box
Opt Out of User Engagement Analytics
Note
For customers with federal or public sector licensees, we disable user engagement analytics by default.
To prevent Exabeam SMP from sending your data to our user analytics:
Access the config file at
/opt/exabeam/config/common/web/custom/application.conf
Add the following code snippet to the file:
webcommon {
    app.tracker {
      appTrackerEnabled = false
      apiKey = ""
    }
}
Run the following command to restart Web Common and apply the changes:
. /opt/exabeam/bin/shell-environment.bash web-common-restart