- Exabeam Data Lake Architecture Overview
- Exabeam Product Deployment in On-premises or Virtual Environments
- Administrator Operations
- User Management
- Exabeam Data Lake Role-based Access Control
- Exabeam Data Lake Object-based Access Control
- Exabeam Data Lake Secured Resources Overview
- Third-Party Identity Provider Configuration
- Audit Log Management in Data Lake
- Common Access Card (CAC) Authentication
- Set Up LDAP Server
- Set Up LDAP Authentication
- Azure AD Context Enrichment
- Adding a User to Exabeam Data Lake
- User Password Policies
- User Engagement Analytics Policy
- Exabeam Threat Intelligence Service
- Threat Intelligence Service Prerequisites
- Connect to Threat Intelligence Service through a Proxy
- View Threat Intelligence Feeds
- Threat Intelligence Context Tables
- View Threat Intelligence Context Tables
- Assign a Threat Intelligence Feed to a New Context Table
- Create a New Context Table from a Threat Intelligence Feed
- Using Threat Intelligence Service with Data Lake
- Check ExaCloud Connector Service Health Status
- Index Management
- Parser Management
- Forwarding to Other Destinations
- Syslog Forwarding Management in Exabeam Data Lake
- Syslog Forwarding Destinations
- Configure Log Forwarding Rate
- How to Forward Syslog to Exabeam Advanced Analytics from Exabeam Data Lake
- How to Forward Syslog from Exabeam Data Lake to Non-Exabeam External Destinations
- Exabeam Data Lake Selective Forwarding using Conditions
- How to Configure Exabeam Data Lake Log Destinations for Correlation Rule Outcomes
- Forward Exabeam Data Lake Incident to Exabeam Incident Responder
- Syslog Forwarding Management in Exabeam Data Lake
- Cluster Operations
- Cross-cluster Search in Exabeam Data Lake
- Prerequisites for Exabeam Data Lake Cross-cluster Search
- Remote Cluster Management for Exabeam Data Lake Cross-cluster Search
- Register a Remote Cluster in Exabeam Data Lake for Cross-cluster Search
- Exabeam Data Lake Cross-cluster Health Monitoring and Handling
- How to Enable/Disable/Delete Exabeam Data Lake Remote Clusters for Cross-cluster Search
- Exabeam Data Lake Remote Cluster Data Access Permissions for Cross-cluster Search
- System Health Page
- A. Technical Support Information
- B. List of Exabeam Services
- C. Network Ports
- D. Supported Browsers
Exabeam Product Deployment in On-premises or Virtual Environments
Hardware and Virtual Deployments Only
Before installing Exabeam products, ensure you have deployed the supported operating system and configurations. Please review all instructions for setting up hosts that will run Exabeam tasks. See the setup guides that apply to your operating environment.
There are a series of prerequisites to implement before installing Exabeam products. There are a number of ports, protocols, and URLs that must be opened and white-listed. We highly recommend reading through the Considerations for Installing and Deploying Exabeam Products and tackling these requirements early. This will ensure that the setup goes smoothly and quickly.
Considerations for Installing and Deploying Exabeam Products
Hardware and Virtual Deployments Only
Before you install and deploy an Exabeam product, ensure you have set up your physical, virtual machine, or Cloud Exabeam appliance. For more information on setting up your environment, please refer to our appliance and virtual machine setup guides.
The installation prompts ask a series of questions regarding how you want your node cluster and distributed file system configured.
Have the following prepared before starting:
exabeamuser account credentials with installation privileges.Warning
DO NOT ATTEMPT TO RUN THIS INSTALLATION AS ROOT.
SSH key for authenticating sessions between hosts. (Authentication using SSH password method is not preferred. SSH password method is not supported for GCP deployments.)
If you are using an external Certificate Authority (CA), please consult an Exabeam technical representative before installation.
IP addresses and hostnames of new node servers.
Preferred NTP and DNS hostnames and addresses.
Docker BIP and Calico subnet (cannot be an existing IP space or in use), if not using default settings
For virtual or cloud installations, obtain access to instance images or configurations for your platform. Contact your Exabeam representative for more information.
If you are setting up a disaster recovery scheme, please consult Disaster Recovery Deployment.
For Google Cloud Platform (GCP) deployments, you must meet the following requirements before installing:
GCP deployments: The firewall rules must allow IP protocol 4 (IP-in-IP or IPIP) traffic within the cluster. While setting up your TCP/UDP ports, ensure the Other protocols box is checked and in the input box type
ipip, and then save the setting.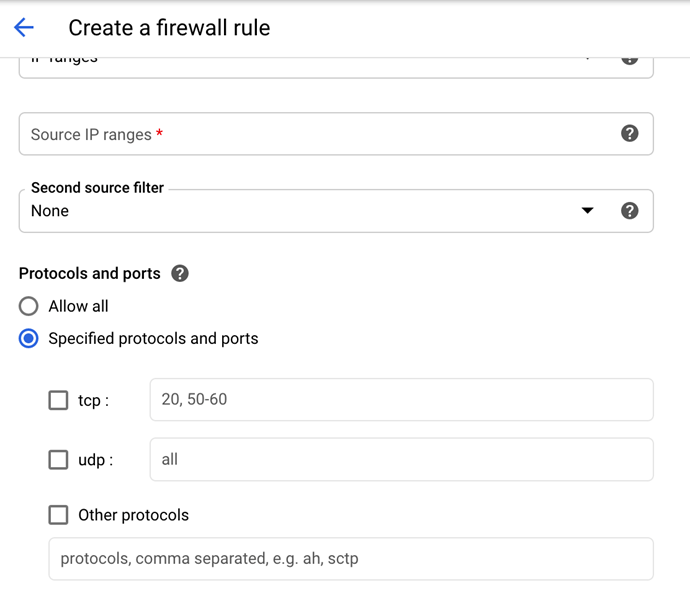
Nodes allow traffic to and from security group to itself.
For Data Lake , use a load balancer in front of your cluster and use TCP (not UDP) as a transmission protocol between the load balancer and the Exabeam Data Lake hosts. A load balancer is required (customer-provided) in front of Data Lake in order to have no downtime for syslog ingestion during the upgrade.
A terminal/screen session (SSH access).
Run deployment scripts only on the master node host. The deployment process will automatically install to worker hosts from the master node/host.
Repeat the deployment process at standby nodes. Secondary sites and standby nodes should have the same resources and capacities as the primary site and its nodes.
If you have questions about the prerequisites or installation approaches, please create a support ticket at Exabeam Community to connect with a technical representative who can assist you.
Supported Exabeam Deployment Configurations
Hardware and Virtual Deployments Only
The tables below shows the supported deployment configurations for Exabeam products and modules. When running the installation scripts, the various packages will be referred to by Exabeam module names.
Data Lake Deployment Configurations
lms = Data Lake
lms_master = Data Lake master host; orchestration and console/API node
lms_slave = Data Lake worker host; data and processing node
For deployments with a cluster of 21 or more hosts, it is mandatory to have three management nodes in the worker node pool with network connections capable of no less than 10 Gbps throughput. Designating three worker nodes as host management nodes is a prerequisite to ensure that the cluster maintains optimal processing performance.
Node Host | lms_master | lms_slave | management node (large clusters only) |
|---|---|---|---|
Master Node | ✓ | ✓ | |
Worker Node 1 | ✓ | ✓ | |
Worker Node 2 | ✓ | ✓ |
Installation Pre-Check for Exabeam Products
Hardware and Virtual Deployments Only
When deploying your Exabeam product, a series of automated pre-checks test your platform to ensure servers meet Exabeam's requirements in terms of available resources (memory, CPU, disks), OS configuration, etc. Any failures or warnings indicate your system will likely fail to deploy, and should be remedied before continuing.
A successful pre-check will conclude with All checks passed.
INFO exa_pre_check.py 2018-08-07 21:42:39,921 verify_precheck_results 111:Pre-check SSHDPrecheck passed at host: localhost . OK
INFO exa_pre_check.py 2018-08-07 21:42:39,921 verify_precheck_results 111:Pre-check OSVersionPrecheck passed at host: localhost . OK
INFO exa_pre_check.py 2018-08-07 21:42:39,921 verify_precheck_results 111:Pre-check FreeRootSpacePrecheck passed at host: localhost . OK
INFO exa_pre_check.py 2018-08-07 21:42:39,921 verify_precheck_results 111:Pre-check FreeExabeamDataSpacePrecheck passed at host: localhost . OK
INFO exa_pre_check.py 2018-08-07 21:42:39,921 verify_precheck_results 111:Pre-check FreeMongoSpacePrecheck passed at host: localhost . OK
INFO exa_pre_check.py 2018-08-07 21:42:39,921 verify_precheck_results 121:All checks passed.
An unsuccessful pre-check will conclude the following messages and it is advised you do not upgrade until checks have passed.
WARNING exa_pre_check.py 2018-08-09 22:06:48,353 verify_precheck_results 103:Precheck FreeMongoSpacePrecheck failed at host: 10.10.2.81 . Please make sure you have enough disk spaces at /opt/exabeam/data/mongo .
ERROR exa_pre_check.py 2018-08-09 22:06:48,353 verify_precheck_results 105: There are problems with your environment, but deployment may still continue. It is recommended that you correct the above problems if possible.
Install Exabeam Software
Hardware and Virtual Deployments Only
The instructions below are for new installations using the fresh_install steps. Installations should only run on Exabeam supported or approved hardware and platforms. For upgrades, please see Upgrading Exabeam Software
Warning
Do not install unauthorized third-party software onto Exabeam appliances. The performance and function of Exabeam hardware may be impacted.
To install Exabeam software:
Download
Exabeam_[product]_[build_version].sxbfile from Exabeam Community that you want to install. Transfer the downloaded SXB to/home/exabeamor anywhere on the master node except/opt/exabeam_installer.Start a new terminal session using the
exabeamcredentials (do not run as ROOT).Initiate a screen session. This is mandatory and will prevent accidental termination of your session.
screen -LS [yourname]_[todaysdate]
Change the permission of the file using:
chmod +x Exabeam_[product]_[build_version].sxb
Execute the following command:
./Exabeam_[product]_[build_version].sxb fresh_install
Note
If your installation is disrupted and needs to be resumed, execute the following:
/opt/exabeam_installer/init/exabeam-multinode-deployment.sh
Then select the "Deploy Cluster" menu option. If the network connection to the Exabeam host is dropped at any point during the installation, type
screen -r [yourname]_[todaysdate]to reattach the screen session.The following are prompts based on the product you are installing.
The minimum number of nodes you need must match your product selection and sizing. The example below is for a large multi-node environment where Node 1 (master), Node 2 (worker) and Node 3 (worker) are designated for management functions. Node 4 onwards are worker nodes that process data. A single-node environment will be the same process, except you will only be asked for the IP address of one node.
Warning
If you are deploying a cluster with 21 nodes or more, three of the nodes will be automatically assigned as the role of host management node. The first three nodes will be designated host management nodes.
Which product(s) do you wish to add? ['uba', 'ml', 'dl', 'cm']
dlHow many nodes do you wish to add? (minimum: 2)3What is the IP address of node 1 (localhost/127.0.0.1 not allowed)? [node1_address] What are the roles of node 1? ['lms_master', 'lms_slave'] :lms_masterWhat is the IP address of node 2 (Localhost/127.0.0.1 not allowed)? [node2_address] What is the IP address of node 3 (localhost/127.0.0.1 not allowed)? [node3_address] What is the IP address of node 4 (localhost/127.0.0.1 not allowed)? [node4_addressThis IP assign step will repeat until all nodes are assigned addresses.
Valid credentials (SSH Keys) are needed for inter-node communications. The example below uses an internal path for the path to the SSH Private Key, which you must replace with your own. The path to the SSH Private Key must be an absolute path. Follow instructions:
Note
If you have set up the instance in GCP, you must use the same private key shared across all the instances.
Follow these instructions if you already have an SSH Private Key. This is the preferred method. Contact your Exabeam representative if you need assistance.
The nodes within the Exabeam cluster communicate with each other regarding the processing status of the jobs, health status of the services etc. Valid credentials (ssh keys) are needed for secure inter-node communications. Do you have a ssh private key that can be used for internode communications? (If you don't have one, answer 'n' and we will create one for you. If you are running Exabeam on Amazon Web Services, you need to use the SSH key that the instance was launched with.) [y/n]
yWhat's the path to the ssh private key? [/opt/exabeam_installer/.ssh/key.pem]/home/exabeam/.ssh/key.pemWhat's the user name used to deploy the public ssh key? This user must exist and have sudo power. [exabeam]exabeamDoes Exabeam need password or SSH key to log in to all hosts? (This credential is needed only to put the SSH key on the machines. All communications moving forward will use the SSH key.) 1) password 2) SSH key ['1','2']: default (none):2What's the path to the ssh private key? [/opt/exabeam_installer/.ssh/key.pem]/opt/exabeam_installer/.ssh/key.pemFollow these instructions if you need to generate an SSH Private Key. This method is not supported for GCP deployments.
The nodes within the Exabeam cluster communicate with each other regarding the processing status of the jobs, health status of the services etc. Valid credentials (ssh keys) are needed for secure inter-node communications. Do you have a ssh private key that can be used for internode communications? (If you don't have one, answer 'n' and we will create one for you. If you are running Exabeam on Amazon Web Services, you need to use the SSH key that the instance was launched with.) [y/n]
nWe will generate a new ssh key for the deployment at /opt/exabeam_installer/.ssh/key.pem What's the user name used to deploy the publish ssh key? This user must exist and have sudo power. [exabeam]exabeamDoes Exabeam need password or SSH key to log in to all hosts? (This credential is needed only to put the SSH key on the machines. All communications moving forward will use the SSH key.) 1) password 2) SSH key ['1','2']: default (None):1You will be prompted several times for password. Password: [password]
The installation will automatically partition your drives. However, if auto-detection fails, you will be prompted to manually configure your partitions.
You will be given a suggested storage layout, which you can accept or override.
Unable to autodetect drive types for host
Check if drive configuration/override is needed.
You will be given a suggested storage layout, which you can accept or override. If you choose to accept the auto-suggested drive mapping, type
yand then proceed to the next step. If you choose to map the drives yourself, typenand follow the prompts to configure your drives to match the parameters in the table below.Exabeam Equivalent
/dev/xvdb
/dev/xvdc
/dev/xvdd
Remainder Drives
EX-3000
Data Lake nodes
LVM (1)
LVM (1)
Dedicated Mount (2)
Dedicated Mount (2)
To manually configure your drives, apply the parameters for the role and node you have assigned your host:
EX[appliance_type] mapping applied. { [suggested drive mappings] ... [suggested drive mappings] } Please review the above, would you like to apply this drive mapping automatically to the host? (Use lsblk or fdisk to verify on a separate screen) [y/n]nTo map an EX3000:
Please specify the drive purpose. We typically put SSDs on the LVM for services requiring fast I/O (data, mongo, es_hot), and HDDs for dedicated services like hadoop, elasticsearch, kafka. Ideally your host should have a mix of SSDs (fast) and HDDs (slow), so you should set your drive purpose accordingly to the Exabeam appliance specs. Important: If your host has all SSDs mounted, please mark the drive purpose for dedicated mounts, and the rest for the LVM. The size of the drive should be a good indicator as to which purpose it should be assigned to (larger sizes go to the dedicated mounts). Important: you should not provision all your disks to the LVM, or the dedicated mounts, there should be a mix. {'device': '/dev/xvdb', 'driver': 'xvd', 'model': 'Xen Virtual Block Device', 'size': '1031GB', 'table': 'unknown'} 1) Provision device /dev/xvdb to LVM (for data, mongo, or es_hot) 2) Provision device /dev/xvdb to dedicated mounts (for hadoop, kafka, or elasticsearch) ['1', '2']: default (None):1{'device': '/dev/xvdc', 'driver': 'xvd', 'model': 'Xen Virtual Block Device', 'size': '1031GB', 'table': 'unknown'} 1) Provision device /dev/xvdc to LVM (for data, mongo, or es_hot) 2) Provision device /dev/xvdc to dedicated mounts (for hadoop, kafka, or elasticsearch) ['1', '2']: default (None):1{'device': '/dev/xvdd', 'driver': 'xvd', 'model': 'Xen Virtual Block Device', 'size': '2147GB', 'table': 'unknown'} 1) Provision device /dev/xvdd to LVM (for data, mongo, or es_hot) 2) Provision device /dev/xvdd to dedicated mounts (for hadoop, kafka, or elasticsearch) ['1', '2']: default (None):2Select Option 2 for the remainder drives.
The following values are recommended.
For Advanced Analytics :
How many elasticsearch instances per host? [2]
1What's the replication factor for elasticsearch? 0 means no replication. [0]0How much memory in GB for each elasticsearch for each instance? [16]16How much memory in GB for each kafka instance? [5]5For Data Lake:
Note
If you are choosing an instance type where the memory is greater than 120 GB, we require 4 warm nodes. Otherwise, you will receive a warning message during the deployment process.
How many elasticsearch instances per host? [4]
4How much memory in GB for each elasticsearch master node? [5]5How much memory in GB for each elasticsearch hot node? [16]16How much memory in GB for each elasticsearch warm node? [22]22How much memory in GB for each kafka instance? [5]5The following values are recommended for GCP deployments.
How many elasticsearch instances per host? [4]
4How much memory in GB for each elasticsearch master node? [5]5How much memory in GB for each elasticsearch hot node? [16]16How much memory in GB for each elasticsearch warm node? [22]11How much memory in GB for each kafka instance? [5]5
NTP is important for keeping the clocks in sync. If you have a local NTP server please input that information. If you do not have a local NTP server, but have internet access, use the default
pool.ntp.org. Only choosenoneif there is no local NTP server and no internet access.What's the NTP server to synchronize time with? Type 'none' if you don't have an NTP server and don't want to sync time with the default NTP server group from ntp.org. [pool.ntp.org]
pool.ntp.orgThe installation will automatically detect and assign a default route for your cluster.
Let us determine the right network interface name for the deployment.Discovered network interface name: eno1. This will be used as the default nic in the cluster.
If you would like to add internal DNS servers, select
yand add them here. If not, selectn. Name resolution here impacts only Docker containers.Would you like to add any DNS servers? [y/n]
nIf there are any conflicting networks in the user's domain, override the Docker BIP and Calico subnets. Answer
yif you want to override (example is given below) andnif you do not.Note
The
docker_bipmust have an IP actually in the subnet (i.e., the value cannot end in .0).Would you like to override the docker_bip IP/CIDR (172.17.0.1/16)? [y/n]
yEnter the new docker_bip IP/CIDR (minimum size /25, recommended size /16): [docker_bip_ip/CIDR] Would you like to override the calico_network_subnet IP/CIDR (10.50.48.0/20)? [y/n]nCaution
IP addresses are given in the form
[ip]/[CIDR]. Please apply the correct subnet CIDR block. Otherwise, network routing may fail or produce an unforeseen impact.For Data Lake installations with clusters of 21 or more nodes, the installation will automatically designate the first three nodes as host management nodes (including master). The remainder of the nodes are marked as worker nodes that process data. Network throughput between management nodes must be capable of no less than 10 Gbps. For example, in a cluster of 24 nodes, nodes 1, 2, and 3, will be designated as host management nodes (including master). The remainder 21 nodes will be worker nodes that will process data.
If you do not have enough nodes to deploy the host management feature, the following message will appear:
Not enough nodes to deploy management nodes.
If the RPM (YUM) packages delivered with your installation have aged 3 months, you will be prompted to update your packages. You can also choose the option to
Install pre-approved CentOS package updatesfrom the main menu. ONLY UPDATE USING RPM (YUM) packages provided by Exabeam inside your SXB package.Note
You have the option to perform a rolling update or update all hosts at once. Choosing to perform a rolling update prevents log ingestion downtime. This option still requires the use of TCP and a load balancer in front of any Syslog source. Only update all hosts at once if you are doing a fresh install.
While this update process will exit the original fresh_install script, once you have run the YUM updates and your hosts have been rebooted, you can return to and complete the deployment process by logging into your master host and apply:
/opt/exabeam_installer/init/exabeam-multinode-deployment.sh
Then select the
Deploy Clustermenu option.
Your product is now deployed.
If you want to disable the Exabeam Cloud Telemetry Service, see How to Disable Exabeam Cloud Telemetry Service.
If you purchased Cloud Connectors to ingest logs, see the Cloud Connectors Administration Guide to get started.
Once you have deployed your purchased products, go to your host UI to configure features and services:
https://[master host IP]:8484
Log in using the credentials for the admin user, using the default password changeme, to make configurations. Please change the default password as soon as possible.
Note
Data Lake uses Elastalert Service to perform correlation rules. It is installed on the second host of the cluster.
Upgrade an Exabeam Product
Hardware and Virtual Deployments Only
Important
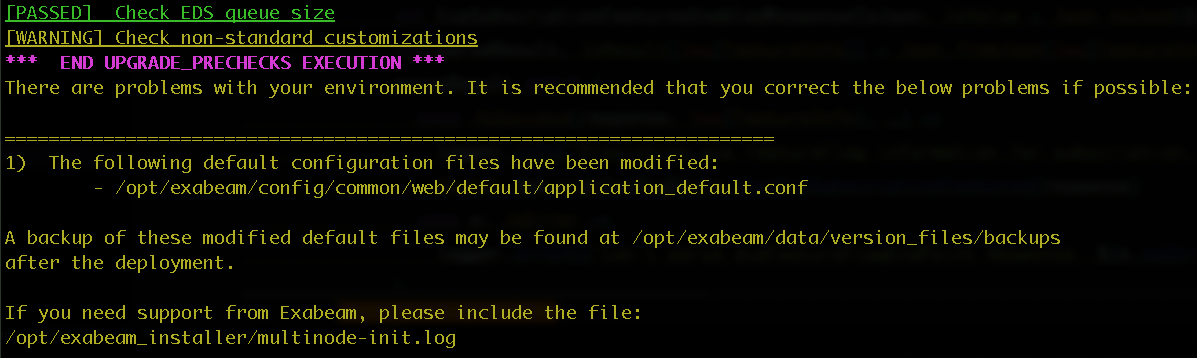
Non-standard customizations to product service and configuration files are overwritten during upgrades. However, these customizations are detected during upgrades, and backups of the corresponding files are automatically created in the following folder: /opt/exabeam/data/version_files/backups. After the upgrade is complete, you can refer to these files to restore the configurations to your upgraded software.
You must meet the following requirements before upgrading to this release:
GCP deployments: Network open to IP protocol 4 (IP in IP) traffic within the cluster.
Nodes allow traffic to and from security group to itself.
For Data Lake, use a load balancer in front of your cluster and use TCP (not UDP) as a transmission protocol between the load balancer and the Data Lake hosts. A load balancer is required (customer-provided) in front of Data Lake to have no downtime for Syslog ingestion during the upgrade.
Warning
Do not install unauthorized third-party software onto Exabeam appliances. The performance and function of Exabeam hardware may be impacted.
If you have questions about the prerequisites, please create a support ticket at Exabeam Community to connect with a technical representative who can assist you.
Note
The current disaster recovery setup requires that both the primary and secondary clusters are on the same release version at all times. For more information, see Disaster Recovery.
Warning
If you have an existing custom UI port, please set the web_common_external_port variable. Otherwise, access at the custom UI port may be lost after upgrading. Ensure the variable is set in /opt/exabeam_installer/group_vars/all.yml:
web_common_external_port: <UI_port_number>
Download
Exabeam_[product]_[build_version].sxbversion file from Exabeam Community that you want to upgrade to. Place it on the master node in a temporary directory. Do not place the SXB file in the/opt/exabeam_installerdirectory.Run the command below to start a new screen session:
screen -LS [yourname]_[todaysdate]
Change the permission of the SXB file.
chmod +x Exabeam_[product]_[build_version].sxb
Start a new terminal session using your
exabeamcredentials (do not run as ROOT).Initiate a screen session. This is mandatory and will prevent accidental termination of your session.
screen -LS [yourname]_[todaysdate]
Execute the following command:
./Exabeam_[product]_[build_version].sxb upgrade
The system will auto-detect your existing version. If it cannot, then you will be asked to enter the existing version that you are upgrading from.
If your previous software had non-standard customizations, the following output displays to indicate that a backup of the corresponding configuration and/or service files have been created in the given location. You can refer to these backup files to restore the customizations to your upgraded software.
Upgrading for Data Lake Large Clusters
For clusters with 21 or more nodes, the first three nodes of the cluster will be designated as host management nodes for Data Lake Host Management. It is mandatory to have three dedicated node for this feature and have no less than 10 Gbps throughput capability between them. These host management nodes help ensure that the cluster maintains optimal processing and performance capabilities. They will not store log data.
The Data Lake Host Management feature is not applied automatically after running an upgrade. Please follow these steps to migrate nodes after you have completed your upgrade, if you have not established host management nodes.
Start a new terminal session using your
exabeamcredentials (do not run as ROOT).Initiate a screen session. This is mandatory and will prevent accidental termination of your session.
screen -LS [yourname]_[todaysdate]
Execute the following command:
/opt/exabeam_mulitnode/init/exabeam-multinode-deployment.sh
Select the option, Run migration service to move ES data off host1,2,3 (dl_management).
You will be prompted to confirm whether you are willing to add 3 nodes. Here, you can add new nodes to your cluster if you do not have hosts set aside from host management.
Are you willing to add another 3 or more hosts for management nodes?
If you answer
yes, the script will exit to allow you the opportunity to add three additional nodes to your cluster. (See Adding Nodes to a Cluster.)When you have added your nodes, re-run
exabeam-multinode-deployment.shand then select Run migration service to move ES data off host1,2,3 (dl_management) which will migrate logs from the first three nodes of your cluster to other nodes. There is no loss of logs. The cluster's retention setting is adjusted automatically to compensate for the newly designated nodes.If you answer
no, you will be prompted within:Do you accept a reduction in EPS and/or a reduction in storage capacity [percent]% resulting in a lower retention policy?
Answer
yes, if you have hosts set aside to operate as host management nodes. The migration will proceed for the first three nodes in your cluster. Logs from the first three nodes of your cluster to other nodes. The cluster's retention setting is adjusted automatically to compensate for the newly designated nodes.Answer
no, if you do not want to proceed with implementing host management.
Updating Data Lake Parsers and Event Categories
Hardware and Virtual Deployments Only
For questions or additional assistance with updating parsers and event categories, please contact Exabeam Customer Success by opening a case via Community.Exabeam.com.
Disk Usage Automatic Clean Up for Upgrades
Hardware and Virtual Deployments Only
Obsolete installation files and backups are automatically deleted by the Exabeam upgrade process at the end of a successful installation session. The installation script runs a search on files and directories with the labels below:
/opt/exabeam_installer*
/opt/exabeam/data/backup/*
All contents that are older than three installations previous will be automatically deleted, including folders suffixed with old timestamps, such as:
/opt/exabeam_installer.backup[old_timestamp]
/opt/exabeam_installer.future[old_timestamp]
Troubleshooting an Installation
Hardware and Virtual Deployments Only
Ansible Failure
If the installer fails during an ansible script (when all of the timestamped tasks are cascading down the screen), the steps to restart the deployment after fixing are:
Navigate to the Menu:
/opt/exabeam_installer/init/exabeam-multinode-deployment.sh
Select option:
Deploy cluster.
Error: Multiple Interfaces Detected
Root Cause: multiple interfaces are defined on boot
Steps to re-mediate:
Examine the output of the following command. Look for the iface of the current box for reference (helps know what iface not to touch)
ip a
Look at the defined interfaces:
cat /etc/sysconfig/network-scripts/ifcfg*
Only one interface (excluding the loopback interface ifc-lo) should have 'ONBOOT=yes'. Change the extra interface files from
ONBOOT=yestoONBOOT=noRequires sudo access to edit these files.
Run
sudo systemctl restart network
Confirm consul is running
sudo systemctl status consul
Restart the deployment process
/opt/exabeam_installer/init/exabeam-multinode-deployment.sh