- Welcome to the New-Scale Security Operations Platform
- Licenses
- Supported Regions for Data Residency
- Get Started with the New-Scale Security Operations Platform
- Universal Role-Based Access
- Exabeam Nova
- Monitoring
- Export Your Exabeam Data
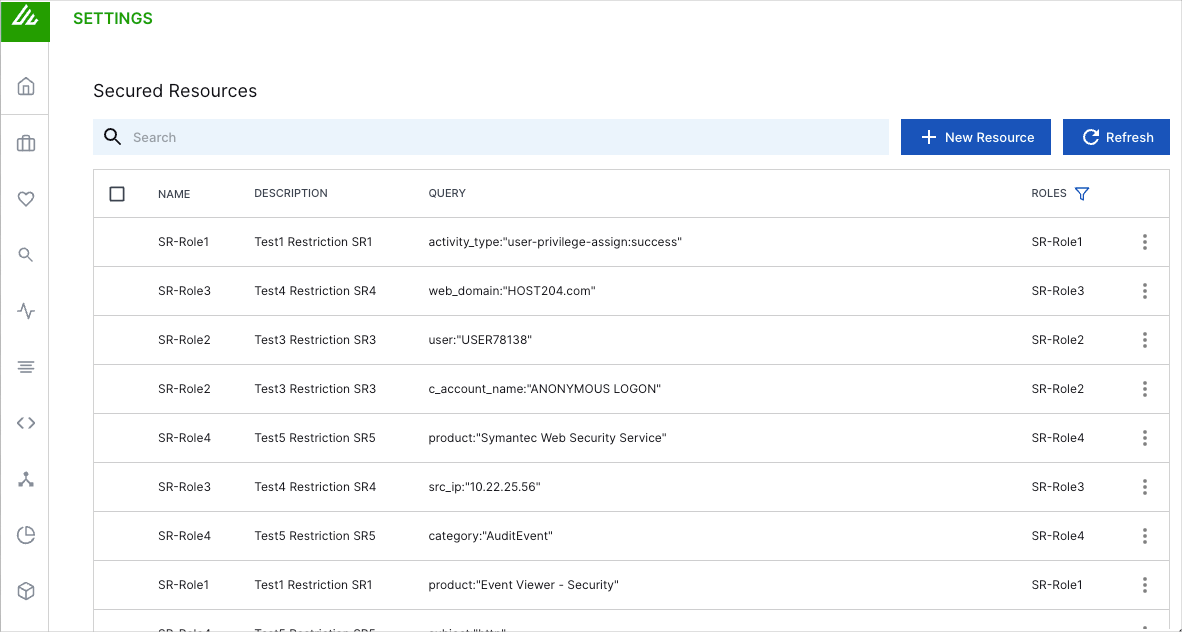
Secured Resources
The Secured Resources feature enables you to tailor data visibility to suit the needs of the different Exabeam user roles in your organization. In other words, you can enhance security and enforce data governance policies by allowing users to access only the data that they need to perform their jobs.
Note
Secured Resources works by limiting data access in user roles as opposed to allowing access. As such, user roles with no secured resources assigned to them will have unlimited data access.
When you add a secured resource, you create a query to filter the data that users see. For example, if you want to have a team that focuses only on Cisco and IBM events involving the alert-trigger activity type, you would define the resource as vendor:("Cisco","IBM") AND activity_type:"alert-trigger".
Secured Resources can be added to user roles that are attached to any of the following products: Search, Dashboards, and Threat Center.
 |
Add a Secured Resource
Note
To manage secure resources, you need to be an Administrator with full access to your organization's Exabeam subscription.
Log in to the New-Scale Security Operations Platform.
On the lower-left side of the page, click the settings icon
 , and then select Secured Resources.
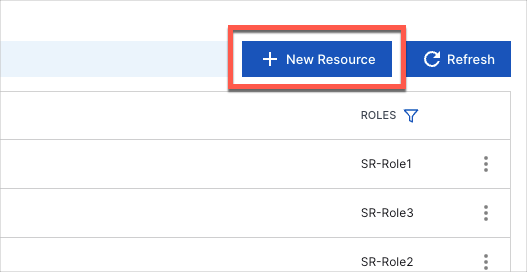
The Secured Resources page opens and displays a list of the existing secured resources in your environment.
Click the New Resource button.
The New Secured Resource page opens.
Enter a Name for the resource.
Enter a Description of the resource.
Build a query to define the the type of events users with this resource will be able to access. To build the query, select one of the following Search mode options:
Basic – In the Basic search mode, you can select search terms and fields from prebuilt lists to build a query. The pre-built lists include subjects, vendors, products, common fields that are part of the Exabeam common information model, and any metadata, anomaly, audit log, and custom fields that are used in your environment.
For information about how to use the Basic search mode to build queries, see Basic Search in the Search Guide.

Note
Basic query building for secured resources does not support entity fields. However, you can enumerate the entity-related fields in a query to achieve the same affect. For example you can add both the username and email fields to the query.
Advanced – In the Advanced search mode, you can construct your own queries using Exabeam Query Language (EQL) syntax and operators. The Advanced search mode includes several features to facilitate ease of use and readability when creating complex queries:
White space characters (such as spaces, tabs, and line breaks) can be used between query syntax terms.
Line numbering is displayed for queries that are formatted on multiple lines.
Color-coding is used to make syntax elements recognizable.
Warnings and syntax validation errors are displayed per line.
For information about how to build queries using the Advanced search mode, and for detailed EQL syntax and operator information, see Advanced Search in the Search Guide.

Note
Advanced mode query building for secured resources does not support the following specific EQL functionality:
SELECT, GROUP-BY, and LIMIT clauses
Pipe Operators
Entity fields – Instead, you can enumerate the entity-related fields in a query to achieve the same affect. For example you can add both the username and email fields to the query.
As an optional step, click the Preview button to verify that the query you constructed yields the intended results. You may need to expand the default time range for the query in Search.
Exabeam Search opens in a new browser tab and displays the query results. Run the query to ensure it returns the results you want.
From the Roles drop-down menu, select the user roles that you want assigned to this secured resource.
Click Create in the bottom right corner of the New Secured Resource page.

The new resource is added to the list on the Secured Resources page.
Note
For users who are logged into one of the affected products (Search, Dashboards, and Threat Center), the new data restrictions will not take effect until they clear their cookies or the cookies expire.
Edit or Delete a Secured Resource
Note
To manage secure resources, you need to be an Administrator with full access to your organization's Exabeam subscription.
Log in to the New-Scale Security Operations Platform.
On the lower-left side of the page, click the settings icon
, and then select Secured Resources.The Secured Resources page opens and displays a list of the existing secured resources in your environment.
Find the secured resource you want to edit or delete and click the Options icon
 .
. Do one of the following:
To edit the resource, select Edit. The Edit Secured Resource page opens. Edit the resource definition as needed and click Update.
To delete the resource, select Delete. When prompted, click Delete to confirm the action.