- Supported Cloud Connectors
- Armis Cloud Connector
- AWS Cloud Connector
- AWS Multi-Tenant Cloud Connector
- Azure Cloud Connector
- Azure Cloud Connector Overview
- Azure Audit Source and Event Support
- Prerequisites to Configure the Azure Cloud Connector
- Configure the Azure Cloud Connector
- Collect EventHub Information for Azure EventHub Endpoints
- Collect all Microsoft Defender ATP Events
- Configure Azure to Monitor Security Center Events in Azure VMs
- Bitglass Cloud Connector
- Box Cloud Connector
- Centrify Cloud Connector
- Cisco AMP for Endpoints Cloud Connector
- Cisco Meraki Cloud Connector
- Cisco Umbrella Cloud Connector
- Citrix ShareFile Cloud Connector
- Cloudflare Cloud Connector
- Code42 Incydr Cloud Connector
- CrowdStrike Falcon Cloud Connector
- Cybereason Cloud Connector
- CylanceProtect Cloud Connector
- Dropbox Business Cloud Connector
- Duo Security Cloud Connector
- Egnyte Cloud Connector
- Fidelis Cloud Connector
- GitHub Cloud Connector
- Google Cloud Platform (GCP) Cloud Connector
- Google Cloud Pub/Sub Cloud Connector
- Google Workspace (Formerly G Suite) Cloud Connector
- LastPass Enterprise Cloud Connector
- Mimecast Email Security Cloud Connector
- Netskope Cloud Connector
- Office 365 Cloud Connector
- Okta Cloud Connector
- OneLogin Cloud Connector
- Palo Alto Networks SaaS Security Cloud Connector
- Ping Identity Cloud Connector
- Proofpoint Cloud Connector
- Rapid7 InsightVM Cloud Connector
- Salesforce Cloud Connector
- SentinelOne Cloud Connector
- ServiceNow Cloud Connector
- Slack App Cloud Connector
- Slack Classic App Cloud Connector (Formerly known as Slack Enterprise Grid Cloud Connector)
- Snowflake Cloud Connector
- Sophos Central Cloud Connector
- Symantec CloudSOC Cloud Connector
- Symantec Endpoint Protection (SEP) Mobile Cloud Connector
- Symantec Email Security.cloud Cloud Connector
- Symantec WSS Cloud Connector
- Tenable.io Cloud Connector
- VMware Carbon Black Cloud Endpoint Standard Cloud Connector
- Workday Cloud Connector
- Zoom Cloud Connector
- Custom Cloud Connector
- Webhook Cloud Connector
Dropbox Business Cloud Connector
Dropbox Business is a file sharing and cloud storage solution that enables employees to store files, and share, sync, and collaborate on files securely. For more information, see the Dropbox documentation.
Prerequisites to Configure the Dropbox Business Cloud Connector
Before you configure the Dropbox Business connector you must complete the following prerequisites:
To access the events endpoint, in the Dropbox developer portal, provide the following permissions:
account_info.read
team_info.read
team_data.member
members.read
groups.read
events.read
Generate the App key and App Secret.
Generate the App key, App Secret, and Set Permissions
To set permissions and obtain the App Key and App Secret:
Log in to the Dropbox developer portal to create a Dropbox application for your organization. For more information, see https://www.dropbox.com/developers.
On the Dropbox developer portal, click Create app.
In the Choose an API section, click Scoped access.
Select the access type Full Dropbox.
Specify a name for the app based on the Dropbox branding guide, then click Create app.
To set permissions, in the Permission Type section, click Scoped App.
Select the check boxes for the following permissions:
account_info.read
team_info.read
team_data.member
members.read
groups.read
events.read
Click Submit.
Navigate to Settings.
Click the Show link for the App Key and the App Secret fields, then record the App Key and App Secret.
Note
While configuring the Dropbox cloud connector, if you select the authentication method OAuth2, enter the App key in the Client ID field and the App Secret in the Client Secret field.
To let Dropbox authenticate Exabeam cloud connector, in the Redirect URIs field for OAuth2, enter the URL https://auth.skyformation.net/v1/oauth.
Configure the Dropbox Business Cloud Connector
Dropbox Business is a file sharing and cloud storage solution that enables employees to store files, and share, sync, and collaborate on files securely. For more information, see the Dropbox documentation.
The following table displays audit source API and security events supported by the connector.
Audit Source: API | Service or Module Covered | Event Types | Event Included |
|---|---|---|---|
Any | Access events, administrative events, file/folders events, security settings events and more | All audit events |
To configure the Dropbox Business connector to import data into the Exabeam Cloud Connectors platform:
Complete the Prerequisites to Configure the Dropbox Business Cloud Connector.
Log in to the Exabeam Cloud Connectors platform with your registered credentials.
Navigate to Settings > Accounts > Add Account.
Click Select Service to Add, then select Dropbox from the list.
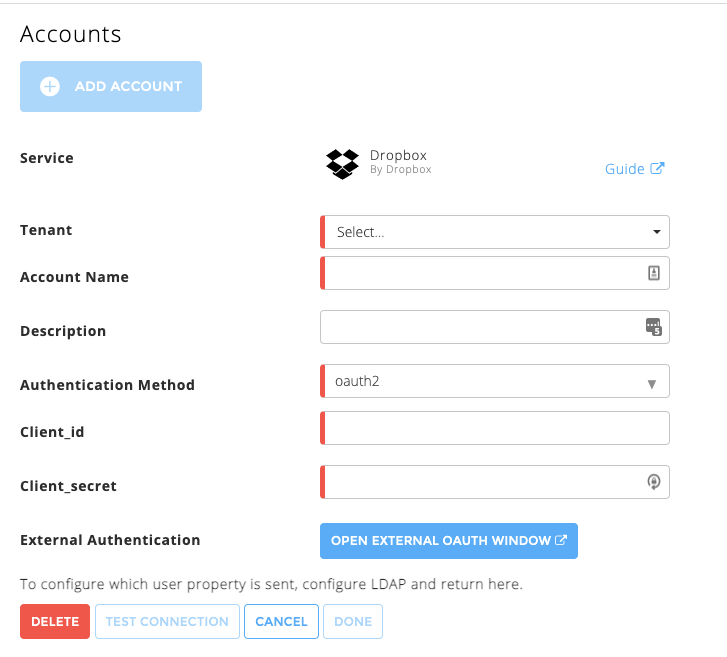
In the Accounts section, enter the required information:
Note
Required fields are indicated with red bar.
Tenant – Select a tenant to be attached to the connector, only for multi-tenant edition of Exabeam Cloud Connector. Otherwise, select default.
Account Name – Specify a name for the connector. For example, Dropbox_file_sharing.
(Optional) Description – Describe the Dropbox account.
Authentication Method – Select OAuth 2.
For the authentication method OAuth2, enter the required information for the following fields.

Client ID – Enter the App Key that you obtained while completing prerequisites.
Client Secret – Enter the App Secret that you obtained while completing prerequisites.
External Authentication – Click Open External OAuth Window to authorize the Exabeam Cloud Connector to communicate with Dropbox account. In a window that prompts you to provide access to allow Exabeam Cloud Connector to interact with Dropbox account for retrieving audit events, click Login.
Note
Do not use the Event Access Token method that is deprecated.
To confirm that the Exabeam Cloud Connector platform communicates with the service, click Test Connection.
Click Done to save your changes. The cloud connector is now set up on the Exabeam Cloud Connector platform.
To ensure that the connector is ready to send and collect data, Start the connector and check that the status shows
OK.
