- Supported Cloud Connectors
- Armis Cloud Connector
- AWS Cloud Connector
- AWS Multi-Tenant Cloud Connector
- Azure Cloud Connector
- Azure Cloud Connector Overview
- Azure Audit Source and Event Support
- Prerequisites to Configure the Azure Cloud Connector
- Configure the Azure Cloud Connector
- Collect EventHub Information for Azure EventHub Endpoints
- Collect all Microsoft Defender ATP Events
- Configure Azure to Monitor Security Center Events in Azure VMs
- Bitglass Cloud Connector
- Box Cloud Connector
- Centrify Cloud Connector
- Cisco AMP for Endpoints Cloud Connector
- Cisco Meraki Cloud Connector
- Cisco Umbrella Cloud Connector
- Citrix ShareFile Cloud Connector
- Cloudflare Cloud Connector
- Code42 Incydr Cloud Connector
- CrowdStrike Falcon Cloud Connector
- Cybereason Cloud Connector
- CylanceProtect Cloud Connector
- Dropbox Business Cloud Connector
- Duo Security Cloud Connector
- Egnyte Cloud Connector
- Fidelis Cloud Connector
- GitHub Cloud Connector
- Google Cloud Platform (GCP) Cloud Connector
- Google Cloud Pub/Sub Cloud Connector
- Google Workspace (Formerly G Suite) Cloud Connector
- LastPass Enterprise Cloud Connector
- Mimecast Email Security Cloud Connector
- Netskope Cloud Connector
- Office 365 Cloud Connector
- Okta Cloud Connector
- OneLogin Cloud Connector
- Palo Alto Networks SaaS Security Cloud Connector
- Ping Identity Cloud Connector
- Proofpoint Cloud Connector
- Rapid7 InsightVM Cloud Connector
- Salesforce Cloud Connector
- SentinelOne Cloud Connector
- ServiceNow Cloud Connector
- Slack App Cloud Connector
- Slack Classic App Cloud Connector (Formerly known as Slack Enterprise Grid Cloud Connector)
- Snowflake Cloud Connector
- Sophos Central Cloud Connector
- Symantec CloudSOC Cloud Connector
- Symantec Endpoint Protection (SEP) Mobile Cloud Connector
- Symantec Email Security.cloud Cloud Connector
- Symantec WSS Cloud Connector
- Tenable.io Cloud Connector
- VMware Carbon Black Cloud Endpoint Standard Cloud Connector
- Workday Cloud Connector
- Zoom Cloud Connector
- Custom Cloud Connector
- Webhook Cloud Connector
Netskope Cloud Connector
Prerequisites to Configure the Netskope Cloud Connector
Before you configure the Netskope Cloud Connector you must complete the following prerequisites:
Note the tenant name. The tenant name is the prefix in your Netskope console URL. For example, in the URL https://tenant1.goskope.com/ns#/dashboard, the tenant name is tenant1.
Create a new REST API token on the Netskope Cloud Security Platform by following the instructions in the Netskope documentation. Record the token to use the token while configuring the Netskope Connector on the Exabeam Cloud Connector platform.
Configure the Netskope Cloud Connector
The Netskope cloud security provides visibility, real-time data security, and threat protection while accessing cloud services, websites, and private apps from anywhere, on any device. Netskope helps organizations to respond to incidents and protect data and associated threats for cloud applications, cloud infrastructure, and the web. For more information, see the Netskope Documentation.
The following table displays audit source API and security events supported by the connector.
Audit Source: API | Service/Module Covered | Events Included |
|---|---|---|
Alerts | Any | All |
Events | Audit, page, application, infrastructure | All |
To configure the Netskope connector to import data into the Exabeam Cloud Connectors platform:
Complete the Prerequisites to Configure the Netskope Cloud Connector.
Log in to the Exabeam Cloud Connectors platform with your registered credentials.
Navigate to Settings > Accounts > Add Account.
Click Select Service to Add, then select Netskope from the list.
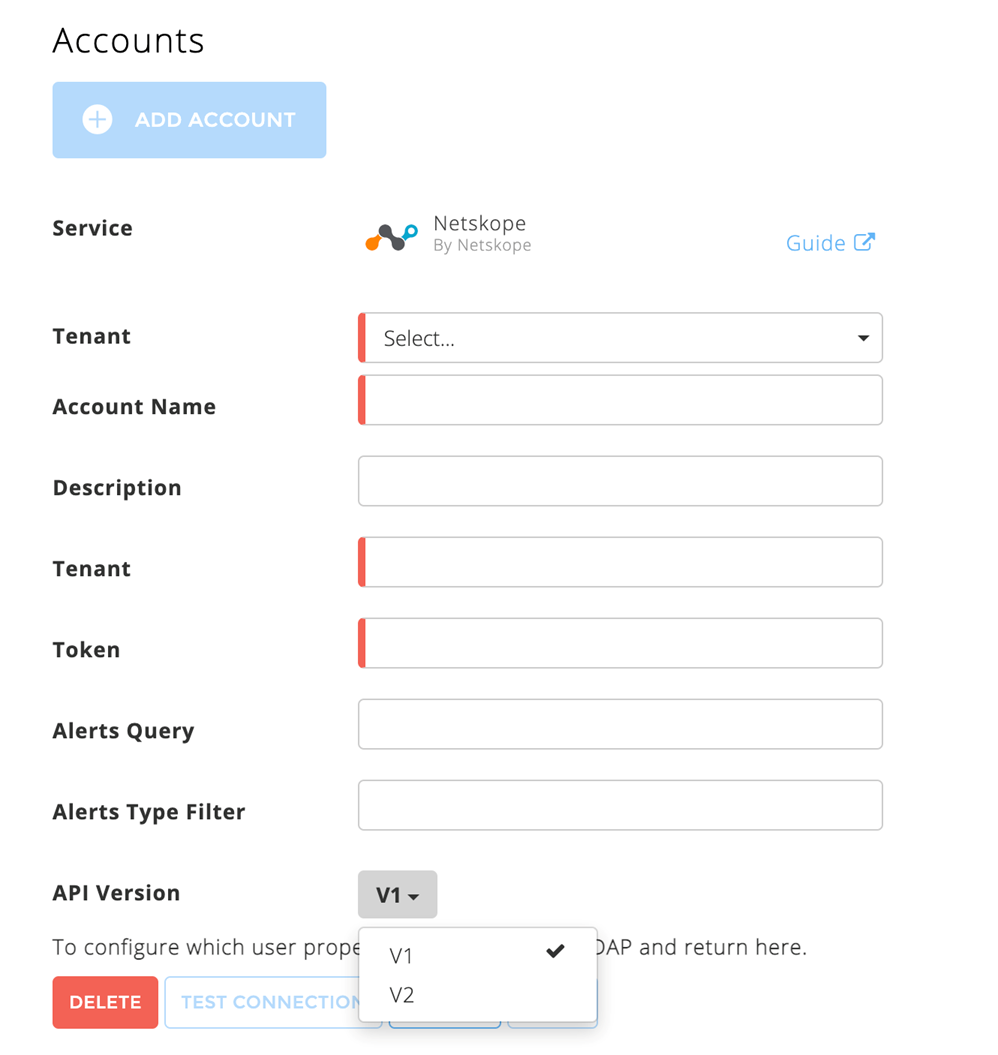
In the Accounts section, enter the required information. Required fields are indicated with a red bar.

Tenant – Select a tenant to attach to the connector if you are using a multi-tenant edition of Exabeam. Otherwise, select default.
Account Name – Specify a name for the connector. For example, Netskope_cloud_security.
(Optional) Description – Describe the Netskope Cloud Connector. For example, Netskope cloud security to control online activities, protect data, stop threats, and respond to incidents.
Tenant – Enter the tenant name that you obtained while completing prerequisites.
Token – Enter the value for API token that you obtained while completing prerequisites.
(Optional) Alerts Query – Enter a valid alert query. For more information see https://{tenant_name}.goskope.com/docs/Netskope_Help/en/get-alerts-data.html.
(Optional) Alerts Type Filter – Select a type to filter alerts. For more information see https://{tenant_name}.goskope.com/docs/Netskope_Help/en/get-alerts-data.html.
Note
The Alerts Query and Alerts Type Filter fields are available for the Exabeam Cloud Connector version 2.5.235 and later.
API Version – Select the V2 (API version 2) because Netskope is going to deprecate API version 1.
To confirm that the Exabeam Cloud Connector platform communicates with the service, click Test Connection.
Click Done to save your changes. The cloud connector is now set up on the Exabeam Cloud Connector platform.
To ensure that the connector is ready to send and collect data, Start the connector and check that the status shows
OK.
