- Supported Cloud Connectors
- Armis Cloud Connector
- AWS Cloud Connector
- AWS Multi-Tenant Cloud Connector
- Azure Cloud Connector
- Azure Cloud Connector Overview
- Azure Audit Source and Event Support
- Prerequisites to Configure the Azure Cloud Connector
- Configure the Azure Cloud Connector
- Collect EventHub Information for Azure EventHub Endpoints
- Collect all Microsoft Defender ATP Events
- Configure Azure to Monitor Security Center Events in Azure VMs
- Bitglass Cloud Connector
- Box Cloud Connector
- Centrify Cloud Connector
- Cisco AMP for Endpoints Cloud Connector
- Cisco Meraki Cloud Connector
- Cisco Umbrella Cloud Connector
- Citrix ShareFile Cloud Connector
- Cloudflare Cloud Connector
- Code42 Incydr Cloud Connector
- CrowdStrike Falcon Cloud Connector
- Cybereason Cloud Connector
- CylanceProtect Cloud Connector
- Dropbox Business Cloud Connector
- Duo Security Cloud Connector
- Egnyte Cloud Connector
- Fidelis Cloud Connector
- GitHub Cloud Connector
- Google Cloud Platform (GCP) Cloud Connector
- Google Cloud Pub/Sub Cloud Connector
- Google Workspace (Formerly G Suite) Cloud Connector
- LastPass Enterprise Cloud Connector
- Mimecast Email Security Cloud Connector
- Netskope Cloud Connector
- Office 365 Cloud Connector
- Okta Cloud Connector
- OneLogin Cloud Connector
- Palo Alto Networks SaaS Security Cloud Connector
- Ping Identity Cloud Connector
- Proofpoint Cloud Connector
- Rapid7 InsightVM Cloud Connector
- Salesforce Cloud Connector
- SentinelOne Cloud Connector
- ServiceNow Cloud Connector
- Slack App Cloud Connector
- Slack Classic App Cloud Connector (Formerly known as Slack Enterprise Grid Cloud Connector)
- Snowflake Cloud Connector
- Sophos Central Cloud Connector
- Symantec CloudSOC Cloud Connector
- Symantec Endpoint Protection (SEP) Mobile Cloud Connector
- Symantec Email Security.cloud Cloud Connector
- Symantec WSS Cloud Connector
- Tenable.io Cloud Connector
- VMware Carbon Black Cloud Endpoint Standard Cloud Connector
- Workday Cloud Connector
- Zoom Cloud Connector
- Custom Cloud Connector
- Webhook Cloud Connector
Office 365 Cloud Connector
Supported Microsoft Office 365 Audit Sources and Events
Following is the list of Office 365 subscriptions needed for each of the audit sources also called as endpoints. If your Office 365 subscription does not support the endpoint, you do not get the events supported by the connector. The following table displays audit source API and security events supported by the connector.
Service Covered | Event included | Endpoint/API | Notes | Minimum Subscription Required |
|---|---|---|---|---|
Azure AD | Graph Directory Audit logs (same as deprecated sign-in events) | Graph Directory Audit logs | See https://docs.microsoft.com/en-us/graph/api/resources/directoryaudit?view=graph-rest-1.0 | None |
Graph Sign-In logs (same as deprecated audit events) + Security alerts on suspicious sign-ins | Graph Sign-In logs | See https://docs.microsoft.com/en-us/graph/api/resources/signin?view=graph-rest-1.0 | None | |
Azure AD deprecated endpoints | Sign-in events (e.g. login success/failed) | Deprecated - signin-event | See https://docs.microsoft.com/en-us/graph/api/signin-list?view=graph-rest-beta | AAD Premium P2 |
General audit events as group/user management | Deprecated - audit-events | See https://docs.microsoft.com/en-us/graph/api/resources/directoryaudit?view=graph-rest-beta | None | |
Risk and anomalies detection in Azure AD | For more information on the Azure AD Identity Protection API please refer to: https://docs.microsoft.com/en-us/graph/api/resources/identityprotection-root?view=graph-rest-beta | None | ||
Share Point | SharePoint administrative and file management operations | None | ||
Exchange | Exchange administrative operation | Events from the Exchange admin audit log. Events from an Exchange mailbox audit log for actions that are performed on a single item, such as creating or receiving an email message. Events from an Exchange mailbox audit log for actions that can be performed on multiple items, such as moving or deleted one or more email messages. | None | |
Message Trace | email send/receive trace | None | ||
DLP |
| Data loss protection (DLP) events in SharePoint and OneDrive for Business. Data loss protection (DLP) events in Exchange, when configured via Unified DLP Policy. DLP events based on Exchange Transport Rules are not supported. | None | |
Microsoft Cloud App Security (MCAS) | Cloud services anomalies, suspicious activities and violations detected by the Microsoft CASB service | mcas-alerts | E5 or purchased to other enterprise edition | |
Advanced Threat Protection (ATP) *** | Spoof Mail SpoofMailReport | view information about insider spoofing in your cloud-based organization. Insider spoofing is where the sender’s email address in an inbound message appears to represent your organization, but the actual identity of the sender is different | E3 | |
DLP Policy MailDetailDlpPolicy | provides details about the Exchange mail data loss prevention (DLP) policies and rules used in processing email messages. | E3 | ||
Malware and Spam report MailDetailATP | provides details about the processing steps taken on email messages identified as containing spam or malware while the message was being processed. | E3 | ||
Audit events | General audit events | audit-events | Office 365 audit events | None |
Yammer | Yammer schema | Yammer events | None | |
Sway | Sway schema | Sway events | None | |
Microsoft Teams |
| Events from Microsoft Teams. | None | |
Office 365 Threat Detection |
| Azure AD Premium P1 or P2 |
Prerequisites to Set Up the Microsoft Office 365 Cloud Connector
Before you configure the Microsoft Office 365 connector, you must complete the following prerequisites:
Create an Azure AD Application for the Exabeam Office 365 Cloud Connector.
Review the Required Microsoft Office 365 Subscriptions.
Obtain the Active Directory (AD) premium license for Azure AD events.
Assign the ATP license to Office 365 users for whom you want to get the exchange ATP events.
Obtain the Office 365 tenant ID, Exabeam app client ID, Secret ID generated by the Exabeam app for OAuth2 authentication, certificate for certificate authentication, and the private key for certificate authentication. For the Azure version 2.4.108 and later, two authentication methods OAuth2 and Certificate are available.
Enable the audit logs recording and auditing for office 365.
Enable the Office 365 mailbox auditing.
Ensure access to the URLs Required for Communication with the Office 365 Cloud Connector.
(Optional) Obtain the username and password with required permissions. For full instructions, see Collect Events from Microsoft Office365 Exchange Admin Reports.
(Optional) Set up the Microsoft Cloud App Security (MCAS) to get alerts and events from Microsoft Cloud App Security (MCAS) service if it is supported and enabled in your Office 365 account.
Required Microsoft Office 365 Subscriptions
Microsoft Office 365 is a cloud service that provides a suite of productivity applications such as Microsoft Word, Excel, Outlook, PowerPoint, OneNote, and OneDrive. For more information visit their website.
Following is the list of minimum Office 365 subscriptions required for each of the audit sources also called endpoints.
Endpoint | Minimum Office 365 Subscription |
|---|---|
management-SharePoint | No Minimum |
management-general | No Minimum |
management-exchange | No Minimum |
management-active-directory | No Minimum |
management-dlp | E3 |
graph-identity-protection-unfamiliar-location | E3 |
graph-identity-protection-suspicious-ip | E3 |
graph-identity-protection-malware | E3 |
graph-identity-protection-leaked-credentials | E3 |
graph-identity-protection-impossible-travel | E3 |
graph-identity-protection-anomalous-ip | E3 |
exchange-admin-reports-message-trace | No Minimum |
exchange-admin-reports-spoof-mail-report | E3 |
exchange-admin-reports-mail-detail-atp | E3 |
exchange-admin-reports-mail-detail-dlp-policy | E3 |
audit-events | No Minimum |
Create an Azure AD Application for the Exabeam Office 365 Cloud Connector
To create an Azure AD application to obtain client ID:
Log into your Azure account by accessing the Azure portal.
Note
Use the Azure for Office 365 option that starts with aad.azure.com.
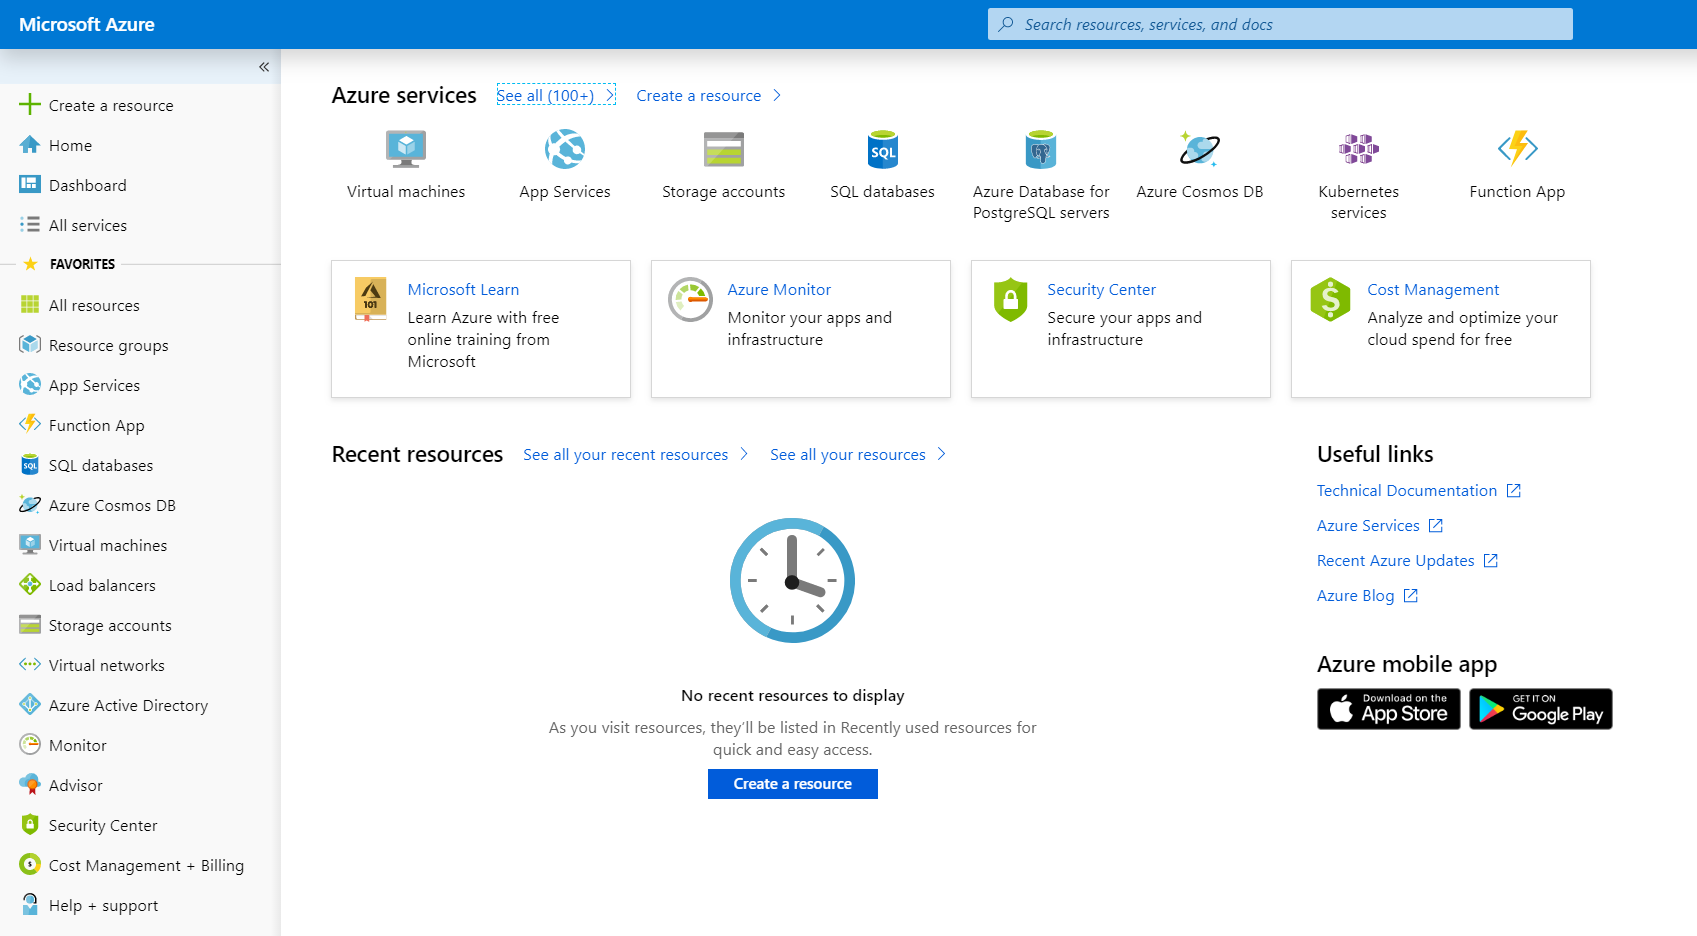
In the right pane, click Azure Active Directory .
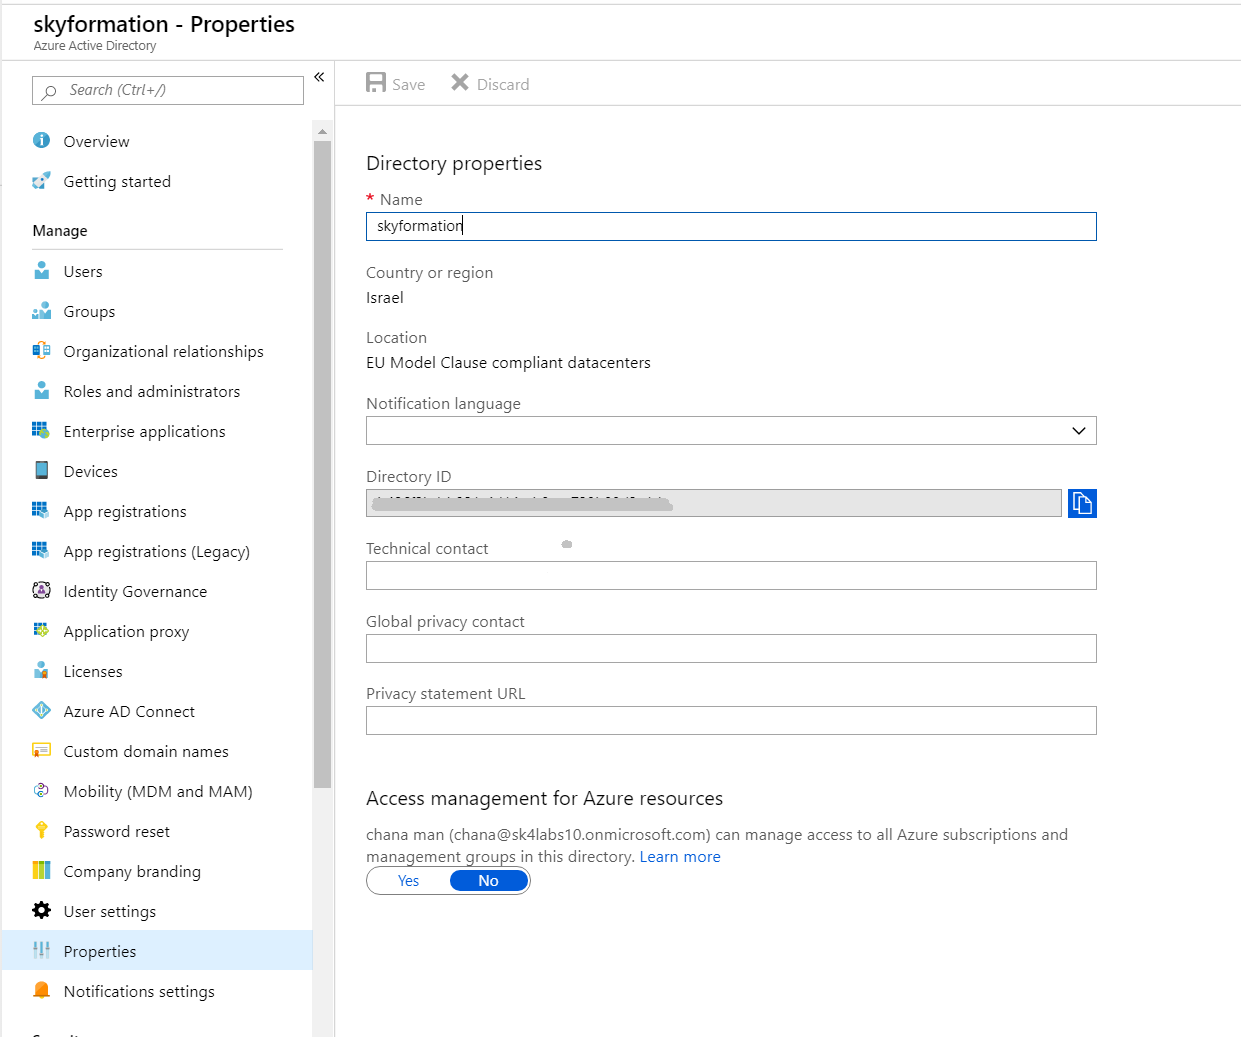
Under User Settings, click Properties.
Specify a name for the directory and note the value for Directory ID. The directory ID is your Tenant ID.
In the right pane, click App Registrations, then click New Registration.
Enter the required information for the following fields:
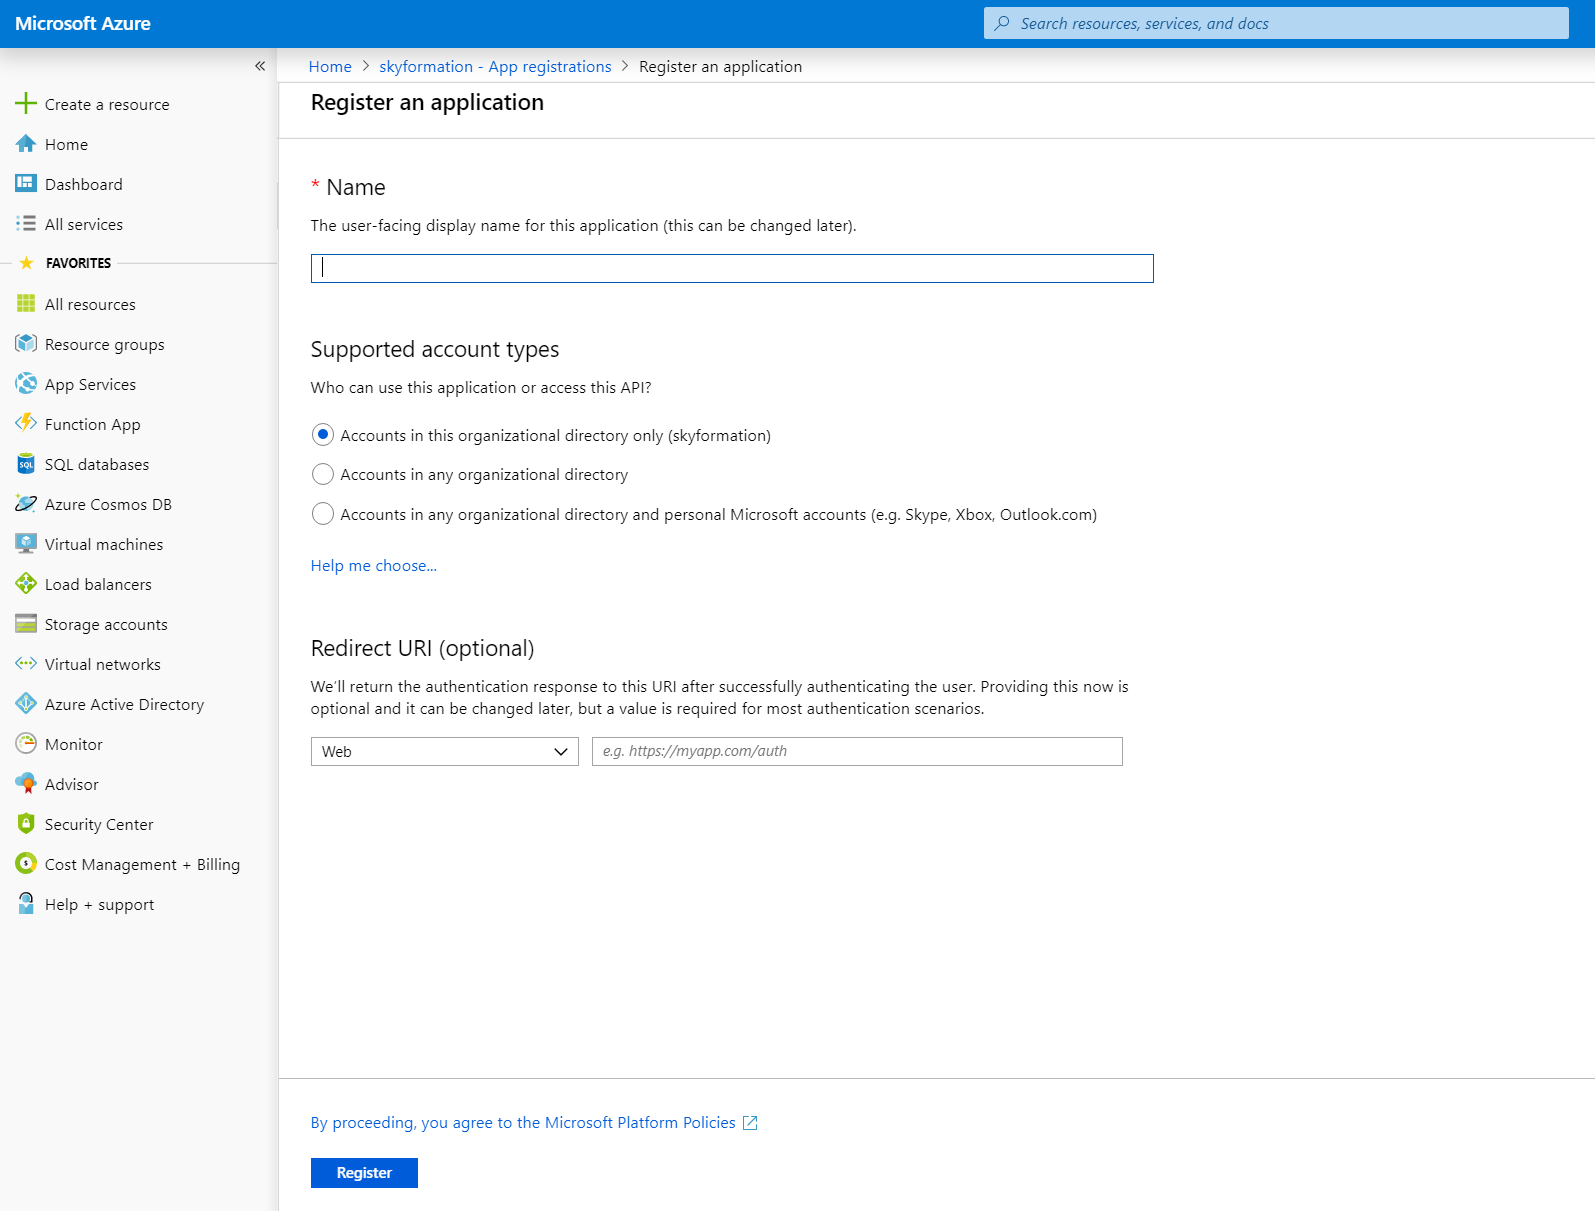
Name – Specify a name for the directory. For example, Exabeam Azure App.
Supported account types – Select the account type Accounts in this organizational directory only.
Redirect URI – (Optional) Specify a URI.
Click Register.

The page displays the application ID and directory ID.
Note the value for Application ID that you must use as a client ID while configuring the Azure connector for Exabeam.
Choose an authentication method.
Starting with Exabeam Cloud Connectors 2.4.108, two authentication methods are available: oauth2 and certificate. If you select the authentication method OAuth2, add a client secret. If you select the authentication method Certification, upload a certificate for the app.
Add Client Secret for Authentication Method OAuth2
For the authentication method OAuth2:
In the Azure portal, navigate to Azure Active Directory > App registrations.
Select the application that you created.
Navigate to Certificates & secrets.
In the Client secrets area, click New client secret.
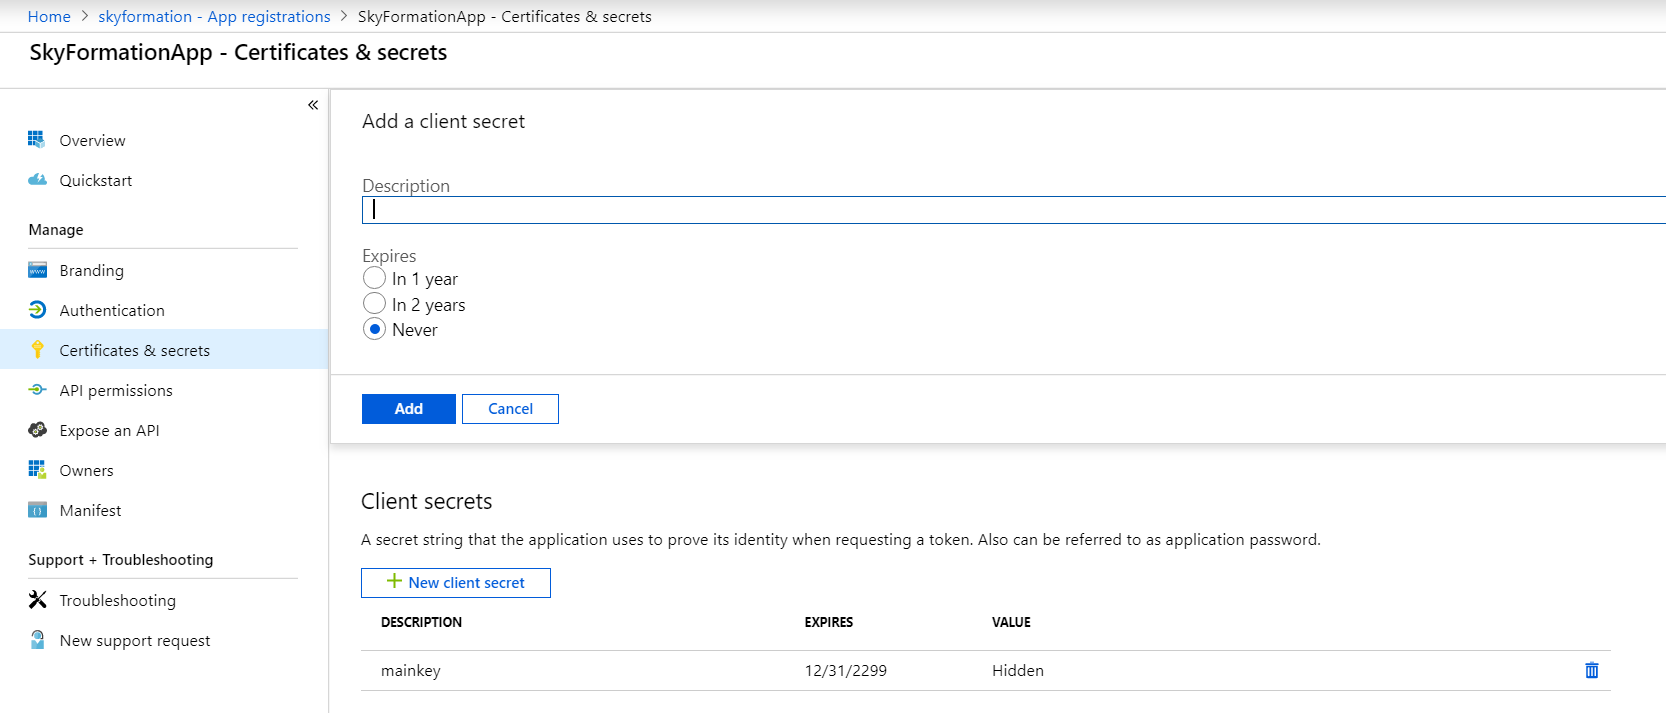
Provide a relevant description for the key and select Never for the expiration.
Click Add.
The Client secrets section displays the client secret value in the Value column.
Copy the value for client secret.
Note
You must note the value immediately after you add the new client secret, otherwise you can’t retrieve the value after leaving the page. If you select the authentication method OAuth2, use the value, represented by a string of letters and numbers, to configure the Office 365 cloud connector.
Upload a Certificate for Authentication Method Certificate
In the Azure portal, navigate to Azure Active Directory > App registrations.
Select the application that you created.
Navigate to the Certificates & secrets section.
If you don't already have the certificate and private key files, create them.
Generate the X.509 asymmetric key by running the following command in the terminal:
openssl req -newkey rsa:2048 -nodes -keyout key.pem -x509 -days 3650 -out certificate.pem
Two files are created in the directory where you ran the command:
certificate.pem - The certificate or public key
key.pem - The private key
In the Certificates area, click Upload certificate.

Select a file and browse to the folder where the certificate file is saved and upload the certificate.pem file. Then click Add.

Add API Permissions
In the Azure portal, navigate to Azure Active Directory > App registrations.
Select the application that you created.
Navigate to API permissions > Add a permission > Microsoft Graph > Application Permissions.
Click Select an API to select an API to which you want to grant permissions.
The Select Permission section lists all the required permissions.
Select the check box for the required permission. For example, select read all users full profiles.
Repeat the steps for each of the required permissions.
API
Type
Permission name
Microsoft Graph
Application
Application
Application
Delegated and Application
Application
Application
AuditLog.Read.All
Directory.Read.All
Group.Read.All
ldentityRiskEvent.Read.All
SecurityEvents.Read.All
User.Read.All
Office 365 Management APIs
Application
Application
Application
ActivityFeed.Read
ActivityFeed.ReadDIp
ServiceHealth.Read
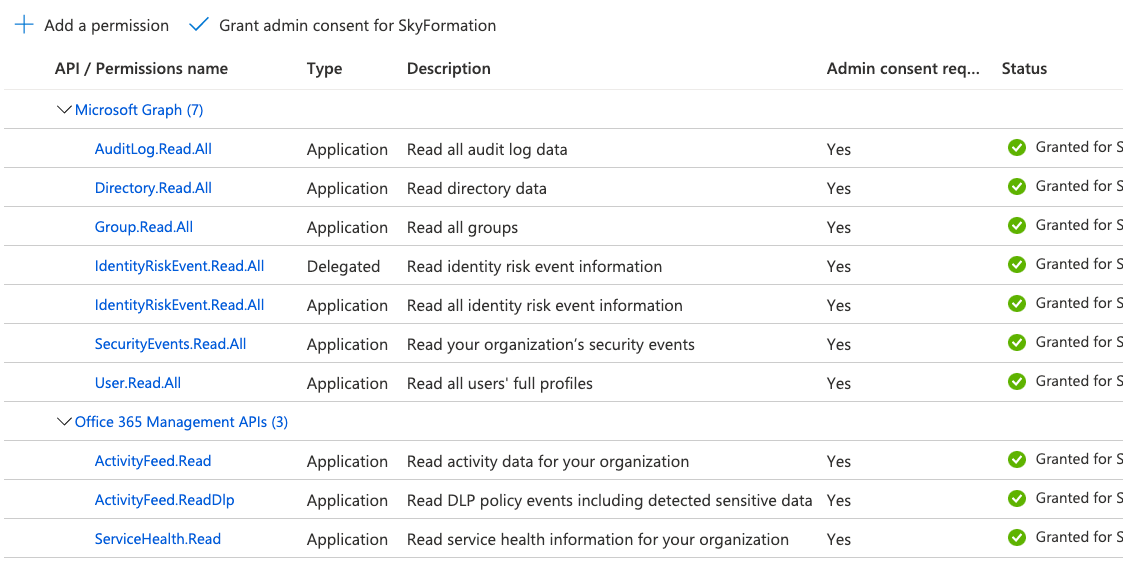
Click Add Permissions.
For the Exabeam cloud connector version 2.4.254 and later, for Graph Security Alerts endpoint, add the application permission for SecurityEvents.Read.All by selecting its check box.
Note
For Cloud Connector version 2.4.254 and above, for Graph Security Alerts endpoint, grant the Application permission SecurityEvents.Read.All.
Grant the application permissions for the new Microsoft Graph API endpoints. If you are unable to add these permissions, add the application permission for DirectoryReadAll in Azure Active Directory Graph API.
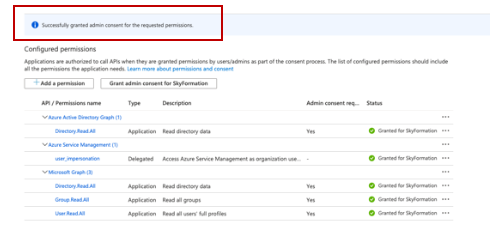
To save the permissions you added, Grant admin consent.
A verification message displays that the admin consent is granted for the requested permissions.
Add Permissions for the Azure App to Access the Reporting Web Service
After you register your application in Azure AD, you must add permissions required for your app for the Reporting Web Service.
To add permissions for the Azure app to access the Reporting Web Service:
On the Azure portal, navigate to App registrations > All Applications.
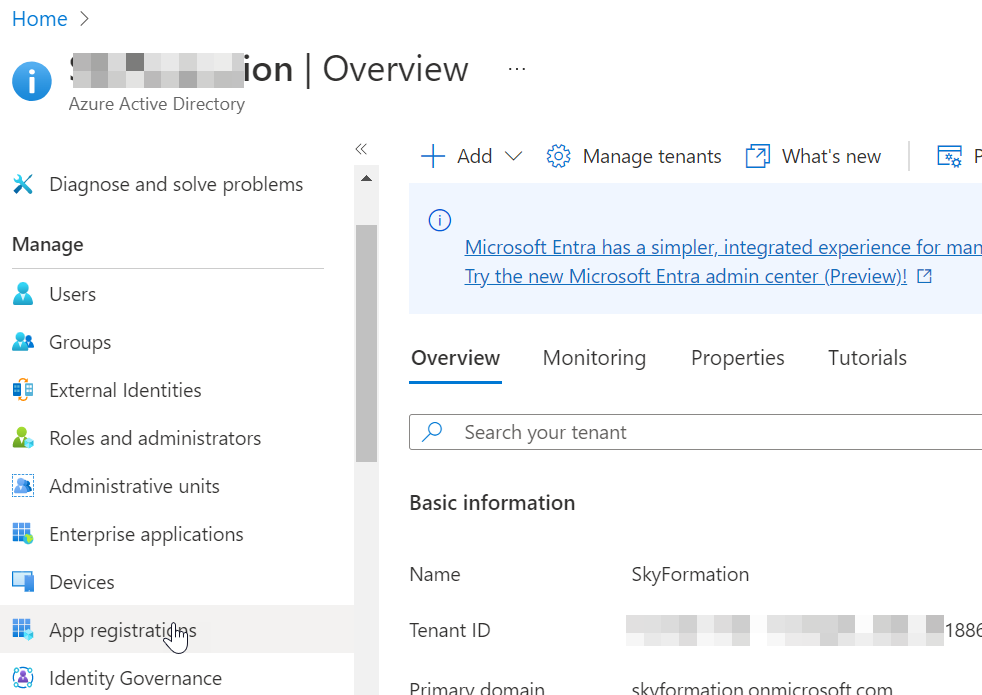
In the All Applications tab that lists all the applications, click your application.
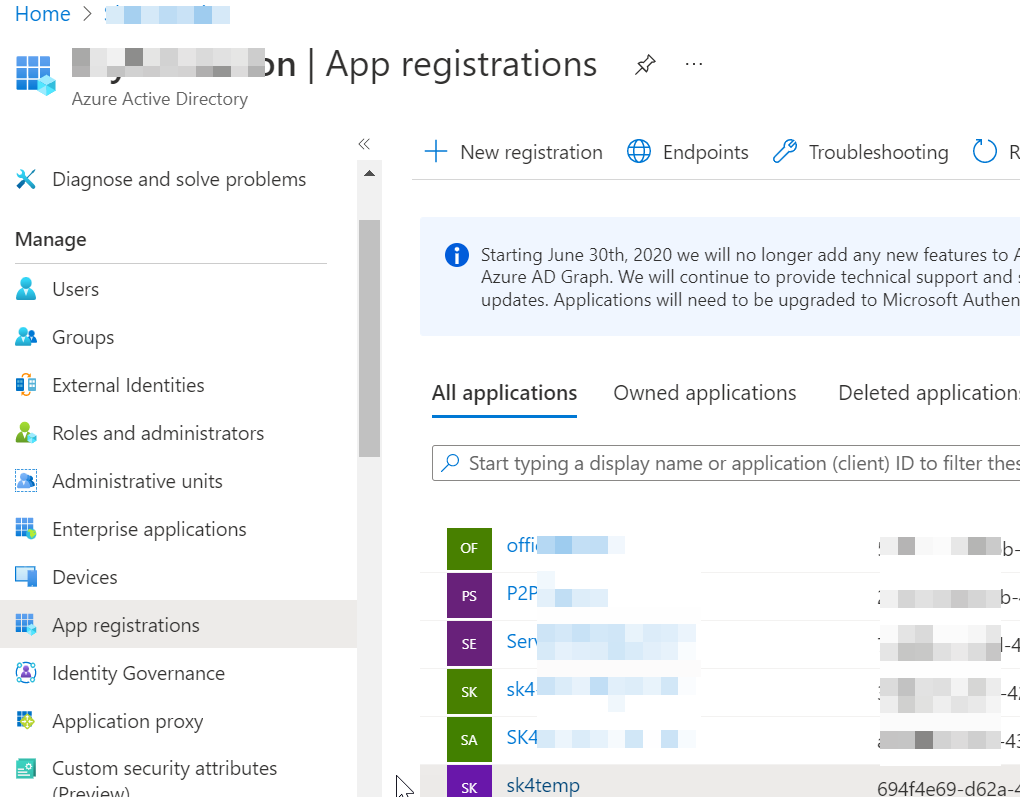
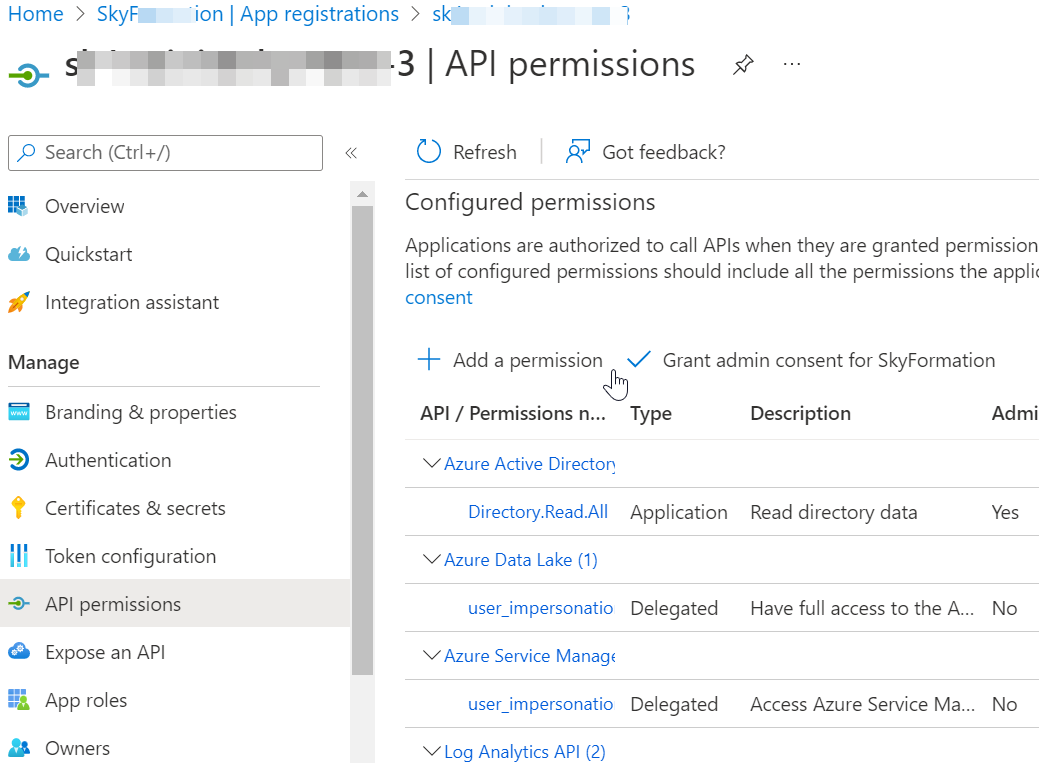
Click API Permissions for the application you selected, then click Add a permission to view the Request API permissions window.
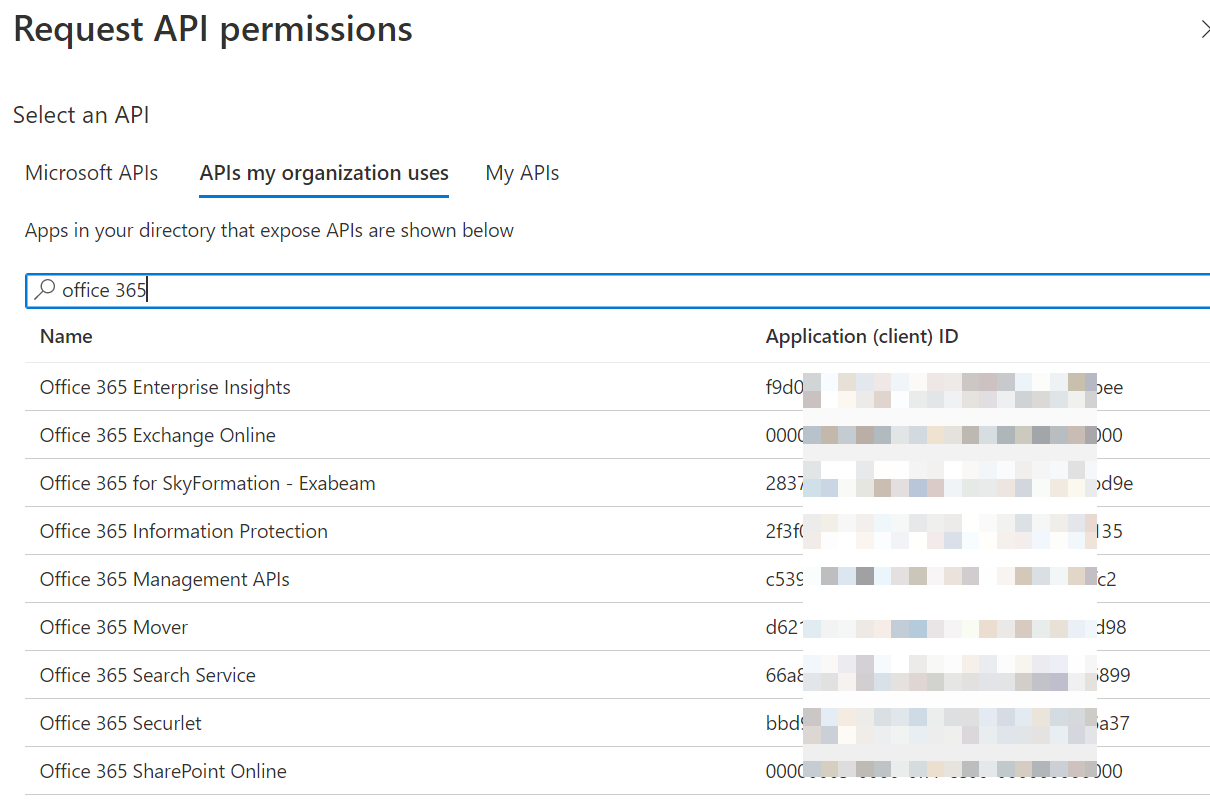
In Request API permissions, on the APIs my organization uses tab, search for Office 365 and click Office 365 Exchange Online in the search result list.
Click Application permissions and select ReportingWebService.Read.All.
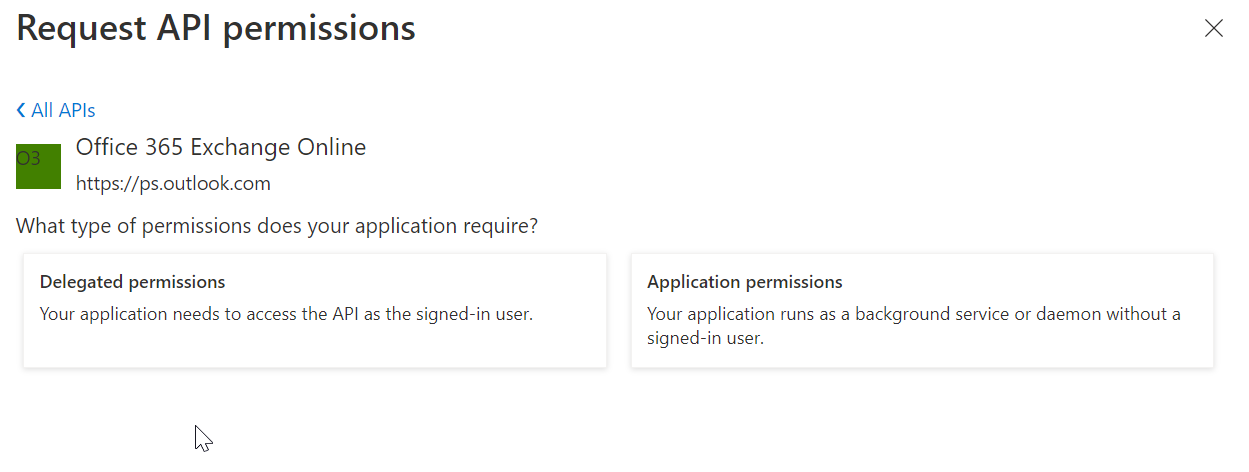
Application permissions enable the client app to authenticate itself without user interaction or consent. For example, the apps used by background services or daemon apps.
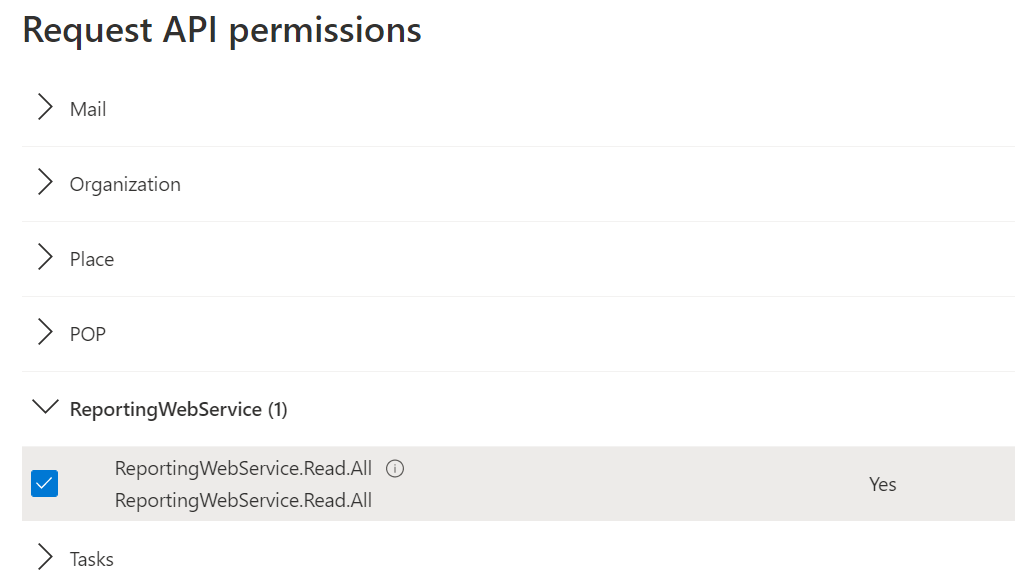
Click Add Permissions.
Click Grant admin consent for to provide consent for the permissions given to your application.
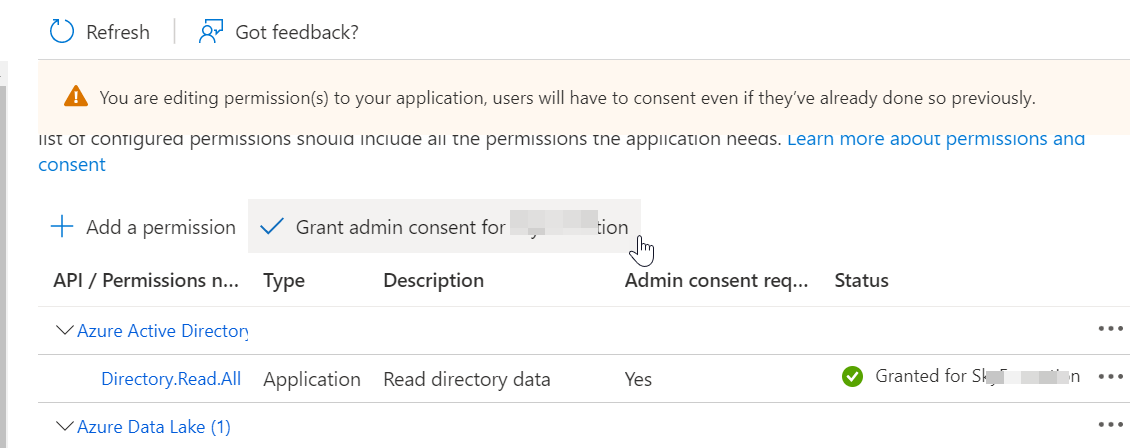
In the confirmation box, click Yes.

Reporting Web Service permissions are granted for your app.
View and Assign Required Roles in Azure Active Directory
The roles Compliance Administrator and Global Reader provide the required permissions for completing tasks in Exchange Online PowerShell or Web Service APIs; unlike the Security Administrator role. The examples of tasks include managing recipients and accessing security and protection features such as anti-spam, anti-malware, anti-phishing, and the associated reports.
Following are the supported roles for Azure AD:
Compliance Administrator
Global Reader
Note
The role Global Reader is required for any exchange endpoint and the role Compliance Administrator is required for the endpoint dlp - data loss prevention.
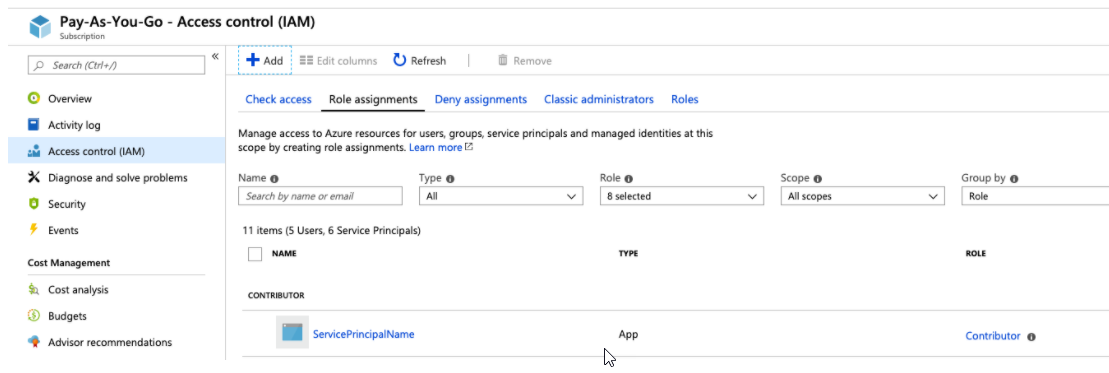
You must add application service principal ID to the Compliance Administrator and Global Reader roles in Azure AD for the App only token flow and assign Azure AD roles to the application. For example, for the Compliance Administrator role:
On the Azure portal, navigate to Azure Active Directory > Roles and administration.
Search for and then select the Compliance Administrator role.
Select Add assignments.
Select No member selected to choose the name of the app that you previously created earlier in the Create an Azure AD Application for the Exabeam Office 365 Cloud Connector workflow.
Submit your changes. Verify the role is permanently assigned and provide justification for the update.
Verify the correct app is chosen by matching the intended Service Principal ID.
For instructions about assigning roles in Azure AD, refer to View and Assign Roles in Azure Active Directory.
URLs Required for Communication with the Office 365 Cloud Connector
The following table lists the domains and URLs required for communication between Microsoft services and the Office 365 Cloud Connector.
Service | Domain or URL |
|---|---|
Office 365 API operations | |
Exchange Admin Reports endpoints (exchange-admin-report-*) | |
Microsoft Cloud App Security for MCAS endpoints (mcas-*) | |
Cloud - Azure AD (global service) | |
Cloud - Azure AD China operated by 21Vianet | |
Cloud - Azure AD Germany | |
Cloud - Azure AD for US Government |
Collect Events from Microsoft Office365 Exchange Admin Reports
The Exchange Admin Reports contain valuable information about email traffic, from the raw traffic information (emails sent, received, etc.) to analysis and anomaly detection provided by the Office 365 platform. In Exabeam, you can collect this information using the Office 365 Cloud Connector. To enable this data collection, you must configure the Microsoft platform to use a set of APIs, each of which require its own set of permissions and credentials.
Ensure that Microsoft Collects Message Trace Events
By default, Microsoft does not collect Message Trace events, and does not analyze the data to generate anomaly and detection events. So before you continue, ensure that the data is available.
Ensure Message Trace is collected by Microsoft.
Browse to https://admin.exchange.microsoft.com/#/messagetrace.
Click + Start a trace, use the defaults of no specified ‘from’ nor ‘to’ people and a time-range of 2 days.
Click Search and verify that the results are as you expect.
If there was no data in the Message Trace search results, or some results were missing (for example excluding some users), refer to the Microsoft guide to enable Microsoft to collect the message trace events.
Note
After completing the configuration, it may take up to 24 hours for MS to start collecting the data.
Create an Account with Permissions to Collect Events
To collect the data from Microsoft, you need a user with permissions to access those events.
Tip
It is best practice to create a dedicated user for this task, as it would be easier to track its actions in the future, as well as ensure only the minimal permissions are assigned to it. So, create a user in the Office 365 platform and set a strong password for it. This user does not need to be assigned to any subscription.
Make sure to create the user in the organization and domain you want to monitor. The organization needs to be licensed to the Exchange email functionality.
Choose the Exchange Admin Reports data for which you want to collect.
Because some of the Exchange Admin Reports require different permissions, it is important to understand the configuration requirements to allow the collection of the data you need. Refer to the Exchange Online permissions for the permissions required for each report type.
Organization Management – Users have access to mailbox reports and mail protection reports.
View-Only Organization Management – Users have access to mailbox reports.
View-Only Recipients – Users have access to mail protection reports.
Compliance Management – Users have access to mail protection reports and Data Loss Prevention (DLP) reports (if their subscription has DLP capabilities).
For example, if you want to collect only Message Trace events, then the View-Only Organization Management role is sufficient.
If you want to collect all other Exchange Reports, except the DLP, then you’d also need to assign the View-Only Recipients role.
And for DLP, assign the Compliance Management role.
Note
For the DLP data source, ensure that the organization have the required subscription. An Office ATP plan is required. For more information, see Microsoft Defender for Office 365 security overview.
Assign the minimum set of required permissions to the user.
To assign the above roles to the user, log into the old Exchange Admin Portal (https://outlook.office365.com/ecp).
Go to Permissions on the left panel and then to the Admin Roles tab.
Select the required role and click the pencil icon at the top.
Under the Members section click + and search for the username of the user to whom you want to the role.
Select it and click Add at the bottom, and then click OK.
Save your changes.
It can take anywhere between 3 to 12 hours for Microsoft to apply the new permissions to the user.
Validate that the user can read the events using the Microsoft API.
Configure the Exabeam Office 365 Cloud Connector to Use the New Account
Enable the Exchange Admin Report endpoints.
By default, the Exchange Admin Report endpoints, all prefixed by
exchange-admin-report-are stopped.After the credentials are set, enable the endpoints for which the account enables collection. To do that, click on STATUS on the Office365 connector row, and find the rows of the respective endpoints.
Click START on each of the endpoints.
It takes 2-5 minutes until the first sync attempts complete. Exabeam automatically updates the row status when complete.
If you overserve any errors in collection for one or more of the Exchange Admin Reports endpoints, the connector will show a status of
ERROR. To troubleshoot:Click STATUS to see which endpoints are failing and then click a row of an endpoint that is failing.
This opens the synchronization details on the right panel which identify up to 3 of the last synchronization attempts, each with the result status and an error if applicable. Common errors are a
401status code which indicates that a permission is missing.If it has been more than 12 hours since the permissions were granted to the user, and you’re still getting this error, try to run the command listed in Step 3.
If the error shows there as well, re-validate the all the permissions listed in Create an Account with Permissions to Collect Events were completed successfully.
If still the issue persists, please open a ticket with Microsoft to troubleshoot.
Click DONE to return to the accounts list.
In case of an error in collection for one or more of the Exchange Admin Reports endpoints, the connector will show a status of
ERROR.
Set Up Microsoft Cloud App Security (MCAS) for Events and Alerts Collection
To configure your MCAS endpoint for your Office 365 Cloud Connector, you must first set up the Microsoft Cloud App Security (MCAS) service to send MCAS service alerts and events.
Navigate to your MCAS portal (https://portal.cloudappsecurity.com).
From the top toolbar, click the gear icon > Security Extensions.
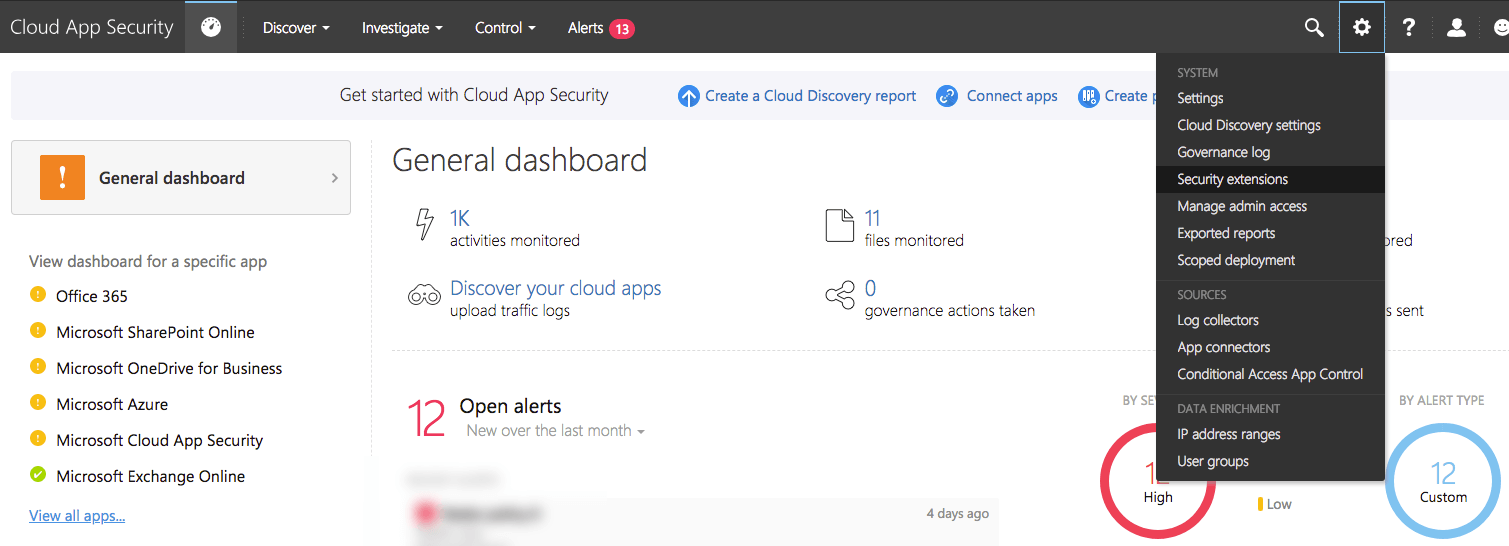
Click the + button to open the add token wizard.

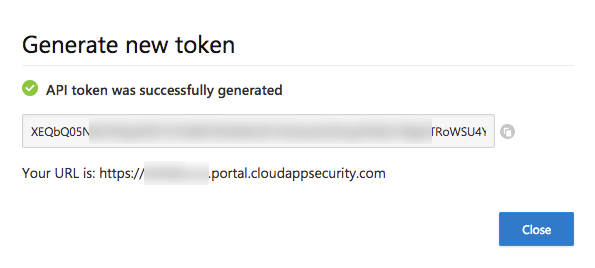
Choose a name for token (i.e. Exabeam) and click Generate.
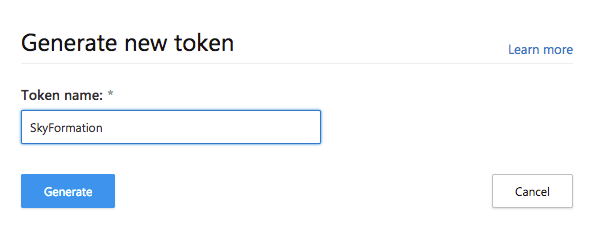
Record the generated token and the tenant URL as you will need it later for your Office 365 Cloud Connector's MCAS endpoint configuration.
Configure the Office 365 Cloud Connector
Review the Prerequisites to Set Up the Microsoft Office 365 Cloud Connector.
Log in to the Exabeam Cloud Connectors platform with your registered credentials.
Navigate to Settings > Accounts > Add Account.
Click Select Service to Add, then select Office 365 from the list.
Note
Required fields are indicated with a red bar.
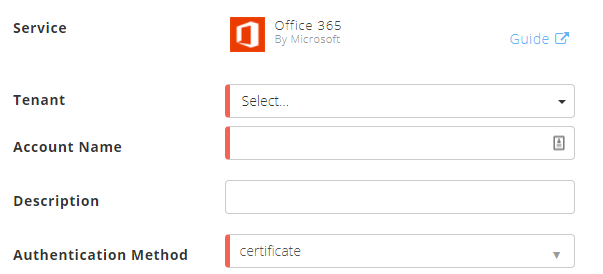
In the Accounts section, enter the required information.
Account Name – Specify a name for the Azure cloud connector. For example, Corporate_Office_365_Service.
Description – Describe the Duo Security connector (optional). For example, Microsoft Office 365 is a cloud service that provides a suite of productivity applications.
Authentication Method – Select the authentication method, OAuth2 or Certificate.
If you select the authentication method OAuth2, enter the following information.
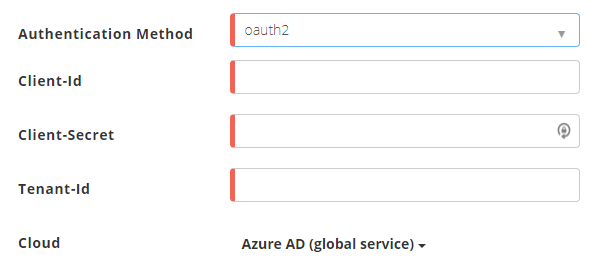
Client ID - Enter the value for the client ID that you obtained while completing prerequisites. For example: 4e11ab22-6d1c-5077-9d73-f7776d3851e8
Client Secret - Enter the value for the client secret that you obtained while completing prerequisites. For example: W17FnTeyRWUasdTGBdVeB+A3kASDaYUH0lre+MzuxRT=
Tenant ID - Enter the value for the Azure tenant ID that you obtained while completing prerequisites. For example: 3d70c501-bb21-1122-9330-c4a25e252086.
If you select the authentication method Certificate, enter the following information.
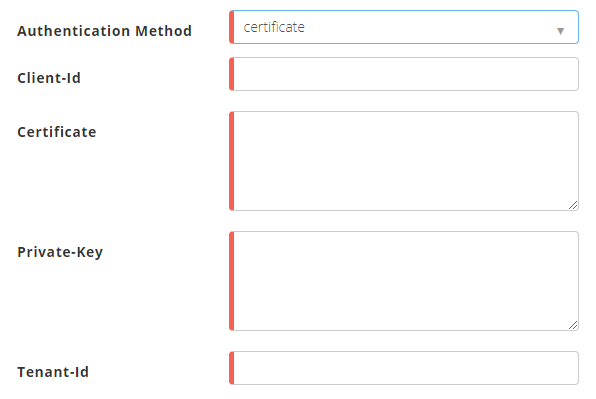
Client ID – Enter the value for the client ID that you obtained while completing prerequisites. For example: 4e11ab22-6d1c-5077-9d73-f7776d3851e8
Certificate – Paste the contents from the certificate file that you obtained while completing prerequisites.
Private Key – Paste the contents from the private key file that you obtained while completing prerequisites.
Tenant ID – Enter the value for the tenant ID that you obtained while completing prerequisites. For example: 3d70c501-bb21-1122-9330-c4a25e252086
Cloud – If your Azure AD is deployed in the China, Germany, and US Government national clouds, change the default Azure AD (global service) to the relevant option.
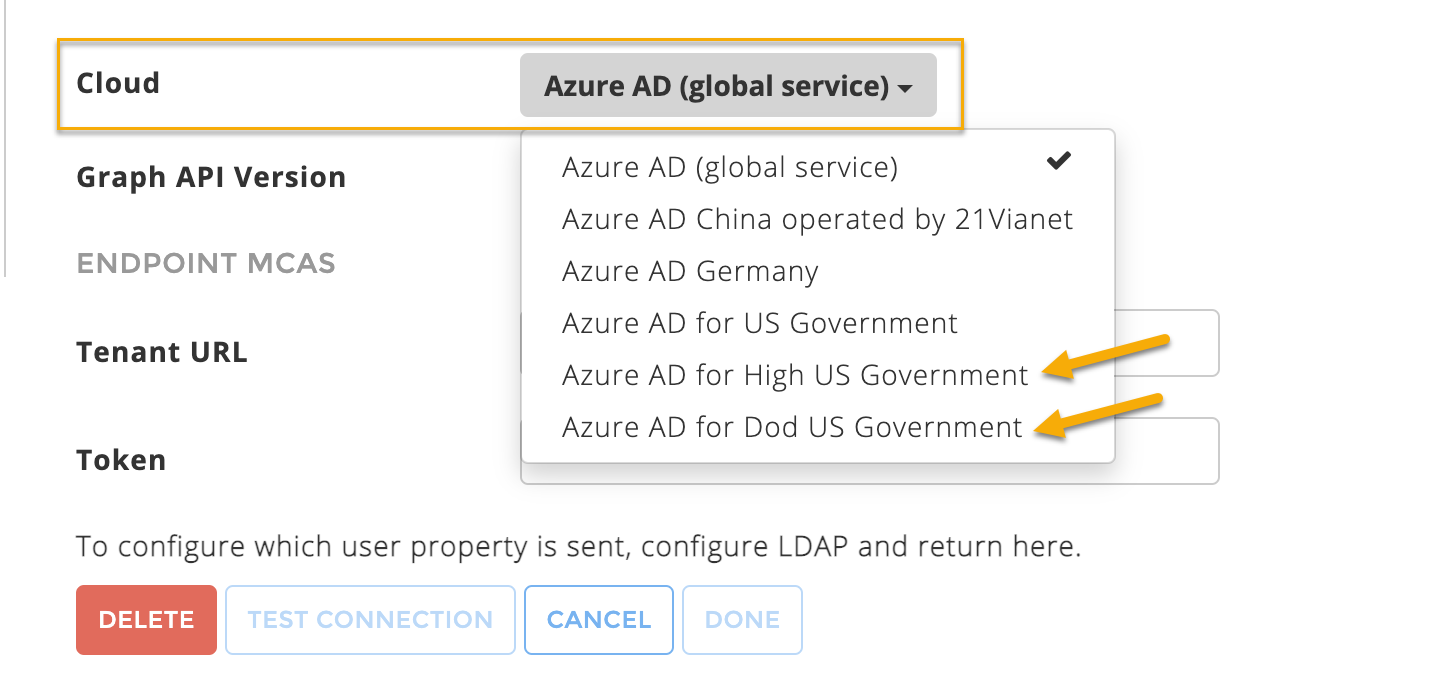
(Optional) ENDPOINT MCAS – This option is available if MACAS service is enabled.

Tenant URL – Enter the URL if you want to get events from the Exchange Admin Reports API.
Token – Enter the token value if you want to get events from the Exchange Admin Reports
To confirm that the Exabeam Cloud Connector platform communicates with the service, click Test Connection.
Click Done to save your changes. The cloud connector is now set up on the Exabeam Cloud Connector platform.
To ensure that the connector is ready to send and collect data, Start the connector and check that the status shows
OK.
Office 365 Cloud Connector Errors
The following table describes the errors you may encounter with your Office 365 Cloud Connector along with the recommended remediation steps to take for each error.
Endpoint Error Messages | Endpoint Name | Potential Root Cause | Recommended Remediation Action |
|---|---|---|---|
"Failed all attempts to retrieve uri ... with last error message [java.lang.RuntimeException: {"Message":"Authorization has been denied for this request."}] | management-* | Missing permissions/grant to the Exabeam Cloud Connectors Azure app | Validate all permissions are granted according to the configuration instructions for the Office 365 Cloud Connector. |
"Failed all attempts to retrieve uri ... [https://graph.microsoft.com/beta/malwareRiskEvents] ..."AccessDenied", "message": "Your tenant is not licensed for Identity Risk Events data from AAD Identity Protection. Please upgrade your subscription to access these events.", "innerError": { "request-id": ..." | graph-identity-protection-* | Insufficient subscription level. Required E3/ATP subscription | Upgrade subscription or stop the endpoint |
Failed all attempts to retrieve uri [https://graph.microsoft.com/beta/anonymousIpRiskEvents] ..."BadRequest", "message": "The MIME type 'text/html, image/gif, image/jpeg, *; q=.2, */*; q=.2' requires a '/' character between type and subtype, such as 'text/plain'.", "innerError": { | graph-identity-protection-* | Bug in Exabeam Cloud Connectors. Fixed. | Upgrade Exabeam Cloud Connectors instance |
Failed all attempts to retrieve uri [https://graph.windows.net/.../audit] with last error message [java.lang.RuntimeException: { "error":{ "code":"Current user is not set.","message":"message:Current user is not set.\n client-request-id:... timestamp:..." } }] | audit-events | Missing permissions/grant to the Exabeam Cloud Connectors Azure app | Validate all permissions are granted according to the configuration instructions for the Office 365 Cloud Connector. |
Failed all attempts to retrieve uri [https://graph.microsoft.com/beta/anonymousIpRiskEvents] ..."AccessDenied", "message": "Your tenant is not licensed for Identity Risk Events data from AAD Identity Protection. Please upgrade your subscription to access these events."..." | graph-identity-protection-anomalous-ip | Insufficient subscription level. Requires Office365 E3 or above | Upgrade subscription or stop the endpoint. |
Invalid endpoint [exchange-admin-reports-url-trace] for Microsoft | exchange-admin-reports-url-trace | Endpoint was removed by Microsoft, and also removed in newer versions of Exabeam Cloud Connectors | Either stop the endpoint or upgrade Exabeam Cloud Connectorsinstance. |
Failed all attempts to retrieve uri [https://reports.office365.com/ecp/reportingwebservice/reporting.svc/MessageTrace] with last error message [Unauthorized] | exchange-admin-reports-* | Insufficient permissions to the provided username | Validate all permissions are granted according to MS guide (bottom row). |
Failed all attempts to retrieve uri [https://graph.microsoft.com/beta/impossibleTravelRiskEvents] with last error message ..."innerError" | graph-identity-protection-impossible-travel | ||
Failed to deserialize {"Organization":..." | exchange-admin-reports-mail-detail-dlp-policy | Parser error that was resolved in version 2.2.17 | Upgrade Exabeam Cloud Connectors instance. |
Failed all attempts to retrieve uri [https://reports.office365.com/ecp/reportingwebservice/reporting.svc/MailDetailDlpPolicy] ..."Resource not found for the segment 'MailDetailDlpPolicy'. | exchange-admin-reports-mail-detail-dlp-policy | Exchange Online subscription does not include DLP protection in the organization | Refer to this subscriptions table: https://docs.microsoft.com/en-us/office365/servicedescriptions/exchange-online-protection-service-description/messaging-policy-and-compliance-servicedesc |
Failed all attempts to retrieve uri [https://graph.windows.net/.../activities/signinEvents] with last error message [{"odata.error":{"code":"Authentication_ApplicationBasedRequestFromNonPremiumTenant","message":{"lang":"en","value":"Application based api auth request from non premium tenant" | signins-events | Insufficient subscription level. Requires ActiveDirectory Premium P2 or above | Upgrade subscription or stop the endpoint. |
Failed all attempts to retrieve uri [https://graph.windows.net/.../activities/audit] .."Unable to check Directory Read access for appId: ..."message:Unable to check Directory Read access for appId: | audit-events, signins-events | Missing permissions/grant to the Exabeam Cloud Connectors Azure app - for Azure Active Directory's "Read directory data" | Validate that all required permissions are granted. |
Failed all attempts to retrieve uri [https://reports.office365.com/ecp/reportingwebservice/reporting.svc/MessageTrace] with last error message [{"odata.error":{"code":"InvalidQueryException","message":{"lang":"","value":"The query is invalid."}}}] | exchange-admin-reports-* | Microsoft API error. Occurs intermittently | Nothing. It'll recover on its own. |
Failed all attempts to retrieve uri [https://manage.office.com/api/v1.0/.../activity/feed/subscriptions/content] with last error message [{"error":{"code":"AF10001","message":"The permission set () sent in the request does not include the expected permission."}}] | management-* | Missing permissions/grant to the Exabeam Cloud Connectors Azure app | Validate all permissions are granted according to configuration instructions for the Office 365 Cloud Connector. |
Failed all attempts to retrieve uri...ProcessingException: java.net.SocketException: Connectionreset | any | Firewall/Proxy blocking the traffic | Try to send an HTTPS post request to the connectors URLs as https://graph.windows.net and verify if the connector is blocked or reset. If so, ask your network admin to allow HTTPS communication from the Exabeam Cloud Connectors app to the internet. |
