- Supported Cloud Connectors
- Armis Cloud Connector
- AWS Cloud Connector
- AWS Multi-Tenant Cloud Connector
- Azure Cloud Connector
- Azure Cloud Connector Overview
- Azure Audit Source and Event Support
- Prerequisites to Configure the Azure Cloud Connector
- Configure the Azure Cloud Connector
- Collect EventHub Information for Azure EventHub Endpoints
- Collect all Microsoft Defender ATP Events
- Configure Azure to Monitor Security Center Events in Azure VMs
- Bitglass Cloud Connector
- Box Cloud Connector
- Centrify Cloud Connector
- Cisco AMP for Endpoints Cloud Connector
- Cisco Meraki Cloud Connector
- Cisco Umbrella Cloud Connector
- Citrix ShareFile Cloud Connector
- Cloudflare Cloud Connector
- Code42 Incydr Cloud Connector
- CrowdStrike Falcon Cloud Connector
- Cybereason Cloud Connector
- CylanceProtect Cloud Connector
- Dropbox Business Cloud Connector
- Duo Security Cloud Connector
- Egnyte Cloud Connector
- Fidelis Cloud Connector
- GitHub Cloud Connector
- Google Cloud Platform (GCP) Cloud Connector
- Google Cloud Pub/Sub Cloud Connector
- Google Workspace (Formerly G Suite) Cloud Connector
- LastPass Enterprise Cloud Connector
- Mimecast Email Security Cloud Connector
- Netskope Cloud Connector
- Office 365 Cloud Connector
- Okta Cloud Connector
- OneLogin Cloud Connector
- Palo Alto Networks SaaS Security Cloud Connector
- Ping Identity Cloud Connector
- Proofpoint Cloud Connector
- Rapid7 InsightVM Cloud Connector
- Salesforce Cloud Connector
- SentinelOne Cloud Connector
- ServiceNow Cloud Connector
- Slack App Cloud Connector
- Slack Classic App Cloud Connector (Formerly known as Slack Enterprise Grid Cloud Connector)
- Snowflake Cloud Connector
- Sophos Central Cloud Connector
- Symantec CloudSOC Cloud Connector
- Symantec Endpoint Protection (SEP) Mobile Cloud Connector
- Symantec Email Security.cloud Cloud Connector
- Symantec WSS Cloud Connector
- Tenable.io Cloud Connector
- VMware Carbon Black Cloud Endpoint Standard Cloud Connector
- Workday Cloud Connector
- Zoom Cloud Connector
- Custom Cloud Connector
- Webhook Cloud Connector
AWS Cloud Connector
AWS Cloud Connector Types
The Cloud Connector that you need to set up is dependent on the data sources and anticipated behavior of your deployment. Review the following information to ensure you choose the appropriate Cloud Connector:
Cloud Connector | Considerations |
|---|---|
| |
|
Supported AWS Audit Sources and Events
AWS is a suite of cloud services platform, provides Infrastructure as a Service (IaaS) and Platform as a Service (PaaS) services. AWS helps organizations consume compute power and needed services, all without the need to buy or manage hardware.
Audit Source (API) | Service/Module Covered | Event Types |
|---|---|---|
console login success/failed | ||
Additional Software & Services: AWS Marketplace | ||
Analytics: , Amazon Athena, Amazon CloudSearch, Amazon EMR, AWS Data Pipeline, Amazon Kinesis Firehose, Amazon Kinesis Streams, Amazon QuickSight | ||
Application Services: Amazon API Gateway, Amazon Elastic Transcoder, Amazon Elasticsearch Service, Amazon Simple Workflow Service, AWS Step Functions | ||
Artificial Intelligence: Amazon Machine Learning, Amazon Polly | ||
Business Productivity: Amazon WorkDocs | ||
Compute: Amazon Elastic Compute Cloud (EC2), Application Auto Scaling, Auto Scaling, Amazon EC2 Container Registry, Amazon EC2 Container Service, AWS Elastic Beanstalk, Elastic Load Balancing, AWS Lambda | ||
Database: Amazon DynamoDB, Amazon ElastiCache, Amazon Redshift, Amazon Relational Database Service | ||
Desktop & App Streaming: Amazon WorkSpaces | ||
Developers Tools: AWS CodeBuild, AWS CodeCommit, AWS CodeDeploy, AWS CodePipeline, AWS CodeStar | ||
Game Development: Amazon GameLift | ||
Internet Of Things (IOT): AWS IoT | ||
Management Tools: AWS Application Discovery Service, AWS CloudFormation, AWS CloudTrail, Amazon CloudWatch Calls, AWS Config, AWS Managed Services, AWS OpsWorks, AWS OpsWorks for Chef Automate, AWS Organizations, AWS Service Catalog, | ||
Messaging: Amazon Simple Email Service, Amazon Simple Notification Service, Amazon Simple Queue Service | ||
Migration: AWS Database Migration Service, AWS Server Migration Service | ||
Mobile Services: Amazon Cognito, AWS Device Farm | ||
Networking & Content Delivery: Amazon CloudFront, AWS Direct Connect, Amazon Route 53, Amazon Virtual Private Cloud | ||
Security, Identity & Compliance: AWS Identity and Access Management (IAM), AWS Key Management Service (KMS), AWS Security Token Service (STS), AWS Certificate Manager, Amazon Cloud Directory, AWS CloudHSM, AWS Directory Service, Amazon Inspector, AWS WAF | ||
Storage: Amazon Simple Storage Service (S3), Amazon Elastic Block Store (EBS), Amazon Elastic File System (EFS), Amazon Glacier, AWS Storage Gateway | ||
Support: AWS Personal Health Dashboard, AWS Support | ||
system, application, and custom log files | ||
monitor log files, set alarms, and automatically react to changes in your AWS resources | ||
AWS GuardDuty: Intelligent threat detection and continuous monitoring on your AWS account and workload | Security Alerts | |
Data warehouse that makes it simple and cost-effective to analyze all your data across your data warehouse and data lake. | ||
Distributed Denial of Service (DDoS) protection service | Security Alerts | |
Automated security assessment service that helps improve the security and compliance of applications deployed on AWS | Security Alerts |
Prerequisites to Configure the AWS Cloud Connector
AWS Data Source Permissions and Requirements
Data Source | Required Permissions for Cloud Connectors Module | Default Endpoints Status |
|---|---|---|
General (All data sources) |
| N/A |
CloudTrail |
| active |
CloudWatch Alarms |
| active |
CloudTrail Data Events (S3, lambda) Retrieved via cloudwatch events targeted to SQS queue. Required Configuration (AWS Console): Monitor AWS S3/Lambda Data Events |
* A resource entry should be added to the policy in step 3 for each queue defined as a target for cloudTrail data events (full ARN)
| inactive NoteActivating this endpoint will trigger deletion of messages from the specified SQS queue. Be sure that Exabeam Cloud Connectors is the only entity using this queue. |
Macie Retrieved via cloudwatch events targeted to SQS queue. Required Configuration (AWS Console): Configure Macie to send events to cloudwatch |
* A resource entry should be added to the policy in step 3 for each queue defined as a target for MACIE data (full ARN)
| inactive NoteActivating this endpoint will trigger deletion of messages from the specified SQS queue. Be sure that Exabeam Cloud Connectors is the only entity using this queue. |
GuardDuty |
| N/A |
Redshift events |
| N/A |
Redshift Audit Logging Required Configuration (AWS Console): Configure Redshift Audit Logging |
S3 actions for specific buckets that were created during the configuration:
* A resource entry should be added to the policy in step 3 for each bucket defined as a target for redshift audit logging | active |
Inspector |
| active |
Shield |
| active |
CloudWatch Logs Required Configuration (AWS Console): Configure CloudWatch Logs and AWS Inspector |
S3 actions for specific buckets that were created during the configuration:
* A resource entry should be added to the policy in step 3 for each bucket defined as a target for redshift audit logging | active |
Flow Logs (Via CloudWatchLogs) Required Configuration (AWS Console): Becausethis is also fetched via CloudWatch logs, you must also Configure CloudWatch Logs and AWS Inspector to collect Flow logs | For FlowLogs enrichment:
| active |
Configure Redshift Audit Logging
This guide is based on https://docs.aws.amazon.com/redshift/latest/mgmt/db-auditing.html and provides only the relevant information for the data that the cloud connector can pull.
Audit logging is not enabled by default in Amazon Redshift. When you enable logging on your cluster, Amazon Redshift creates and uploads logs to Amazon S3 that capture data from the creation of the cluster to the present time. Each logging update is a continuation of the information that was already logged.
The connection log, user log, and user activity log are enabled together. For the user activity log, you must also enable the enable_user_activity_logging database parameter. If you enable only the audit logging feature, but not the associated parameter, the database audit logs will log information for only the connection log and user log, but not for the user activity log.
The enable_user_activity_logging parameter is disabled by default, but you can enable the user activity log. For more information, see Amazon Redshift Parameter Groups.
From the AWS console, go to Services > Redshift > Cluster, and click on the cluster for which you want to enable audit logging.
Click on the Maintenance and monitoring.

Scroll to the bottom of the page to the Audit logging section and click Edit.

Enable the audit logging and select a bucket or create a new one.
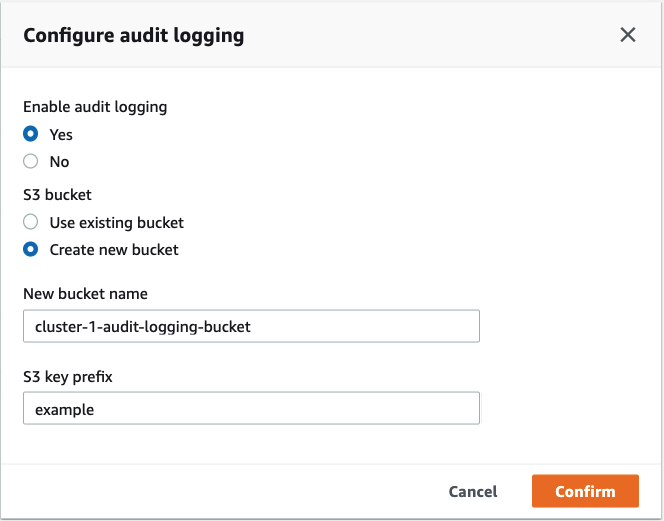
Record the name of the bucket as you will need it later in the workflow to grant the cloud connector read-only permissions for this bucket.
If you also wish to pull data from the user activity log, configure the parameter group for the cluster:
In the cluster view, go to the properties tab.

Scroll down to the Database configurations section, and click on the parameter group.

In the default parameter group, create another parameter group with the user activity logging enabled (the user activity logging is disabled by default).
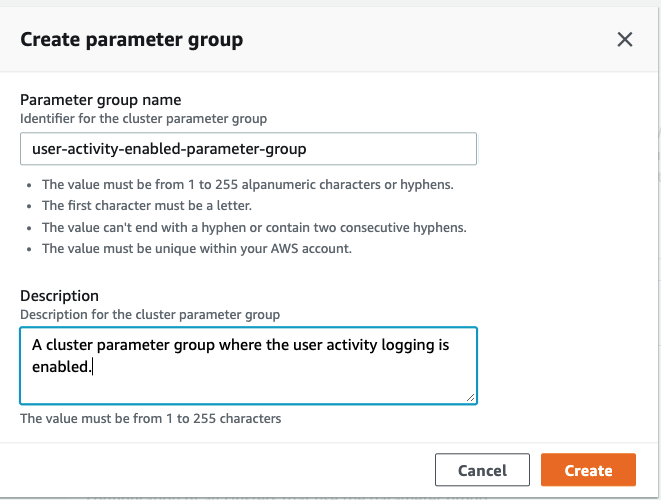
Select the new parameter group.
On the Parameters tab, click Edit parameters, change the user activity logging parameter to True, and then Save your changes.

Back in the cluster view, click Modify in the upper left and change the parameter group to the newly created one.
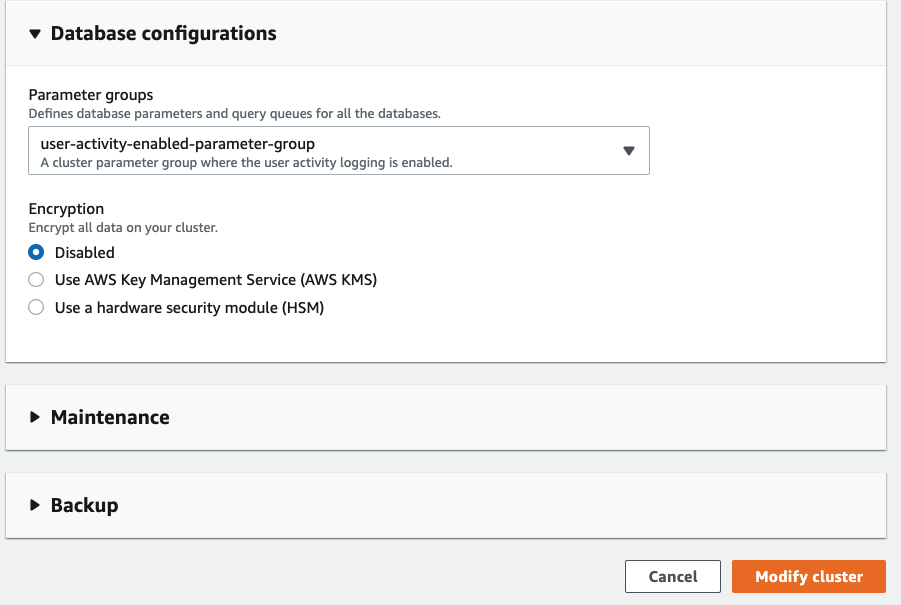
Click Modify cluster when done.
Supported Authentication Methods
Exabeam Cloud Connectors provides three methods for cloud connectors module authentication with AWS:
InstanceProfile – This is the recommended authentication method if the instance where Exabeam runs is in AWS EC2, and the AWS account we want to collect data from is the same as the one where the machine is hosted. To use this method, you will need to create and IAM policy and assign it to a role, then assign the role with the required permissions to the EC2 instance running Exabeam Cloud Connectors.
For further reading, see https://docs.aws.amazon.com/IAM/latest/UserGuide/id_roles_use_switch-role-ec2_instance-profiles.html.
STSAssumeRole – This is the recommended method for authentication by AWS. It also allows for cross-account access. The credentials for the IAM user (i.e. "Basic") are used to authenticate with the user that will then assume the role. That user does not need any other permission other than the ability to assume the role specified.
For further reading, see https://docs.aws.amazon.com/cli/latest/reference/sts/assume-role.html.
Basic – Uses the access key and secret of an IAM User. For any of the above methods, an IAM Policy is needed.
Create an IAM Policy
In your AWS console, navigate to Services > IAM > Policies > Create policy.
Click on the JSON tab, to get an online editor.
Replace the default, empty JSON with the JSON below. The JSON contains several statements:
{
   "Version":"2012-10-17",
   "Statement":[
      {
         "Effect":"Allow",
         "Action":[
            "cloudtrail:DescribeTrails",
            "cloudtrail:LookupEvents",
            "iam:ListGroups",
            "iam:ListRoles",
            "iam:ListPolicies",
            "iam:ListUsers",
            "iam:ListAccountAliases",
            "iam:GetUser",
            "cloudwatch:DescribeAlarms",
            "cloudwatch:DescribeAlarmHistory",
            "guardduty:GetFindings",
            "guardduty:ListDetectors",
            "guardduty:ListFindings",
            "events:ListRules",
            "events:ListTargetsByRule",
            "redshift:DescribeEvents",
            "redshift:DescribeClusters",
            "redshift:DescribeLoggingStatus",
            "redshift:DescribeClusterParameters",
            "shield:ListAttacks",
            "shield:GetSubscriptionState",
            "inspector:ListFindings",
            "inspector:DescribeFindings",
            "inspector:ListAssessmentTemplates",
            "logs:DescribeLogGroups",
            "logs:CreateExportTask",
            "logs:DescribeExportTasks",
            "logs:CancelExportTask",
            "ec2:DescribeInstances",
            "ec2:DescribeRegions"
         ],
         "Resource":"*"
      },
      {
         "Effect":"Allow",
         "Action":[
            "s3:GetObject",
            "s3:GetBucketAcl",
            "s3:ListBucket"
         ],
         "Resource":[
            "arn:aws:s3:::my-cloudwatch-logs-bucket-for-region1",
            "arn:aws:s3:::my-cloudwatch-logs-bucket-for-region2",
            "arn:aws:s3:::my-redshift-cluster1-db-audit-log-bucket",
            "arn:aws:s3:::my-redshift-cluster2-db-audit-log-bucket",
            "arn:aws:s3:::my-cloudwatch-logs-bucket-for-region1/*",
            "arn:aws:s3:::my-cloudwatch-logs-bucket-for-region2/*",
            "arn:aws:s3:::my-redshift-cluster1-db-audit-log-bucket/*",
            "arn:aws:s3:::my-redshift-cluster2-db-audit-log-bucket/*"
         ]
      },
      {
         "Effect":"Allow",
         "Action":[
            "s3:DeleteObject"
         ],
         "Resource":[
            "arn:aws:s3:::my-cloudwatch-logs-bucket-for-region1",
            "arn:aws:s3:::my-cloudwatch-logs-bucket-for-region2",
            "arn:aws:s3:::my-cloudwatch-logs-bucket-for-region1/*",
            "arn:aws:s3:::my-cloudwatch-logs-bucket-for-region2/*"
         ]
      },
      {
         "Effect":"Allow",
         "Action":[
            "sqs:DeleteMessage",
            "sqs:ReceiveMessage"
         ],
         "Resource":[
            "arn:aws:sqs:my-region:my-account-id:my-macie-sqs",
            "arn:aws:sqs:my-region:my-account-id:my-cloudtraildata-sqs"
         ]
      }
   ]
}
The first statement is a read-only statement without any reference to actual resources. It contains all of the required permissions, and it is highly recommended to use it as is. This way all supported services will get auto discovered, even if will be used only in the future. However you may remove some of the permissions based on the table of supported services above.
The rest of the statements contain references to actual resources.
The second statement contains references for S3 buckets and that are used for CloudWatch logs and Redshift audit logging.
The third statement contains the deleteObject permission which is required only for CloudWatch logs retrieval, related to the special bucket created specifically for this purpose.
The last statement contains references for SQS queues, used for SQS events and macie events. This means you will have to input the actual names of your S3 buckets and/or queues (See the relevant config links in the table above for how to create/find these buckets/queues). If you don't know them or you don't currently use these services, you can remove the 2nd to 4th statement entries altogether. Note that AWS may after you save the policy merge the 2nd and 4th statements, this is OK.
Note
If your S3 buckets are encrypted, you will need to add more permissions to the policy. Please review the following guide for more details: https://aws.amazon.com/premiumsupport/knowledge-center/decrypt-kms-encrypted-objects-s3/
Create an IAM User
If you chose to use Basic or AssumeRole authentication, you must also create an IAM user.
In your AWS console, navigate to Services > IAM > Users > Add user.
Give your user a unique name and enable Programmatic access:
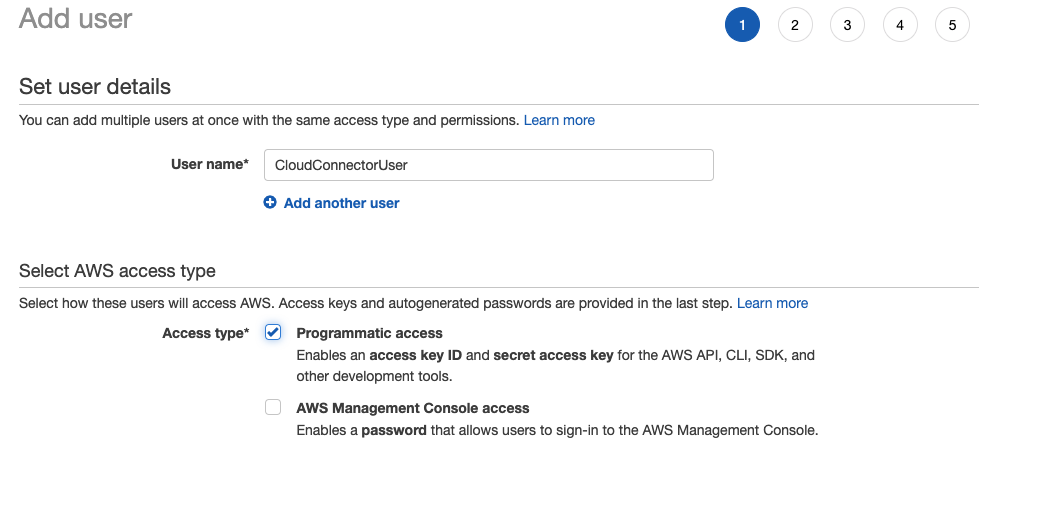
Click Next: Permissions.
You are transferred to the Set permissions page.
(Basic authentication only) Choose Attach Existing Policies Directly and search for any policies you created.
Typically you will have one policy per cloud collector.
For STSAssumeRole authentication, skip this step.
Continue the user creation process (tags are optional) and finish the user creation.
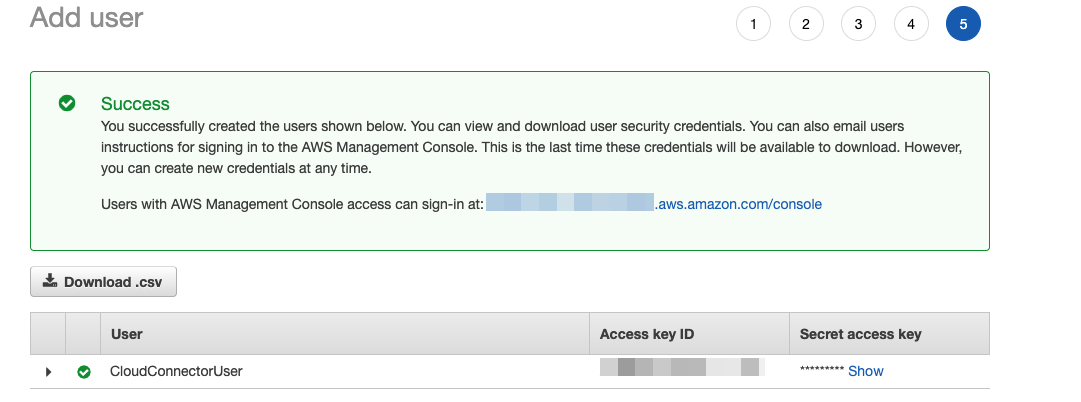
When you are finished, click Next: Review and then Create user.
Record the Secret Access Key and Access Key ID. Optionally download the credentials in CSV format, as they will not be accessible after you leave this page.

Create an IAM Role
An IAM Role is required for AssumeRole and InstanceProfile authentication.
In your AWS console, navigate to IAM > Roles > Create Role.
Enable the AWS Service and EC2 service and Click Next: Permissions.
This will create a Trust relationship that allows EC2 instances to call AWS services on your behalf. You will modify the Trust relationship later, per authentication method that you choose.
Search the policy created earlier and check its checkbox. Click Next: Tags.
Optionally add tags. Click Next: Review.
Give it a meaningful name, for example ExabeamCCAWSConnectorRole, and description. Click Create Role.
Search for the created role and click on it. Copy aside the role ARN.
Finalize AssumeRole and InstanceProfile authentication configuration.
AssumeRoleNavigate to IAM > Roles and search for the role created earlier.
Allow a specific user to use (assume) the role.
Go to Trust relationships tab and then click Edit trust relationship.
Make sure the Statements array contains the following entry (modify accordingly for your user):
{
   "Effect":"Allow",
   "Principal":{
      "AWS":"arn:aws:iam::123456789012:user/ccuser"
   },
   "Action":"sts:AssumeRole"
}
Click Update Trust Policy.
InstanceProfileNavigate to IAM > Roles and search for the role created earlier.
Allow EC2 instances to use (assume) the role:
Go to Trust relationships tab, click Edit trust relationship.
Make sure the Statements array contains the following statement entry:
{
   "Effect":"Allow",
   "Principal":{
      "Service":"ec2.amazonaws.com"
   },
   "Action":"sts:AssumeRole"
}
Click Update Trust Policy.
Navigate to AWS EC2 service.
Right-click on the instance where Cloud Connectors is installed, and then click Instance Settings > Attach/Replace IAM Role.
Choose the role from the drop-down list, and Apply.
Monitor AWS S3/Lambda Data Events
Data plane events, as opposed to management events, are not monitored by CloudTrail out-of-the box. However, you can configure CloudTrail to monitor and direct these events into an SQS queue, from which Exabeam Cloud Connectors can pull them at near real-time latency.
Configure CloudTrail and CloudWatch Events to Monitor Data Events
Before you begin, verify that the credentials given to the user/access key that were provided to Exabeam Cloud Connectors has permission to read and write on the above SQS queue.
Go to a CloudTrail's trail configuration

Under Data events, click Edit and select the boxes for the S3 buckets for which you want to monitor (or select All S3 buckets to monitor all existing and future buckets).
Select the actions to monitor (Read or Write).
Repeat the process for the Lambda functions under the Lambda tab.
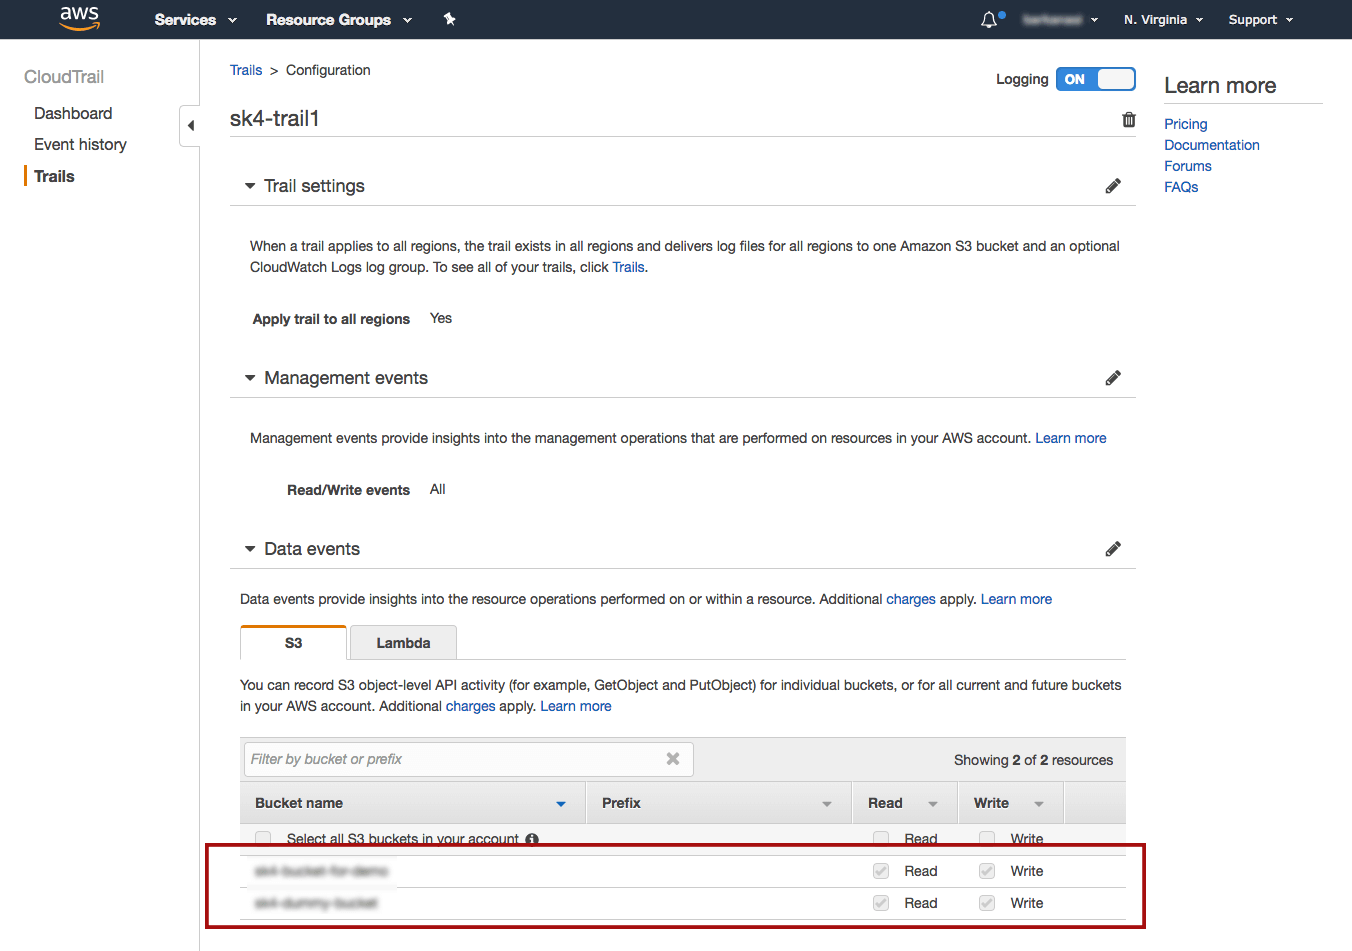
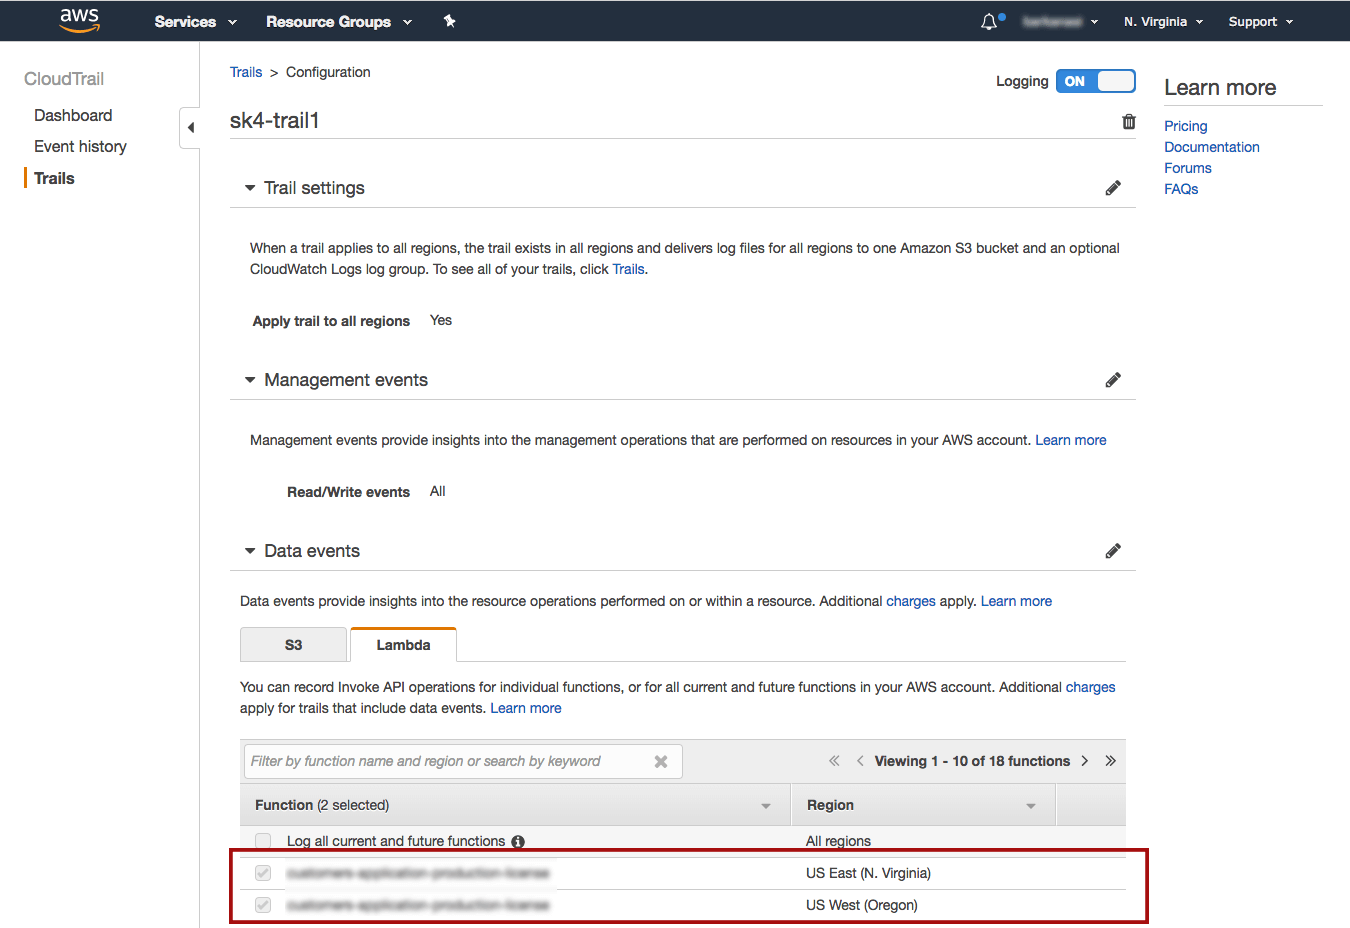
Click Save.
Create an SQS queue that will be the target of the above events.
Configure the queue as a target.
Go to CloudWatch Events and create a new rule.
Events Source is Event Pattern, for service "Simple Storage Service (S3)" and another rule for "Lambda", Event Type is All Events.
Add a target of SQS queue and select the queue created earlier in this procedure.
Click Configure Details and provide a meaningful name, for example
CloudTrail Data Events.Select the checkbox of state enabled, and click Create rule.
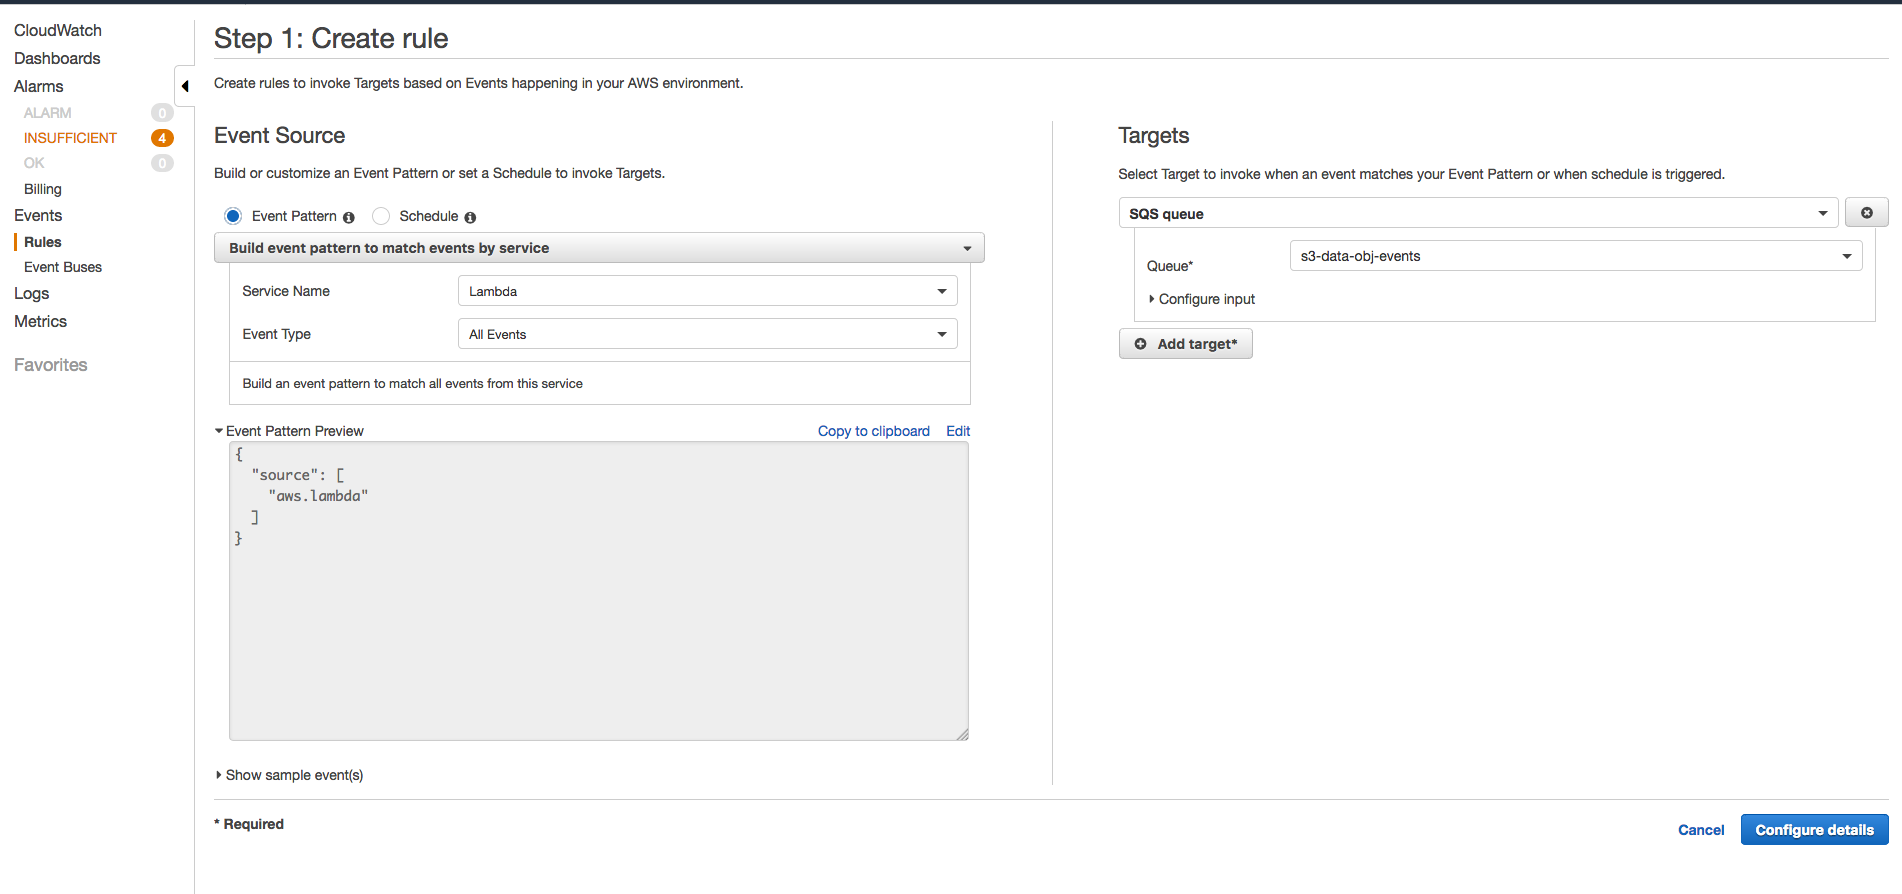
Verify the configuration is working by forcing an event to occur (i.e. downloading an object from a monitored S3 bucket) and verify it is present in the queue.
(Exabeam Cloud Connectors 2.4.186 and earlier releases) Proceed to Configure the Exabeam AWS Account to Monitor the Pipeline.
Configure the Exabeam AWS Account to Monitor the Pipeline
Monitoring the pipeline is only required for releases earlier than Exabeam Cloud Connectors 2.4.186. You configure Exabeam Cloud Connectors to monitor this queue by adding its URL to the AWS Account credentials.
Log in to the Exabeam Cloud Connectors instance.
Go to Settings > Accounts > Edit the AWS Account.
Under Sqs-Url set the URL of the SQS queue you created in Configure CloudTrail and CloudWatch Events to Monitor Data Events.
Save your changes.
Click Status on the AWS Account and verify that the endpoint cloud-watch-events-sqs is started. If necessary, click Start to initiate the startup.
Click Save.
Configure the AWS Cloud Connector
Multi region is available with Cloud Connectors 2.4.185 and later releases.
AWS organizations - AWS SCP (Service Control Policies) that are defined in the AWS Organizations infrastructure could potentially override the IAM policies that we will configure during this procedure. If your AWS infrastructure uses SCP, verify that it does not have overriding policies that will later block the IAM policies which could result in access denied errors.
AWS China - AWS in China is a completely different partition than the global AWS partition. Not all of the services that are offered in the global partition are also available in China and some services differ significantly. At this point, our support for AWS China accounts is only available through the Exabeam AWS multi tenant connector even for single tenant accounts.
Onboard the AWS Cloud Connector
Before you begin, make sure you review the Prerequisites to Configure the AWS Cloud Connector.
Log in to the Exabeam Cloud Connectors platform with your registered credentials.
Navigate to Settings > Accounts > Add Account.
Click Select Service to Add, then select AWS from the list.
In the Accounts section, enter the required information.
Tenant – Select the tenant.
Account Name – Give the account a meaningful name. This will become the cloud connector name displayed in the Exabeam Cloud Connectors platform and added to entire events sent to your SIEM system from this connector as identifier.
Description – (Optional) Enter a descriptive name for the connector.
Choose the authentication method.
If you chose the basic authentication, fill in the access key and secret of the designated user which you created in the previous steps.
If you chose the STSAssumeRole Authentication, the following additional information will be needed:
Role ARN – The ARN of the role, which has the permissions above assigned to it.
Role session name – A unique name to identify the use of this role, for example
Exabeam.External ID – (Optional) A unique identifier that might be required when you assume a role in another account
Account ID – The AWS account ID to which we're using these credentials to connect to, a 12-digit number.
If you chose ProfileInstance authentication, it requires only the Account ID of the AWS account to which the credentials can connect, a 12-digit number.
To confirm that the Exabeam Cloud Connector platform communicates with the service, click Test Connection.
Click Done to save your changes. The cloud connector is now set up on the Exabeam Cloud Connector platform.
To ensure that the connector is ready to send and collect data, Start the connector and check that the status shows
OK.
Configure CloudWatch Logs and AWS Inspector
If you have AWS CloudWatch Logs, or AWS Inspector, after a few minutes services will automatically be discovered by the cloud connector. For these two services, extra information is required. When you navigate to Settings > Accounts > choose your relevant AWS account > Edit, you will see the option to enter the additional information.
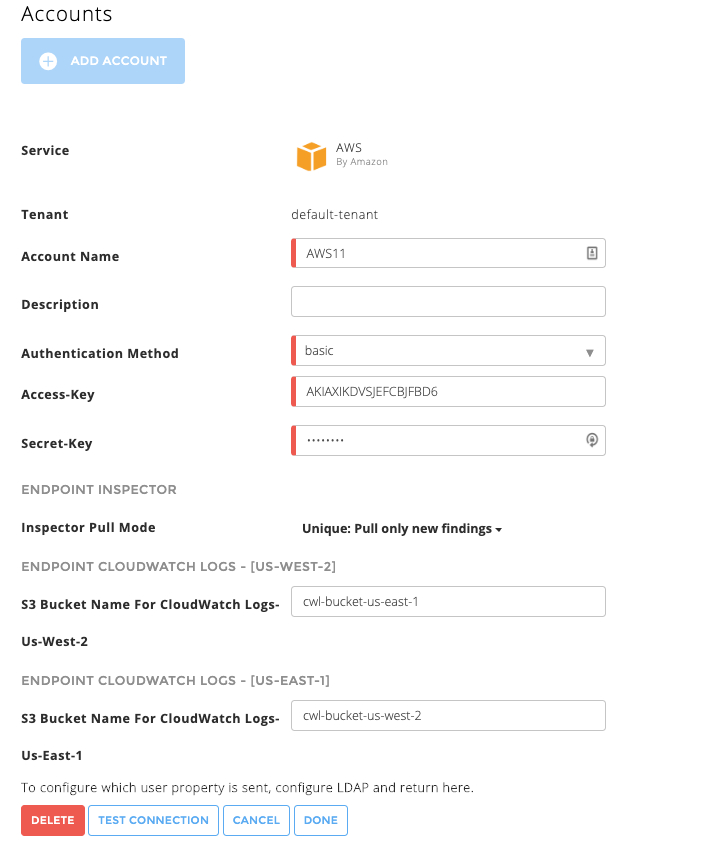 |
CloudWatch Logs – In order to pull the data, you must fill in the relevant S3 buckets for each region you want to pull the data from. Fill in the bucket names (these buckets should also be part of the permissions JSON and these buckets should also have the correct ACL, see Monitor AWS S3/Lambda Data Events) and click on Done.
Inspector Pull Mode – (Optional) Default is Full. Options are:
Full – With this option, you will receive the current inspector finding each time Exabeam pulls for inspector information, regardless if a finding was previously reported by Exabeam or not.
Unique – With this option, you will only receive events for inspector findings which are new, i.e. were not reported by Exabeam in the previous syncs.
For example, in time t0 Exabeam pulled inspector and got findings a,b,c. Finding b was then corrected. Then, in time t1 Exabeam pulled again and got findings a,b,d.
Choosing full mode, in t0 you will get events for findings a,b,c and in t1 you will get a,b,d.
Choosing unique mode, in t0 you will get events for findings a,b,c and in t1 you will get only d.
