- Supported Cloud Connectors
- Armis Cloud Connector
- AWS Cloud Connector
- AWS Multi-Tenant Cloud Connector
- Azure Cloud Connector
- Azure Cloud Connector Overview
- Azure Audit Source and Event Support
- Prerequisites to Configure the Azure Cloud Connector
- Configure the Azure Cloud Connector
- Collect EventHub Information for Azure EventHub Endpoints
- Collect all Microsoft Defender ATP Events
- Configure Azure to Monitor Security Center Events in Azure VMs
- Bitglass Cloud Connector
- Box Cloud Connector
- Centrify Cloud Connector
- Cisco AMP for Endpoints Cloud Connector
- Cisco Meraki Cloud Connector
- Cisco Umbrella Cloud Connector
- Citrix ShareFile Cloud Connector
- Cloudflare Cloud Connector
- Code42 Incydr Cloud Connector
- CrowdStrike Falcon Cloud Connector
- Cybereason Cloud Connector
- CylanceProtect Cloud Connector
- Dropbox Business Cloud Connector
- Duo Security Cloud Connector
- Egnyte Cloud Connector
- Fidelis Cloud Connector
- GitHub Cloud Connector
- Google Cloud Platform (GCP) Cloud Connector
- Google Cloud Pub/Sub Cloud Connector
- Google Workspace (Formerly G Suite) Cloud Connector
- LastPass Enterprise Cloud Connector
- Mimecast Email Security Cloud Connector
- Netskope Cloud Connector
- Office 365 Cloud Connector
- Okta Cloud Connector
- OneLogin Cloud Connector
- Palo Alto Networks SaaS Security Cloud Connector
- Ping Identity Cloud Connector
- Proofpoint Cloud Connector
- Rapid7 InsightVM Cloud Connector
- Salesforce Cloud Connector
- SentinelOne Cloud Connector
- ServiceNow Cloud Connector
- Slack App Cloud Connector
- Slack Classic App Cloud Connector (Formerly known as Slack Enterprise Grid Cloud Connector)
- Snowflake Cloud Connector
- Sophos Central Cloud Connector
- Symantec CloudSOC Cloud Connector
- Symantec Endpoint Protection (SEP) Mobile Cloud Connector
- Symantec Email Security.cloud Cloud Connector
- Symantec WSS Cloud Connector
- Tenable.io Cloud Connector
- VMware Carbon Black Cloud Endpoint Standard Cloud Connector
- Workday Cloud Connector
- Zoom Cloud Connector
- Custom Cloud Connector
- Webhook Cloud Connector
AWS Multi-Tenant Cloud Connector
AWS Cloud Connector Types
The Cloud Connector that you need to set up is dependent on the data sources and anticipated behavior of your deployment. Review the following information to ensure you choose the appropriate Cloud Connector:
Cloud Connector | Considerations |
|---|---|
| |
|
Supported AWS Multi-Tenant Audit Sources and Events
Service/Module | Service Details |
|---|---|
Audit Source: CloudTrail API | Event Types: console login success/failed Events included: A user in your account (root, IAM, federated, SAML, or SwitchRole) signed in to the AWS Management Console. |
Additional Software & Services | AWS Marketplace |
Analytics | Amazon Athena, Amazon CloudSearch, Amazon EMR, AWS Data Pipeline, Amazon Kinesis Firehose, Amazon Kinesis Streams, Amazon QuickSight |
Application Services | Amazon API Gateway, Amazon Elastic Transcoder, Amazon Elasticsearch Service, Amazon Simple Workflow Service, AWS Step Functions |
Artificial Intelligence | Amazon Machine Learning, Amazon Polly |
Business Productivity | Amazon WorkDocs |
Compute | Amazon Elastic Compute Cloud (EC2), Application Auto Scaling, Auto Scaling, Amazon EC2 Container Registry, Amazon EC2 Container Service, AWS Elastic Beanstalk, Elastic Load Balancing, AWS Lambda |
Database | Amazon DynamoDB, Amazon ElastiCache, Amazon Redshift, Amazon Relational Database Service |
Desktop & App Streaming | Amazon WorkSpaces |
Developers Tools | AWS CodeBuild, AWS CodeCommit, AWS CodeDeploy, AWS CodePipeline, AWS CodeStar |
Game Development | Amazon GameLift |
Internet Of Things (IOT) | AWS IoT |
Management Tools | AWS Application Discovery Service, AWS CloudFormation, AWS CloudTrail, Amazon CloudWatch Calls, AWS Config, AWS Managed Services, AWS OpsWorks, AWS OpsWorks for Chef Automate, AWS Organizations, AWS Service Catalog |
Messaging | Amazon Simple Email Service, Amazon Simple Notification Service, Amazon Simple Queue Service |
Migration | AWS Database Migration Service, AWS Server Migration Service |
Mobile Services | Amazon Cognito, AWS Device Farm |
Networking & Content Delivery | Amazon CloudFront, AWS Direct Connect, Amazon Route 53, Amazon Virtual Private Cloud |
Security, Identity & Compliance | AWS Identity and Access Management (IAM), AWS Key Management Service (KMS), AWS Security Token Service (STS), AWS Certificate Manager, Amazon Cloud Directory, AWS CloudHSM, AWS Directory Service, Amazon Inspector, AWS WAF |
Storage | Amazon Simple Storage Service (S3), Amazon Elastic Block Store (EBS), Amazon Elastic File System (EFS), Amazon Glacier, AWS Storage Gateway |
Support | AWS Personal Health Dashboard, AWS Support |
Prerequisites to Configure the AWS Multi-Tenant Cloud Connector
To configure the AWS Multi-Tenant Cloud Connector, ensure you set up your environment to meet the following requirements:
Note
For on-premises deployment, open Outbound communication to *.amazonaws.com:443.
Setup your AWS configuration to support the central CloudTrail settings. Follow the steps at Set up AWS to Send CloudTrail Logs From Multiple AWS Accounts Into a Single Account. To add an Exabeam AWS MT Cloud Connector, you need the following SQS and S3 bucket attributes: SQS URL, SQS Region, S3 Bucket Region.
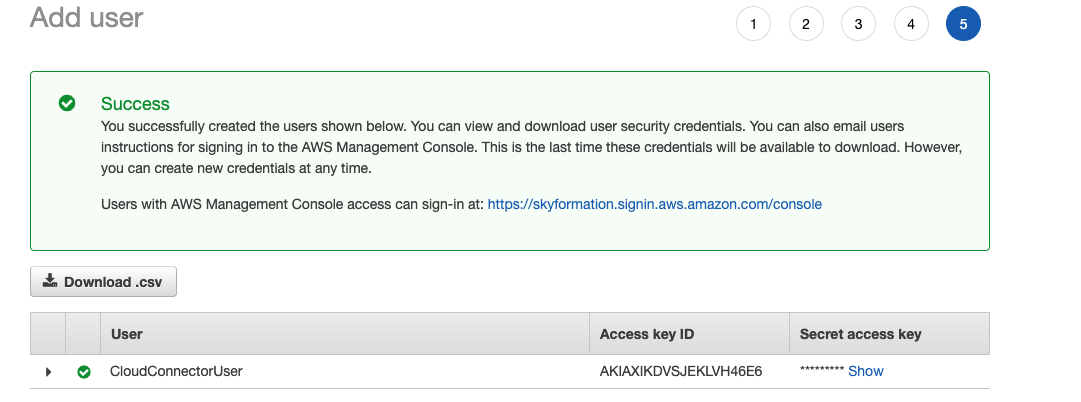
Have (or create) an AWS IAM user that the cloud connector will use to integrate with the AWS APIs and ingest the audit events. The users attributes that you need are: Secret Access Key (e.g. see in the diagram an example) and Access Key ID (e.g. see in the diagram an example).
The AWS IAM user mentioned above should have the AWS permissions specified in Mandatory.
Set up AWS to Send CloudTrail Logs From Multiple AWS Accounts Into a Single Account
To monitor CloudTrail from multiple AWS accounts, you can set up AWS to forward the trails from the various accounts into a single account’s S3 Bucket. You can also set up a SQS queue that is notified when new objects are added to that bucket.
In this guide you will implement this architecture within AWS, including the creation of the collecting bucket, the SQS queue, the various accounts’ trails, all with air-tight permissions/policies, and finally you will create an AWS IAM User with permissions to orchestrate this setup, again, with air-tight policy.
For more information, refer to the AWS documentation for Receiving CloudTrail log files from multiple accounts and Amazon S3 Event Notifications.
Collect all the account numbers that will be sending CloudTrail events.
Find your Account # in My Account under Account Settings > Account ID. The account number is a 12 digit number, for example 111111111111.
In the account you want to set up to receive the trails (for the duration of this procedure, we use Account A as an example of the account name), create an S3 bucket.
Record the ARN for the bucket (see the properties tab).
Create an SQS queue (Standard).
Note
Make sure the Queue is in the same region as the bucket.
Record the URL.
Set a policy for the SQS Queue to allow only the S3 bucket to send events to it:
In SQS, select the queue and then Permissions.
Click Edit Policy Document (Advanced).
Paste the following policy and modify it for your environment.
 {
        "Version": "2012-10-17",
        "Id": "queue ARN/SQSDefaultPolicy",
        "Statement": [
            {
            "Effect": "Allow",
            "Principal": {
                "AWS": "*"
            },
            "Action": ["SQS:SendMessage"],
            "Resource": "queue ARN",
            "Condition": {
                "ArnLike": {
                "aws:SourceArn": "bucket ARN"
                }
            }
            }
        ]
  }
Configure the S3 Bucket to notify the SQS Queue when files are added to it:
In S3, select the Properties tab for the bucket.
Select Events > Add notification.
Enter a meaningful name (i.e. “Notify SQS new Files”).
Select ObjectCreate (All).
Under Send to, select SQS Queue.
Select the queue and then Save your changes.
Set a policy for the S3 Bucket to allow only the accounts for which you want to send CloudTrail events to this bucket to add objects to it:
In S3, select the bucket > Permissions > Bucket Policy.
Paste the following policy and modify it to add a row with the account ID for each source account:
{
    "Version": "2012-10-17",
    "Statement": [
        {
        "Effect": "Allow",
        "Principal": {
            "Service": "cloudtrail.amazonaws.com"
        },
        "Action": "s3:GetBucketAcl",
        "Resource": "Bucket ARN"
        },
        {
            "Effect": "Allow",
            "Principal": {
                "Service": "cloudtrail.amazonaws.com"
            },
            "Action": "s3:PutObject",
            "Resource": [
                "Bucket ARN/[optional] myLogFilePrefix/AWSLogs/Account ID 1/*",
                "Bucket ARN/[optional] myLogFilePrefix/AWSLogs/Account ID 2/*"
            ],
            "Condition": {
                "StringEquals": {
                "s3:x-amz-acl": "bucket-owner-full-control"
                }
            }
        }
    ]
}
Configure a CloudTrail for each account to send its events to the bucket in Account A.
Log in to the desired account.
In CloudTrail, create a new trail (or re-configure an existing one).
Under Storage location select No in Create new bucket and set the bucket name (not ARN) of Account A.
Choose your preferred authentication method:
Exabeam Cloud Connectors provides three authentication options for authentication with AWS:
InstanceProfile: This is the recommended authentication method if the instance where cloud connector is running is in AWS EC2 and the AWS account we want to collect data from is the same as the one where the machine is hosted.
To use this method, you will need to create and IAM policy and assign it to a role, then assign the role with the required permissions to the EC2 instance running the Exabeam Cloud Connectors.
For more information, see the following AWS documentation: https://docs.aws.amazon.com/IAM/latest/UserGuide/id_roles_use_switch-role-ec2_instance-profiles.html.
STSAssumeRole: This is the recommended method for authentication by AWS. It also allows for cross-account access.
The credentials for the IAM user (i.e. Basic) are used to authenticate with the user that will then assume the role. That user does not need any other permission other than the ability to assume the role specified.
For more information, see the following AWS documentation: https://docs.aws.amazon.com/cli/latest/reference/sts/assume-role.html.
Basic: Authenticates using the access key and secret of an IAM User.
For any of the above methods, an IAM Policy is needed.
Create IAM Policy:
In your AWS console, select Services > IAM > Policies > Create policy.
Click on the JSON tab, to get an online editor.
Replace the default, empty JSON with the following JSON
Modify the JSON as appropriate and edit the name the policy (for example
SQS and S3 for Exabeam Cloud Connectors).{ "Version": "2012-10-17", "Statement": [ { "Action": [ "sqs:DeleteMessage", "sqs:DeleteMessageBatch", "sqs:ReceiveMessage" ], "Effect": "Allow", "Resource": "Queue ARN" }, { "Action": [ "s3:GetObject" ], "Effect": "Allow", "Resource": "Bucket ARN/*" } ] }
(Basic and AssumeRole Authentication only) Create an IAM user.
Create a user with the policy from step 6:
In Account A:
In your AWS console, navigate to Services > IAM > Users > Add user.
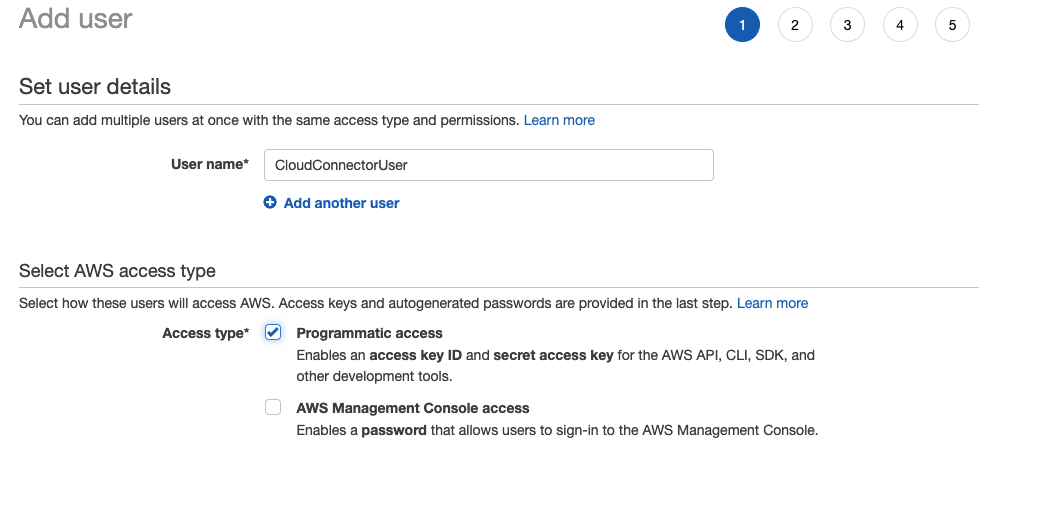
Give your user a name and enable programmatic access for the account.

When you click next, you will be transferred to the set permissions page.
(Basic Authentication only) Choose Attach Existing Policies Directly and search for the policy you created in the previous step.
For STSAssumeRole authentication, skip this step as you will be warned about user has no permissions (this is okay).
Continue the user creation process (tags are optional) and finish the user creation. You will see a screen like the following :

Note the following attributes which you will need to create an IAM role.

Access Key ID (e.g. see in the diagram an example)
Secret Access Key (e.g. see in the diagram an example)
(AssumeRole and InstanceProfile authentication only) Create an IAM role:
Navigate to IAM > Roles and click Create Role.
Enable the AWS Service and EC2 service, and then click Next: Permissions.
This will create a trust relationship that allows EC2 instances to call AWS services on your behalf. Later in this procedure, you will modify the trust relationship per the authentication method of your choice.
Search and then select the policy you created, and then click Next: Tags.
(Optional) Add tags if desired and then click Next: Review.
Give the role a meaningful name, e.g. ExabeamCCAWSConnectorRole, and description and then click Create Role.
Search and then select the role you created.
Record the ARN for the role.
Finalize the AssumeRole and InstanceProfile authentication configuration:
AssumeRole
Navigate to IAM > Roles and search for the role created earlier.
Allow a specific user to use (assume) the role:
Go to the Trust relationships tab, click Edit trust relationship.
Make sure the Statements array contains the following entry (modify accordingly):
{
  "Effect": "Allow",
  "Principal": {
    "AWS": "arn:aws:iam::123456789012:user/ccuser"
  },
  "Action": "sts:AssumeRole"
 }
Click Update Trust Policy.
InstanceProfile
Navigate to IAM > Roles and search for the role created earlier.
Allow EC2 instances to use (assume) the role.
Go to the Trust relationships tab, click Edit trust relationship.
Make sure the Statements array contains the following statement entry:
{
  "Effect": "Allow",
  "Principal": {
    "Service": "ec2.amazonaws.com"
  },
  "Action": "sts:AssumeRole"
 }
Click Update Trust Policy.
Navigate to AWS EC2 service.
Right-click on the instance where Exabeam Cloud Connectors in installed.
Click Instance Settings > Attach/Replace IAM Role.
Choose the role from the drop-down list, and Apply.
Proceed to Configure the AWS Multi-Tenant Cloud Connector.
Configure the AWS Multi-Tenant Cloud Connector
AWS is a suite of cloud services platform, provides Infrastructure as a Service (IaaS) and Platform as a Service (PaaS) services. AWS helps organizations consume compute power and needed services, all without the need to buy or manage hardware.
If you send Cloudtrail audit events from multiple AWS accounts into a into a shared S3 bucket (see CloudTrail Receive Logs From Multiple Accounts), you can add Amazon Web Service (AWS) Multi-Tenant connector to your Exabeam Platform.
If you use a standard AWS account with a its own private audit logs, please use the standard AWS Cloud Connector instead and onboard a cloud connector for each AWS account.
Log in to the Exabeam Cloud Connectors platform with your registered credentials.
Navigate to Settings > Accounts > Add Account.
Click Select Service to Add, then select AWS-MultiTenant from the list.
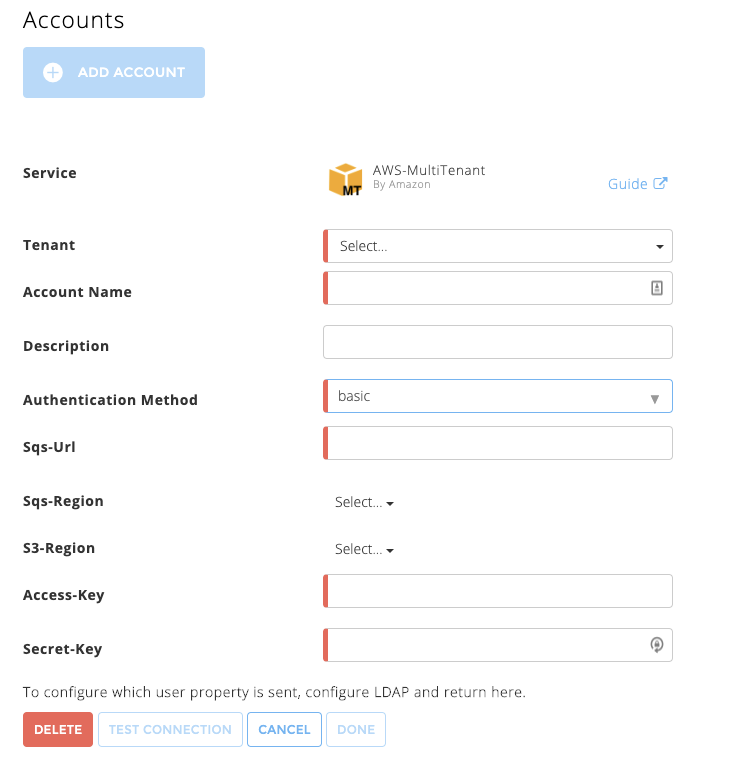
Fill in the following information:

Tenant – Select your tenant from the list.
Account Name – Provide this cloud connector a meaningful name. Exabeam uses this name to identify the cloud connector across the Exabeam Cloud Connectors platform and in entire events sent by your connector to your SIEM/Log/Splunk system. For example,
AWS EMEA Central Audit.Description – Enter any text that describes the specific cloud connector function and provides meaning for your organization. For example,
AWS account for central cloudtrail audit in EMEA AWS accounts.Sqs-URL – Enter the URL of the SQS in use for the central audit. For example (not a valid value for use),
https://sqs.us-west-2.amazonaws.com/123456789/new-trail-s3-file-from-snsS3Sqs-Region – Enter the SQS region. For example,
us-west-2.S3-Region – Enter the S3 bucket region name, from the S3 bucket used for the central CloudTrail. For example,
us-west-2.Access-Key – Enter the Access Key ID for the IAM user.
Secret-Key – Enter the Secret Access Key for the IAM user.
To confirm that the Exabeam Cloud Connector platform communicates with the service, click Test Connection.
Click Done to save your changes. The cloud connector is now set up on the Exabeam Cloud Connector platform.
To ensure that the connector is ready to send and collect data, Start the connector and check that the status shows
OK.