- Supported Cloud Connectors
- Armis Cloud Connector
- AWS Cloud Connector
- AWS Multi-Tenant Cloud Connector
- Azure Cloud Connector
- Azure Cloud Connector Overview
- Azure Audit Source and Event Support
- Prerequisites to Configure the Azure Cloud Connector
- Configure the Azure Cloud Connector
- Collect EventHub Information for Azure EventHub Endpoints
- Collect all Microsoft Defender ATP Events
- Configure Azure to Monitor Security Center Events in Azure VMs
- Bitglass Cloud Connector
- Box Cloud Connector
- Centrify Cloud Connector
- Cisco AMP for Endpoints Cloud Connector
- Cisco Meraki Cloud Connector
- Cisco Umbrella Cloud Connector
- Citrix ShareFile Cloud Connector
- Cloudflare Cloud Connector
- Code42 Incydr Cloud Connector
- CrowdStrike Falcon Cloud Connector
- Cybereason Cloud Connector
- CylanceProtect Cloud Connector
- Dropbox Business Cloud Connector
- Duo Security Cloud Connector
- Egnyte Cloud Connector
- Fidelis Cloud Connector
- GitHub Cloud Connector
- Google Cloud Platform (GCP) Cloud Connector
- Google Cloud Pub/Sub Cloud Connector
- Google Workspace (Formerly G Suite) Cloud Connector
- LastPass Enterprise Cloud Connector
- Mimecast Email Security Cloud Connector
- Netskope Cloud Connector
- Office 365 Cloud Connector
- Okta Cloud Connector
- OneLogin Cloud Connector
- Palo Alto Networks SaaS Security Cloud Connector
- Ping Identity Cloud Connector
- Proofpoint Cloud Connector
- Rapid7 InsightVM Cloud Connector
- Salesforce Cloud Connector
- SentinelOne Cloud Connector
- ServiceNow Cloud Connector
- Slack App Cloud Connector
- Slack Classic App Cloud Connector (Formerly known as Slack Enterprise Grid Cloud Connector)
- Snowflake Cloud Connector
- Sophos Central Cloud Connector
- Symantec CloudSOC Cloud Connector
- Symantec Endpoint Protection (SEP) Mobile Cloud Connector
- Symantec Email Security.cloud Cloud Connector
- Symantec WSS Cloud Connector
- Tenable.io Cloud Connector
- VMware Carbon Black Cloud Endpoint Standard Cloud Connector
- Workday Cloud Connector
- Zoom Cloud Connector
- Custom Cloud Connector
- Webhook Cloud Connector
Google Workspace (Formerly G Suite) Cloud Connector
Prerequisites to Configure the Google Workspace Cloud Connector
Before you begin:
Make sure a person with G Suite super-admin rights is present when onboarding the Google Workspace Cloud Connector.
Verify your Google Workspace edition is either Business or Enterprise. Your G Suite administrator can verify the edition type in the Billing tab of the Google Apps admin console (https://admin.google.com). For more about the Google Apps for Work editions go to: https://apps.google.com/intx/en/pricing.html.
Enable API access. This should be done by a G Suite administrator. The administrator can go to Security > API reference in the Google Apps admin console.
Choose and set up your authentication method, either OAuth2 or a service account.
OAauth2 authentication – With this method, a G Suite administrator must assist with the Google Workspace Cloud Connector onboarding process. See Enable Access for the Exabeam Cloud Connectors.
Service account authentication – With this method, the G Suite administrator will be asked to prepare an authorization file for use during the connector configuration. See Authorize the Google Workspace Cloud Connector to Retrieve Events.
(Optional) Enable Collection of Gmail Logs – Requires Google Workspace Enterprise edition; Education Standard or Plus.
Enable Access for the Exabeam Cloud Connectors
For OAuth2 authentication, allow access to the entire.skyformation.net addresses over SSL from the desktop which will be used by the Google Apps admin to onboard the Google Apps Cloud Connector (only needed for the on-boarding process). To validate:
Open a browser to https://auth.skyformation.net.
Verify that you can reach this URL and get the following message (403 status).
Authorize the Google Workspace Cloud Connector to Retrieve Events
For Service-Account authentication, a G Suite administrator will need to create a file (called Service-Credentials-Json) that authorizes the Google Workspace Cloud Connector (or anyone else who possess it) to communicate with the G Suite account and retrieve relevant logs, events and data for the security monitoring.
To create the Service-Credentials-Json JSON file, ask the G Suite administrator to follow the instructions at Create a Service-Credentials-Json File for the Google Workspace Cloud Connector.
Use your preferred secured method of transport to send the JSON file to the Exabeam Cloud Connectors administrator that will configure the Google Workspace Cloud Connector.
Create a Service-Credentials-Json File for the Google Workspace Cloud Connector
If you use the service-account authentication method, you need to set up communication between the cloud connector and the G-Suite account. To facilitate communication and enable to retrieve audit events, you must create a service-credentials-json file.
Note
To use the service account you are required to have a Domain-Wide Delegation of Authority. Since you need this delegation of authority to read reports about admin activity, the user, whose authority is being used, must have super-admin privileges to view admin report activity and read user and groups information. The service account is still bound by the permissions granted and thus cannot perform any action other than read access on the specified scopes.
To create the JSON file, review the video or use the following workflow:
Log in to the Google Developers Console with an account that has super-admin permissions.
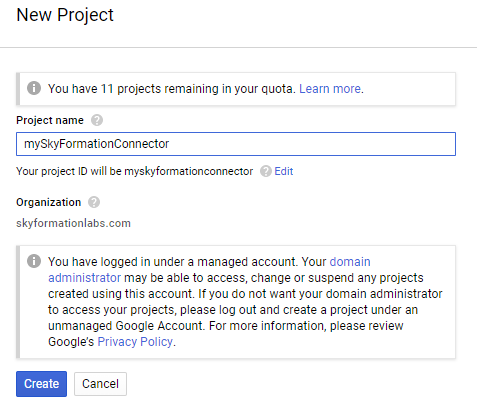
Create a new project by doing one of the following:
If you haven't used the Developers Console before, agree to the Google Cloud Platform Terms of Service. Then, click Create a project.
At the top of the screen next to your most recent project name, click the down arrow to open your projects list. Then, Create a new project.
Enter a project name and click Create.

Enable the Admin SDK API.
Each project uses its own set of APIs. For the Google Workspace Cloud Connector to be able to use the service-account authentication method, you must enable the Admin SDK API to the just added project.
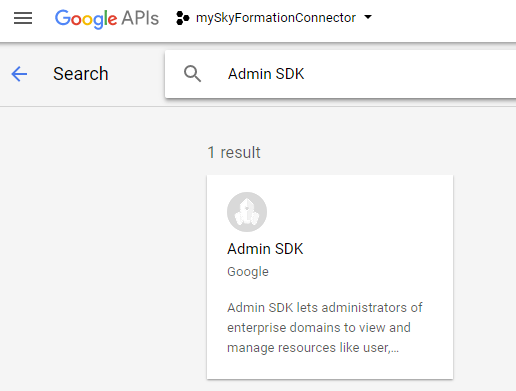
ENABLE APIS AND SERVICES in the project context to display the API Library Search.

In the search field, enter
Admin SDK API.
Create the service account.
In the top-left corner of the console, click Menu.
Click IAM & Admin.
Click Create service account and in the Service account name field, enter a name for the service account.
Select the Furnish a new private key box and ensure the key type is set to JSON.
Select the Enable Domain-wide Delegation box and enter a name in the Product name for the consent screen field.
Click Create. You'll see a message that the service account JSON file has been downloaded to your computer.
Encrypt and send the JSON file to Exabeam Support using a secure transport method.
Click Close.
In the Options column, click the View Client ID link for the service account you have just created.
Copy the Client ID value. You will need this later.
Set the needed API permission scope.
Open the admin console.
Go to Security > Advanced settings > Manage API client access.
In the upper raw, in the Client Name field, enter:
Under Client Name, insert the Client ID saved during the previous step (you can also see it in the JSON file created under client_id key).
Under the One or More API Scopes field, enter the below API scopes (copy and paste to keep the comma separation in place).
For Exabeam to only read events:
https://www.googleapis.com/auth/admin.directory.group.readonly,https://www.googleapis.com/auth/admin.directory.user.readonly,https://www.googleapis.com/auth/admin.directory.rolemanagement.readonly,https://www.googleapis.com/auth/admin.directory.orgunit.readonly,https://www.googleapis.com/auth/admin.reports.audit.readonly,https://www.googleapis.com/auth/admin.reports.usage.readonly,https://www.googleapis.com/auth/apps.alerts
You should see a screen similar to the below:

(Optional) Enable Collection of Gmail Logs
To enable collection of Gmail logs, you must have Google Workspace Enterprise edition; Education Standard or Plus. To make changes to permissions and roles, you must also have super-admin access.
Set up service log exports to Workspace BigQuery because Google has merged Gmail logs in BigQuery with Workspace logs and reports in BigQuery.
Create a service account in the BigQuery project created.
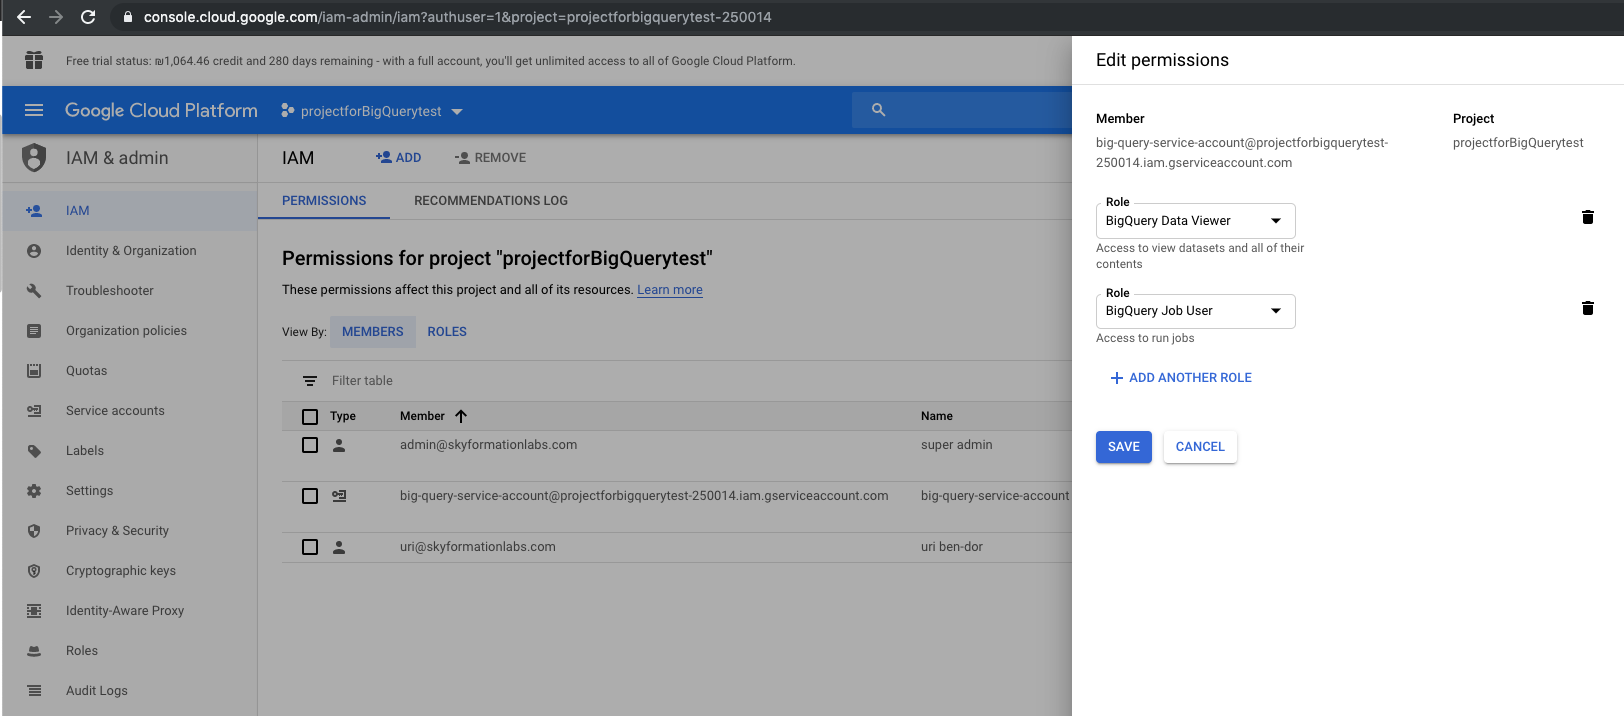
Assign the BigQuery Data Viewer and the BigQuery Job User roles to the service account.
From the GCP Admin console, select project > IAM, and then select a service account > edit permissions.

Create a JSON key for the service account.
Configure the Google Workspace Cloud Connector
G Suite also known as Google Workspace offers a wide range of cloud computing, collaboration and productivity, and business and collaboration tools including a set of office applications, such as Calendar, Meet, Chat, Drive, Docs, Gmail, Sheets, Slides, Forms, and Sites. For more information visit their website.
The following table displays audit source API and security events supported by the connector.
Endpoint | Audit Source: API | Event Included | Notes |
|---|---|---|---|
Login | applicationName=login | ||
Admin | applicationName=admin | ||
Drive | applicationName=drive | ||
Token | applicationName=token | ||
Mobile | applicationName=mobile | ||
Calendar | applicationName=calendar | ||
Groups | applicationName=groups | ||
GPlus | applicationName=gplus | ||
Rules | applicationName=rules | ||
SAML | applicationName=saml | ||
Gmail Logs |
To configure the G Suite connector to import data into the Exabeam Cloud Connector platform:
Complete the Prerequisites to Configure the Google Workspace Cloud Connector.
Log in to the Exabeam Cloud Connectors platform with your registered credentials.
Navigate to Settings > Accounts > Add Account.
Click Select Service to Add, then select Google Apps from the list.
In the Accounts section, enter the required information. Required fields are indicated with a red bar.
Tenant – Select a tenant to attach to the connector if you are using a multi-tenant edition of Exabeam. Otherwise, select default.
Account Name – Specify a name for the Google Apps G Suite connector. For example, Corporate Google business and collaboration platform.
Description – Describe the G Suite connector (optional). For example, Google cloud computing, business, and collaboration tools with office applications.
Authentication Method – Select the authentication method.
If you select the authentication method OAuth2, click the OPEN External OAUTH Window button for External Authentication.
The G Suite super administrator must authenticate and grant a set of view OAuth scopes to Exabeam.
After the G Suite super administrator allows authorization, G Suite provides and authorization code for Exabeam’s authorization endpoint auth.skyformation.net. The client uses the authorization code to get an access token used by the connector.
If you select service account, enter the following information.
Service Credentials Json – Enter the JSON key that you obtained while completing prerequisites.
Admin Username – Enter the user name of the administrator user who created the service account.
API-Scopes – Retain the default value for API Scopes. Ensure that the default set of scopes is the set that was assigned to the service account in the G Suite admin console.
Endpoint Gmail Logs – Enter the following information.
Service Credentials Json – Enter the JSON key for the BigQuery service account which you obtained while completing prerequisites.
BigQuery Columns to select – Retain the default value ALL.
BigQuery Dataset Name – Enter the BigQuery dataset name.
Initial Sync Hours From Now – Retain the default value 24 hours.
To confirm that the Exabeam Cloud Connector platform communicates with the service, click Test Connection.
Click Done to save your changes. The cloud connector is now set up on the Exabeam Cloud Connector platform.
To ensure that the connector is ready to send and collect data, Start the connector and check that the status shows
OK.
