- Supported Cloud Connectors
- Armis Cloud Connector
- AWS Cloud Connector
- AWS Multi-Tenant Cloud Connector
- Azure Cloud Connector
- Azure Cloud Connector Overview
- Azure Audit Source and Event Support
- Prerequisites to Configure the Azure Cloud Connector
- Configure the Azure Cloud Connector
- Collect EventHub Information for Azure EventHub Endpoints
- Collect all Microsoft Defender ATP Events
- Configure Azure to Monitor Security Center Events in Azure VMs
- Bitglass Cloud Connector
- Box Cloud Connector
- Centrify Cloud Connector
- Cisco AMP for Endpoints Cloud Connector
- Cisco Meraki Cloud Connector
- Cisco Umbrella Cloud Connector
- Citrix ShareFile Cloud Connector
- Cloudflare Cloud Connector
- Code42 Incydr Cloud Connector
- CrowdStrike Falcon Cloud Connector
- Cybereason Cloud Connector
- CylanceProtect Cloud Connector
- Dropbox Business Cloud Connector
- Duo Security Cloud Connector
- Egnyte Cloud Connector
- Fidelis Cloud Connector
- GitHub Cloud Connector
- Google Cloud Platform (GCP) Cloud Connector
- Google Cloud Pub/Sub Cloud Connector
- Google Workspace (Formerly G Suite) Cloud Connector
- LastPass Enterprise Cloud Connector
- Mimecast Email Security Cloud Connector
- Netskope Cloud Connector
- Office 365 Cloud Connector
- Okta Cloud Connector
- OneLogin Cloud Connector
- Palo Alto Networks SaaS Security Cloud Connector
- Ping Identity Cloud Connector
- Proofpoint Cloud Connector
- Rapid7 InsightVM Cloud Connector
- Salesforce Cloud Connector
- SentinelOne Cloud Connector
- ServiceNow Cloud Connector
- Slack App Cloud Connector
- Slack Classic App Cloud Connector (Formerly known as Slack Enterprise Grid Cloud Connector)
- Snowflake Cloud Connector
- Sophos Central Cloud Connector
- Symantec CloudSOC Cloud Connector
- Symantec Endpoint Protection (SEP) Mobile Cloud Connector
- Symantec Email Security.cloud Cloud Connector
- Symantec WSS Cloud Connector
- Tenable.io Cloud Connector
- VMware Carbon Black Cloud Endpoint Standard Cloud Connector
- Workday Cloud Connector
- Zoom Cloud Connector
- Custom Cloud Connector
- Webhook Cloud Connector
Cloudflare Cloud Connector
Prerequisites to Configure the Cloudflare Cloud Connector
Before you configure the Cloudflare Cloud Connector you must complete the following prerequisites:
Create a Cloudflare account with the required permissions
Obtain a Global API Key for the basic authentication method and for obtaining the organization name
Obtain the organization name required for the authentication method that you select: basic or token
Obtain a Global API Key
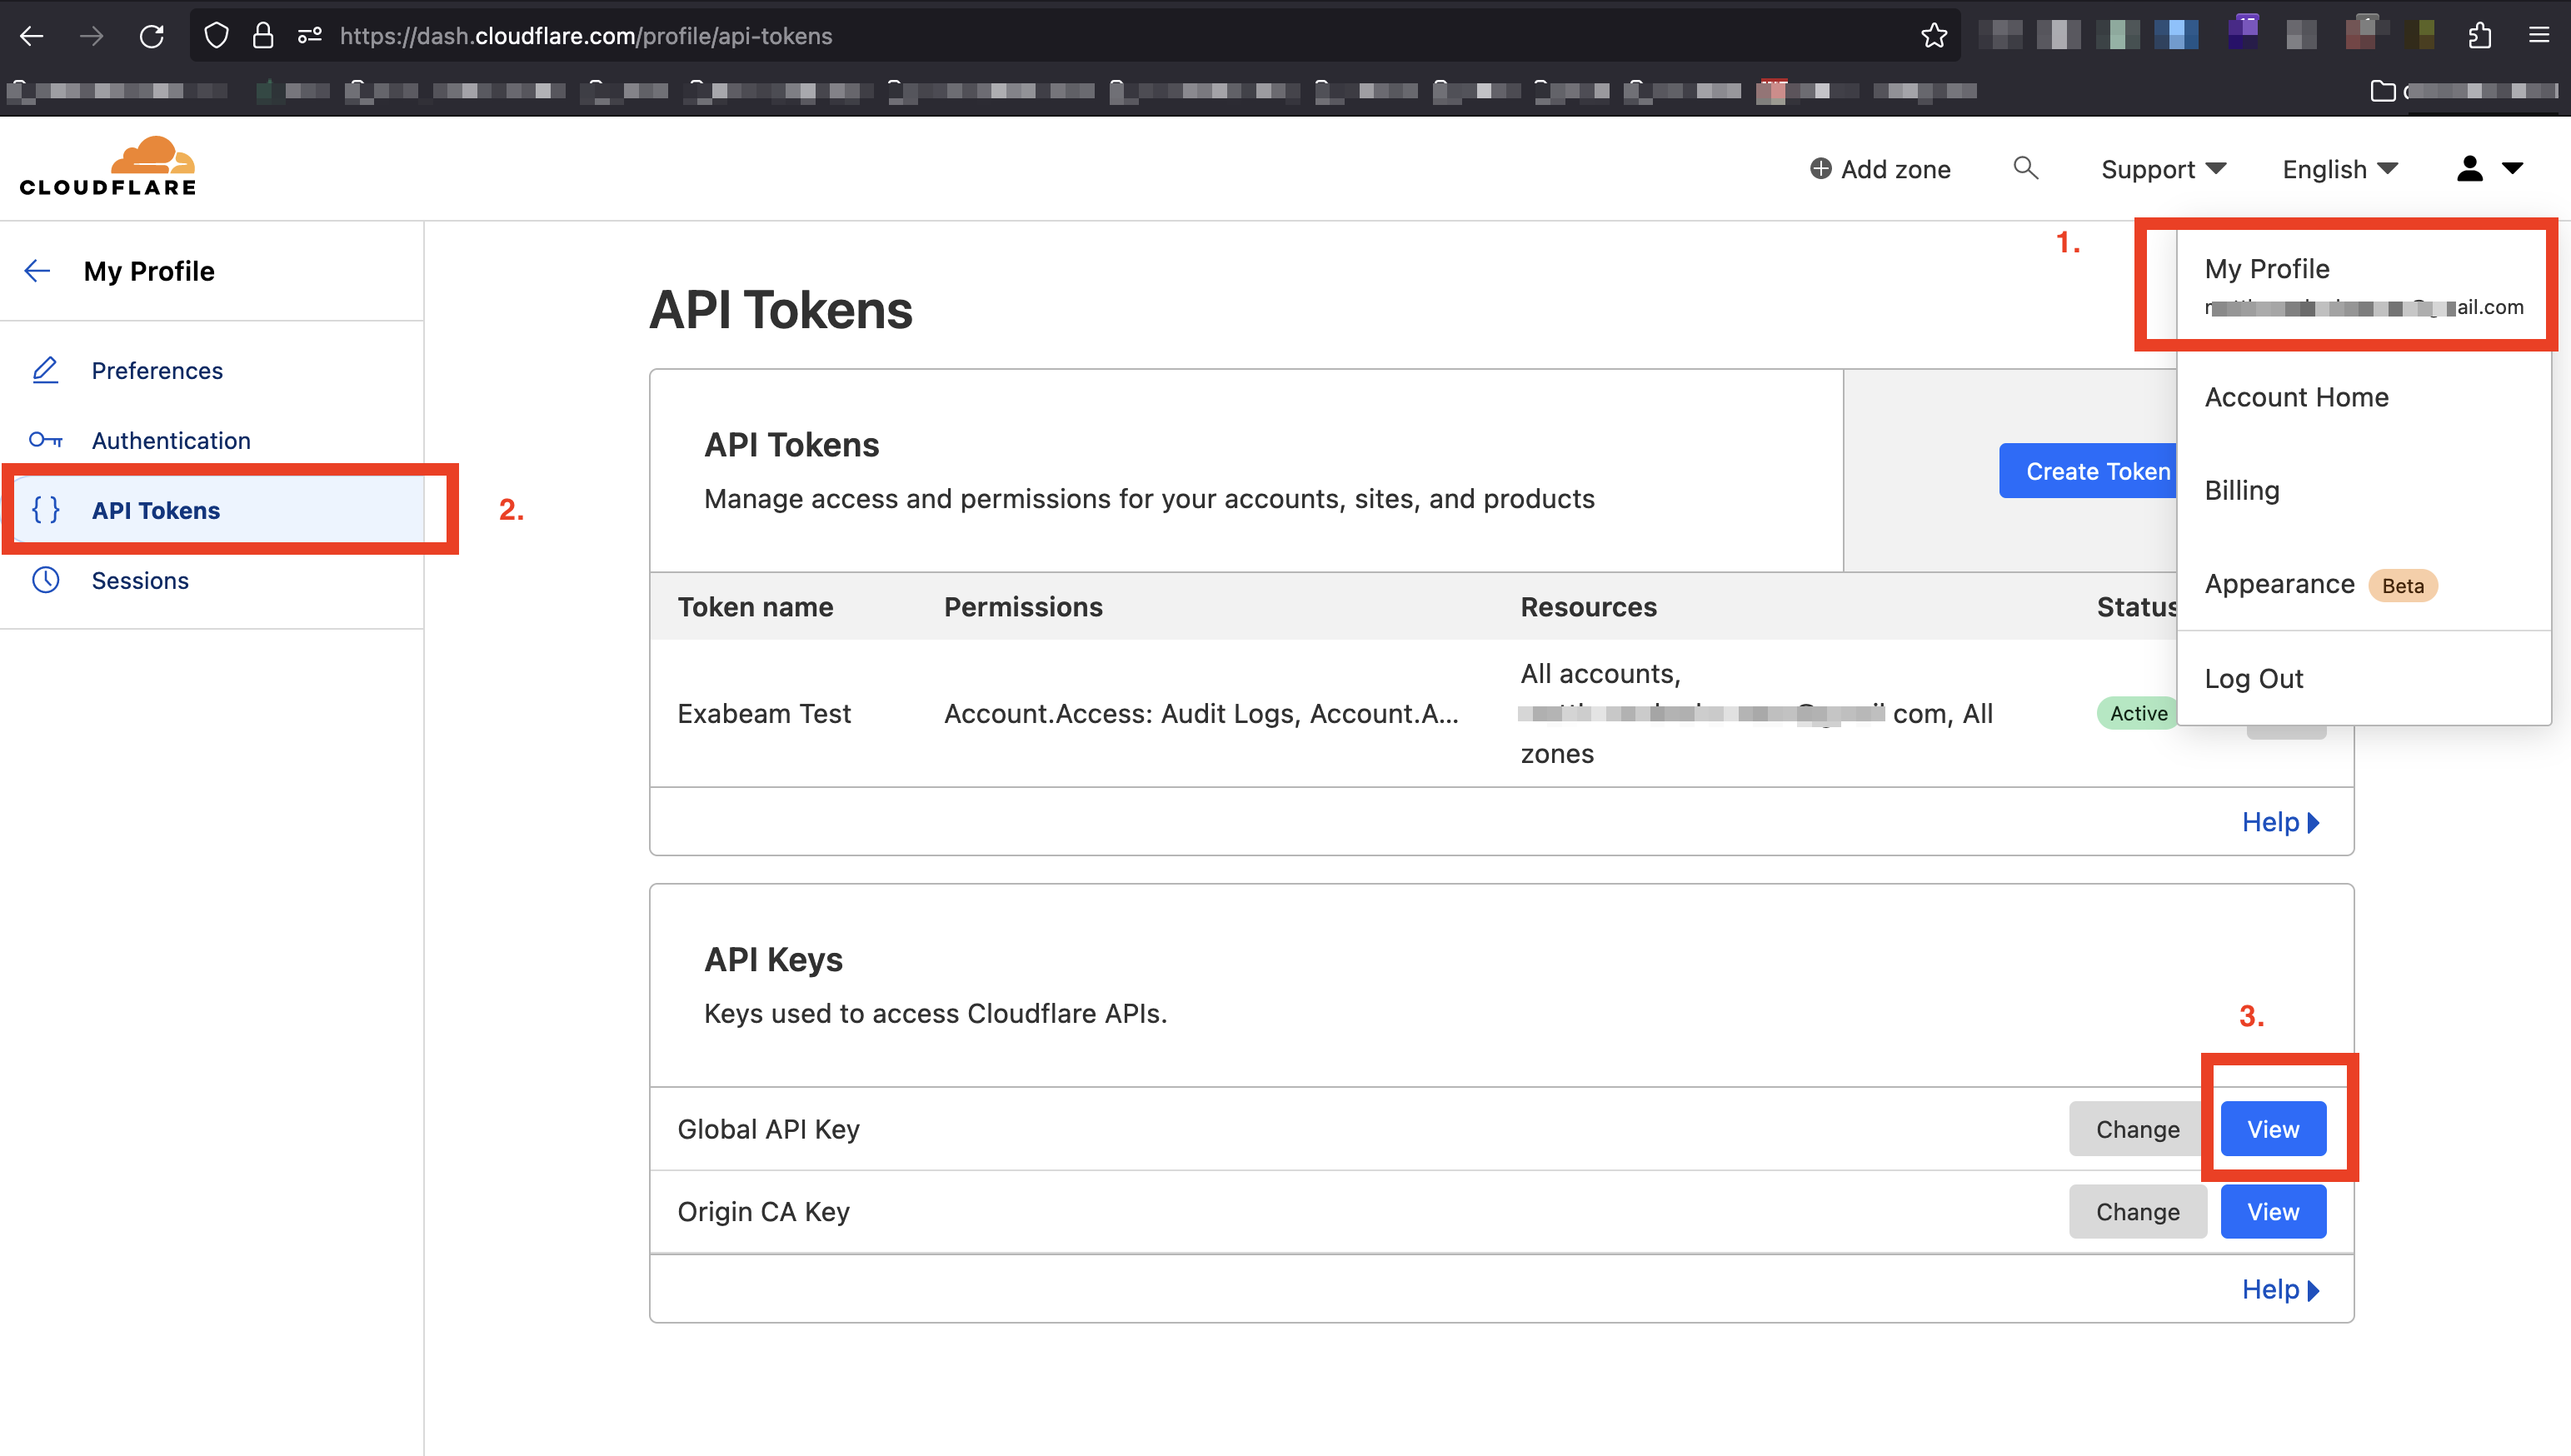
To use the Cloudflare API, an API token or an API key to authenticate the source of the API request is required. For more information, see the Cloudflare API documentation. To obtain the Global API Key, refer to the Cloudflare User Profile section in the API Tokens page. The Global API Key is required for configuring the cloud connector via basic authentication method, and for obtaining the organization name. For more information, see Get Global API Key in the Cloudflare documentation.

Obtain the Organization Name
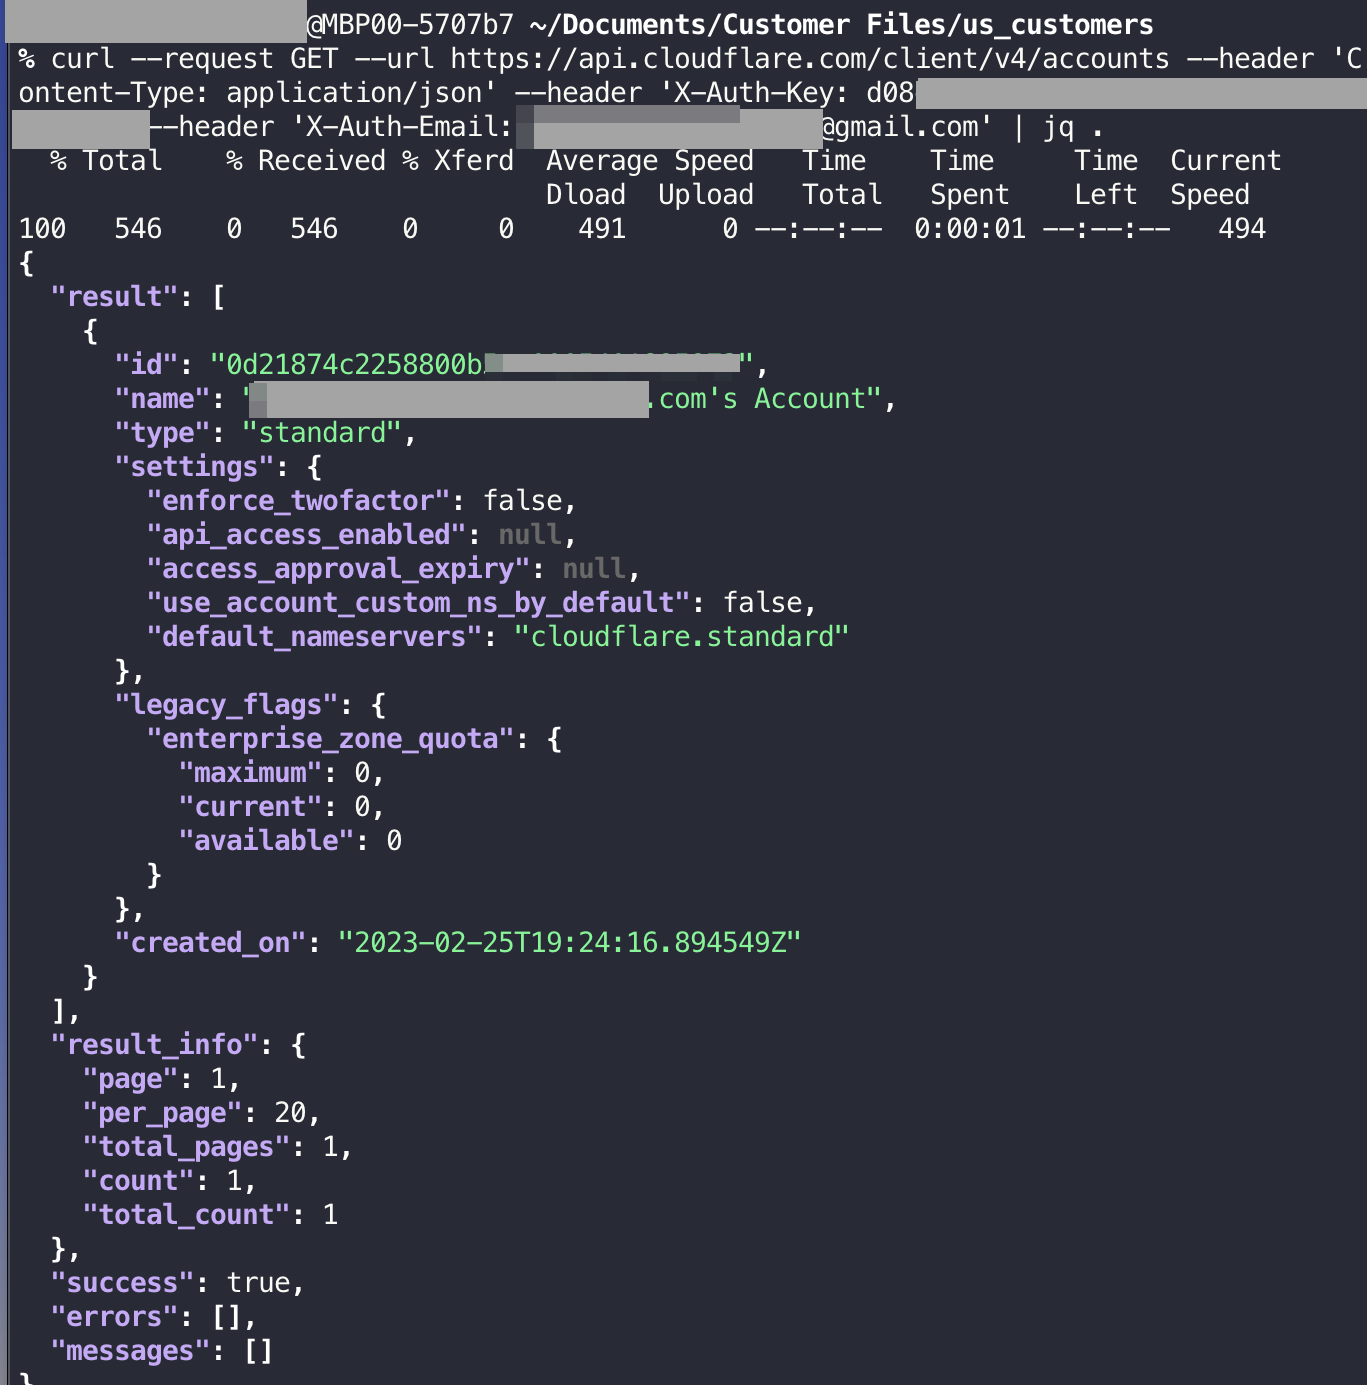
To find your organization name, run the following curl command using a curl tool. Enter the Global API Key in the curl command as the X-Auth-Key and the email associated with the Cloudflare account as the X-Auth-Email.
curl --request GET --url https://api.cloudflare.com/client/v4/accounts --header 'Content-Type: application/json' --header 'X-Auth-Key: <global_auth_key> --header 'X-Auth-Email: <email_address>'

The organization name is the value of the name field in the returned JSON object. After you obtain the organization name by running the curl command, proceed to:
Set up the Cloudflare Cloud Connector, using the steps to Configure the Cloudflare Cloud Connector, if you want to use the basic authentication method.
Obtain the API token that has restricted permissions, if you want to use the more secure and recommended token authentication method. Then, Configure the Cloudflare Cloud Connector.
Obtain an API Token
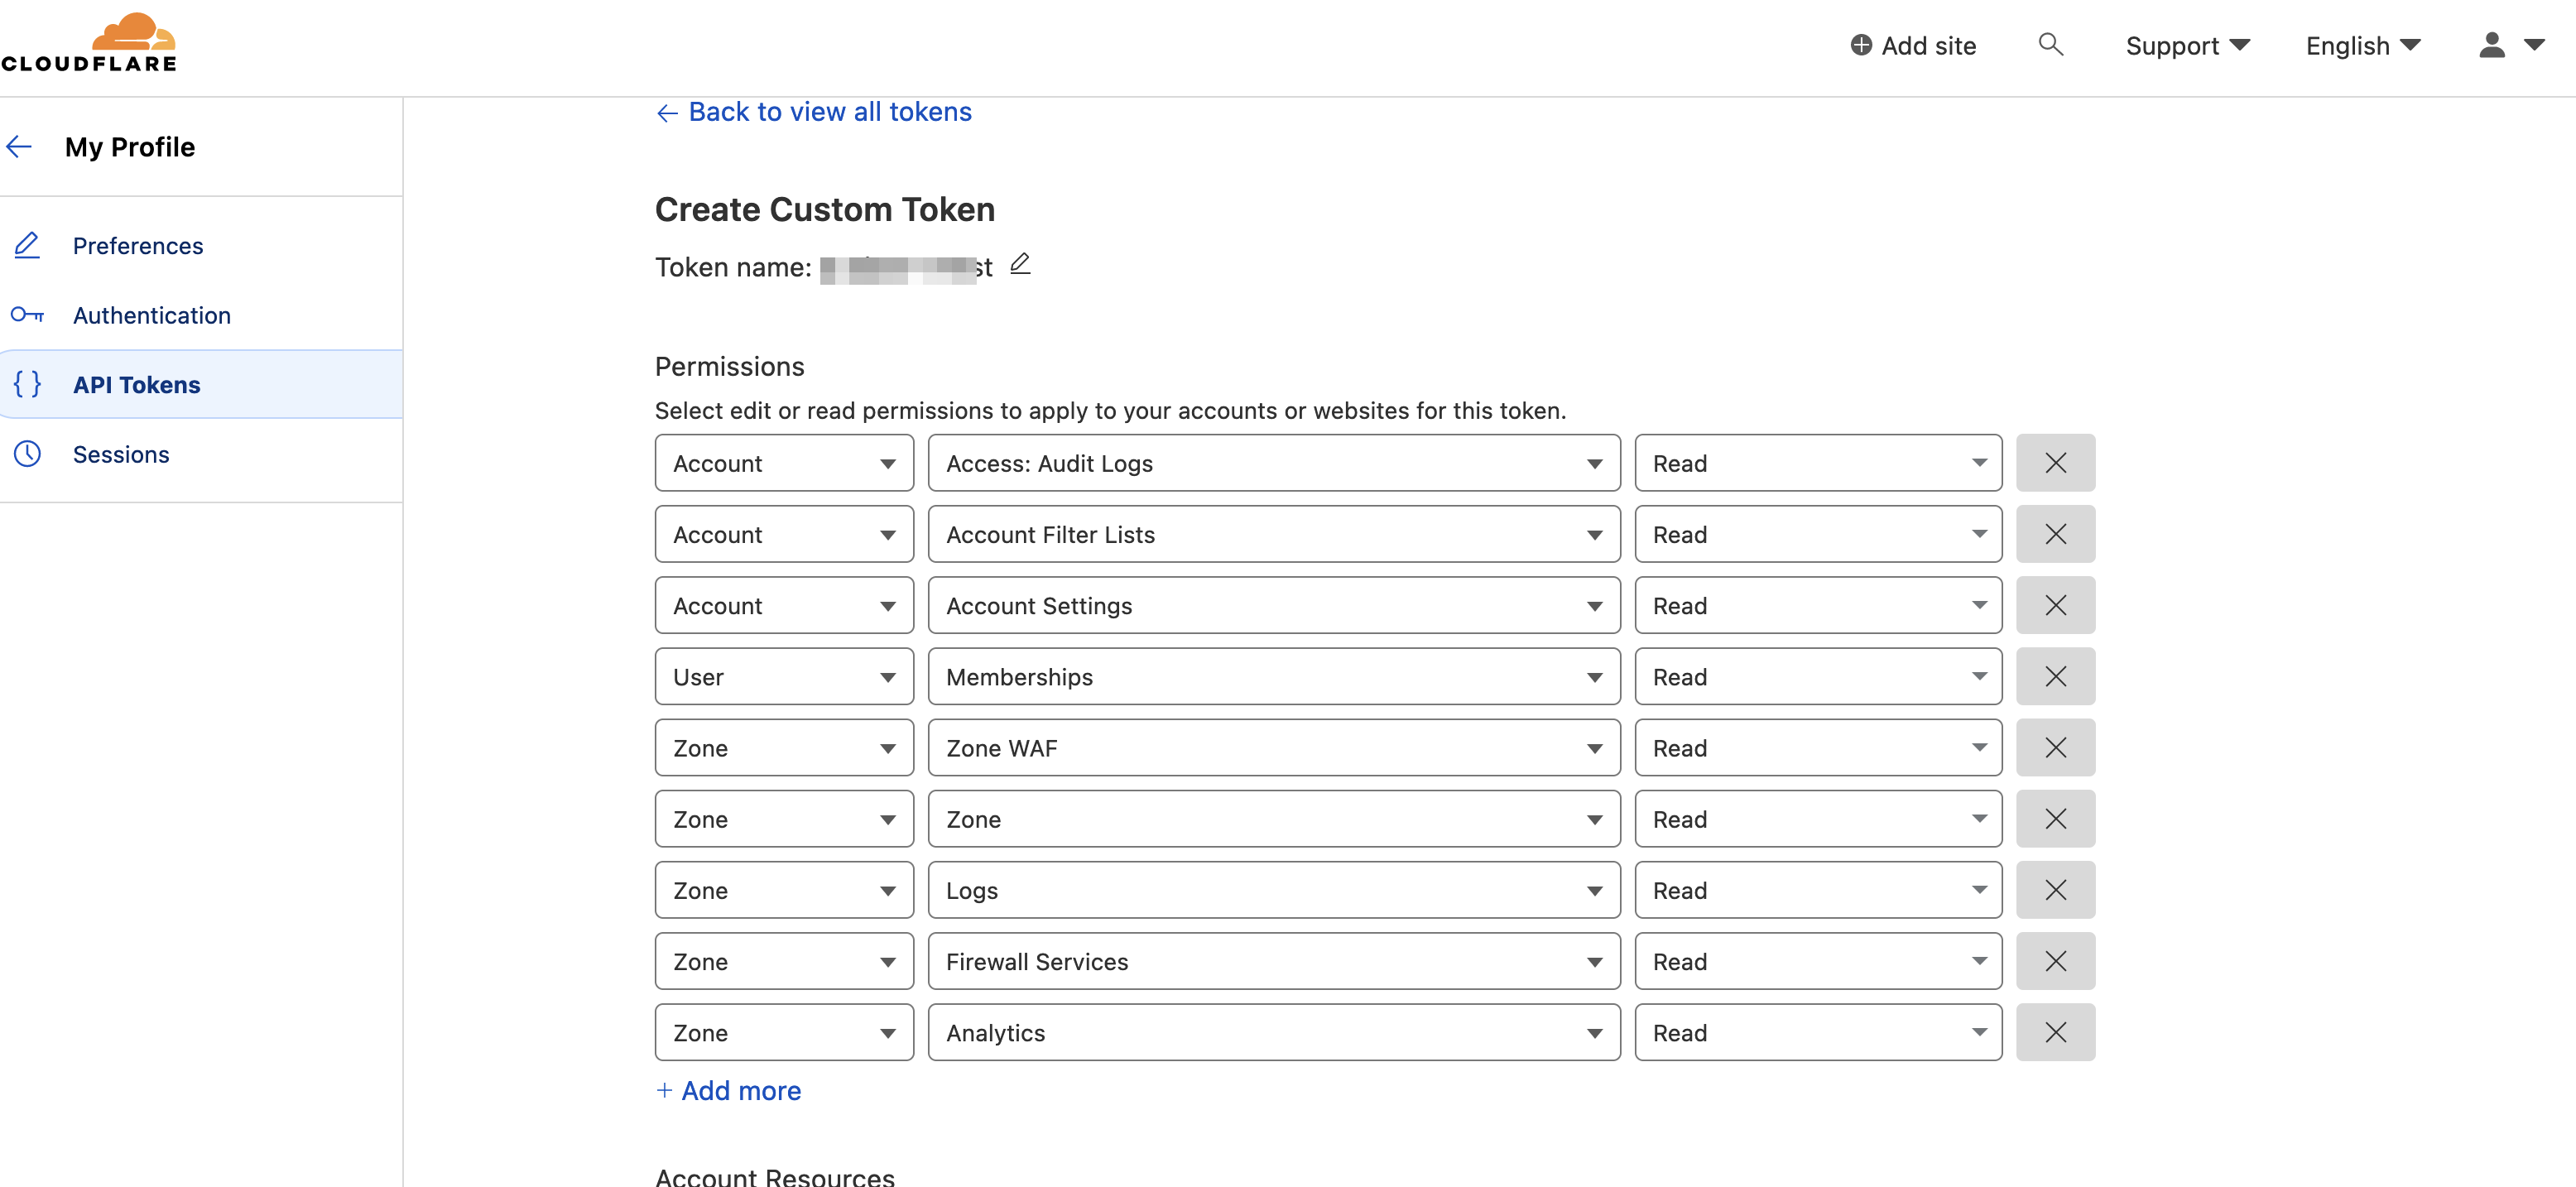
To create an API token with the following required permissions, see the Cloudflare Documentation. Cloudflare limits the API calls for an account. To add Cloudflare to the Exabeam platform, create a new Cloudflare account with the following required permissions. For more information about permissions, see API token permissions.
All Accounts
Access: Audit Logs: Read
Account Filter List: Read
Account Settings: Read
All Zones
Zone: Read
Logs: Read
Firewall Services: Read
Zone WAF: Read
Zone Analytics: Read
All Users
Memberships: Read

Add the new account that you created to your organization’s account in Cloudflare. If you have the Cloudflare enterprise plan, set up a multi-user account. For more information, see the Cloudflare Documentation.
Enable the Retention Policy
For Cloudflare to retrieve events from the CDN logs endpoint, enable the retention policy for each of the zones. For the procedure to enable the retention policy, see the Cloudflare Documentation.
Configure the Cloudflare Cloud Connector
Cloudflare, a web infrastructure and website security company, provides content delivery network services to protect against cyber threats such as SQL injection and identity theft. Cloudflare secures websites, APIs, applications, and internal resources. Cloudflare security solutions offer a suite of products that offers firewall, IOT security, bot management, DDoS protection, and internet security. For more information visit their website.
The following table displays audit source API and security events supported by the connector.
Audit Source: API | Service or Module and Events |
|---|---|
Account audit logs | Provides audit logs for the account events such as sign-ins, account members and role changes, account setting changes, API token creation, revoke and view, MFA enablement and disablement. Provides audit logs for zones in the account such as zone add, zone remove, firewall rule add, firewall rule remove, route add, and route remove. |
CDN logs | Provides logs that contain data related to the connecting client, the request path through the Cloudflare network, and the response from the origin web server, for each zone. |
Firewall events | Provides comprehensive firewall events per requests including detailed information. |
To configure the Cloudflare Cloud Connector to import data into the Exabeam Cloud Connector platform:
Complete the Prerequisites to Configure the Cloudflare Cloud Connector.
Log in to the Exabeam Cloud Connectors platform with your registered credentials.
Navigate to Settings > Accounts > Add Account.
Click Select Service to Add, then select Cloudflare from the list.
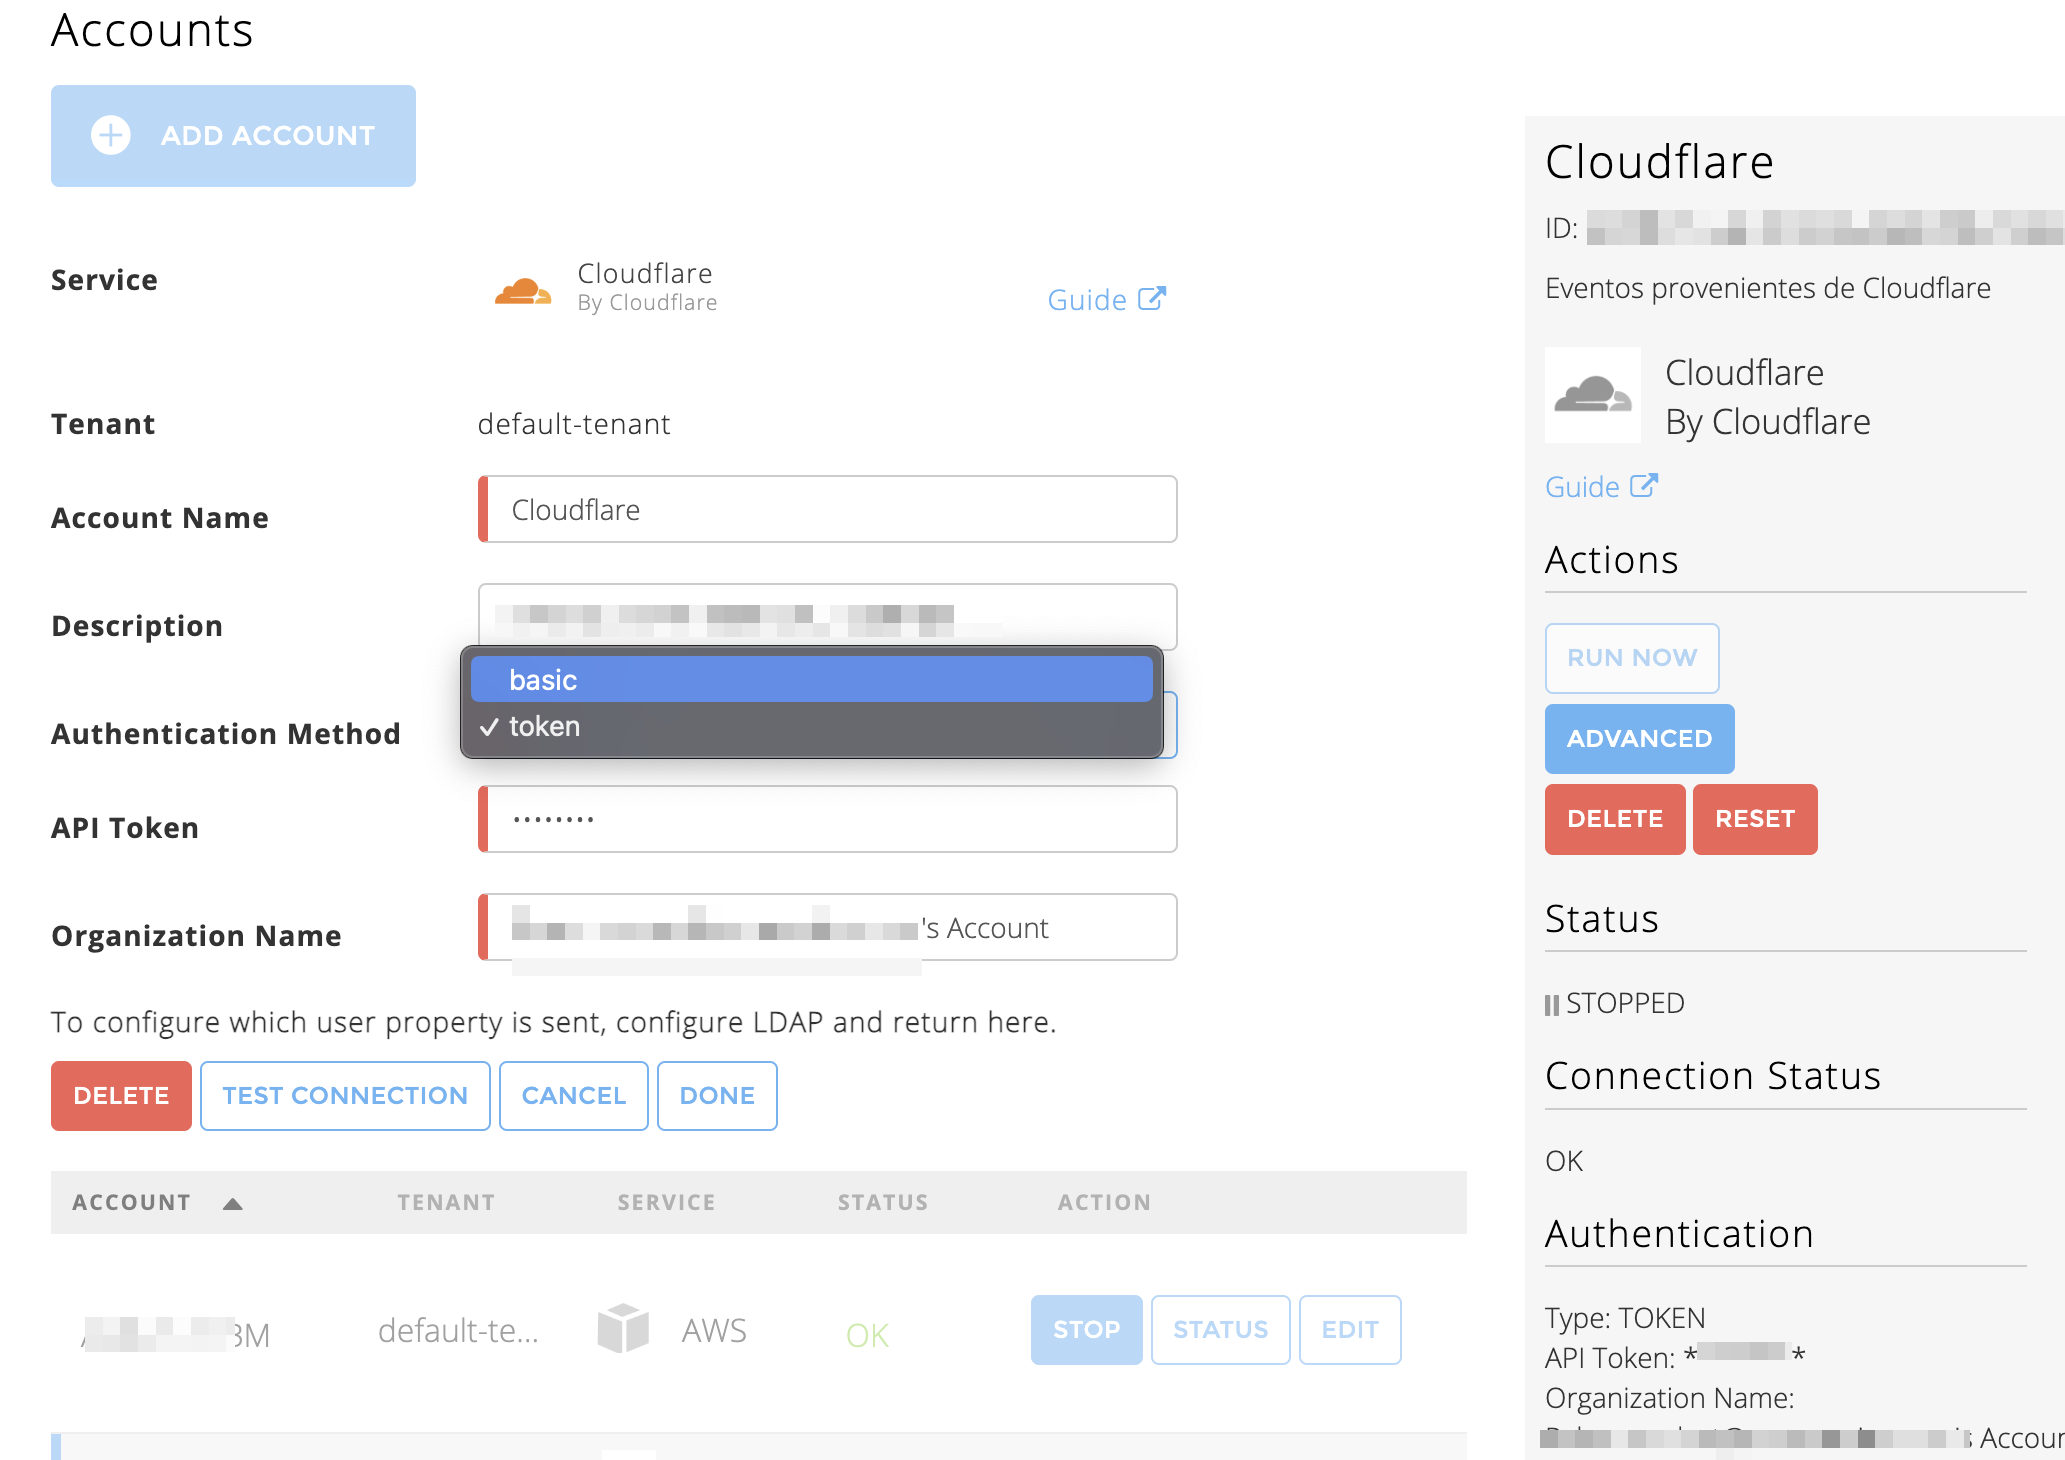
In the Accounts section, enter the required information. Required fields are indicated with a red bar.
Tenant – Select a tenant to attach to the connector if you are using a multi-tenant edition of Exabeam. Otherwise, select default.
Account Name – Specify a name for the Cloudflare connector. For example, Cloudflare_ web_security.
Description – Describe the Cloudflare connector (optional). For example, Cloudflare content delivery network services to protect against cyber threats.
Authentication Method – Select basic or token.

If you select the basic authentication method, enter the required information for the following fields.
Email Address – Enter the email address that you obtained while completing prerequisites.
API Global Token – Enter the API Global Key that you obtained while completing prerequisites.
Organization Name – Enter the name of your organization that you obtained while completing prerequisites.
If you select the token authentication method, enter the required information for the following fields.
API Token – Enter the API token that you obtained while completing prerequisites.
Organization Name – Enter the name of your organization that you obtained while completing prerequisites.
To confirm that the Exabeam Cloud Connector platform communicates with the service, click Test Connection.
Click Done to save your changes. The cloud connector is now set up on the Exabeam Cloud Connector platform.
To ensure that the connector is ready to send and collect data, Start the connector and check that the status shows
OK.
