- Supported Cloud Connectors
- Armis Cloud Connector
- AWS Cloud Connector
- AWS Multi-Tenant Cloud Connector
- Azure Cloud Connector
- Azure Cloud Connector Overview
- Azure Audit Source and Event Support
- Prerequisites to Configure the Azure Cloud Connector
- Configure the Azure Cloud Connector
- Collect EventHub Information for Azure EventHub Endpoints
- Collect all Microsoft Defender ATP Events
- Configure Azure to Monitor Security Center Events in Azure VMs
- Bitglass Cloud Connector
- Box Cloud Connector
- Centrify Cloud Connector
- Cisco AMP for Endpoints Cloud Connector
- Cisco Meraki Cloud Connector
- Cisco Umbrella Cloud Connector
- Citrix ShareFile Cloud Connector
- Cloudflare Cloud Connector
- Code42 Incydr Cloud Connector
- CrowdStrike Falcon Cloud Connector
- Cybereason Cloud Connector
- CylanceProtect Cloud Connector
- Dropbox Business Cloud Connector
- Duo Security Cloud Connector
- Egnyte Cloud Connector
- Fidelis Cloud Connector
- GitHub Cloud Connector
- Google Cloud Platform (GCP) Cloud Connector
- Google Cloud Pub/Sub Cloud Connector
- Google Workspace (Formerly G Suite) Cloud Connector
- LastPass Enterprise Cloud Connector
- Mimecast Email Security Cloud Connector
- Netskope Cloud Connector
- Office 365 Cloud Connector
- Okta Cloud Connector
- OneLogin Cloud Connector
- Palo Alto Networks SaaS Security Cloud Connector
- Ping Identity Cloud Connector
- Proofpoint Cloud Connector
- Rapid7 InsightVM Cloud Connector
- Salesforce Cloud Connector
- SentinelOne Cloud Connector
- ServiceNow Cloud Connector
- Slack App Cloud Connector
- Slack Classic App Cloud Connector (Formerly known as Slack Enterprise Grid Cloud Connector)
- Snowflake Cloud Connector
- Sophos Central Cloud Connector
- Symantec CloudSOC Cloud Connector
- Symantec Endpoint Protection (SEP) Mobile Cloud Connector
- Symantec Email Security.cloud Cloud Connector
- Symantec WSS Cloud Connector
- Tenable.io Cloud Connector
- VMware Carbon Black Cloud Endpoint Standard Cloud Connector
- Workday Cloud Connector
- Zoom Cloud Connector
- Custom Cloud Connector
- Webhook Cloud Connector
Slack App Cloud Connector
Slack Enterprise Grid is a platform for all workplace collaboration that helps organizations collaborate across workspaces. Using Slack, teams can communicate, share files from other services, and work on those files together. Slack connects multiple interconnected workspaces. For more information see the Slack Documentation.
Prerequisites to Configure the Slack App Cloud Connector
Before you configure the Slack App Cloud Connector, you must obtain the values for client ID and client secret by creating a Slack app for integration.
Obtain Client ID and Secret by Creating a Slack App
Slack APIs are authenticated via client ID and client secret. You must create a Slack app to obtain the values for client ID and client secret to use while configuring the Slack connector.
To create a Slack app:
Log in to Slack Enterprise Grid, and access https://api.slack.com/apps.
Click Create New App.
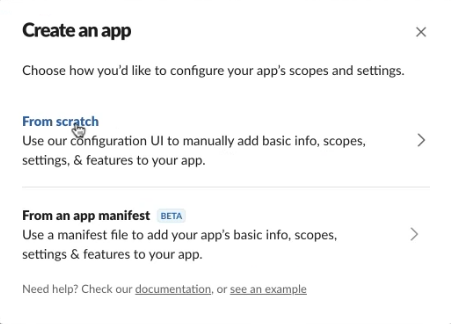
In the Create an app section, click From scratch.

Specify a name for the app, select the Slack workspace to which the app belongs, and click Create App.
Navigate to OAuth & Permissions page.
Click Add New Redirect URL and enter https://auth.skyformation.net/v1/oauth in the Redirect URLs box.
Click Add, then click Save URLs.
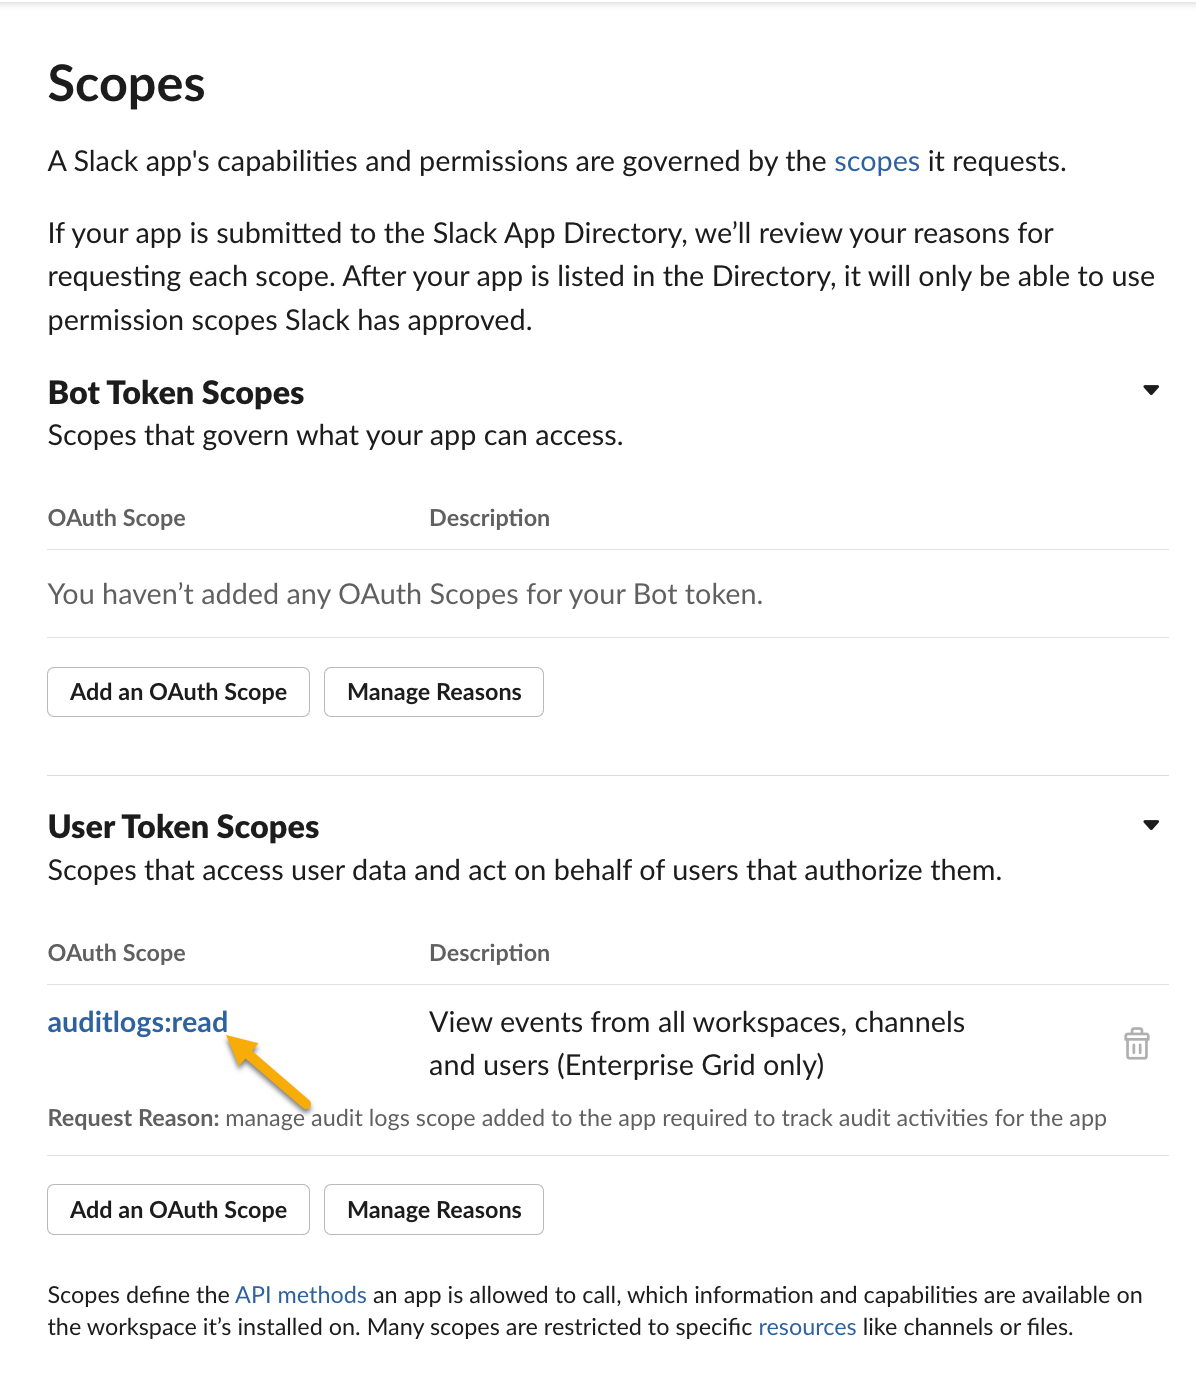
Scroll down to the Scopes section.
In the User Token Scopes section, select the scope auditlogs:read as this permission is required to allow interaction with the Audit Log API.

Click Save Changes.
In the left pane, navigate to Settings > Basic Information.
In the Basic Information section, click Manage Distribution.
Click Distribute App.
In the Share Your App with Other Workspaces section, click Remove Hard Coded Information.
Note
In the Share Your App with Other Workspaces section, ensure that you select the check boxes for all the available options such as Enable Features & Functionality, Add OAuth Redirect URLs, and Use HTTPS For Your Features.
Select the I've reviewed and removed any hard-coded information check box.
Click Activate Public Distribution.
Initiate the OAuth handshake that will install the app:
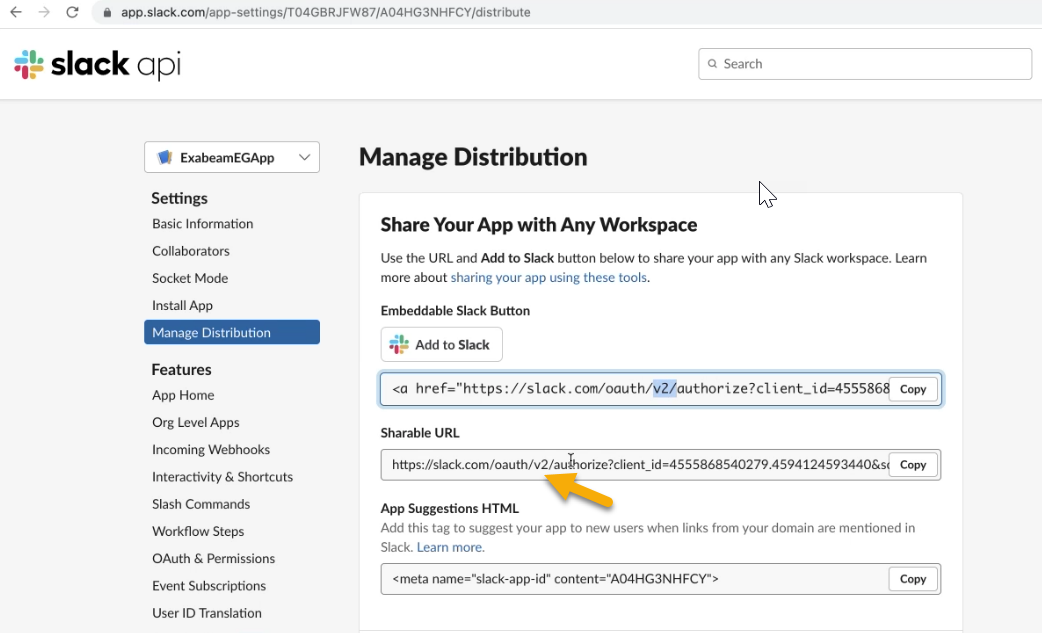
In Share Your App with Your Workspace, copy the Sharable URL and paste it into a browser to on your organization.
You must be logged in as the Owner of your Enterprise Grid organization to install the app.
Verify the dropdown in the upper right of the installation screen to make sure you are installing the app on the Enterprise Grid organization, not an individual workspace within the organization.
After your app completes the OAuth flow, you will be granted an OAuth token that you can use to call all of the Audit Logs API methods for your organization.
For more information, see the Slack documentation.
In the left pane, navigate to Basic Information > App Credentials.
Copy the values for Client ID and Client Secret to use for authorizing the API calls. Use these values, represented by a string of letters and numbers, to configure the Slack cloud connector.
Note
If the app authorization URL or shareable URL in the Manage Distribution section displays v2, proceed to configure the Slack App Cloud Connector. If you do not see the version v2, in the URL, proceed to configure the Slack Classic App Cloud Connector.

Configure the Slack App Cloud Connector
Slack Enterprise Grid is a platform for all workplace collaboration that helps organizations collaborate across workspaces. Using Slack, teams can communicate, share files from other services, and work on those files together. Using the messaging and collaboration tool, users can get connected through search, direct messaging, a directory, and conversation channels for various groups, topics, and projects. Slack connects multiple interconnected workspaces. For more information see the Slack Documentation.
The following table displays the audit source API and security events supported by the connector.
Audit Source: API | Service or Module Covered | Event Included |
|---|---|---|
All | Monitor what's happening in your Slack Enterprise Grid organization. |
To configure the Slack App Cloud Connector to import data into the Exabeam Cloud Connector platform:
Complete the Prerequisites to Configure the Slack App Cloud Connector.
Log in to the Exabeam Cloud Connectors platform with your registered credentials.
Navigate to Settings > Accounts > Add Accounts.
Click Select Service to Add, then select Slack from the list.

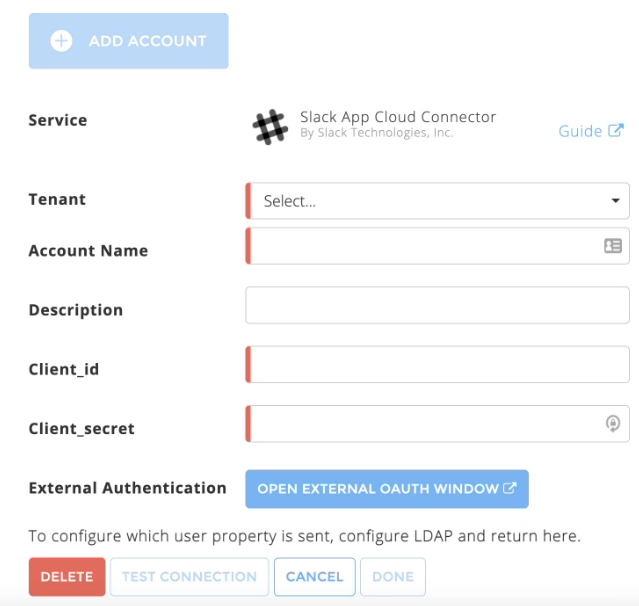
In the Accounts section, enter the required information. Required fields are indicated with a red bar.
Tenant – Select a tenant to attach to the connector if you are using a multi-tenant edition of Exabeam. Otherwise, select default.
Account Name – Specify a name for the Slack connector. For example, Slack collaboration.
Description – (Optional) Describe the Slack connector. For example, Slack, a platform to collaborate across workspaces.
Client-ID – Enter the value for client ID that you obtained while completing prerequisites.
Client-Secret – Enter the value for client secret that you obtained while completing prerequisites.
External Authentication – Click the Open External OAuth Window to log in to the Slack account that you used to create the Slack app and click Authenticate.
Note
The External Authentication field is required even though it is not indicated with a red bar. The Slack administrator must authenticate the connection request by entering the username and password to give required permission to the Exabeam Cloud Connector.
To confirm that the Exabeam Cloud Connector platform communicates with the service, click Test Connection.
Click Done to save your changes. The cloud connector is now set up on the Exabeam Cloud Connector platform.
To ensure that the connector is ready to send and collect data, Start the connector and check that the status shows Ok.
