- Supported Cloud Connectors
- Armis Cloud Connector
- AWS Cloud Connector
- AWS Multi-Tenant Cloud Connector
- Azure Cloud Connector
- Azure Cloud Connector Overview
- Azure Audit Source and Event Support
- Prerequisites to Configure the Azure Cloud Connector
- Configure the Azure Cloud Connector
- Collect EventHub Information for Azure EventHub Endpoints
- Collect all Microsoft Defender ATP Events
- Configure Azure to Monitor Security Center Events in Azure VMs
- Bitglass Cloud Connector
- Box Cloud Connector
- Centrify Cloud Connector
- Cisco AMP for Endpoints Cloud Connector
- Cisco Meraki Cloud Connector
- Cisco Umbrella Cloud Connector
- Citrix ShareFile Cloud Connector
- Cloudflare Cloud Connector
- Code42 Incydr Cloud Connector
- CrowdStrike Falcon Cloud Connector
- Cybereason Cloud Connector
- CylanceProtect Cloud Connector
- Dropbox Business Cloud Connector
- Duo Security Cloud Connector
- Egnyte Cloud Connector
- Fidelis Cloud Connector
- GitHub Cloud Connector
- Google Cloud Platform (GCP) Cloud Connector
- Google Cloud Pub/Sub Cloud Connector
- Google Workspace (Formerly G Suite) Cloud Connector
- LastPass Enterprise Cloud Connector
- Mimecast Email Security Cloud Connector
- Netskope Cloud Connector
- Office 365 Cloud Connector
- Okta Cloud Connector
- OneLogin Cloud Connector
- Palo Alto Networks SaaS Security Cloud Connector
- Ping Identity Cloud Connector
- Proofpoint Cloud Connector
- Rapid7 InsightVM Cloud Connector
- Salesforce Cloud Connector
- SentinelOne Cloud Connector
- ServiceNow Cloud Connector
- Slack App Cloud Connector
- Slack Classic App Cloud Connector (Formerly known as Slack Enterprise Grid Cloud Connector)
- Snowflake Cloud Connector
- Sophos Central Cloud Connector
- Symantec CloudSOC Cloud Connector
- Symantec Endpoint Protection (SEP) Mobile Cloud Connector
- Symantec Email Security.cloud Cloud Connector
- Symantec WSS Cloud Connector
- Tenable.io Cloud Connector
- VMware Carbon Black Cloud Endpoint Standard Cloud Connector
- Workday Cloud Connector
- Zoom Cloud Connector
- Custom Cloud Connector
- Webhook Cloud Connector
Armis Cloud Connector
This integration provides support for ingesting alert logs and device context from Armis. The Armis integration enables a wide variety of detection IOT/OT use cases, as well as alert enrichment, contextualization and prioritization, and allows analysts to triage and investigate alerts more effectively in IOT/OT environments.
Armis Endpoints
Endpoint | Frequency | Description | Limitations |
|---|---|---|---|
Alert Logs | 10 Minutes | This endpoint is turned on by default and ingests Alert Logs | Subject to Armis API quota limitations. |
Device Context | Weekly |
|
|
Prerequisites to Configure the Armis Cloud Connector
Before you can configure the Armis Cloud Connector, you must obtain the API Key and Tenant Name. For on-premises deployments, you must also Configure Device Context Endpoint
API Key
To obtain the API Key:
Create an Armis user with Read-Only permissions for Alerts and for Devices. You can use the OOTB Read Only role, and assign this role to your user
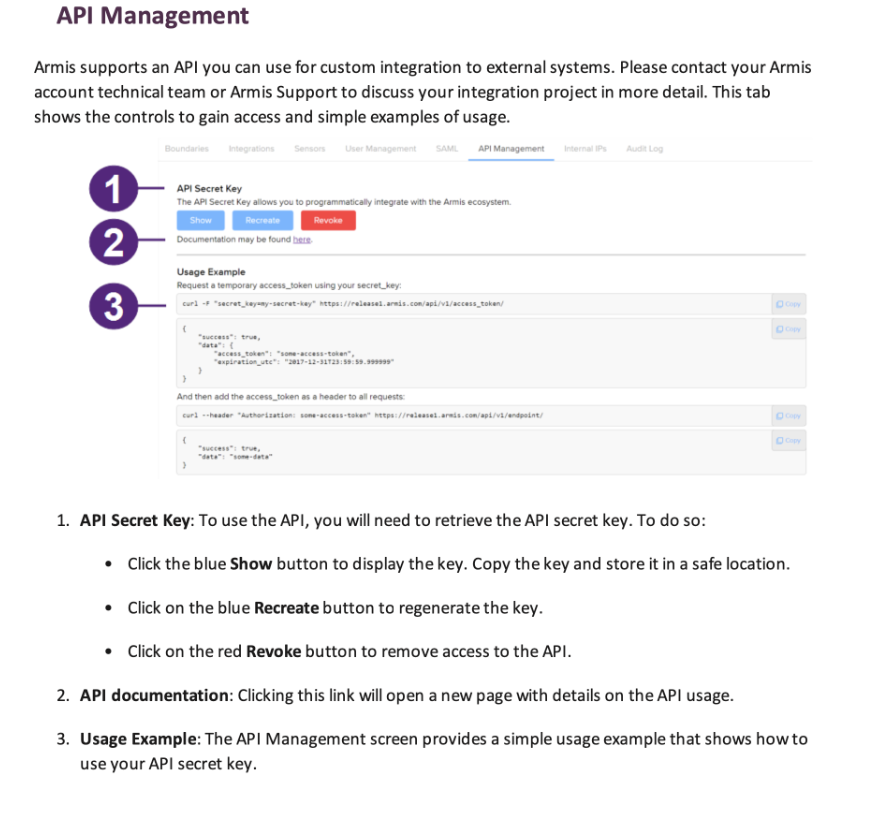
Generate an API Secret Key for this user using the Armis API Management UI (see screenshot below), and copy it in order to use in Cloud Connector configuration in the next step.

Tenant Name
To obtain the Tenant Name:
To obtain the Tenant Name, log in to your Armis dashboard and identify the prefix of the URL. For example:

Record the Tenant Name. In this example, the name is partner-demo.
Configure Device Context Endpoint
Note
This configuration is required for on-premises deployments only. In SaaS deployments, it is done automatically and no user action is required.
To push Device Context using the Rest API to your Advanced Analytics deployment, your Armis Cloud Connectors deployment must be configured with the IP Address of your Advanced Analytics deployment and the Authentication token.
Obtain your Advanced Analytics Authentication token from the Advanced Analytics Settings UI: https://AA_UI_IP/settings.
Go to Cluster Authorization Token under the Admin Operations card.
Click the + sign on the right.
Give your token a Name.
For Expiry Date choose Permanent.
Verify that the Permission Level is Administrator.
Click Add Token and save the value.
Obtaining the External IP of the aa-master node using the ifconfig command or using your preferred method.
After you obtained the configuration details, you can supply them to the Exabeam Cloud Connectors platform using the following methods:
If you haven’t upgraded the Exabeam Cloud Connectors platform yet and plan to perform an upgrade, you can supply the parameters directly to the upgrade script (substitute <VALUE> with the proper values):
aaexternalip=<VALUE>
aatoken=<VALUE>
If you already have upgraded the Exabeam Cloud Connectors platform, you can manually add the credentials:
Go to your Cloud Connectors install directory.
This will typically be under
/opt/exabeam/data/sk4/. If not, check the installation dir by running systemctl status sk4compose and observing the location of thedocker-compose.ymlfile underExecStart.Open the
.envfile for editing.Add the following two lines at the bottom of the file (substitute <VALUE> with the proper values). The code is case sensitive.
AA_AUTH_TOKEN=
<VALUE>AA_EXTERNAL_IP=<VALUE>
Configure the Armis Cloud Connector
Complete the Prerequisites to Configure the Armis Cloud Connector.
Log in to the Exabeam Cloud Connectors platform with your registered credentials.
Navigate to Settings > Accounts > Add Account.
Click Select Service to Add, then select Armis from the list.
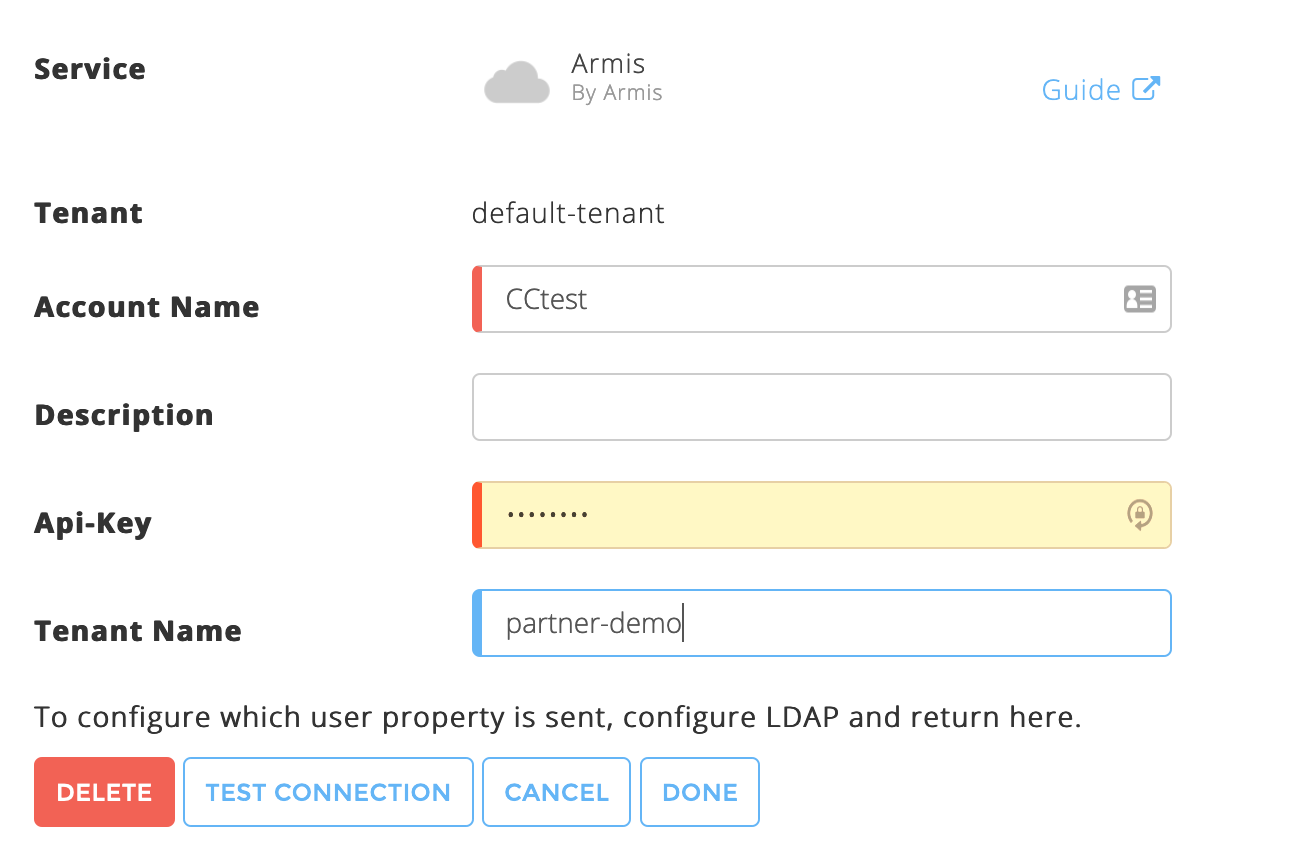
Fill in the following information:

Account Name – Provide this cloud connector a meaningful name. Exabeam uses this name to identify the cloud connector across the Exabeam Cloud Connectors platform and in entire events sent by your connector to your SIEM/Log/Splunk system.
Description – Enter any text that describes the specific cloud connector function and provides meaning for your organization.
API Key – Enter the API Key you obtained during the prerequisites workflows.
Tenant Name – Enter the tenant name you obtained during the prerequisites workflows.
To confirm that the Exabeam Cloud Connector platform communicates with the service, click Test Connection.
Click Done to save your changes. The cloud connector is now set up on the Exabeam Cloud Connector platform.
To ensure that the connector is ready to send and collect data, Start the connector and check that the status shows
OK.
