- Supported Cloud Connectors
- Armis Cloud Connector
- AWS Cloud Connector
- AWS Multi-Tenant Cloud Connector
- Azure Cloud Connector
- Azure Cloud Connector Overview
- Azure Audit Source and Event Support
- Prerequisites to Configure the Azure Cloud Connector
- Configure the Azure Cloud Connector
- Collect EventHub Information for Azure EventHub Endpoints
- Collect all Microsoft Defender ATP Events
- Configure Azure to Monitor Security Center Events in Azure VMs
- Bitglass Cloud Connector
- Box Cloud Connector
- Centrify Cloud Connector
- Cisco AMP for Endpoints Cloud Connector
- Cisco Meraki Cloud Connector
- Cisco Umbrella Cloud Connector
- Citrix ShareFile Cloud Connector
- Cloudflare Cloud Connector
- Code42 Incydr Cloud Connector
- CrowdStrike Falcon Cloud Connector
- Cybereason Cloud Connector
- CylanceProtect Cloud Connector
- Dropbox Business Cloud Connector
- Duo Security Cloud Connector
- Egnyte Cloud Connector
- Fidelis Cloud Connector
- GitHub Cloud Connector
- Google Cloud Platform (GCP) Cloud Connector
- Google Cloud Pub/Sub Cloud Connector
- Google Workspace (Formerly G Suite) Cloud Connector
- LastPass Enterprise Cloud Connector
- Mimecast Email Security Cloud Connector
- Netskope Cloud Connector
- Office 365 Cloud Connector
- Okta Cloud Connector
- OneLogin Cloud Connector
- Palo Alto Networks SaaS Security Cloud Connector
- Ping Identity Cloud Connector
- Proofpoint Cloud Connector
- Rapid7 InsightVM Cloud Connector
- Salesforce Cloud Connector
- SentinelOne Cloud Connector
- ServiceNow Cloud Connector
- Slack App Cloud Connector
- Slack Classic App Cloud Connector (Formerly known as Slack Enterprise Grid Cloud Connector)
- Snowflake Cloud Connector
- Sophos Central Cloud Connector
- Symantec CloudSOC Cloud Connector
- Symantec Endpoint Protection (SEP) Mobile Cloud Connector
- Symantec Email Security.cloud Cloud Connector
- Symantec WSS Cloud Connector
- Tenable.io Cloud Connector
- VMware Carbon Black Cloud Endpoint Standard Cloud Connector
- Workday Cloud Connector
- Zoom Cloud Connector
- Custom Cloud Connector
- Webhook Cloud Connector
Custom Cloud Connector
Supported Data Sources
Custom Cloud Connectors support the following two data sources:
AWS S3 Bucket, with a backing SQS queue
Azure Storage Account (General purpose V2, i.e. StorageV2) with a backing queue in that storage account (version 2.4.165 and later)
Supported Audit Sources and Events
The custom Cloud Connector will process the ingested events using a supported processor.
Processor Name | Data Source Events Type |
|---|---|
Pass-through | Any (No parsing / modeling is done) |
Set up a Custom Cloud Connector with an AWS Data Source
Prerequisites to Configure AWS S3/SQS for Use with the Custom Cloud Connector
Use this workflow to set up the following:
A tightly secured integration between the S3 bucket where the data you want to retrieve is stored and an SQS queue, which will be notified when new objects are added to the S3 Bucket.
A preferred authentication method that allows the Custom Cloud Connector to read the messages in the SQS queue and S3 bucket with minimal permissions.
This guide assume an existence of S3 bucket, and a SQS queue. Before you begin, identify the names for your S3 Bucket and the SQS queue ARNs. If you do not know these, you can find them on the AWS Web Console or use the CLI. In this workflow, you will configure them such that whenever a new object is put into the S3 bucket, the SQS queue will get a notification. The Custom Cloud Connector will read events off the SQS queue and read the S3 Objects to which they, to ingest its data.
Configure S3/SQS Integration
Note
If the data is not stored in S3, but instead sent directly to SQS by a third party, skip these steps.
In the AWS Web Console, navigate to the S3 bucket where the data it located.
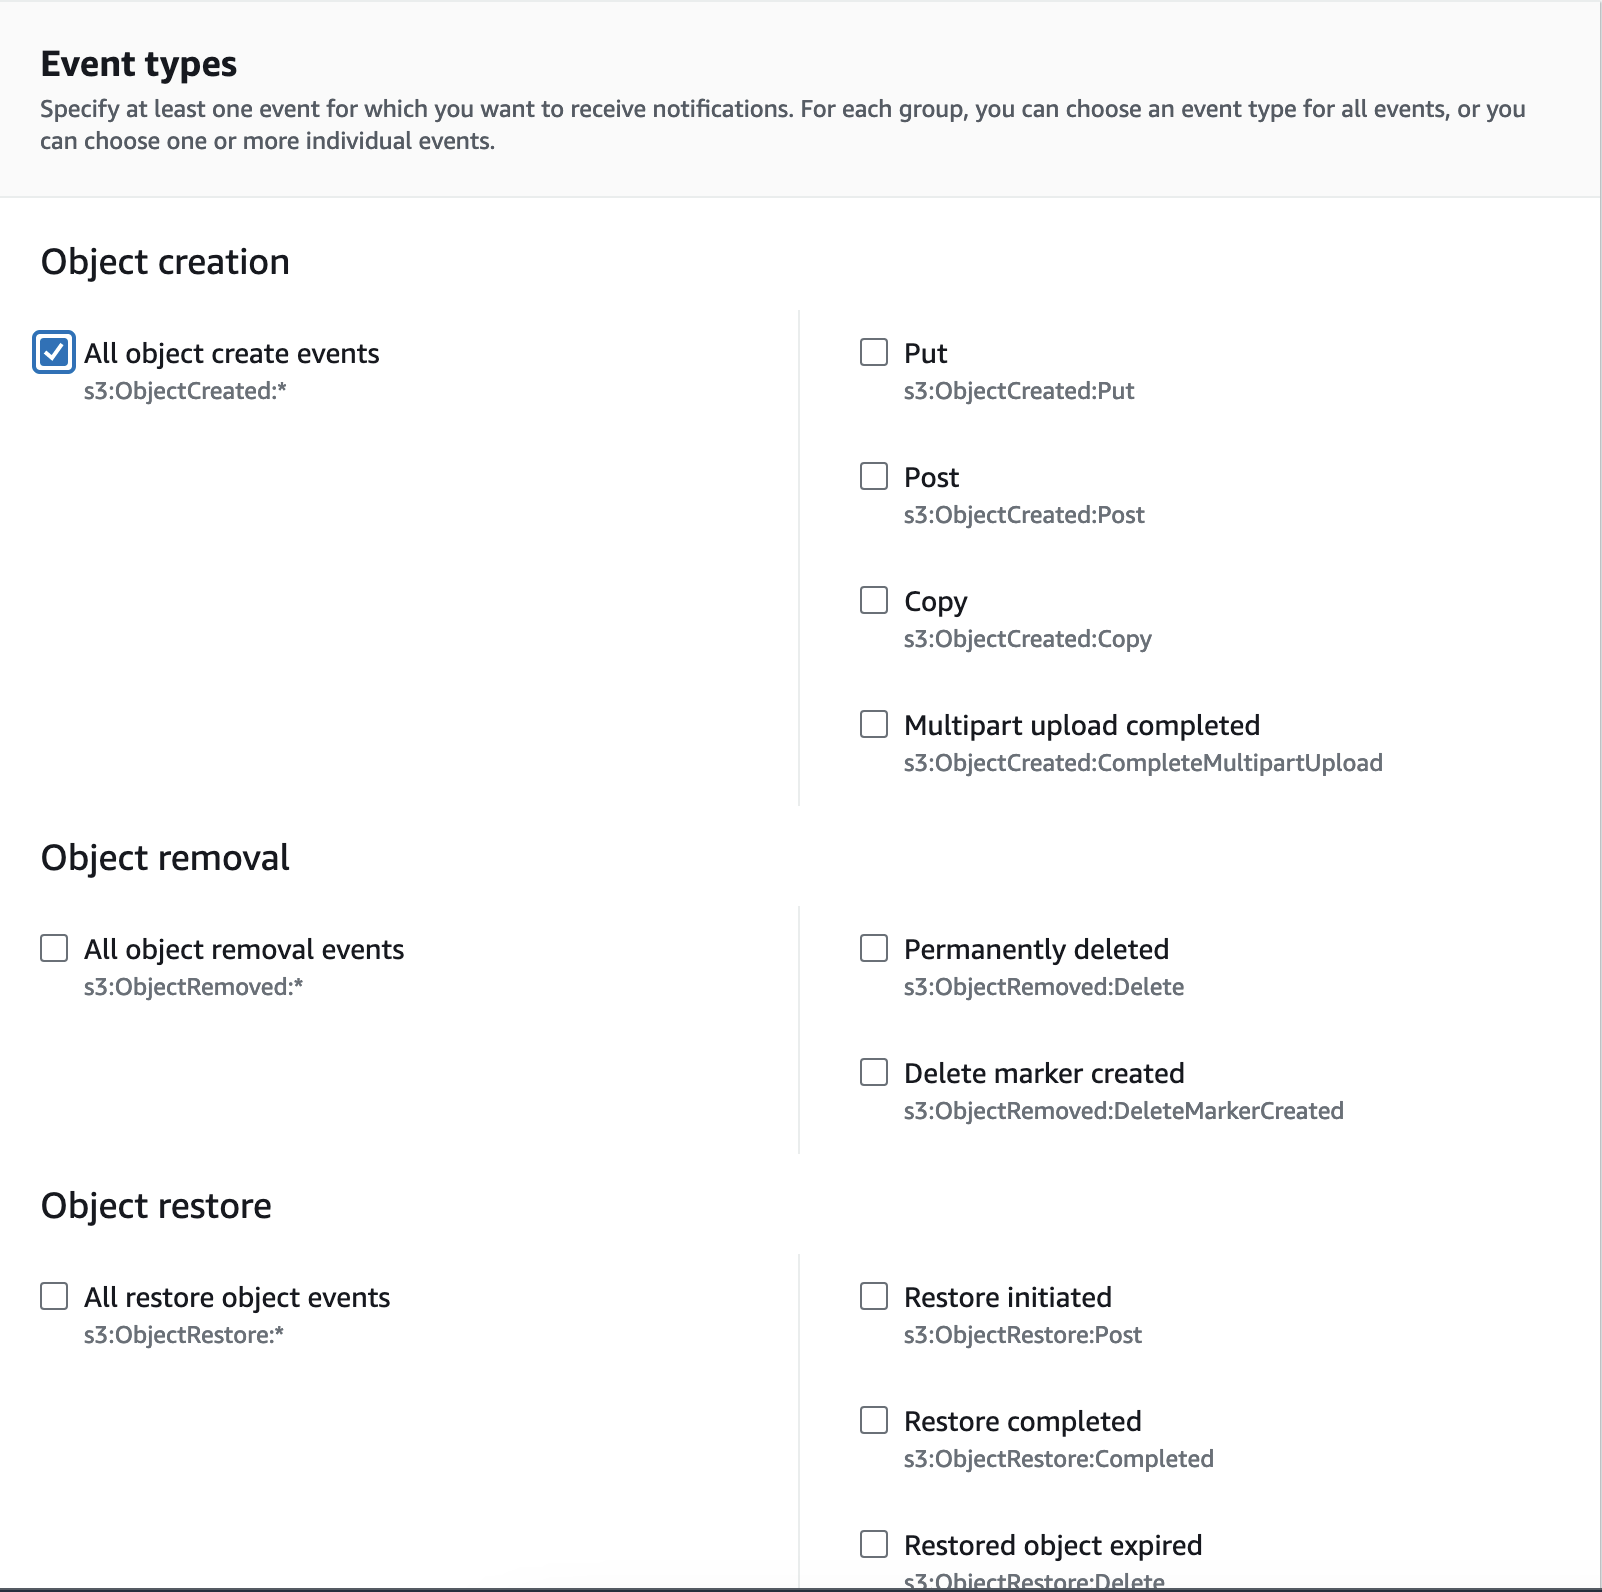
Under Properties, enable event notification for the SQS queue in the S3 bucket on which you want to receive logs.
For more information, see https://docs.aws.amazon.com/AmazonS3/latest/user-guide/enable-event-notifications.html.
Choose ObjectCreate (All) events to be notified as in the below example.
Allow the S3 Bucket to send events to the SQS Queue
Replace the access policy attached to the queue with the following policy (in the SQS console, you select the queue, and in the Permissions tab, click Edit Policy Document (Advanced).
{
   "Version":"2012-10-17",
   "Id":"example-ID",
   "Statement":[
      {
         "Sid":"example-statement-ID",
         "Effect":"Allow",
         "Principal":{
            "AWS":"*"
         },
         "Action":[
            "SQS:SendMessage"
         ],
         "Resource":"SQS-queue-ARN",
         "Condition":{
            "ArnLike":{
               "aws:SourceArn":"arn:aws:s3:*:*:bucket-name"
            }
         }
      }
   ]
}
Obtain the Authentication Properties
SQS URL – Log into your AWS account, go to the SQS service and focus on the SQS Queue used for the S3 events notifications. In the Details tab copy the URL value (see example below):
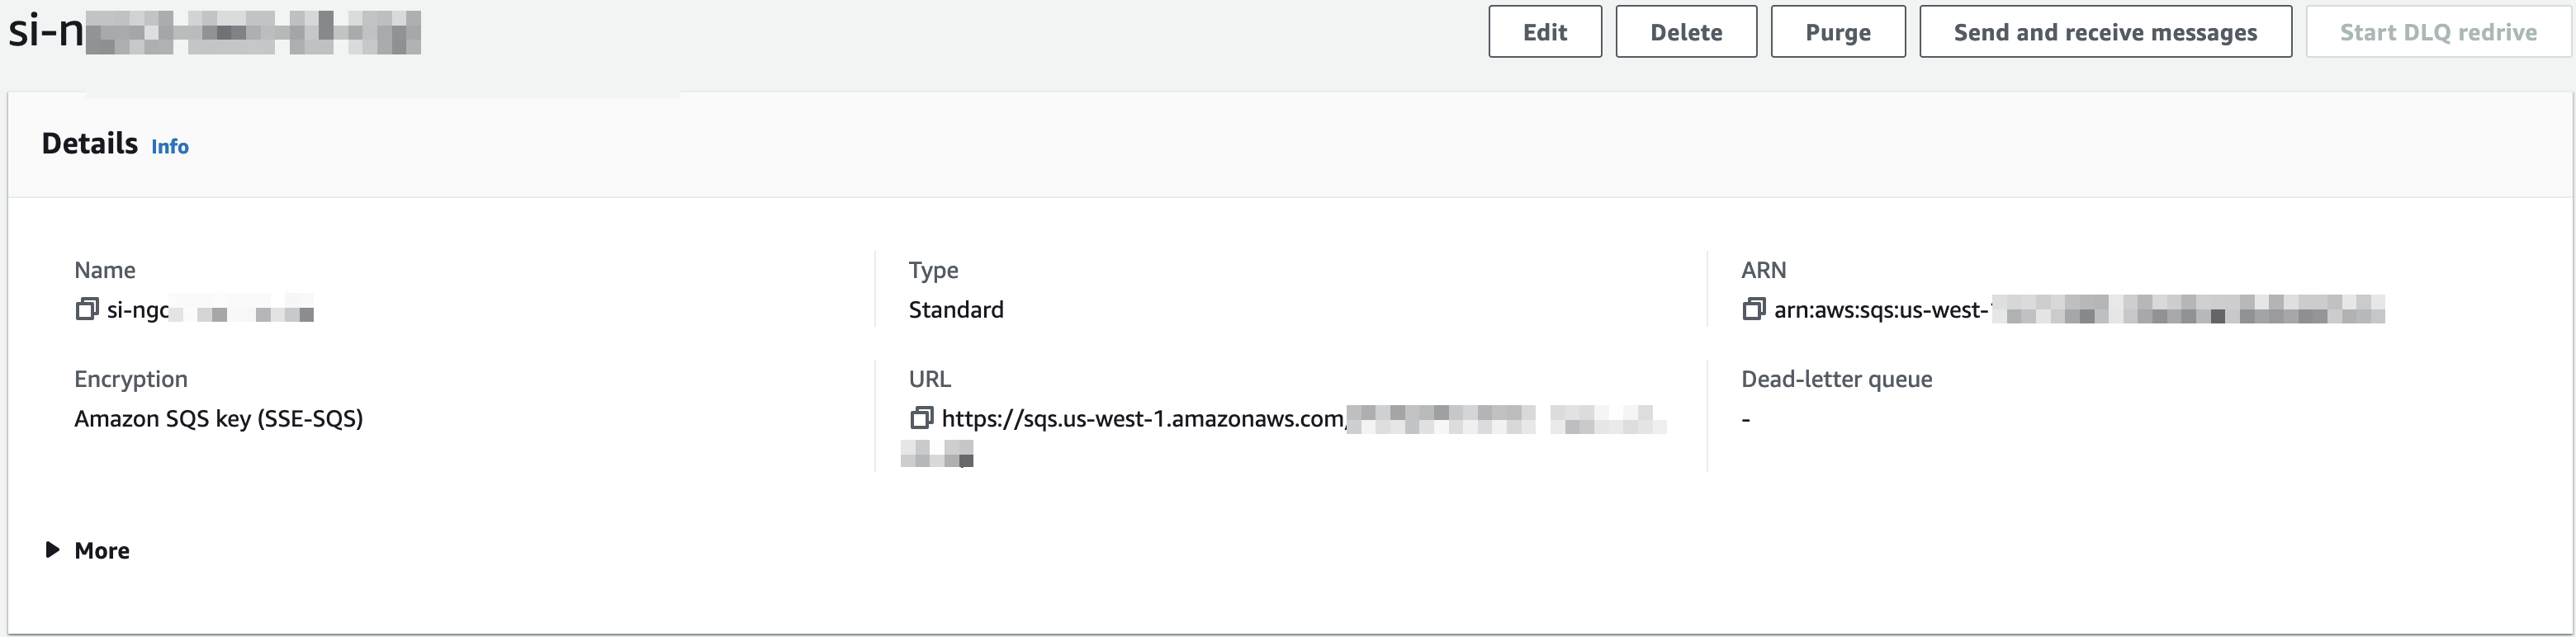
SQS Region – In the same page as above (SQS detail tab) you will see the SQS region. It is the string between the sqs and amazonaws strings in the URL. In the example above, the region is: us-east-1.
SQS-Message-Origin – Based on the integration you're configuring, messages are put in the queue in different ways.
For messages put in the queue by the above setup, i.e. S3 notifies the SQS directly, select S3_TO_SQS.
For messages put in the queue by the above method, with that variation that the messages were sent from S3 to SNS, and then configured in SNS to be sent to SQS, select S3_TO_SNS_TO_SQS.
For messages not configured by the above method that are not pointing to any objects in S3 at all and are themselves the data that needs to be consumes (usually used by third parties to notify on events directly), select DIRECT_SQS.
Authentication
You can use any of the following authentication methods:
InstanceProfile – If the Custom Cloud Connector is deployed in AWS EC2, this is the easiest method.
STSAssumeRole – AWS's most recommended method of authentication. Also allows to monitor S3/SQS in different AWS accounts.
IAM User – For legacy reasons, the user appears in the UI as
s3-sqs-authn-type.
For any of the above methods, an IAM Policy is needed, with minimal permissions that'll allow it to manipulate the SQS queue, and read the objects from the S3 bucket.
Create an IAM Policy
In your AWS console, navigate to Services > IAM > Policies > Create policy.
Click on the JSON tab, to get an online editor.
Copy the below policy and modify it to include your Queue and Bucket ARN.
{
"Version": "2012-10-17",
"Statement": [
    {
    "Action": [
        "sqs:DeleteMessage",
        "sqs:DeleteMessageBatch",
        "sqs:ReceiveMessage"
    ],
    "Effect": "Allow",
    "Resource": "Queue ARN"
    },
    {
    "Action": [
        "s3:GetObject"
    ],
    "Effect": "Allow",
    "Resource": "Bucket ARN/*"
    }
  ]
}
Proceed to set up your preferred authentication method.
Create an IAM Role
In your AWS console, navigate to IAM > Roles > Create Role.
Enable the AWS Service and EC2 service and Click Next: Permissions.
This will create a Trust relationship that allows EC2 instances to call AWS services on your behalf. You will modify the Trust relationship later, per authentication method that you choose.
Search the policy created earlier and check its checkbox. Click Next: Tags.
Optionally add tags. Click Next: Review.
Give the role a meaningful name (for example CCCustomConnectorRole) and description and then click Create Role.
Search for and then select the new role.
Record the role ARN for future use.
Authenticate with InstanceProfile
First ensure that you Create an IAM Role.
In your AWS console, navigate to IAM > Roles and search for the role you created for this purpose.
Allow EC2 instances to use (assume) the role:
Go to the Trust relationships tab, click Edit trust relationship.
Make sure the Statements array contains the document.
{
  "Effect": "Allow",
  "Principal": {
    "Service": "ec2.amazonaws.com"
  },
  "Action": "sts:AssumeRole"
 }
Click Update Trust Policy.
Navigate to AWS EC2 service.
Right-click on the instance where Cloud Connectors in installed, Click Instance Settings > Attach/Replace IAM Role.
Choose the role from the drop-down list, and Apply.
When you Configure a Custom Cloud Connector with an AWS Data Source, select InstanceProfile as the authentication method.
Authenticate with IAM User
In your AWS console, navigate to Services > IAM > Users > Add user.
Give your user a unique name and enable Programmatic access:
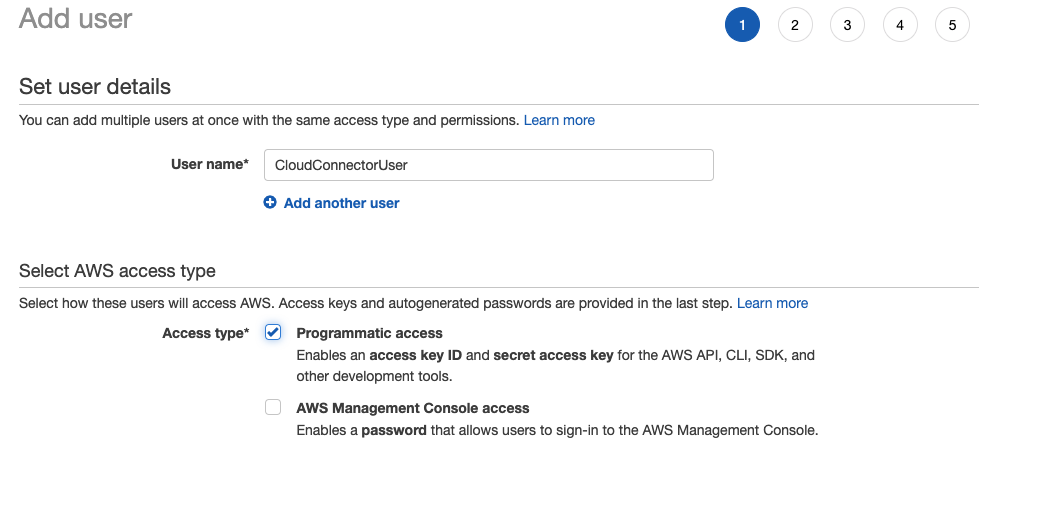
Click Next: Permissions.
You are transferred to the Set permissions page.
(Basic authentication only) Choose Attach Existing Policies Directly and search for any policies you created.
Typically you will have one policy per cloud collector.
For STSAssumeRole authentication, skip this step.
Continue the user creation process (tags are optional) and finish the user creation.
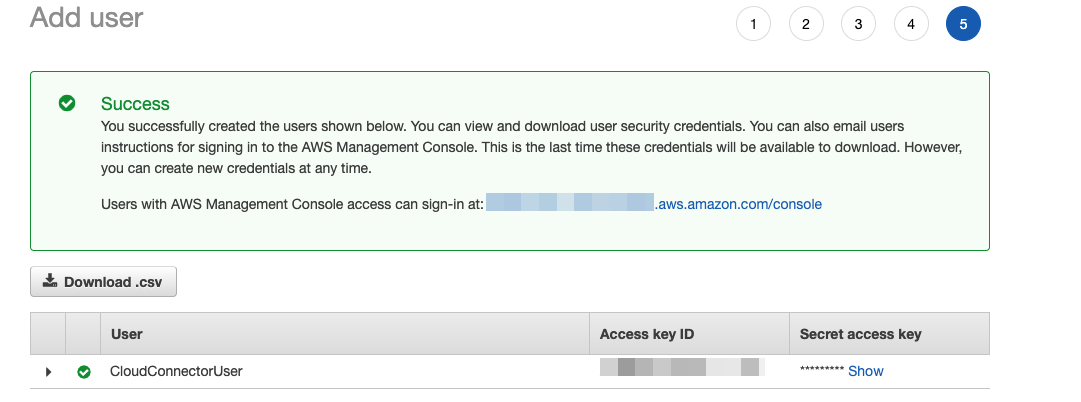
When you are finished, click Next: Review and then Create user.
Record the Secret Access Key and Access Key ID. Optionally download the credentials in CSV format, as they will not be accessible after you leave this page.

When you Configure a Custom Cloud Connector with an AWS Data Source, select s3-sqs-authn-type as the authentication method.
Authenticate with STSAssumeRole
If you don't already have an IAM user, create an IAM user with programmatic access that will be used to use (assume) the role.
Follow the steps of Authenticate with IAM User but skip the steps to attach any policy to that user.
This user does will not have any permissions until you later allow it to assume the role with the policy.
Record the Access key and Secret Access key.
Navigate to IAM > Roles and search for the role created earlier
Allow a specific user to use (assume) the role:
Go to Trust relationships tab and then click Edit trust relationship.
Make sure the
Statementsarray contains the document. modify accordingly{ "Effect": "Allow", "Principal": { "AWS": "arn:aws:iam::123456789012:user/ccuser" }, "Action": "sts:AssumeRole" }Click Update Trust Policy.
Record the ARN for the role.
When you Configure a Custom Cloud Connector with an AWS Data Source, select STSAssumeRole as the authentication method.
Fill in the credentials.
Under Role-Session-Name, give a meaningful name to identify sessions initiated by the Custom Cloud Connector.
Under Access-Key, fill in the IAM User's Access key.
Under Secret-Key fill, in the IAM User's Secret Access key.
Configure a Custom Cloud Connector with an AWS Data Source
The Custom Cloud Connector can continuously ingest events from AWS S3 buckets.
Before you configure the Custom Cloud Connector, ensure that you complete the Prerequisites to Configure AWS S3/SQS for Use with the Custom Cloud Connector.
Log in to the Exabeam Cloud Connectors platform with your registered credentials.
Navigate to Settings > Accounts > Add Account.
Click Custom Application.
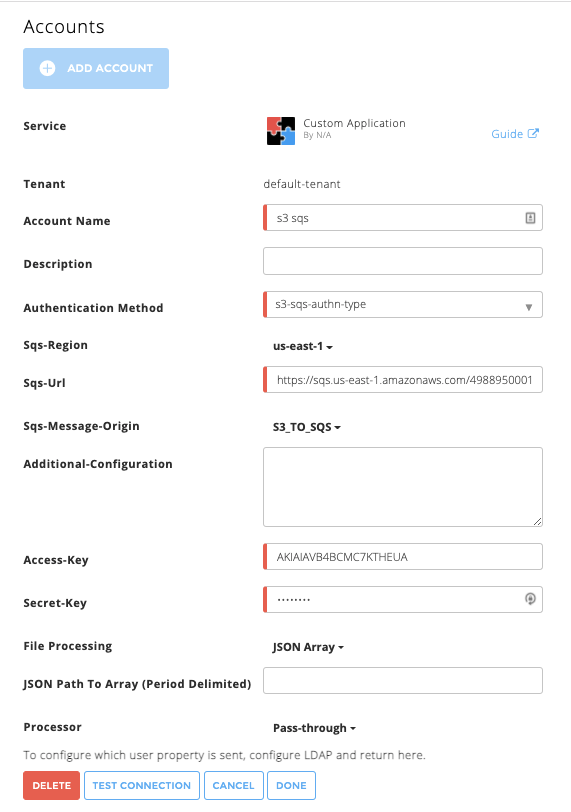
Enter the following information for the cloud connector:

Tenant – (Multi-tenant Exabeam Cloud Connectors edition only) Choose the tenant to which the new cloud connector will be attached.
Account Name – Give the custom cloud connector a meaningful name. This will identify your application connector in the Exabeam platform and is added to entire events sent to your SIEM system from this connector as identifier. Example:
Sales custom pricing app.Description – Add any text that describe the specific application and meaning for the business. Example:
Corp sales application to define and optimize sales pricing.Authentication Method – For an AWS data source, choose one of the following methods for authentication and fill out the associated fields for your selection: InstanceProfile, STSAssumeRole, or s3-sqs-authn-type. The InstanceProfile type is supported for deployments on an AWS EC2 instance.
File Processing – (Exabeam Cloud Connectors 2.5.302 and later releases) By default, the cloud connector processes Events per Line, however you can change the file processing to process events embedded in a JSON Array. If you choose JSON Array, you can optionally specify the JSON Path To Array (Period Delimited).
For example,
k3.k3_2is the JSON path to the embedded JSON array below:{ "k1": "v1", "k2": [ "v2_1", "v2_2" ], "k3": { "k3_1": "v3_1", "k3_2": [ { "obj1Key": "obj1Val" }, { "obj2Key": "obj2Val" } ] } }If you do not specify a path for the JSON Array, the cloud connector assumes the the events are the array’s elements.
[
    {
        "obj1Key": "obj1Val"
    },
    {
        "obj2Key": "obj2Val"
    }
]
Processor – You must also specify a Processor to determine the way the ingested events ingested are parsed. Choose Pass-Thru to pass the data as-is without changing or parsing the data structure in any way (including the timestamp of the events).
To confirm that the Exabeam Cloud Connector platform communicates with the service, click Test Connection.
Click Done to save your changes. The cloud connector is now set up on the Exabeam Cloud Connector platform.
To ensure that the connector is ready to send and collect data, Start the connector and check that the status shows
OK.
Set up a Custom Cloud Connector with an Azure Data Source
Prerequisites to Configure a Custom Cloud Connector with an Azure Data Store
With Exabeam Cloud Connectors 2.4.165 and later releases, the Custom Cloud Connector can consume data stored in Azure Storage Accounts. This opens the door to retrieving many Azure data sources that were not previously available.
With this addition, any Azure data source that can put its data into the following:
Azure Storage Account's Blob store – The store must be StorageV2 to alert its queue on new blobs.
In clear-text files with one event per line, for example .log or.txt format. You can also use JSON-line format with each line as a valid event in JSON format.
Go to the the storage account where that data that you want to consume is located.
Go to https://portal.azure.com.
Navigate to Storage Accounts and then select your storage account.
Verify the type of storage is StorageV2 in the storage accounts table, or in the Overview > Account Kind.
Configure a Queue in that storage account to be notified when new Blobs are added to its blob store.
Create a queue dedicated for the connector.
Navigate to Queues.
Click + Queue, name it something unique, for example
sk4queue, and then click OK.Record the queue name for later use.
Navigate to Events.
Click + Event Subscription.
Enter a descriptive name like
notify-sk4queue-on-new-blobs.Verify that Events Schema are set to the default Event Grid Schema.
Under Event Types > Filter to Event Types make sure only the Blob Created is selected.
Configure the Endpoint Details:
In Endpoint Type, select Storage Queues.
In Endpoint, click Select an endpoint.
In the panel that opened, select the subscription where the current Storage Account is located.
Select the storage account.
Select the queue that you created in the first step, for example
sk4queue.Confirm Selection.
Click Create.
While the queue and the blob can be created in different storage accounts, for the sake of simplicity, they're configured in the same storage account.
Create minimal-permissions SAS tokens.
Navigate to Settings > Shared access signature.
Create a SAS token for the blob storage.
Select the Blob from the Allowed services section.
Select the Object from the Allowed resource types.
Select the Read from the Allowed permissions.
Set the End time to a time far in the future, for example 10 years in the future, so the connector doesn't stop working because of SAS Token invalidation.
Click Generate SAS and connection string.
Copy the value from the SAS Token field.
For example, the token can look like
?sv=2018-03-28&ss=q&srt=o&sp=p&se=2019-09-23T17:52:57Z&st=2019-09-23T09:52:57Z&spr=https&sig=aASkYB8%2BGf21fMXl3Bnf0Mod7n81Dq8E%2FeggjEQr%2BD8%3D.
Note
Similarly, create a SAS Token for Queue with the following settings.
Allowed services: Queue
Allowed services resource types: Object
Allowed permissions: Process
Obtain other Storage Account properties.
Navigate to Properties.
Record the value from the Primary Blob Service Endpoint field, under the Blob service section.
Record the value from the Primary Queue Service Endpoint field, under the Queue service section.
Proceed to Configure a Custom Cloud Connector for Use with an Azure Data Store.
During the setup, you will choose Azure Storage - SAS Tokens as the authentication method and configure the Sync. Strategy.
Configure a Custom Cloud Connector for Use with an Azure Data Store
The Custom Cloud Connector can continuously ingest events from an Azure data store.
Complete the Prerequisites to Configure a Custom Cloud Connector with an Azure Data Store.
Log in to the Exabeam Cloud Connectors platform with your registered credentials.
Navigate to Settings > Accounts > Add Account.
Click Custom Application.
Enter the following information for the cloud connector:
Tenant – (Multi-tenant Exabeam Cloud Connectors edition only) Choose the tenant to which the new cloud connector will be attached.
Account Name – Give the custom cloud connector a meaningful name. This will identify your application connector in the Exabeam platform and is added to entire events sent to your SIEM system from this connector as identifier. Example:
Sales custom pricing app.Description – Add any text that describe the specific application and meaning for the business. Example:
Corp sales application to define and optimize sales pricing.Authentication Method – Choose Azure Storage - SAS Tokens as the method for authenticating with the data source and fill out the associated fields for your selection:
Fill in the credentials and properties you recorded when you set up the Azure storage account.
Under Sync. Strategy select the appropriate method:
Select Continuous - Azure Duration Auto-Detection if the blobs put into the storage are in a format of a duration for example, PT1H.json or PT15M.json.
These blobs are updated by the service sending the data for a long duration and needs to be synced continuously for a period of time. By selecting this option, the application will auto-detect the duration for which each blob needs to be monitored for changes, and only collect the added delta to prevent duplicates.
Note
Only services that add new lines, one per event, are compliant with this connector. Some Azure services, for example NSG Flow Logs, update the file but only have one line in it that gets updated. Such services are NOT compliant with this connector.
Select Once if the blobs put into the storage will not be updated after they are put there.
File Processing – (Exabeam Cloud Connectors 2.5.302 and later releases) By default, the cloud connector processes Events per Line, however you can change the file processing to process events embedded in a JSON Array. If you choose JSON Array, you can optionally specify the JSON Path To Array (Period Delimited).
For example,
k3.k3_2is the JSON path to the embedded JSON array below:{ "k1": "v1", "k2": [ "v2_1", "v2_2" ], "k3": { "k3_1": "v3_1", "k3_2": [ { "obj1Key": "obj1Val" }, { "obj2Key": "obj2Val" } ] } }If you do not specify a path for the JSON Array, the cloud connector assumes the the events are the array’s elements.
[
    {
        "obj1Key": "obj1Val"
    },
    {
        "obj2Key": "obj2Val"
    }
]
Processor – You must also specify a Processor to determine the way the ingested events ingested are parsed. Choose Pass-Thru to pass the data as-is without changing or parsing the data structure in any way (including the timestamp of the events).
To confirm that the Exabeam Cloud Connector platform communicates with the service, click Test Connection.
Click Done to save your changes. The cloud connector is now set up on the Exabeam Cloud Connector platform.
To ensure that the connector is ready to send and collect data, Start the connector and check that the status shows
OK.