- Search Overview
- Search Home Page
- Performing Searches
- Basic Search
- Advanced Search
- Advanced Search Building Blocks
- Running an Advanced Search Query
- Query Syntax
- Query by Subject
- Query by Vendor and Product
- Query by Field and Value
- Query by Context Table
- Query Using Regex
- Query Using Wildcards
- Free Text Search
- Query Using Advanced Query Language Operators
- Query Using Aggregation Functions
- Query Using Structured Fields
- Dynamic Field Extraction
- Natural Language Search
- Anomaly Search
- Refine a Search
- Context Tables in Search
- Search Best Practices
- Search Results
- Histogram View of Search Results
- Search Results Navigation Bar
- Timeline View of Search Results
- List View of Search Results
- Table View of Search Results
- Aggregated Search Results
- Event Details
- Detection Details
- Entity Details
- Data Insights
- Export Search Results
- View and Download Exported Search Result Files
- Dashboard Visualizations
Define Selective Retention Tiers
To begin defining a selective retention tier, do one of the following:
If no tiers have been configured yet, click Define in the Define your selective retention periods step in the bottom panel of the Selective Log Retention settings page.
If tiers have already been configured, click the Edit retention tiers button to the right of the search bar in the middle panel of the Selective Log Retention settings page.
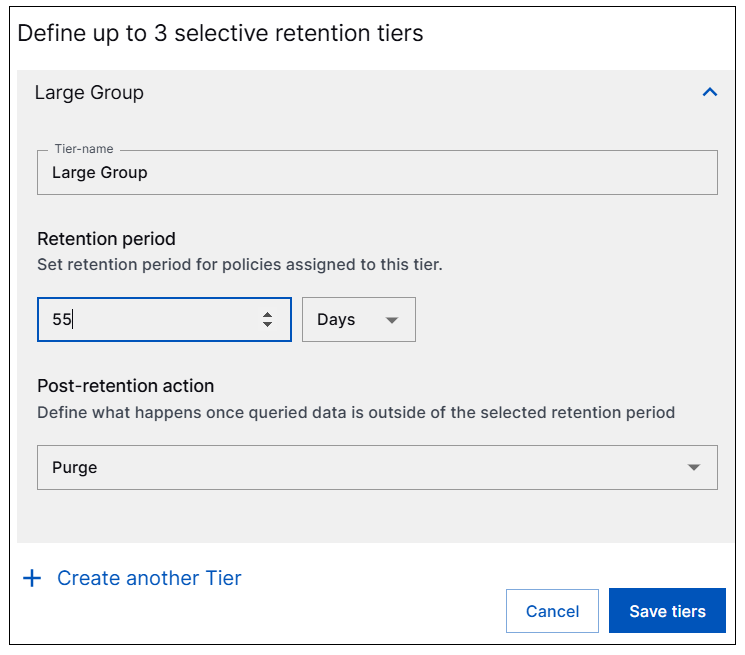
The Define up to 3 selective retention tiers dialog box opens.

For the first tier you want to define or edit, enter the following information:
Tier name – Enter a name for the retention tier that is descriptive of the type of log data it will contain.
Retention period – Define the number of days, weeks, months, or years you want log data in this tier to be retained for.
Post-retention action – Select an option for how you want the log data in the tier to be handled when the retention period in this tier ends. Currently, the only post-retention option is to purge the data.
Create another Tier – Click to add space to define another tier and repeat the process to define a second and third tier.
When you've defined up to three retention tiers, click Save tiers.
Continue with the procedure to Add Selective Retention Policies.
