- Cloud Collectors Overview
- Administration
- Administrative Access
- Shareable Service Accounts
- Add Accounts for AWS Cloud Collectors
- Add Accounts for Cisco Duo Cloud Collector
- Add Accounts for Google Cloud Collectors
- Add Accounts for Microsoft Cloud Collectors
- Add Accounts for Okta Cloud Collectors
- Add Accounts for Salesforce Cloud Collectors
- Add Accounts for Splunk Cloud Collectors
- Add Accounts for Trend Micro Cloud Collectors
- Add Accounts for Wiz
- Define a Unique Site Name
- Sign Up for the Early Access Program
- Onboard Cloud Collectors
- Abnormal Security Cloud Collector
- Anomali Cloud Collector
- AWS CloudTrail Cloud Collectors
- AWS CloudWatch Cloud Collector
- AWS CloudWatch Alarms Cloud Collector
- AWS GuardDuty Cloud Collector
- AWS S3 Cloud Collector
- AWS Security Lake Cloud Collector
- AWS SQS Cloud Collector
- Azure Activity Logs Cloud Collector
- Azure Blob Storage Cloud Collector
- Azure Log Analytics Cloud Collector
- Azure Event Hub Cloud Collector
- Azure Storage Analytics Cloud Collector
- Azure Virtual Network Flow Cloud Collector
- Box Cloud Collector
- Broadcom Carbon Black Cloud Collector
- Cato Networks Cloud Collector
- ChatGPT Enterprise Cloud Collector
- Cisco Duo Cloud Collector
- Cisco Meraki Cloud Collector
- Cisco Secure Endpoint Cloud Collector
- Cisco Umbrella Cloud Collector
- Cloudflare Cloud Collector
- Cribl Cloud Collector
- CrowdStrike Cloud Collectors
- Cylance Protect (now Arctic Wolf) Cloud Collector
- DataBahn Cloud Collector
- Dropbox Cloud Collector
- GCP Cloud Logging Cloud Collector
- GCP Pub/Sub Cloud Collector
- GCP Security Command Center Cloud Collector
- Gemini Enterprise Cloud Collector
- GitHub Cloud Collector
- Gmail BigQuery Cloud Collector
- Google Workspace Cloud Collector
- LastPass Cloud Collector
- Microsoft Defender XDR (via Azure Event Hub) Cloud Collector
- Microsoft Entra ID Context Cloud Collector
- Microsoft Entra ID Logs Cloud Collector
- Microsoft 365 Exchange Admin Reports Cloud Collector
- Supported Sources from Microsoft 365 Exchange Admin Reports
- Migrate to the Microsoft 365 Exchange Admin Reports Cloud Collector
- Prerequisites to Configure the Microsoft 365 Exchange Admin Reports Cloud Collector
- Configure the Microsoft 365 Exchange Admin Reports Cloud Collector
- Troubleshooting the Microsoft 365 Exchange Admin Reports Cloud Collector
- Microsoft 365 Management Activity Cloud Collector
- Microsoft Security Alerts Cloud Collector
- Microsoft Sentinel (via Event Hub) Cloud Collector
- Mimecast Cloud Collector
- Mimecast Incydr Cloud Collector
- Netskope Alerts Cloud Collector
- Netskope Events Cloud Collector
- Okta Cloud Collector
- Okta Context Cloud Collector
- Palo Alto Networks Cortex Data Lake Cloud Collector
- Palo Alto Networks XDR Cloud Collector
- Progress ShareFile Cloud Collector
- Proofpoint On-Demand Cloud Collector
- Proofpoint Targeted Attack Protection Cloud Collector
- Qualys Cloud Collector
- Recorded Future Cloud Collector
- Recorded Future Context Cloud Collector
- Rest API Cloud Collector
- S2W Threat Intelligence Cloud Collector
- Salesforce Cloud Collector
- Salesforce EventLog Cloud Collector
- SentinelOne Alerts Cloud Collector
- SentinelOne Cloud Funnel Cloud Collector
- SentinelOne Threats Cloud Collector
- SentinelOne Cloud Collector
- ServiceNow Cloud Collector
- Slack Cloud Collector
- Snowflake Cloud Collector
- Sophos Central Cloud Collector
- Splunk Cloud Collector
- STIX/TAXII Cloud Collector
- Symantec Endpoint Security Cloud Collector
- Tenable Cloud Collector
- Trend Vision One Cloud Collector
- Trellix Endpoint Security Cloud Collector
- Vectra Cloud Collector
- Zoom Cloud Collector
- Zscaler ZIA Cloud Collector
- Webhook Cloud Collectors
- Wiz Issues Cloud Collector
- Wiz API Cloud Collector
- Troubleshooting Cloud Collectors
Prerequisites to Configure the Splunk Cloud Collector
Before you configure the Splunk Cloud Collector you must complete the following prerequisites:
Identify the Splunk query and the associated event-type that appears in the raw log based on the query response on Splunk Cloud; for example, JSON, plain text, or Windows multiline. Based on the query response that you receive, you can determine and choose the event type while configuring the Splunk Cloud collector.
Create a user role and a user if you choose to use the Basic Authentication method for creating a sharable account for the Splunk Cloud Collector.
Allow Exabeam IP Addresses for your Region
Allow the IP addresses for your region to enable the Splunk Cloud Collector to connect and use the Search APIs on the Splunk Cloud platform. To do this, navigate to SYSTEM > Server Settings > IP allow list > Search head API access on the Splunk Cloud console and provide the relevant IP addresses for your region.
Based on your network requirements, to allow the IP addresses for your region to enable the Cloud Collector to connect with your cloud platform, see Allow Exabeam IP Addresses for your Region.
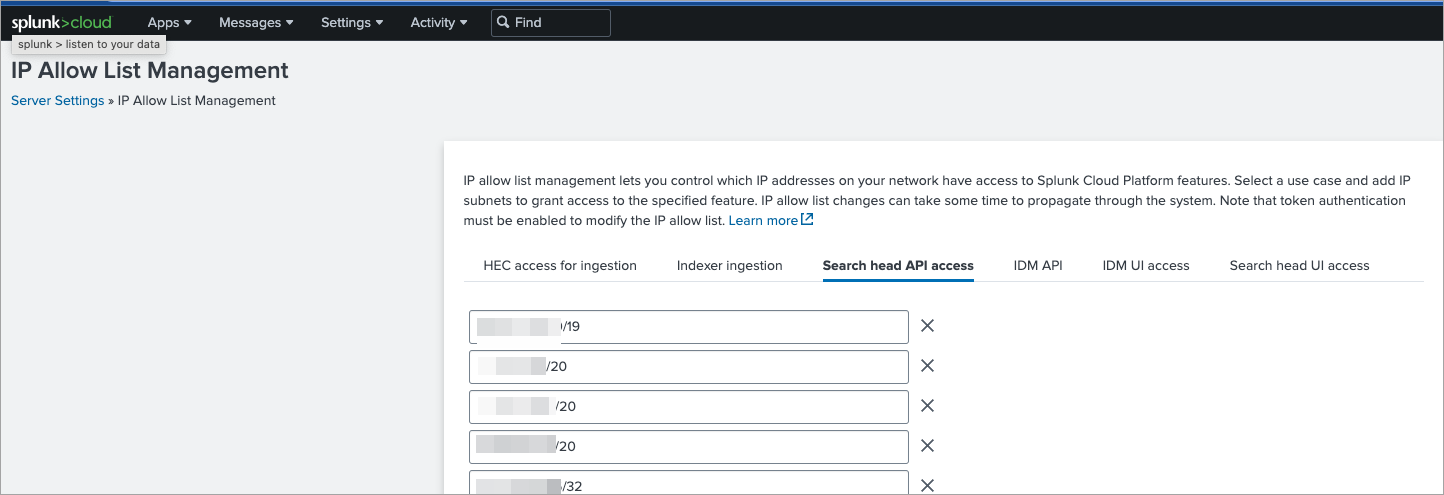
For more information see Determine IP allow list use case in the Splunk Cloud documentation.
Create a User Role and a User in the Splunk Cloud Console
The Splunk Cloud Collector supports two authentication methods: Basic and Token. If you choose to use the Token authentication method while creating a sharable account for Splunk cloud, ensure that you have a role User assigned to you. The token inherits the privileges or capabilities of the user who creates the token.
If you choose to use the Basic authentication method, you must create a new role and a user in the Splunk Cloud Console.
Create a New Role
To create a role:
Log in to the Splunk Cloud Console with your registered user name and password.
Navigate to Settings > Users and Authentication > Roles.
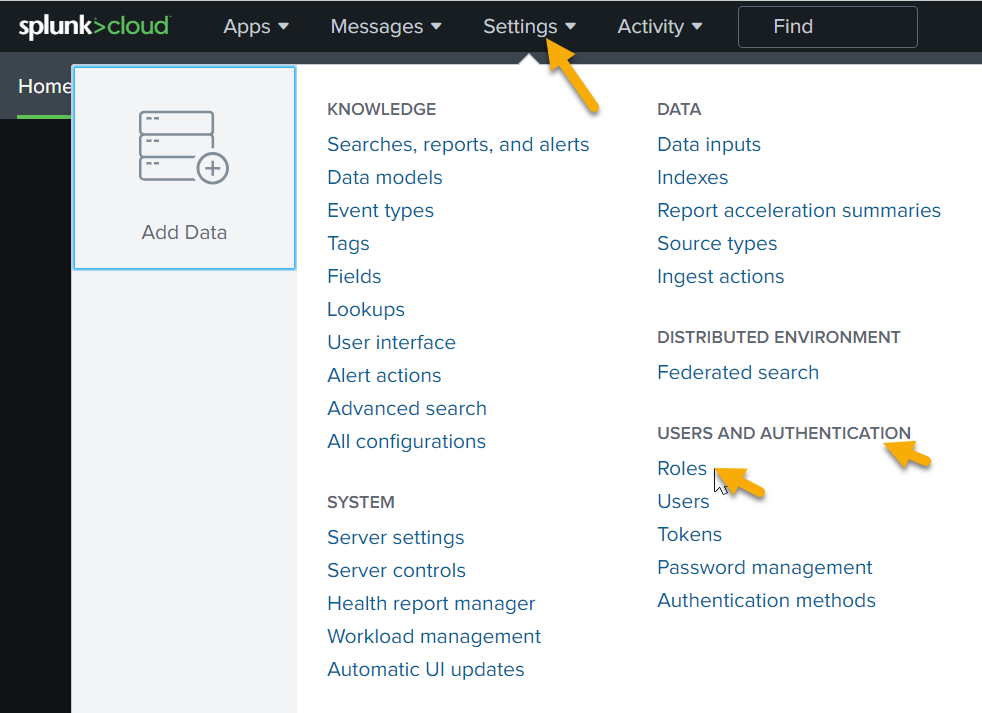
Click New Role.

In the Inheritance section, select the role user to let the new role inherit all the capabilities of the assigned role.
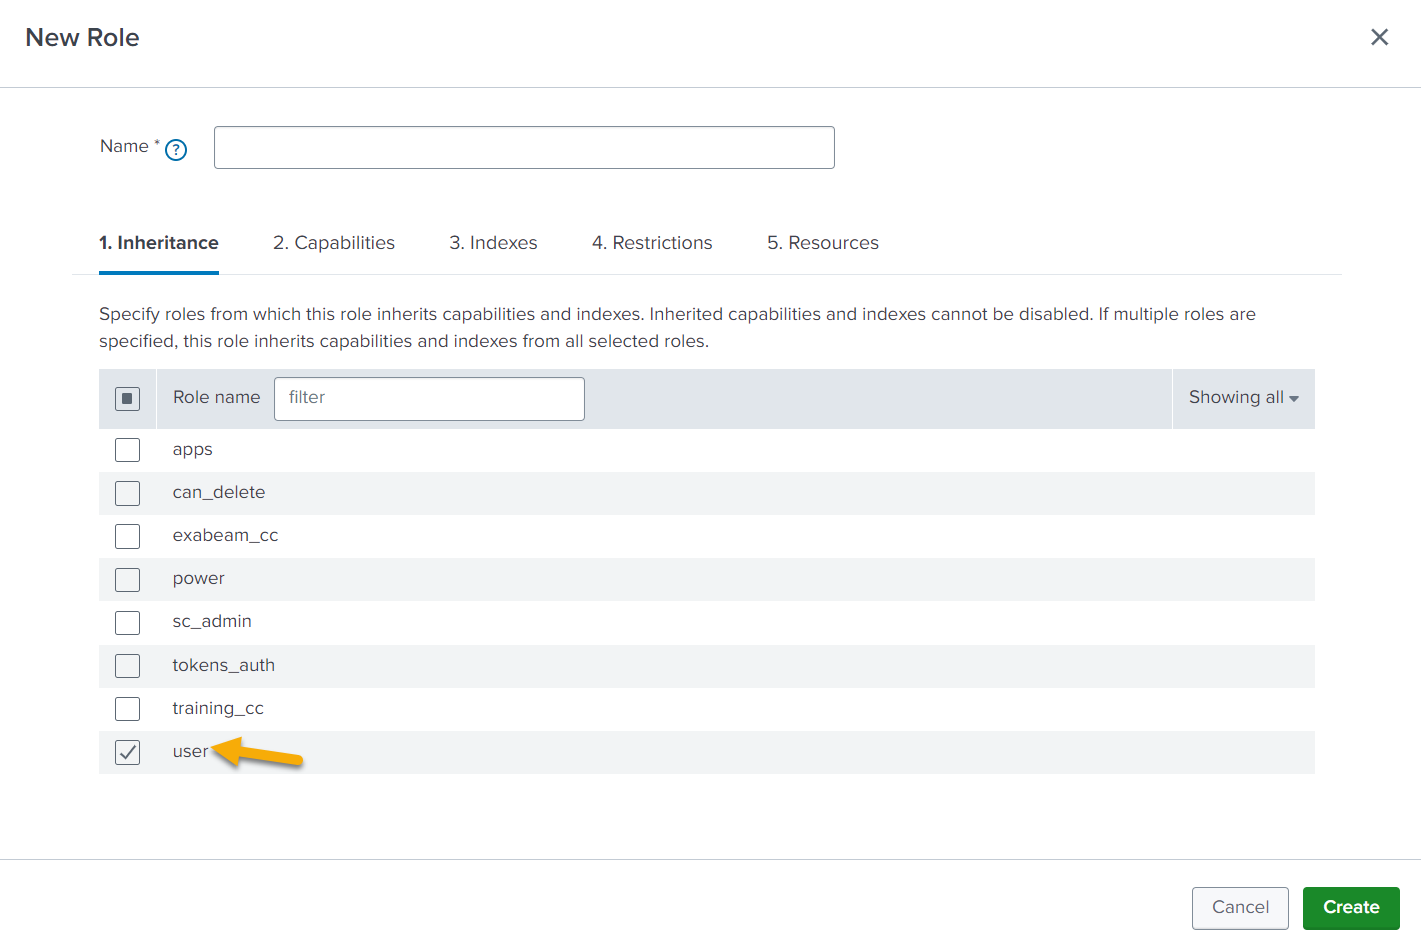
The Capabilities section displays the inherited capabilities of the selected role user.
The Indexes section displays the inherited (All non-internal indexes) of the selected role user .
Retain the default values for Restrictions.
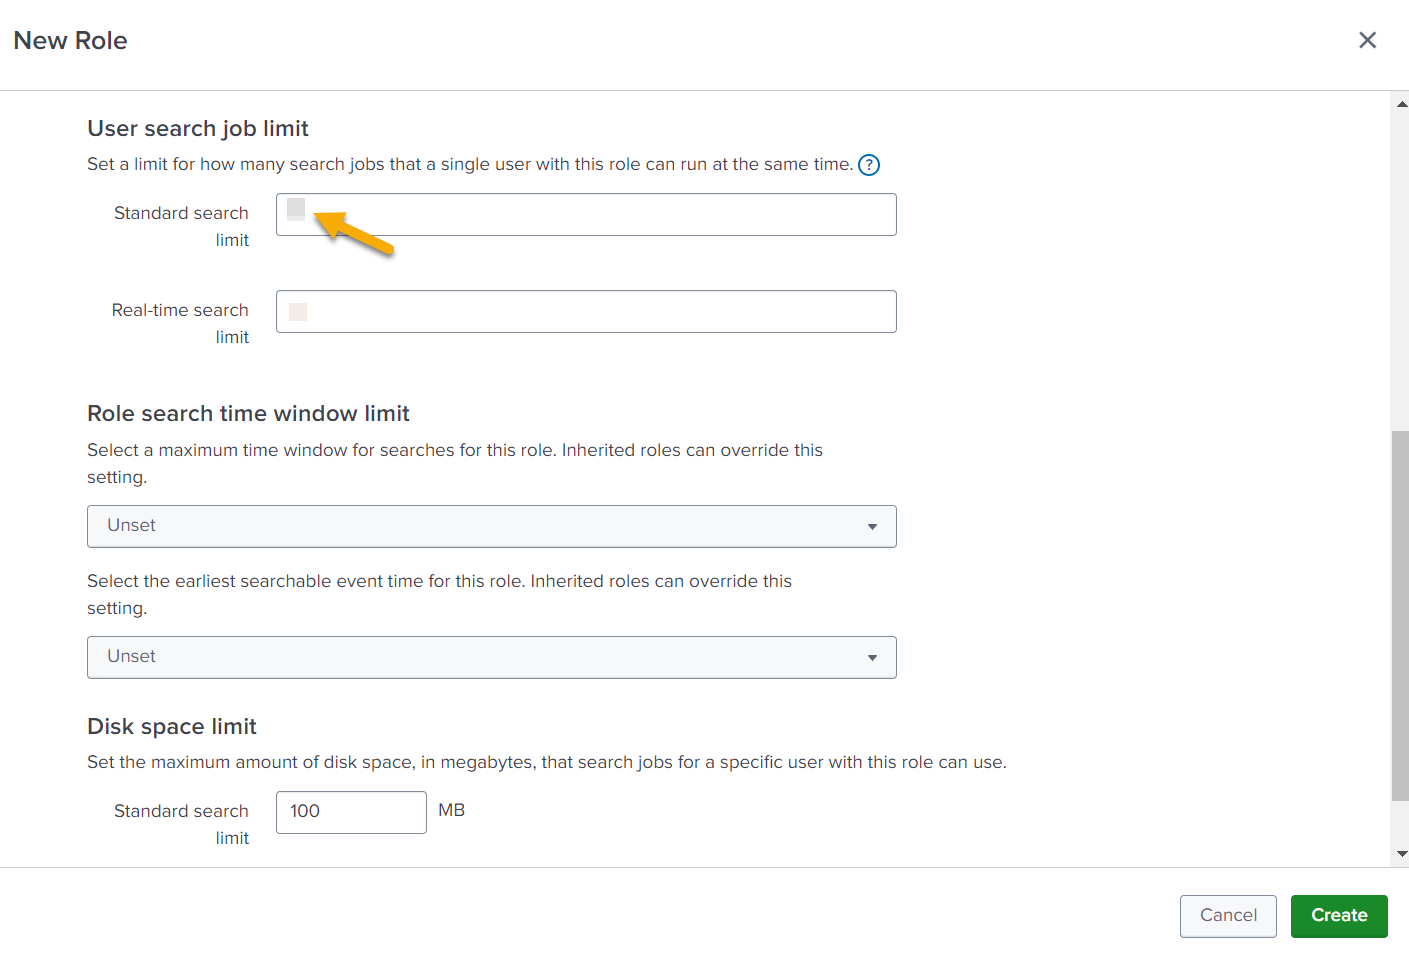
In the Resources section, set the limit for user search job. The Splunk Cloud Collector uses the standard search method to collect data based on the Splunk query. Set the Standard search limit to 20 in the User search job limit area. If any Splunk Cloud Collector instances display throttling errors, increase this limit.
Note
It is recommended to set the Splunk Search Job Limit to a value equal to twice the total number of Splunk queries configured in the Splunk Cloud Collectors. For example, if you have three collectors configured—Windows, Linux, and Firewall—the recommended Search Job Limit is six.
Click Create.
Use this role specifically for configuring the Exabeam Splunk Cloud Collector.
Create a New User
After you create a role in the Splunk cloud console, you can assign this role to the newly created user. To create a user:
Log in to the Splunk Cloud Console.
Navigate to Settings > Users and Authentication > Users.
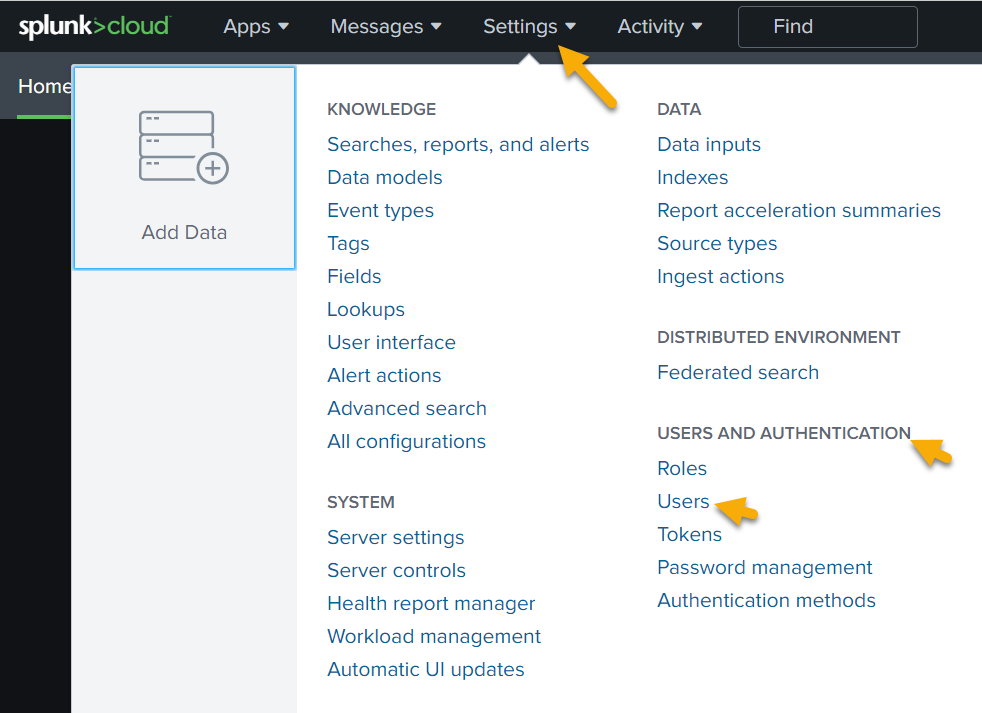
Click New User.
Enter the name and password for the new user. While creating a sharable account for the Splunk Cloud Collector, use this user name and password for the fields Login and Password for the Basic authentication method.
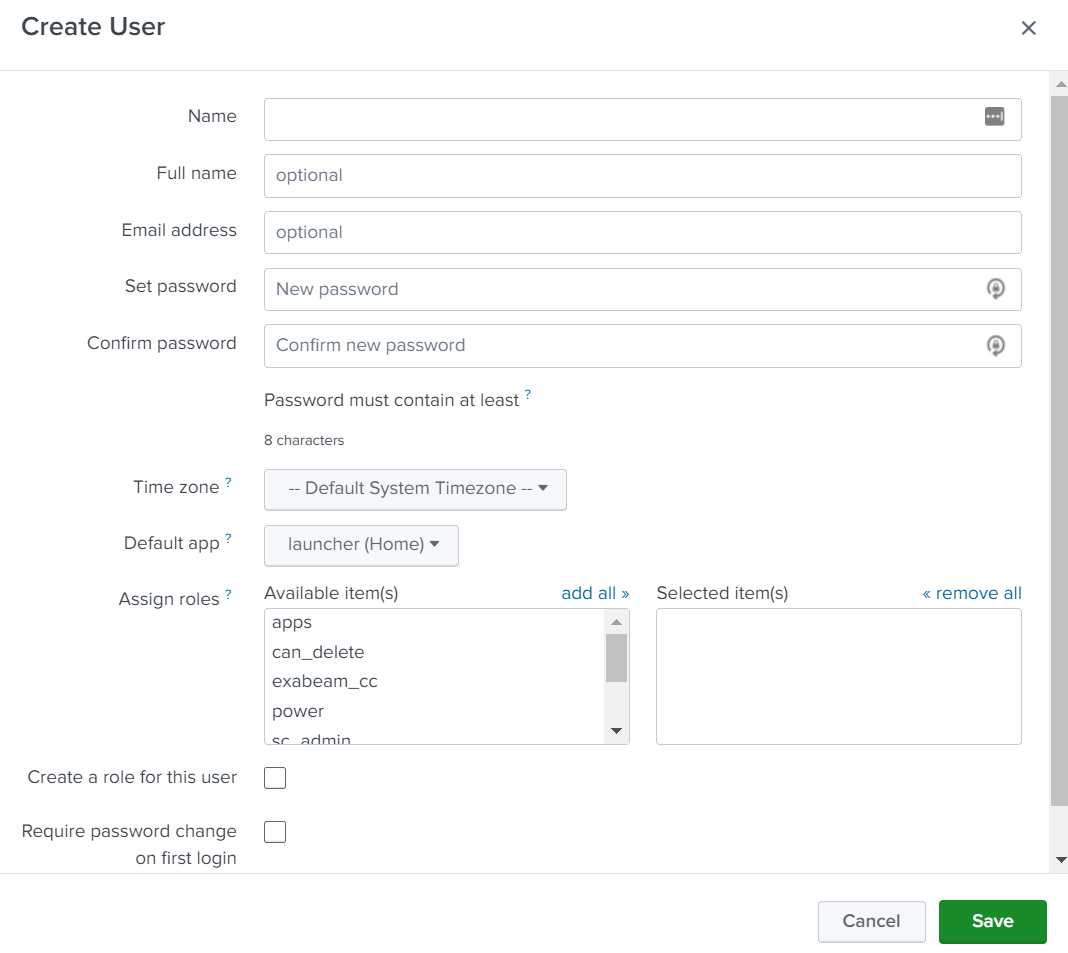
In the Assign roles section, assign the role that you created for the Exabeam Splunk Cloud Collector.
Clear the check boxes for the fields Create a role for this user and Require password change on first login.
Click Save.
A new user is created. When you create a user in the Splunk Cloud console, Splunk sets limits for a user to limit a user from overburdening the system with searches. To edit the role search job limit, user search job limit, role search time window limit, and disk space limit, navigate to Settings > Roles. For more information see Specify default app and search-related limits for a role in the Add and Edit Role section in the Splunk Cloud documentation.
