- Cloud Collectors Overview
- Administration
- Administrative Access
- Shareable Service Accounts
- Add Accounts for AWS Cloud Collectors
- Add Accounts for Cisco Duo Cloud Collector
- Add Accounts for Google Cloud Collectors
- Add Accounts for Microsoft Cloud Collectors
- Add Accounts for Okta Cloud Collectors
- Add Accounts for Salesforce Cloud Collectors
- Add Accounts for Splunk Cloud Collectors
- Add Accounts for Trend Micro Cloud Collectors
- Add Accounts for Wiz
- Define a Unique Site Name
- Sign Up for the Early Access Program
- Onboard Cloud Collectors
- Abnormal Security Cloud Collector
- Anomali Cloud Collector
- AWS CloudTrail Cloud Collectors
- AWS CloudWatch Cloud Collector
- AWS CloudWatch Alarms Cloud Collector
- AWS GuardDuty Cloud Collector
- AWS S3 Cloud Collector
- AWS Security Lake Cloud Collector
- AWS SQS Cloud Collector
- Azure Activity Logs Cloud Collector
- Azure Blob Storage Cloud Collector
- Azure Log Analytics Cloud Collector
- Azure Event Hub Cloud Collector
- Azure Storage Analytics Cloud Collector
- Azure Virtual Network Flow Cloud Collector
- Box Cloud Collector
- Broadcom Carbon Black Cloud Collector
- Cato Networks Cloud Collector
- ChatGPT Enterprise Cloud Collector
- Cisco Duo Cloud Collector
- Cisco Meraki Cloud Collector
- Cisco Secure Endpoint Cloud Collector
- Cisco Umbrella Cloud Collector
- Cloudflare Cloud Collector
- Cribl Cloud Collector
- CrowdStrike Cloud Collectors
- Cylance Protect (now Arctic Wolf) Cloud Collector
- DataBahn Cloud Collector
- Dropbox Cloud Collector
- GCP Cloud Logging Cloud Collector
- GCP Pub/Sub Cloud Collector
- GCP Security Command Center Cloud Collector
- Gemini Enterprise Cloud Collector
- GitHub Cloud Collector
- Gmail BigQuery Cloud Collector
- Google Workspace Cloud Collector
- LastPass Cloud Collector
- Microsoft Defender XDR (via Azure Event Hub) Cloud Collector
- Microsoft Entra ID Context Cloud Collector
- Microsoft Entra ID Logs Cloud Collector
- Microsoft 365 Exchange Admin Reports Cloud Collector
- Supported Sources from Microsoft 365 Exchange Admin Reports
- Migrate to the Microsoft 365 Exchange Admin Reports Cloud Collector
- Prerequisites to Configure the Microsoft 365 Exchange Admin Reports Cloud Collector
- Configure the Microsoft 365 Exchange Admin Reports Cloud Collector
- Troubleshooting the Microsoft 365 Exchange Admin Reports Cloud Collector
- Microsoft 365 Management Activity Cloud Collector
- Microsoft Security Alerts Cloud Collector
- Microsoft Sentinel (via Event Hub) Cloud Collector
- Mimecast Cloud Collector
- Mimecast Incydr Cloud Collector
- Netskope Alerts Cloud Collector
- Netskope Events Cloud Collector
- Okta Cloud Collector
- Okta Context Cloud Collector
- Palo Alto Networks Cortex Data Lake Cloud Collector
- Palo Alto Networks XDR Cloud Collector
- Progress ShareFile Cloud Collector
- Proofpoint On-Demand Cloud Collector
- Proofpoint Targeted Attack Protection Cloud Collector
- Qualys Cloud Collector
- Recorded Future Cloud Collector
- Recorded Future Context Cloud Collector
- Rest API Cloud Collector
- Salesforce Cloud Collector
- Salesforce EventLog Cloud Collector
- SentinelOne Alerts Cloud Collector
- SentinelOne Cloud Funnel Cloud Collector
- SentinelOne Threats Cloud Collector
- SentinelOne Cloud Collector
- ServiceNow Cloud Collector
- Slack Cloud Collector
- Snowflake Cloud Collector
- Sophos Central Cloud Collector
- Splunk Cloud Collector
- STIX/TAXII Cloud Collector
- Symantec Endpoint Security Cloud Collector
- Tenable Cloud Collector
- Trend Vision One Cloud Collector
- Trellix Endpoint Security Cloud Collector
- Vectra Cloud Collector
- Zoom Cloud Collector
- Zscaler ZIA Cloud Collector
- Webhook Cloud Collectors
- Wiz Issues Cloud Collector
- Wiz API Cloud Collector
- Troubleshooting Cloud Collectors
Prerequisites to Configure the ServiceNow Cloud Collector
Before you configure the ServiceNow cloud collector, you must complete the following prerequisites:
Ensure that you have ServiceNow Fuji release version or later.
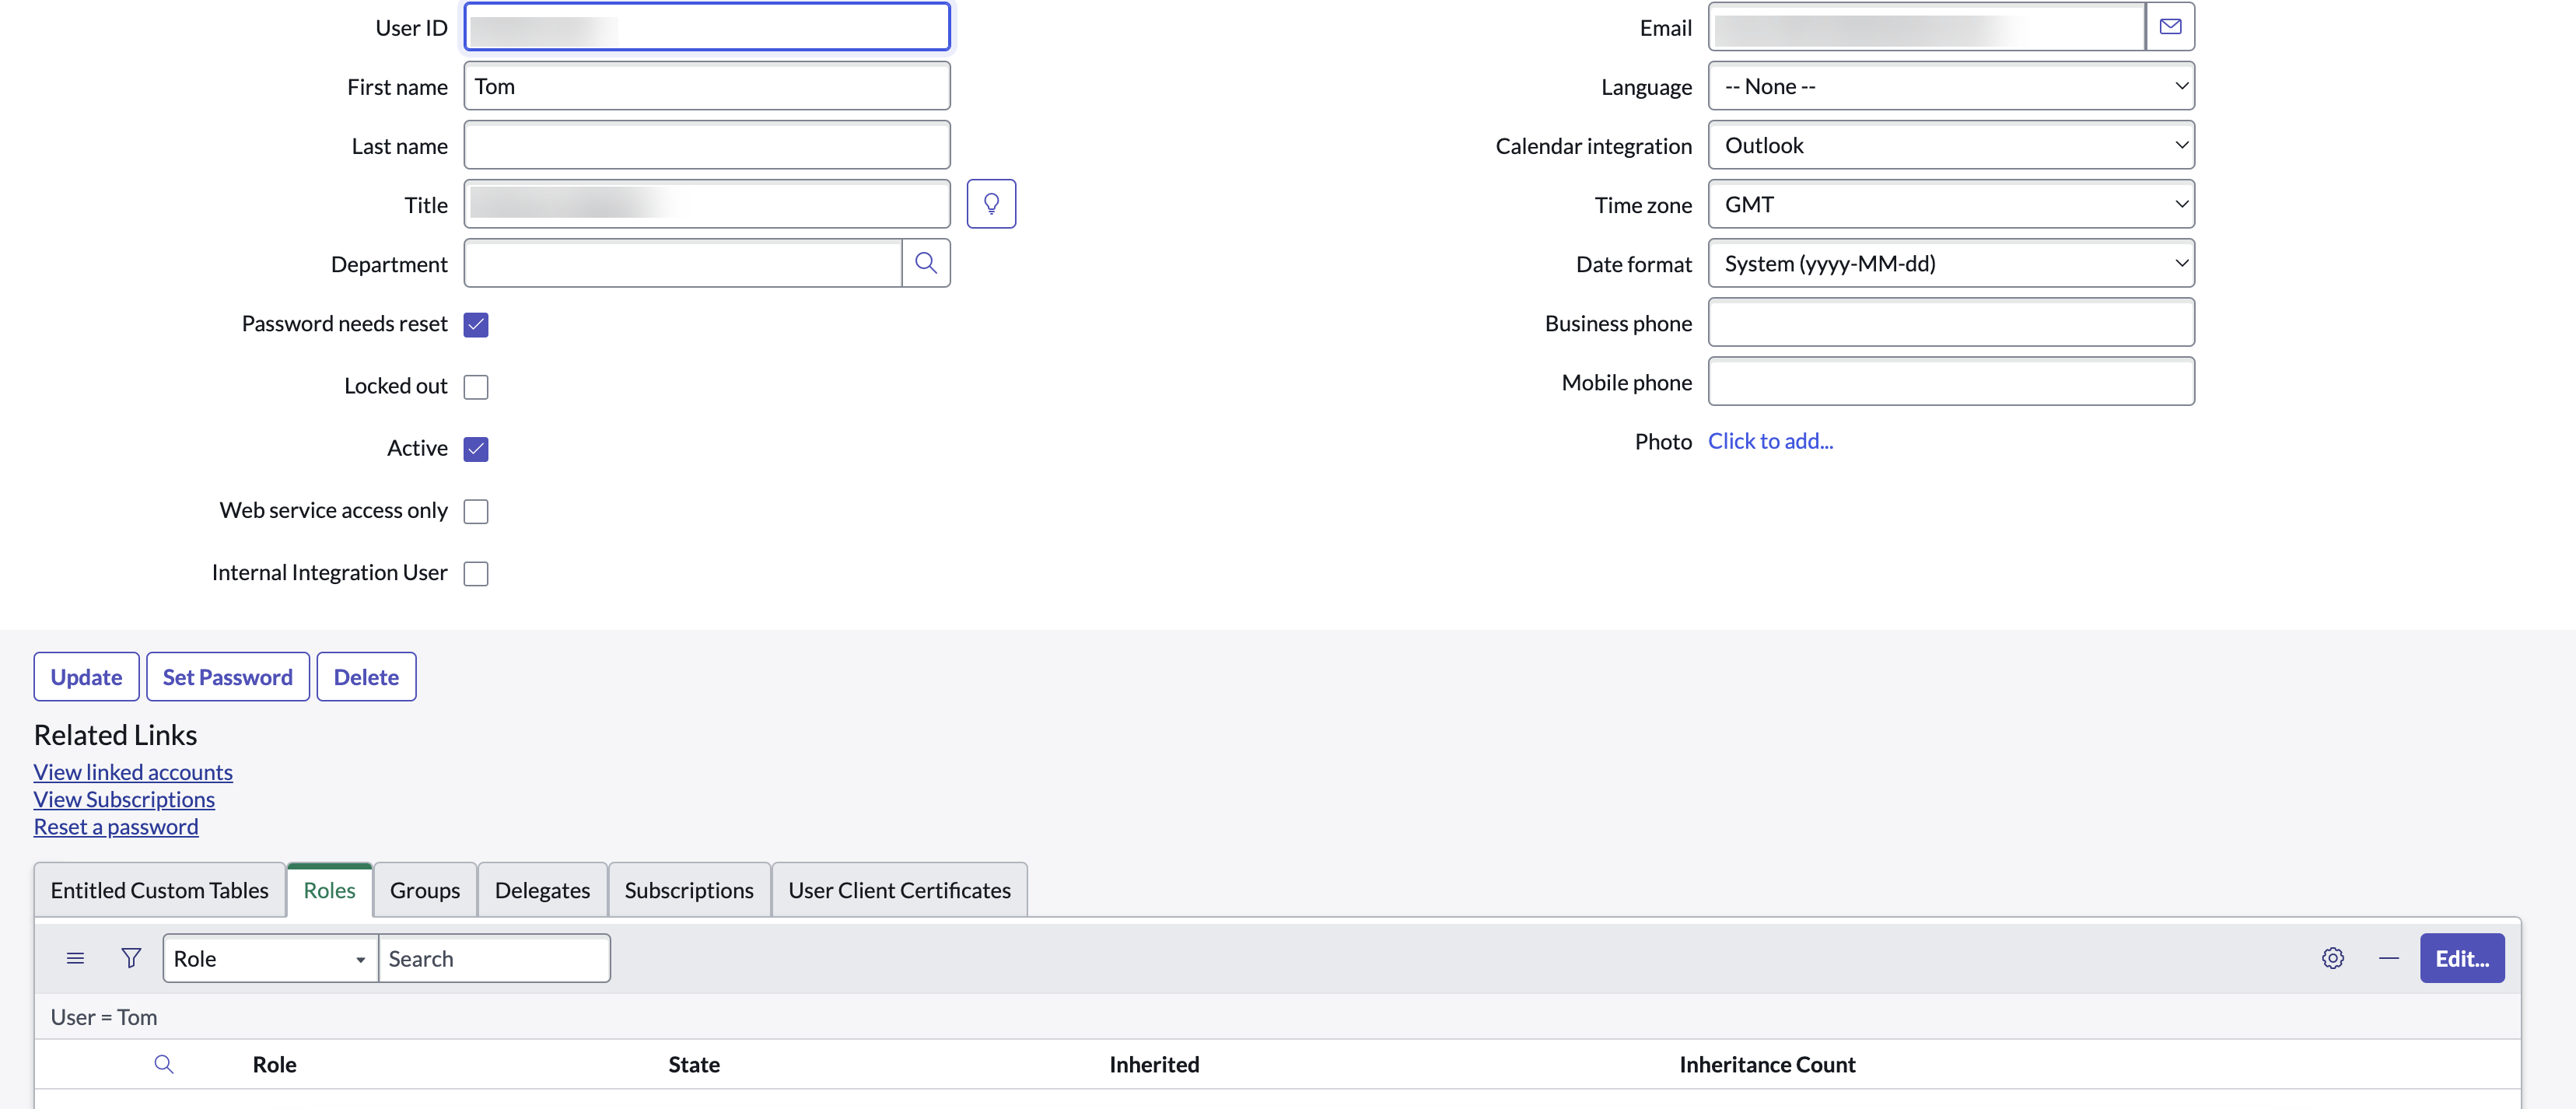
Create a new user and set the ServiceNow time zone as GMT.
Enable the client credential flow and obtain the client ID and secret.
Provide read permission for the following tables:
sysevent (login events)
sys_audit (user lockout and update related events)
sys_audit_role (roles related events)
sys_user (user added events)
pwd_reset_request (password reset events)
sys_attachment (attachment events)
syslog_transaction (resource views events)
report_view (report run events)
sys_user_role (roles defined, data enrichment)
change_request
change_task
incident
interaction
problem
sc_request
sc_task
Ensure that you enable table auditing for the following system tables to track changes:
sysevent (login events)
sys_audit_delete (user deleted events)
sys_audit (user lockout and update related events)
sys_audit_role (roles related events)
sys_user (user added events)
pwd_reset_request (password reset events)
sys_attachment (attachment events)
syslog_transaction (resource views events)
report_view (report run events)
change_request
change_task
incident
interaction
problem
sc_request
sc_task
Create a New User and Set the Time Zone
Use the following steps to create a new user and set the ServiceNow time zone.
Log in to the ServiceNow console as an administrator.
Navigate to User Administration > Users.
Click New. Then specify the details such as user ID, name, and email. Then set the TimeZone to GMT.

Note the user ID.
Click Submit.
Navigate to User Administration > Users.
Search for the user ID for the user that you created and click the user ID.
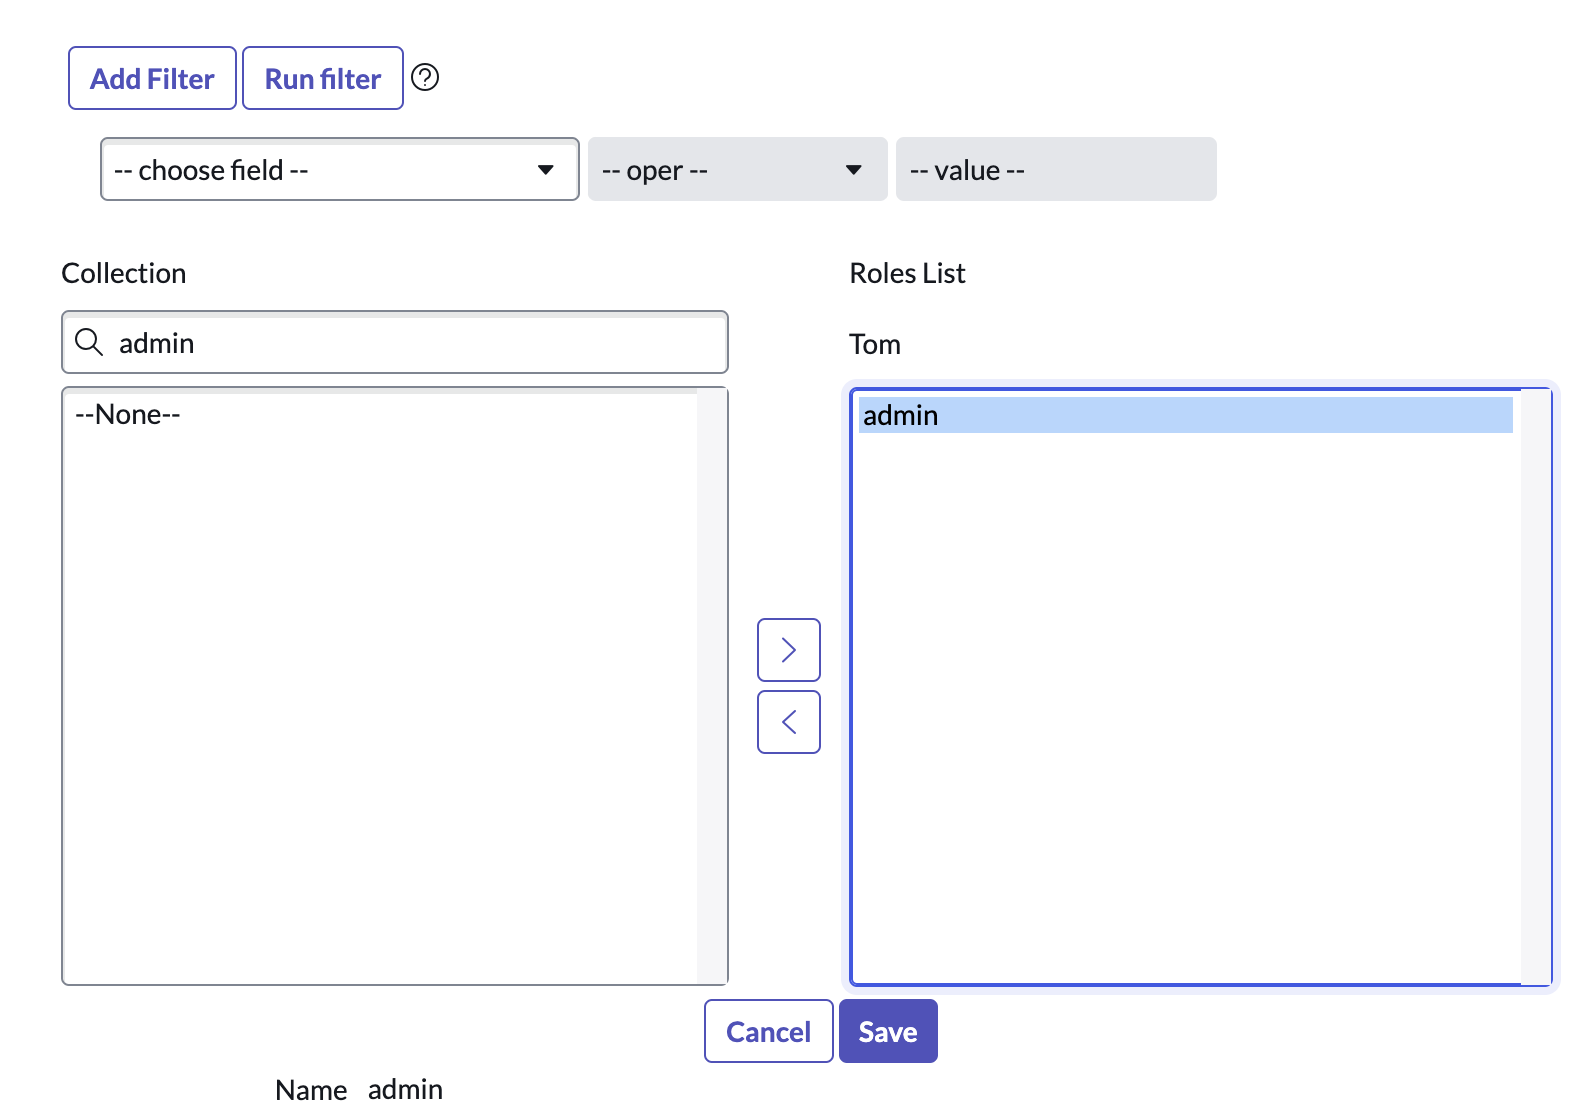
Click Role and click Edit.

Add the admin role, and click Save.

Click Set Password.

Generate the password and note the password for later use.
Click Save Password and Close.
Click Update.
Enable the Client Credential Flow
Using OAuth, you log in once by providing a user ID and password. Then use a token for future REST requests instead of entering your credentials each time. For more information obtaining the client ID, secret and access token, see Enable OAuth with inbound REST in the ServiceNow documentation.
Activate the OAuth 2.0 plugin. For more information, see Activate a plugin in the ServiceNow documentation.
Set the value for system property com.snc.platform.security.oauth.is.active to true.
Navigate to System OAuth > Application Registry. Then click New.
Click Create an OAuth API endpoint for external clients.
Record values for the client_id and client_secret for later use for requesting an access token.
To obtain the access token, send a request to the OAuth endpoint (oauth_token.do) using a REST client like CURL (a command-line tool) or Postman (a GUI-based API testing tool).
The API returns a response containing the access token, which you can use in future API requests to authenticate.
Record the access token for later use.
Enable Auditing for a Table
To enable auditing for a table:
Log in to the ServiceNow console as an administrator.
Navigate to System Definition > Dictionary.
Select the table you want to audit, in the list of dictionary entries. For example, cmdb_ci_computer or sys_user.
Select the dictionary entry for the table.
Select Audit to enable table auditing.
Click Update.
Note
Follow this procedure to enable and verify table auditing for multiple tables for which you want to get audit.
