- Cloud Collectors Overview
- Administration
- Administrative Access
- Shareable Service Accounts
- Add Accounts for AWS Cloud Collectors
- Add Accounts for Cisco Duo Cloud Collector
- Add Accounts for Google Cloud Collectors
- Add Accounts for Microsoft Cloud Collectors
- Add Accounts for Okta Cloud Collectors
- Add Accounts for Salesforce Cloud Collectors
- Add Accounts for Splunk Cloud Collectors
- Add Accounts for Trend Micro Cloud Collectors
- Add Accounts for Wiz
- Define a Unique Site Name
- Sign Up for the Early Access Program
- Onboard Cloud Collectors
- Abnormal Security Cloud Collector
- Anomali Cloud Collector
- AWS CloudTrail Cloud Collectors
- AWS CloudWatch Cloud Collector
- AWS CloudWatch Alarms Cloud Collector
- AWS GuardDuty Cloud Collector
- AWS S3 Cloud Collector
- AWS Security Lake Cloud Collector
- AWS SQS Cloud Collector
- Azure Activity Logs Cloud Collector
- Azure Blob Storage Cloud Collector
- Azure Log Analytics Cloud Collector
- Azure Event Hub Cloud Collector
- Azure Storage Analytics Cloud Collector
- Azure Virtual Network Flow Cloud Collector
- Box Cloud Collector
- Broadcom Carbon Black Cloud Collector
- Cato Networks Cloud Collector
- ChatGPT Enterprise Cloud Collector
- Cisco Duo Cloud Collector
- Cisco Meraki Cloud Collector
- Cisco Secure Endpoint Cloud Collector
- Cisco Umbrella Cloud Collector
- Cloudflare Cloud Collector
- Cribl Cloud Collector
- CrowdStrike Cloud Collectors
- Cylance Protect (now Arctic Wolf) Cloud Collector
- DataBahn Cloud Collector
- Dropbox Cloud Collector
- GCP Cloud Logging Cloud Collector
- GCP Pub/Sub Cloud Collector
- GCP Security Command Center Cloud Collector
- Gemini Enterprise Cloud Collector
- GitHub Cloud Collector
- Gmail BigQuery Cloud Collector
- Google Workspace Cloud Collector
- LastPass Cloud Collector
- Microsoft Defender XDR (via Azure Event Hub) Cloud Collector
- Microsoft Entra ID Context Cloud Collector
- Microsoft Entra ID Logs Cloud Collector
- Microsoft 365 Exchange Admin Reports Cloud Collector
- Supported Sources from Microsoft 365 Exchange Admin Reports
- Migrate to the Microsoft 365 Exchange Admin Reports Cloud Collector
- Prerequisites to Configure the Microsoft 365 Exchange Admin Reports Cloud Collector
- Configure the Microsoft 365 Exchange Admin Reports Cloud Collector
- Troubleshooting the Microsoft 365 Exchange Admin Reports Cloud Collector
- Microsoft 365 Management Activity Cloud Collector
- Microsoft Security Alerts Cloud Collector
- Microsoft Sentinel (via Event Hub) Cloud Collector
- Mimecast Cloud Collector
- Mimecast Incydr Cloud Collector
- Netskope Alerts Cloud Collector
- Netskope Events Cloud Collector
- Okta Cloud Collector
- Okta Context Cloud Collector
- Palo Alto Networks Cortex Data Lake Cloud Collector
- Palo Alto Networks XDR Cloud Collector
- Progress ShareFile Cloud Collector
- Proofpoint On-Demand Cloud Collector
- Proofpoint Targeted Attack Protection Cloud Collector
- Qualys Cloud Collector
- Recorded Future Cloud Collector
- Recorded Future Context Cloud Collector
- Rest API Cloud Collector
- S2W Threat Intelligence Cloud Collector
- Salesforce Cloud Collector
- Salesforce EventLog Cloud Collector
- SentinelOne Alerts Cloud Collector
- SentinelOne Cloud Funnel Cloud Collector
- SentinelOne Threats Cloud Collector
- SentinelOne Cloud Collector
- ServiceNow Cloud Collector
- Slack Cloud Collector
- Snowflake Cloud Collector
- Sophos Central Cloud Collector
- Splunk Cloud Collector
- STIX/TAXII Cloud Collector
- Symantec Endpoint Security Cloud Collector
- Tenable Cloud Collector
- Trend Vision One Cloud Collector
- Trellix Endpoint Security Cloud Collector
- Vectra Cloud Collector
- Zoom Cloud Collector
- Zscaler ZIA Cloud Collector
- Webhook Cloud Collectors
- Wiz Issues Cloud Collector
- Wiz API Cloud Collector
- Troubleshooting Cloud Collectors
Add Accounts for Salesforce Cloud Collectors
To set up a shareable account for Salesforce, ensure that you complete the following steps.
Configure a connected app in Salesforce for the OAuth 2.0 client credentials flow. Ensure that you select the Enable Client Credential Flow option while creating the connected app.
Obtain the consumer key and consumer secret after creating the connected app. For more information, see Create a Connected App in the Salesforce documentation.
Add a shareable account for the Salesforce service in Cloud Collectors.
Configure a Connected App
To create a connected app, refer to the following information.
In Setup, in the Quick Find box enter
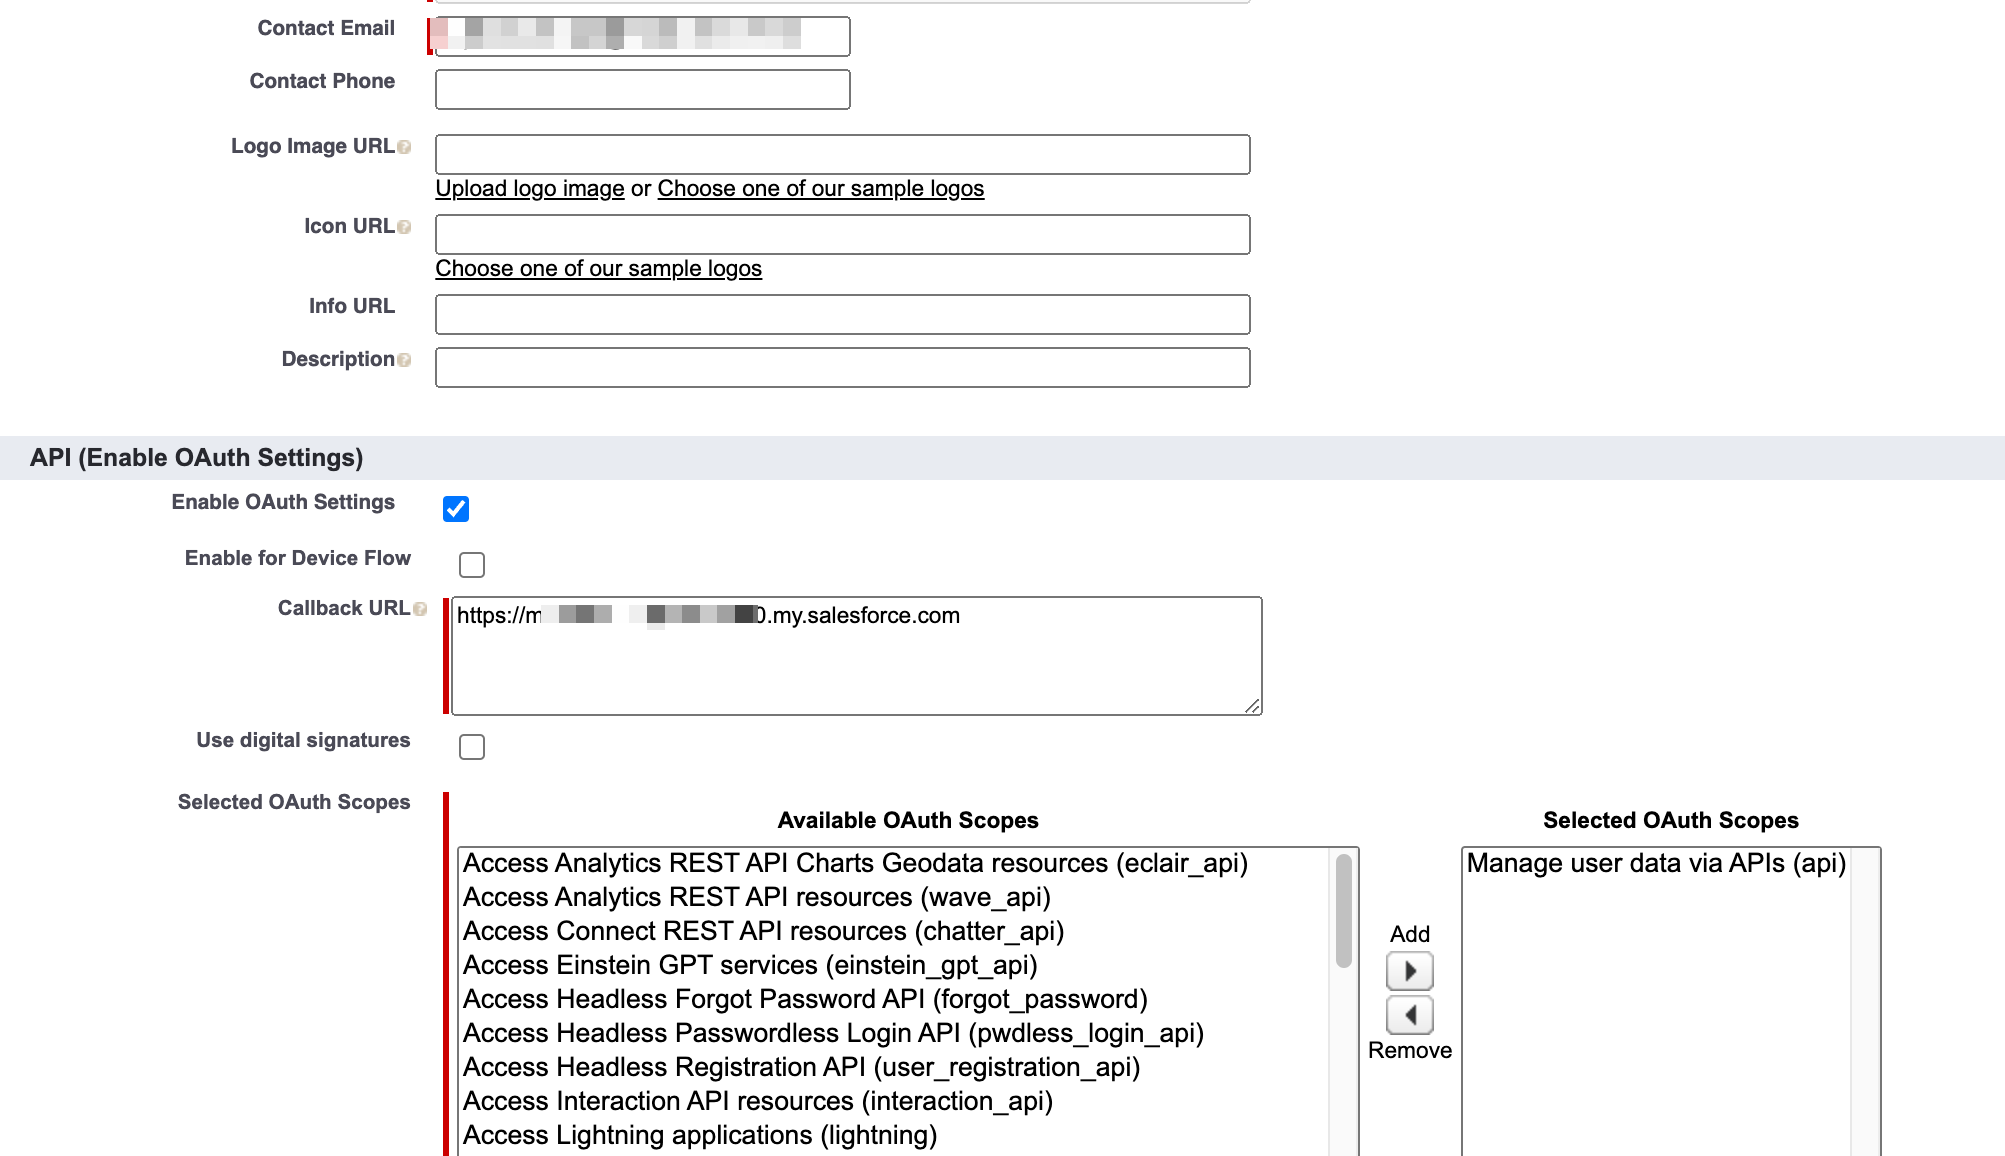
Apps, and select App Manager.Click New Connected App and complete the basic set up. For more information see Configure Basic Connected App Settings in the Salesforce documentation.
Configure the required OAuth settings for the connected app.

Enable the client credentials flow for your connected app.
After you save the changes, the connected app is saved in the App Manager.
For more information, see Configure a Connected App for the OAuth 2.0 Client Credentials Flow in the Salesforce documentation.
Select an execution user for the flow.
On the connected app detail page, click Manage.
Click Edit Policies.
Under Client Credentials Flow, in the Run As search box, find the user that you want to assign the client credentials flow. Ensure that this is the same user that you created as Salesforce user by accessing Setup > Administration > Users > Users as explained in the Create a User in Salesforce section.
Save the changes.
For more information, see Configure a Connected App for the OAuth 2.0 Client Credentials Flow in the Salesforce documentation.
Obtain the Consumer Key and Consumer Secret
To obtain the consumer key and secret, refer to the following steps.
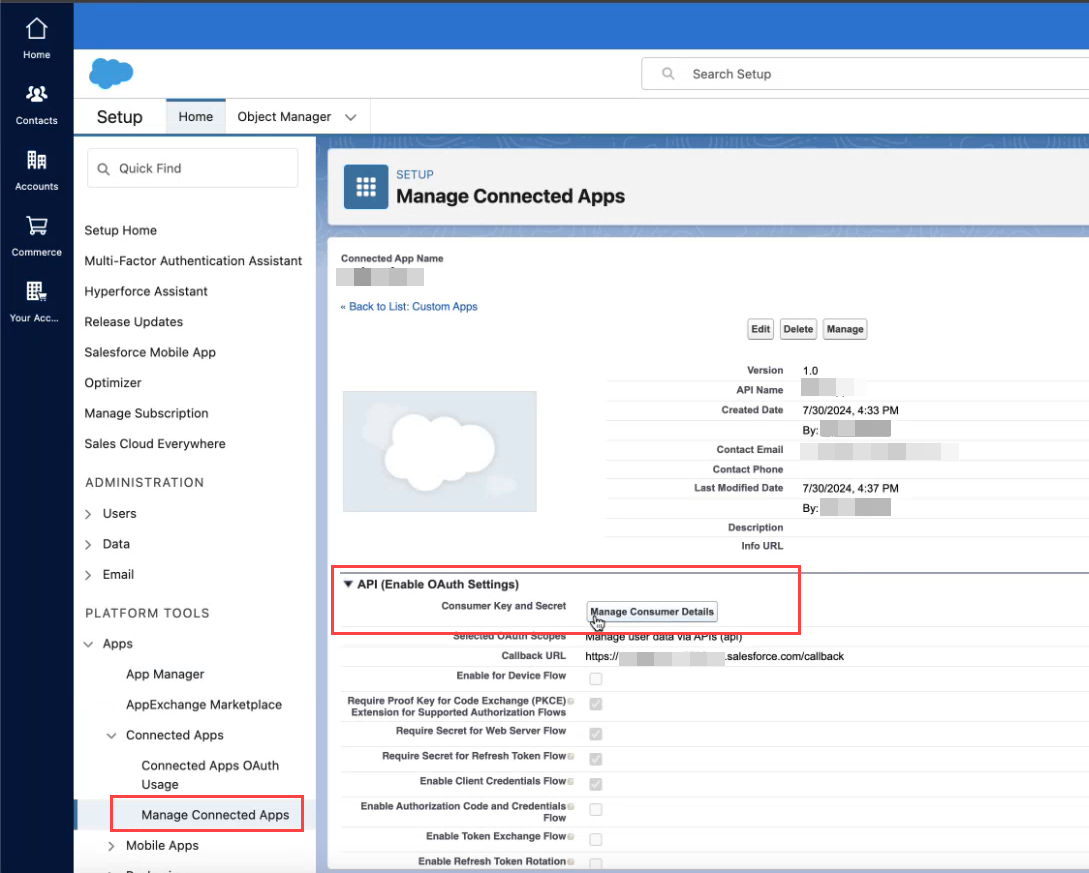
After you configure a connected app in Salesforce, navigate to Apps > App Manager.
Click View for the connected app that you created.
In the API (Enable OAuth Settings) section, click Manage Consumer Details and note the consumer key and consumer secret.

Add a shareable account in Cloud Collectors
Set up a shareable account for the Salesforce service in Cloud Collectors.
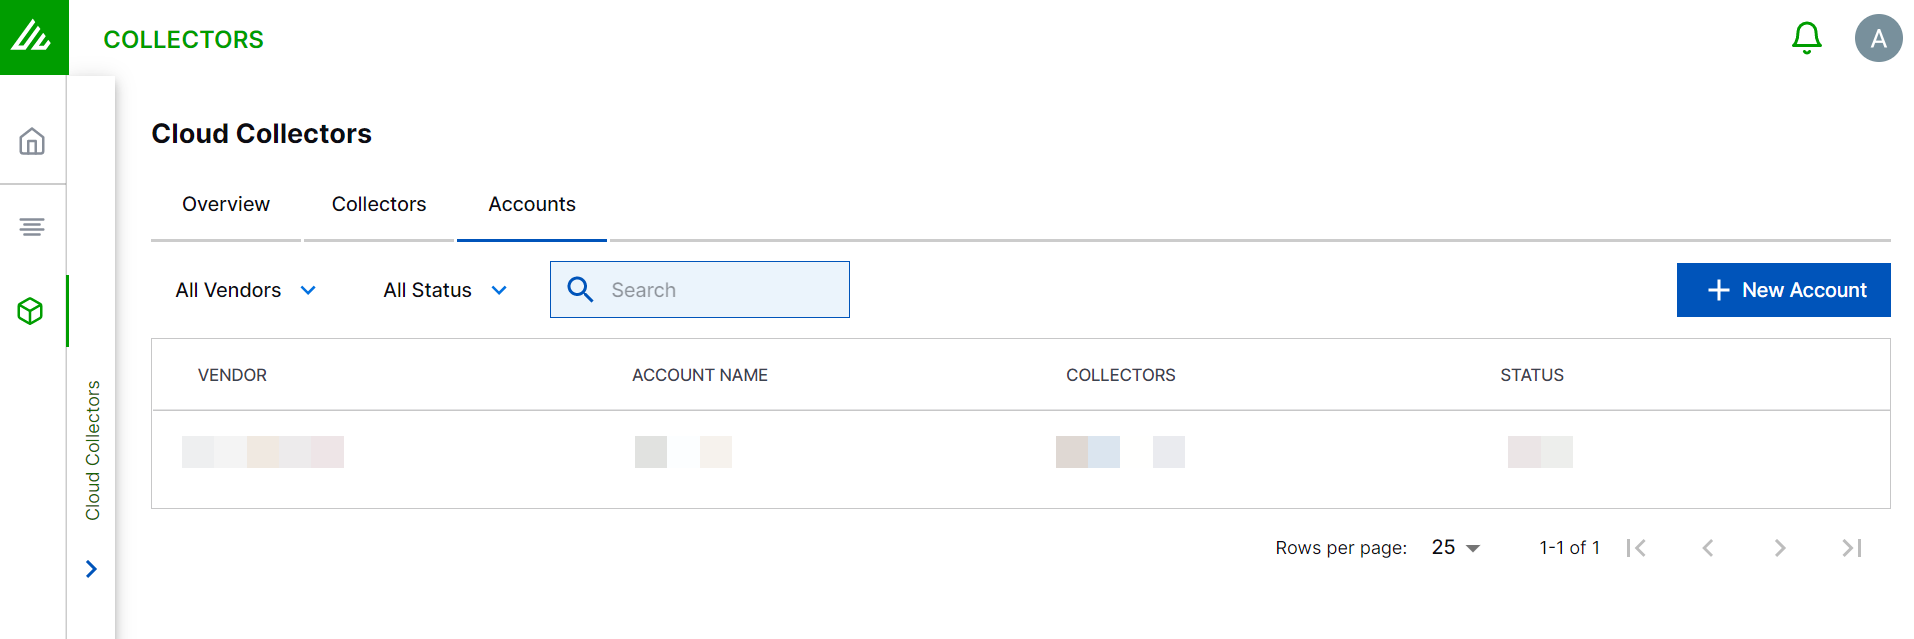
Log in to the New-Scale Security Operations Platform with your registered credentials as an administrator.
Navigate to Collectors > Cloud Collectors.
Click Accounts, then click New Account.

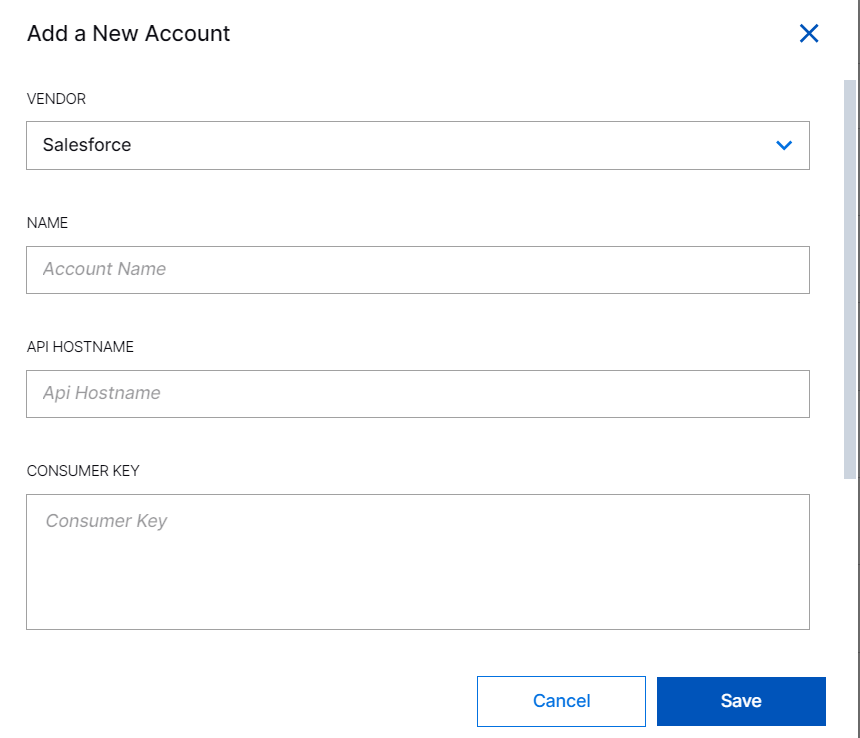
In the Add a New Account page, enter the required information.

VENDOR – Select the vendor as Salesforce.
NAME – Specify a name for the Salesforce account.
API HOSTNAME – Enter the hostname. For example, https://myCompany.my.salesforce.com.
CONSUMER KEY – Enter the consumer key that you obtained while creating the connected app in Salesforce.
CONSUMER SECRET – Enter the consumer secret that you obtained while creating a connected app in Salesforce.
Click Save.
Proceed to Onboard Cloud Collectors to configure your Salesforce Cloud Collector, such as Salesforce cloud collector.
