- Cloud Collectors Overview
- Administration
- Administrative Access
- Shareable Service Accounts
- Add Accounts for AWS Cloud Collectors
- Add Accounts for Cisco Duo Cloud Collector
- Add Accounts for Google Cloud Collectors
- Add Accounts for Microsoft Cloud Collectors
- Add Accounts for Okta Cloud Collectors
- Add Accounts for Salesforce Cloud Collectors
- Add Accounts for Splunk Cloud Collectors
- Add Accounts for Trend Micro Cloud Collectors
- Add Accounts for Wiz
- Define a Unique Site Name
- Sign Up for the Early Access Program
- Onboard Cloud Collectors
- Abnormal Security Cloud Collector
- Anomali Cloud Collector
- AWS CloudTrail Cloud Collectors
- AWS CloudWatch Cloud Collector
- AWS CloudWatch Alarms Cloud Collector
- AWS GuardDuty Cloud Collector
- AWS S3 Cloud Collector
- AWS Security Lake Cloud Collector
- AWS SQS Cloud Collector
- Azure Activity Logs Cloud Collector
- Azure Blob Storage Cloud Collector
- Azure Log Analytics Cloud Collector
- Azure Event Hub Cloud Collector
- Azure Storage Analytics Cloud Collector
- Azure Virtual Network Flow Cloud Collector
- Box Cloud Collector
- Broadcom Carbon Black Cloud Collector
- Cato Networks Cloud Collector
- ChatGPT Enterprise Cloud Collector
- Cisco Duo Cloud Collector
- Cisco Meraki Cloud Collector
- Cisco Secure Endpoint Cloud Collector
- Cisco Umbrella Cloud Collector
- Cloudflare Cloud Collector
- Cribl Cloud Collector
- CrowdStrike Cloud Collectors
- Cylance Protect (now Arctic Wolf) Cloud Collector
- DataBahn Cloud Collector
- Dropbox Cloud Collector
- GCP Cloud Logging Cloud Collector
- GCP Pub/Sub Cloud Collector
- GCP Security Command Center Cloud Collector
- Gemini Enterprise Cloud Collector
- GitHub Cloud Collector
- Gmail BigQuery Cloud Collector
- Google Workspace Cloud Collector
- LastPass Cloud Collector
- Microsoft Defender XDR (via Azure Event Hub) Cloud Collector
- Microsoft Entra ID Context Cloud Collector
- Microsoft Entra ID Logs Cloud Collector
- Microsoft 365 Exchange Admin Reports Cloud Collector
- Supported Sources from Microsoft 365 Exchange Admin Reports
- Migrate to the Microsoft 365 Exchange Admin Reports Cloud Collector
- Prerequisites to Configure the Microsoft 365 Exchange Admin Reports Cloud Collector
- Configure the Microsoft 365 Exchange Admin Reports Cloud Collector
- Troubleshooting the Microsoft 365 Exchange Admin Reports Cloud Collector
- Microsoft 365 Management Activity Cloud Collector
- Microsoft Security Alerts Cloud Collector
- Microsoft Sentinel (via Event Hub) Cloud Collector
- Mimecast Cloud Collector
- Mimecast Incydr Cloud Collector
- Netskope Alerts Cloud Collector
- Netskope Events Cloud Collector
- Okta Cloud Collector
- Okta Context Cloud Collector
- Palo Alto Networks Cortex Data Lake Cloud Collector
- Palo Alto Networks XDR Cloud Collector
- Progress ShareFile Cloud Collector
- Proofpoint On-Demand Cloud Collector
- Proofpoint Targeted Attack Protection Cloud Collector
- Qualys Cloud Collector
- Recorded Future Cloud Collector
- Recorded Future Context Cloud Collector
- Rest API Cloud Collector
- Salesforce Cloud Collector
- Salesforce EventLog Cloud Collector
- SentinelOne Alerts Cloud Collector
- SentinelOne Cloud Funnel Cloud Collector
- SentinelOne Threats Cloud Collector
- SentinelOne Cloud Collector
- ServiceNow Cloud Collector
- Slack Cloud Collector
- Snowflake Cloud Collector
- Sophos Central Cloud Collector
- Splunk Cloud Collector
- STIX/TAXII Cloud Collector
- Symantec Endpoint Security Cloud Collector
- Tenable Cloud Collector
- Trend Vision One Cloud Collector
- Trellix Endpoint Security Cloud Collector
- Vectra Cloud Collector
- Zoom Cloud Collector
- Zscaler ZIA Cloud Collector
- Webhook Cloud Collectors
- Wiz Issues Cloud Collector
- Wiz API Cloud Collector
- Troubleshooting Cloud Collectors
Prerequisites to Configure the Mimecast Cloud Collector
Before you configure the Mimecast Email Security cloud collector you must complete the following prerequisites:
Ensure that you have the Mimecast administrator role.
Use user persona enrichment to ensure that Mimecast syncs groups and users that are used for enrichment of the events. To use user persona enrichment, you must have the Mimecast administrator role with Directories, Internal, and Read permission.
Ensure that you assign the required permissions for the required endpoints.
Obtain the client ID and client secret by creating a Mimecast API application.
Assign the Required Permissions
To set the required permissions, ensure that you have an administrator role. If you do not have the administrator role, create a new administrator role with the required permissions, and then set up an API application.
Ensure that you have the permissions mentioned in the table below for the required endpoints by navigating to to Account > Admin Roles to access Application Permissions and set the required permissions.
For example, to set permissions for Archive Search Logs endpoint, in the Application Permissions section, expand the Archive menu and select Read permission for Search Logs. Remove any other permissions. Similarly you can set permissions for other endpoints.
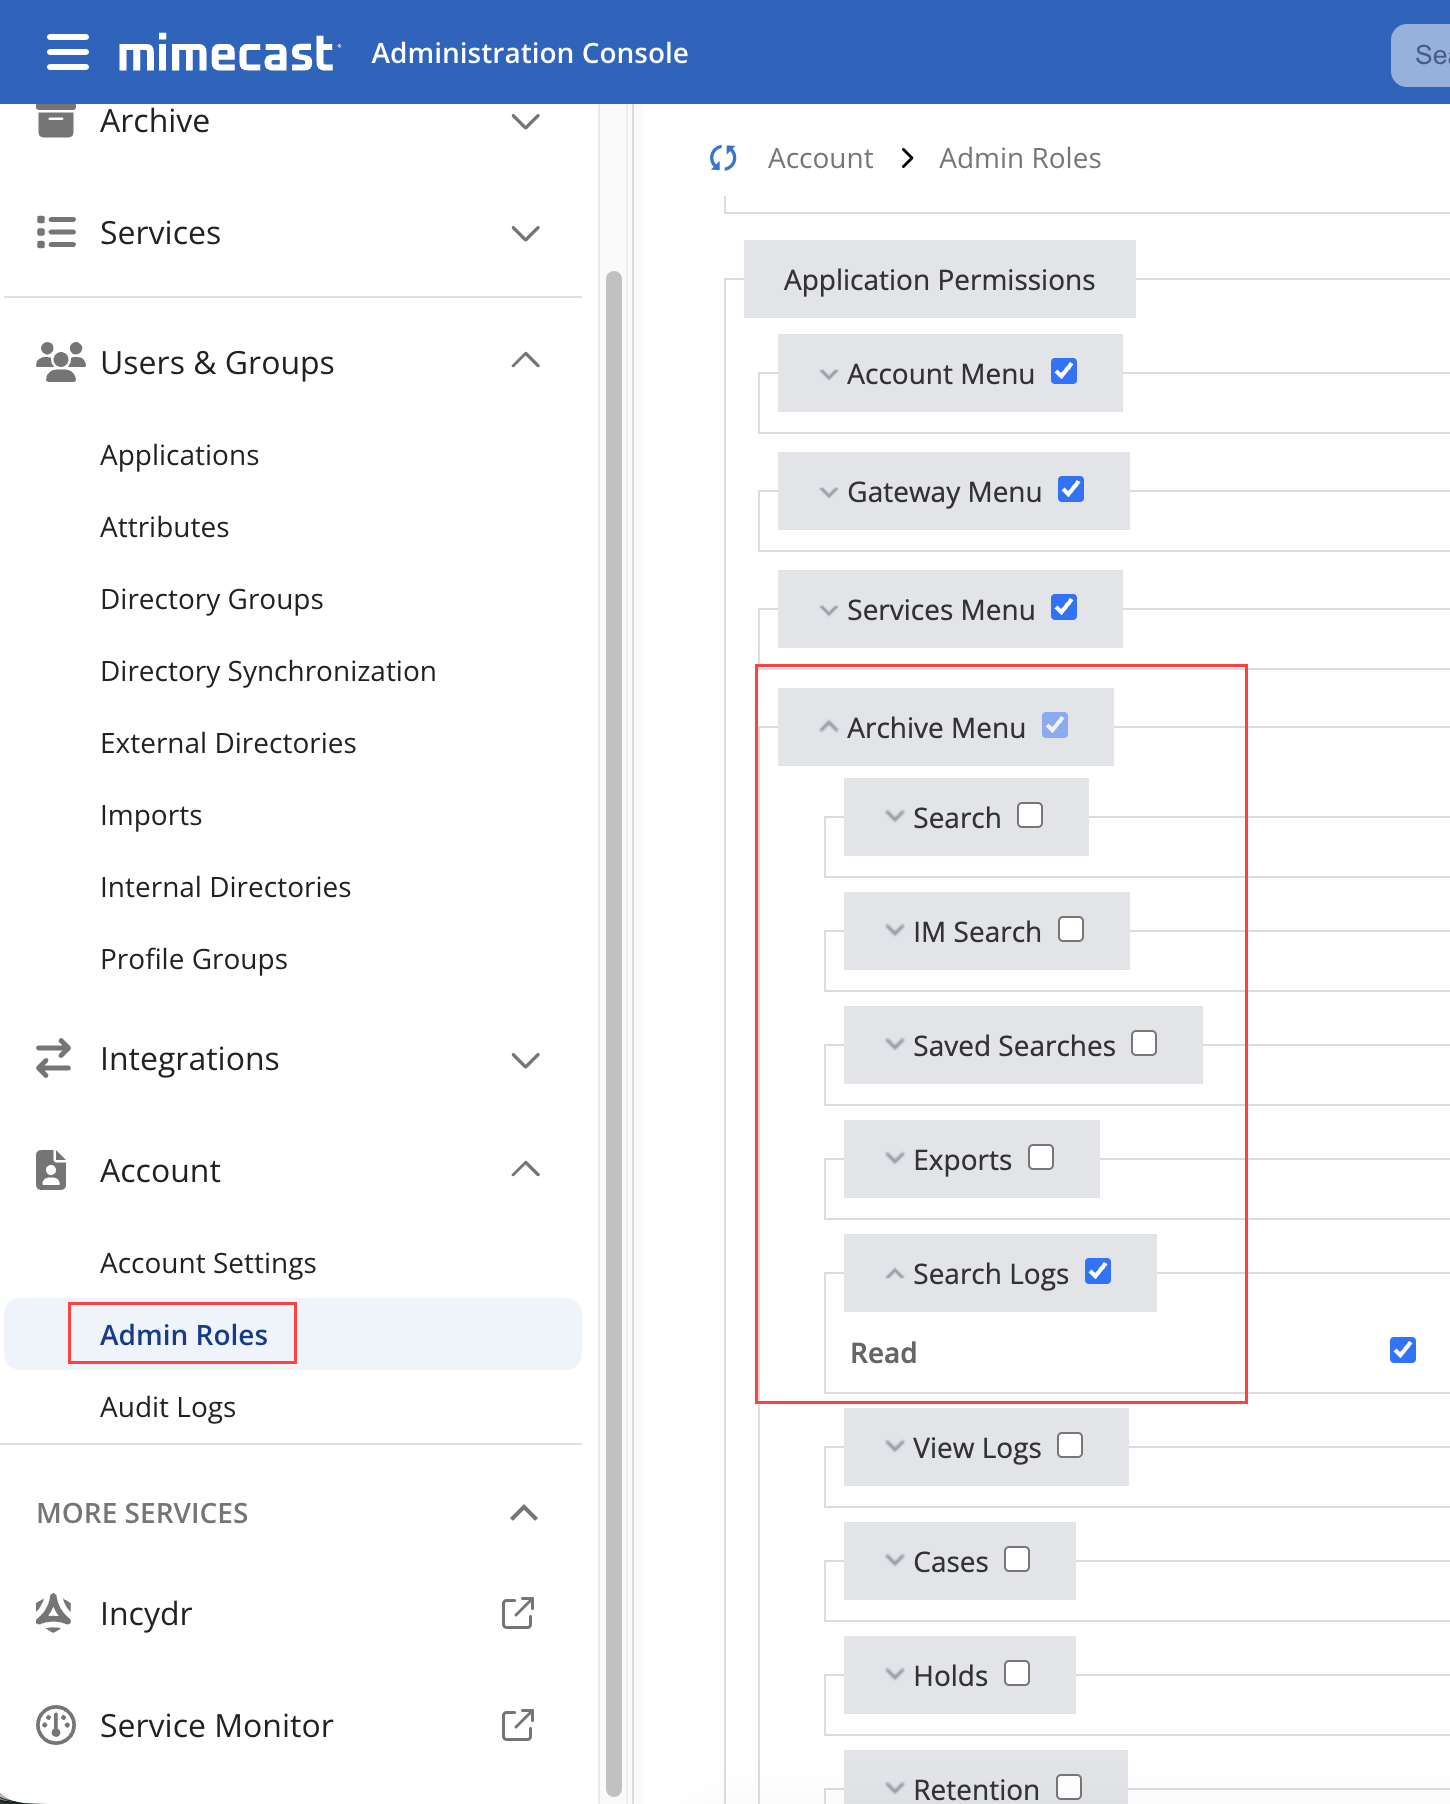
The following table displays the endpoint name, associated product, and the navigation to set the required permission along with the permission name.
Endpoint Name | Product | Required Permissions |
|---|---|---|
Archive Search Logs | Audit Events | Archive > Search Logs > Read |
Archive Message View Logs | Audit Events | Archive > View Logs > Read |
TTP URL Logs | Security Events | Monitoring > URL Protection > Read |
TTP Impersonation Protect Logs | Security Events | Monitoring > Impersonation Protection > Read |
Attachment Protection Logs | Security Events | Monitoring > Attachment Protection > Read |
Audit Events | Audit Events | Account > Logs > Read |
SIEM Logs (MTA) | Threats, Security Events and Data for CG | Security Events and Data Retrieval > Threat and Security Events (SIEM) > Read |
Create a Mimecast API Application to Obtain Client ID and Secret Keys
To create a Mimecast Email Security API application and obtain the client ID and client secret keys:
Log in to the Mimecast administrator console.
Navigate to Integrations > API and Platform Integrations.
Navigate to Mimecast API 2.0 tile and click Generate Keys.
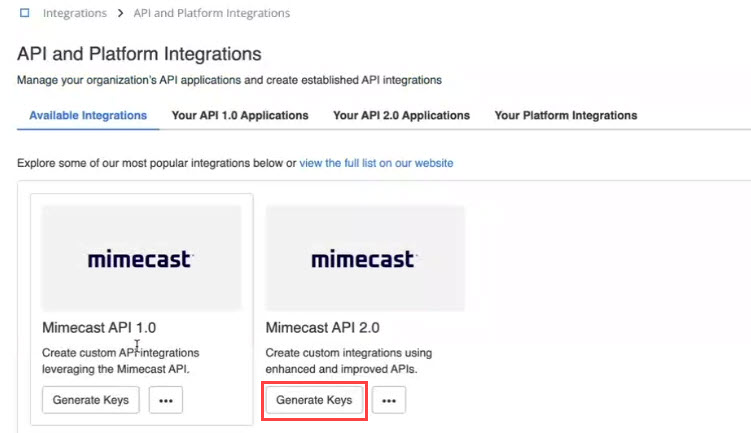
Read and accept the terms and conditions, and proceed to complete the Application Details section.
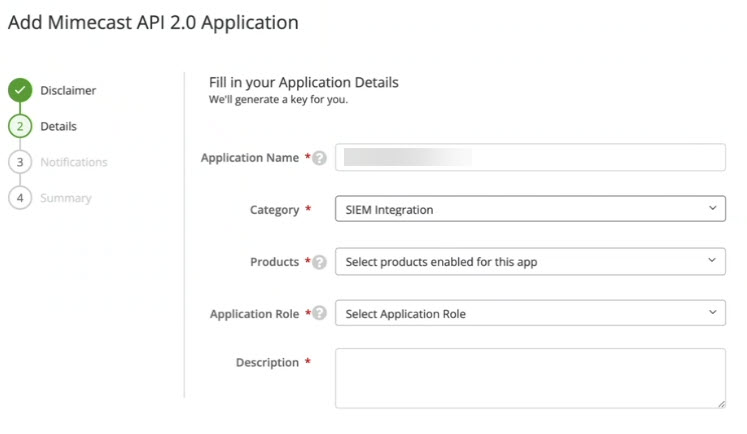
Application Name – Specify a name for the Mimecast API application.
Category – Select SIEM Integration.
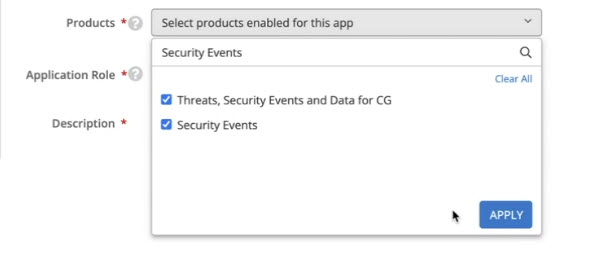
Products – Select the required products listed below. To select the products, refer to the Table 1, “Mimecast Endpoints, Products, and Associated Permissions” table, based on your requirement.
Audit Events
Threats, Security Events and Data for CG
Security Events
Ensure that you search for and select at least these three products. The following screenshot displays an example of entering the key words and searching for the required product in the given search box. You may add more products based on your requirement after you add the three required products.
Application Role – Select Basic Administrator.
Description – Enter a description for the Mimecast API application.
In the Notifications section, specify a name and email of the technical point of contact.
Review the summary information for the API application that you are creating and click Add and Generate Keys. For more information see, Creating an API 2.0 Application.
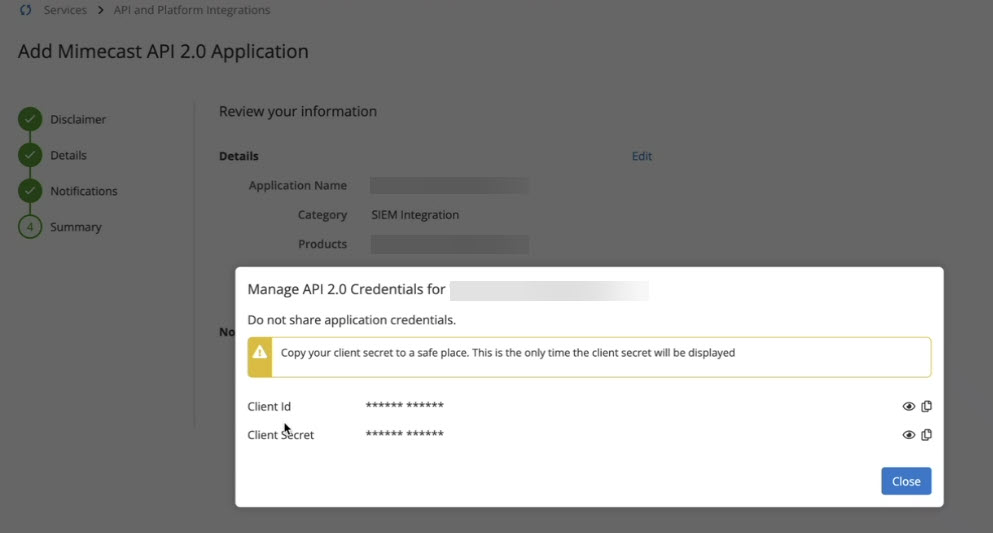
Copy and record the Client ID and Client Secret that a window displays, for later use.
If you have already created an API application, and want to edit the API application, navigate to Integrations > API and Platform Integrations and click Your API 2.0 Applications. You can locate your API application and click Manage API 2.0 Credentials to generate new keys.
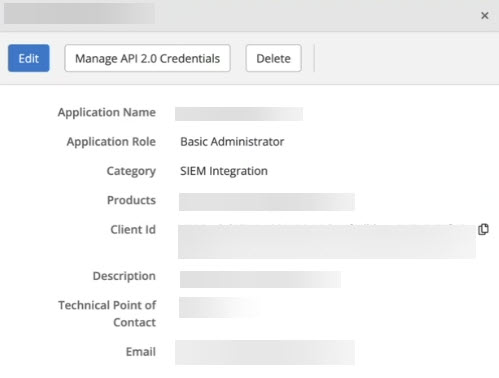
Follow the steps to obtain client ID and client secret in the Regenerating Keys section.
Ensure that you generate new keys every time when you edit the Mimecast API application details or add more products.
Copy and record the values for the client ID and client secret to use them while configuring the Mimecast Email Security cloud collector.
