- Cloud Collectors Overview
- Administration
- Administrative Access
- Shareable Service Accounts
- Add Accounts for AWS Cloud Collectors
- Add Accounts for Cisco Duo Cloud Collector
- Add Accounts for Google Cloud Collectors
- Add Accounts for Microsoft Cloud Collectors
- Add Accounts for Okta Cloud Collectors
- Add Accounts for Salesforce Cloud Collectors
- Add Accounts for Splunk Cloud Collectors
- Add Accounts for Trend Micro Cloud Collectors
- Add Accounts for Wiz
- Define a Unique Site Name
- Sign Up for the Early Access Program
- Onboard Cloud Collectors
- Abnormal Security Cloud Collector
- Anomali Cloud Collector
- AWS CloudTrail Cloud Collectors
- AWS CloudWatch Cloud Collector
- AWS CloudWatch Alarms Cloud Collector
- AWS GuardDuty Cloud Collector
- AWS S3 Cloud Collector
- AWS Security Lake Cloud Collector
- AWS SQS Cloud Collector
- Azure Activity Logs Cloud Collector
- Azure Blob Storage Cloud Collector
- Azure Log Analytics Cloud Collector
- Azure Event Hub Cloud Collector
- Azure Storage Analytics Cloud Collector
- Azure Virtual Network Flow Cloud Collector
- Box Cloud Collector
- Broadcom Carbon Black Cloud Collector
- Cato Networks Cloud Collector
- ChatGPT Enterprise Cloud Collector
- Cisco Duo Cloud Collector
- Cisco Meraki Cloud Collector
- Cisco Secure Endpoint Cloud Collector
- Cisco Umbrella Cloud Collector
- Cloudflare Cloud Collector
- Cribl Cloud Collector
- CrowdStrike Cloud Collectors
- Cylance Protect (now Arctic Wolf) Cloud Collector
- DataBahn Cloud Collector
- Dropbox Cloud Collector
- GCP Cloud Logging Cloud Collector
- GCP Pub/Sub Cloud Collector
- GCP Security Command Center Cloud Collector
- Gemini Enterprise Cloud Collector
- GitHub Cloud Collector
- Gmail BigQuery Cloud Collector
- Google Workspace Cloud Collector
- LastPass Cloud Collector
- Microsoft Defender XDR (via Azure Event Hub) Cloud Collector
- Microsoft Entra ID Context Cloud Collector
- Microsoft Entra ID Logs Cloud Collector
- Microsoft 365 Exchange Admin Reports Cloud Collector
- Supported Sources from Microsoft 365 Exchange Admin Reports
- Migrate to the Microsoft 365 Exchange Admin Reports Cloud Collector
- Prerequisites to Configure the Microsoft 365 Exchange Admin Reports Cloud Collector
- Configure the Microsoft 365 Exchange Admin Reports Cloud Collector
- Troubleshooting the Microsoft 365 Exchange Admin Reports Cloud Collector
- Microsoft 365 Management Activity Cloud Collector
- Microsoft Security Alerts Cloud Collector
- Microsoft Sentinel (via Event Hub) Cloud Collector
- Mimecast Cloud Collector
- Mimecast Incydr Cloud Collector
- Netskope Alerts Cloud Collector
- Netskope Events Cloud Collector
- Okta Cloud Collector
- Okta Context Cloud Collector
- Palo Alto Networks Cortex Data Lake Cloud Collector
- Palo Alto Networks XDR Cloud Collector
- Progress ShareFile Cloud Collector
- Proofpoint On-Demand Cloud Collector
- Proofpoint Targeted Attack Protection Cloud Collector
- Qualys Cloud Collector
- Recorded Future Cloud Collector
- Recorded Future Context Cloud Collector
- Rest API Cloud Collector
- Salesforce Cloud Collector
- Salesforce EventLog Cloud Collector
- SentinelOne Alerts Cloud Collector
- SentinelOne Cloud Funnel Cloud Collector
- SentinelOne Threats Cloud Collector
- SentinelOne Cloud Collector
- ServiceNow Cloud Collector
- Slack Cloud Collector
- Snowflake Cloud Collector
- Sophos Central Cloud Collector
- Splunk Cloud Collector
- STIX/TAXII Cloud Collector
- Symantec Endpoint Security Cloud Collector
- Tenable Cloud Collector
- Trend Vision One Cloud Collector
- Trellix Endpoint Security Cloud Collector
- Vectra Cloud Collector
- Zoom Cloud Collector
- Zscaler ZIA Cloud Collector
- Webhook Cloud Collectors
- Wiz Issues Cloud Collector
- Wiz API Cloud Collector
- Troubleshooting Cloud Collectors
Prerequisites to Configure the Microsoft Security Alerts Cloud Collector
Before you configure the Microsoft Security Alerts Cloud Collector, complete the following prerequisite tasks:
Create an Azure Active Directory application – Includes creating and registering an application in the Microsoft Azure portal, generating authentication certificates and secrets, assigning API permissions, and granting administration consent.
Add a shareable Microsoft account – Create an account in Exabeam Cloud Collectors that can be shared across multiple Microsoft collectors.
Review the required subscriptions for Microsoft Security Alerts – Includes a list of minimum subscriptions that are required to collect data from Microsoft Security Alerts.
Required Subscriptions for Microsoft Security Alerts
Before you can onboard a Microsoft Security Alerts collector, validate that your organization has the required subscriptions to collect data from specific service sources. Information about managing subscriptions can be found in the Microsoft Azure Active Directory fundamentals documentation.
Ensure that you have the minimum subscriptions required for each of the service sources from which you intend to receive alerts in your Microsoft Security Alerts cloud collector:
Azure Active Directory Identity Protection
Microsoft 365 Defender
Microsoft App Governance
Microsoft Defender for Cloud
Microsoft Defender for Cloud Apps
Microsoft Defender for Endpoint
Microsoft Defender for Identity
Microsoft Defender for Office 365
Microsoft Purview Data Loss Prevention
Create a Microsoft Entra ID Application for Cloud Collectors
Before you can begin onboarding any of the available Microsoft cloud collectors, you must create a Microsoft Entra ID application (formerly called Azure Active Directory) in the Microsoft Azure portal. The same application can support multiple Microsoft cloud collectors, as long as all of the relevant API permissions are assigned.
To create a Microsoft Entra ID application and prepare it for use by cloud collectors, follow the steps below to complete these required tasks:
During the procedure, make a note of the IDs you will need when you configure a new Microsoft cloud collector.
Create and Register a Microsoft Entra ID Application
Log into your Azure account by accessing the Azure portal.
From the available Azure Services, select Microsoft Entra ID (formerly called Azure Active Directory).

From the left navigation pane, select App Registrations, then click New Registration.
On the Register an application page, enter the following information:
Name – Specify a name for the new application. For example, Exabeam MS Entra ID App.
Supported account types – Select the account type Accounts in this organizational directory only.
Redirect URI – (Optional) Select the Web platform and specify a URI.
Click Register. When registration is complete, the Overview tab of the new application is displayed.

Copy and make a note of the values for both the Application (client) ID and the Directory (tenant) ID. You will need these values when configuring a Microsoft cloud collector.
Generate Certificates and Secrets
In your new Microsoft Entra ID application, click Certificates & secrets in the left navigation pane.
Decide which authentication method you want to use. Two methods are available: OAuth2 or certificate authentication. Depending on which method you plan to use, do one of the following:
OAuth2 method – Select the Client secrets tab, and continue with Step 3.
Certificate method – Click the Certificates tab and continue with Step 4.
On the Client Secrets tab, click New client secret and do the following:
Enter a Description and an Expire term for the secret.
Click Add. The new client secret is displayed on the Client secrets tab.
Copy and make a note of the Value. You will need this client secret value when you configure a Microsoft cloud collector. You will not be able to recover this value later if you don't make a note of it.

On the Certificates tab, click Upload certificate and do the following:
Use the File Selection icon (
 ) to upload an existing certificate (a public key) of file type .cer, .pem, or .crt.
Enter a Description for the certificate.
Click Add. The new certificate is displayed on the Certificates tab.

Note
If you don't already have the certificate and private key files, create them.
Generate the X.509 asymmetric key by running the following command in the terminal:
openssl req -newkey rsa:2048 -nodes -keyout key.pem -x509 -days 3650 -out certificate.pem
Two files are created in the directory where you ran the command:
certificate.pem – The certificate or public key
key.pem – The private key
The cloud collector supports RSA encryption algorithm with up to 16384 bits key length.
Use the certificates and secrets while creating a sharable Microsoft account.
Assign API Permissions
The permissions you assign to the new application depend on which Microsoft collectors you plan to onboard in the Cloud Collectors service. You can assign all the permissions for multiple Microsoft cloud collectors to the same Microsoft Entra ID application in the Azure portal.
To assign permissions, follow the general procedure below but make sure you include all of the API permissions required for the specific types of Microsoft cloud collectors you plan to configure. The specific permissions required for each Microsoft cloud collector are shown in the table at the end of this procedure.
In your new Microsoft Entra ID application, click API permissions in the left navigation pane.
Click Add a permission.
In the Request API permissions pane on the right, click the APIs my organization uses tab.
Depending on which permissions you need to assign, use the search field to find and select a specific API name or Application ID. Consult the table at the end of this procedure for collector-specific information.
Click Application permissions to expand the permission selections.
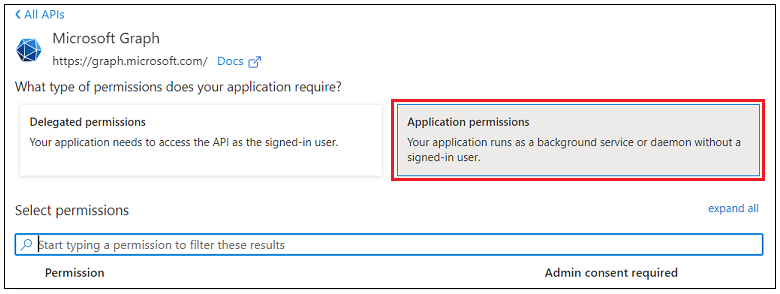
In the permissions search bar, search for and expand a specific set of permissions. In the expanded options, select the permissions you need. For a list of the required permissions for each Microsoft cloud collector, see the table below.
For example, the Microsoft Entra ID application requires the ReportingWebService.Read.All API permission for the Office 365 Exchange Online API for the Microsoft Exchange Admin Reports Cloud Collector.
Click Add permissions. The new permissions are added to the application.
Repeat this procedure for each set of API permissions required for the Microsoft cloud collectors you plan to configure.
Cloud Collector | API Name/Application ID | Permission Category | Specific Permission |
|---|---|---|---|
Microsoft Entra ID (formerly Azure Active Directory) | Microsoft Graph | Directory | Directory.Read.All |
IdentityRiskEvent | IdentityRiskEvent.Read.All | ||
AuditLog | AuditLog.Read.All | ||
Microsoft Entra ID Context Data Source - Users | Microsoft Graph | Directory | Directory.Read.All |
Delegated | User.Read | ||
Microsoft Entra ID Context Devices | Microsoft Graph | Directory | Directory.Read.All |
Microsoft 365 Exchange Admin Reports | Office 365 Exchange Online | ReportingWebService | ReportingWebService.Read.All |
Microsoft 365 Management Activity | Office 365 Management APIs | ActivityFeed | ActivityFeed.Read |
ActivityFeed | ActivityFeed.ReadDlp | ||
ServiceHealth | ServiceHealth.Read | ||
Microsoft Security Alerts | Microsoft Graph | Alert_v2 | SecurityAlert.Read.All |
Legacy_API | SecurityEvents.Read.All |
Grant Administration Consent
When all of the API permissions have been created, the configured permissions table should look like the image below. Notice that the Status for each new permission is Not granted.
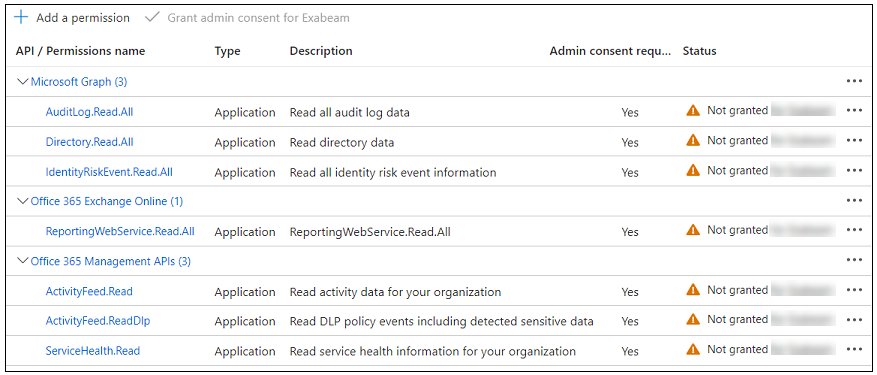
In order for a Microsoft cloud collector to pull data from these data sources, you must grant administration consent for each API permission as follows:
Above the configure permissions table, click Grant admin consent.
When prompted to confirm, click Yes. The Status for each permission changes to Granted.

Assign Required Roles (only for the Microsoft 365 Exchange Admin Report Collector)
If you plan to onboard a Microsoft 365 Exchange Admin Report Cloud Collector, you must configure specific roles. The Compliance Administrator role provides the required permissions for completing tasks in Exchange Online PowerShell or Web Service APIs; unlike the Security Administrator role. The examples of tasks include managing recipients and accessing security and protection features such as anti-spam, anti-malware, anti-phishing, and the associated reports. The Compliance Administrator role is required for the endpoint dlp - data loss prevention.
Add an application service principal ID to the Compliance Administrator role in Microsoft Entra ID (formerly called as Azure AD) for the App only token flow and assign Microsoft Entra ID roles to the application.
If you want to use a role with minimum privileges, use the Global Reader role.
To assign the Compliance Administrator role or a Global Reader role to the Microsoft Entra ID application:
On the Azure portal, navigate to Microsoft Entra ID > Roles and administrators.
Search for and then select the Compliance Administrator role or Global Reader role based on your requirement.
Click the role you selected.
Select Add assignments.
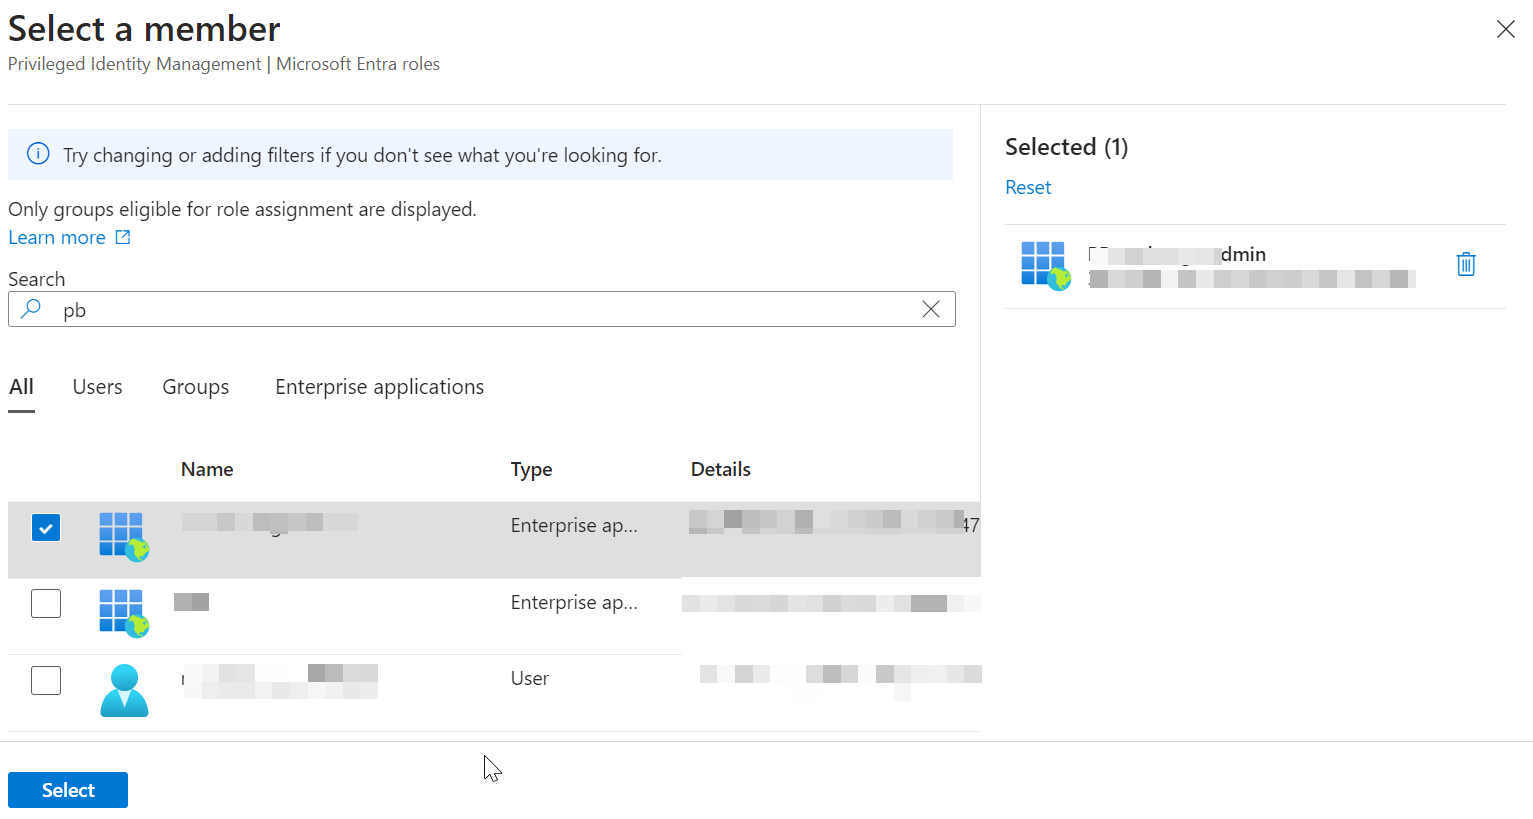
Click No member selected to choose the name of the app that you previously created earlier in the Create a Microsoft Entra ID Application for Cloud Collectors workflow, from the Select a Member window. Note that member here refers to your Microsoft Entra ID application.
Click Select.
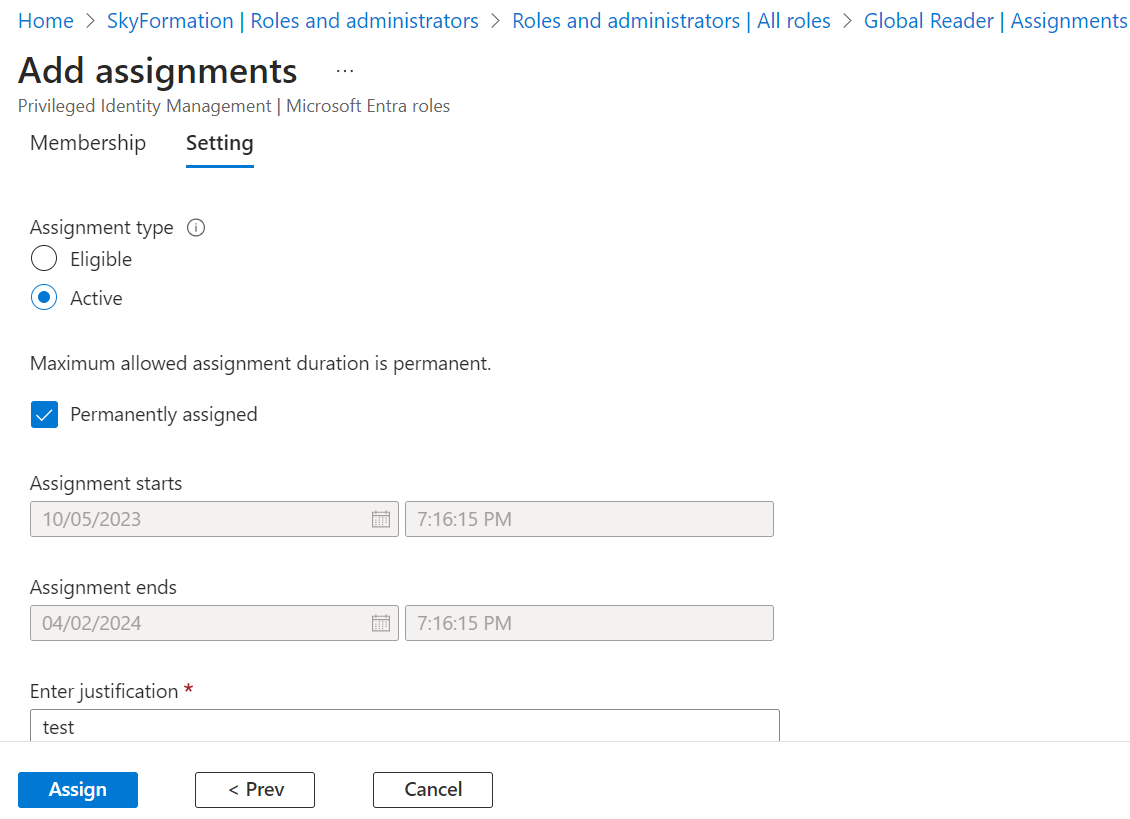
In the Add Assignments section, click Next.
Ensure that the role is permanently assigned by selecting the Permanently assigned option in the Setting section.
In the Setting section, enter the justification for the role assignment, and click Assign.
Verify the correct app is chosen by matching the intended Service Principal ID, in the Active assignments column that appears next.
Note
Ensure that you assign this role to your role group that you selected in Exchange Admin Portal.
For more information about assigning roles in Microsoft Entra ID, refer to Assign Microsoft Entra Roles to Users.
Add Accounts for Microsoft Cloud Collectors
To streamline the onboarding process, create a shareable account that can be used across one or more collectors that require a Microsoft account.
To set up a shareable Microsoft account in Cloud Collectors:
Log in to the New-Scale Security Operations Platform with your registered credentials as an administrator.
Navigate to Collectors > Cloud Collectors.
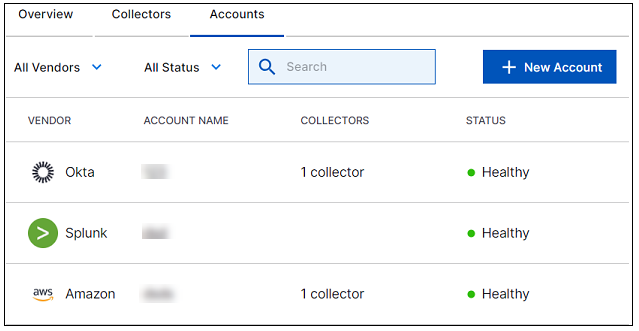
Click Accounts, then click New Account.
On the Add a New Account page, enter the following information, as shown in the image below:
VENDOR – Select Microsoft as the vendor.
NAME – Specify a name for the Microsoft account.
Authentication – Select an authentication method. Depending on how you created your Microsoft Entra ID application (formerly called Azure Active Directory) in the Azure portal, select either of the options below and provide the applicable IDs and certificates or secrets.
Certificate – If your application uses the certificate authentication method, enter the following information:
CLIENT ID – Enter the value of the Application (client) ID that was generated when you created and registered your Microsoft Entra ID application. If you did not make a note of the value, return to the Azure portal and navigate to the Overview tab of your application.
TENANT ID – Enter the value of the Directory (tenant) ID that was generated when you created and registered your Microsoft Entra ID application. If you did not make a note of the value, return to the Azure portal and navigate to the Overview tab of your application.
CERTIFICATE – Copy and enter the public key portion of the existing certificate you uploaded in the Azure portal when you selected the authentication method of your Microsoft Entra ID application.
PRIVATE KEY – Copy and enter the private key of the existing certificate.
OAuth2 – If your application uses the OAuth2 authentication method, enter the following information:
CLIENT ID – Enter the value of the Application (client) ID that was generated when you created and registered your Microsoft Entra ID application. If you did not make a note of the value, return to the Azure portal and navigate to the Overview tab of your application.
CLIENT SECRET – Enter the value of the client secret that was generated when you selected the authentication method of your Microsoft Entra ID application. If you did not make a note of the value, you will need to generate a new secret for the application in the Azure portal.
TENANT ID – Enter the value of the Directory (tenant) ID that was generated when you created and registered your Microsoft Entra ID application. If you did not make a note of the value, return to the Azure portal and navigate to the Overview tab of your application.
CLOUD – Select an Azure AD cloud environment from the list of available clouds.
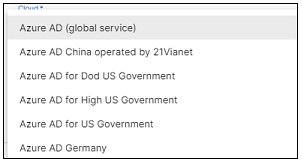
Click Save.
Proceed to configure any cloud collector that requires the use of the Microsoft account.
When you onboard new cloud collectors that require this Microsoft account, you can reuse credentials between different collectors, provided that you assigned the required permissions when you created the Microsoft Entra ID application in the Azure portal. The required permissions for each Microsoft cloud collector are listed in a table in that procedure.
